Page is loading ...

006-0185-001 Rev. D
Spectrum X Quick Reference Guide
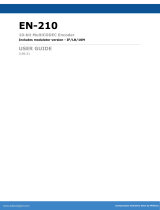
Rear panel components
+7 495 926 4608 (Russia, CIS), +81 3 5565 6737 (Japan), +86 10 6569 5580 (China, mainland)
Harmonic Technical Support: +888 673 4896 (Americas), +65 6542 0050 (Asia Pacific), + 44 1252 555 450 (EMEA),
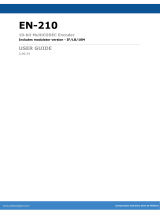
Front panel components
1. Air vents
2. Power indicator/wink
3. Status LEDs
4. System label pull-out tab
5. VGA port
6. USB connectors (2)
7. Control Panel
8. Hard drives, 1-4 from left to right
(for internal storage configuration only)
4 5 67
8
Spectrum X
23
1
1. Redundant, hot-swappable power supplies
(0, 1 from left to right)
2. DSUB connector (for GPIO, RS-422,
reference, AES audio, and LTC)
3. SDI I/O cards (1, 2 from left to right; board
0, board 1 in software)
7. USB ports (for Service only)
8. BMC (for Service only)
9. 1 Gb Eth ports for transport stream ingest (3,
4, 5, 6 from left to right; eth2, eth3, eth4, eth5)
a. Optional 10 Gb I/O module - optical SFP
for SMPTE 2022-6 (from left to right: ixeth1, ixeth0)
b. Optional 10 Gb I/O module - copper
for SMPTE 2022-6 (from left to right: ixeth0, ixeth1)
Ethernet network indicator
Normal operation
Light blue
Yellow
NIC 1 connection failure
Both connections have failed
Red
NIC 2 connection failure
Dark blue
Light blue Reference present
Reference not present
Red
Reference indicator SDI I/O card indicator
SDI I/O card up and idle
Light blue
SDI I/O card failure
Red
One or more channel playing
Dark blue (blink)
Green (blink)
One or more channel recording
Yellow
Firmware update in progress
Status LED states
Reference
Ethernet network
SDI I/O card 1
SDI I/O card 2
76
5 7 8
4
23
1
9
a
b
Internal storage configuration: use for system
management and file transfers.
Shared storage configuration: use for connection
to Spectrum video server. Port 1 corresponds to SDI
I/O card 1, and port 2 to SDI I/O card 2.
5. VGA port
6. RS-232 serial (for Service only)
4. 1 Gb Eth ports (1, 2 from left to right; eth0 and eth1
in software)

+7 495 926 4608 (Russia, CIS), +81 3 5565 6737 (Japan), +86 10 6569 5580 (China, mainland)
Harmonic Technical Support: +888 673 4896 (Americas), +65 6542 0050 (Asia Pacific), + 44 1252 555 450 (EMEA),
Spectrum X SDI I/O connectors: enhanced channel
Configuration
I/O 1
I/O 2
I/O 3
I/O 4
I/O 5
I/O 6
I/O 7
I/O 8
Enhanced
Channel (EC) 1
External Input 1/
Key 1
External Input 2/
Fill 1
Out, Secondary
Out, Primary
External Input 4/
Key 2
External Input 5/
Fill 2
External Input 6
Out, Clean
Primary
Enhanced
Channel (EC) 2
External Input 1/
Key 1
External Input 2/
Fill 1
Out, Secondary
Out, Primary
External Input 4/
Key 2
External Input 5/
Fill 2
Out, Clean
Secondary
Out, Clean
Primary
Enhanced
Channel (EC) 3
External Input 1/
Key 1
External Input 2/
Fill 1
External Input 3
Out, Primary
External Input 4/
Key 2
External Input 5/
Fill 2
External Input 6
Out, Secondary
13
2 4
6 8
5 7
1. External IN 1/Key 1
2. External IN 2/Fill 1
3. External IN 3/OUT (if OUT, Secondary or HD/SD-branded*)
4. OUT (Primary or HD/SD-branded)
5. External IN 4/Key 2
6. External IN 5/Fill 2
7. External IN 6/OUT (if OUT, Clean Secondary**)
8. OUT (Clean Primary/Secondary or HD/SD-branded)
* “HD/SD-branded” refers to Independent Branding mode.
** “Clean Primary/Secondary” refers to video output with no graphics or overlays.
006-0185-001 Rev. D
Configuration
I/O 1
I/O 2
I/O 3
I/O 4
I/O 5
I/O 6
I/O 7
I/O 8
Standard
Channel (SC) 1
External Input 1
(Channel A)
Out, Primary
(Channel A)
Out, Secondary
(Channel A)
Out, Primary
(Channel A)
External Input 1
(Channel B)
Out, Primary
(Channel B)
Out, Secondary
(Channel B)
Out, Primary
(Channel B)
Standard
Channel (SC) 2
External Input 1
(Channel A)
External Input 2
(Channel A)
Out, Secondary
(Channel A)
Out, Primary
(Channel A)
External Input 1
(Channel B)
External Input 2
(Channel B)
Out, Secondary
(Channel B)
Out, Primary
(Channel B)
13
2 4
6 8
5 7
1. External IN 1 Channel A
2. External IN 2/OUT (if OUT, Primary) Channel A
3. OUT (Secondary or HD/SD-branded*) Channel A
4. OUT (Primary or HD/SD-branded) Channel A
5. External IN 1 Channel B
6. External IN 2/OUT (if OUT, Primary) Channel B
7. OUT (Secondary or HD/SD-branded) Channel B
8. OUT (Primary or HD/SD-branded) Channel B
* “HD/SD-branded” refers to Independent Branding mode.
Spectrum X SDI I/O connectors: standard channel
SDI card 1
1, 2, 5, 6: IN 1
3, 4, 7, 8: OUT, Primary
Spectrum X SDI I/O connectors: UHD channel
In UHD mode, both SDI cards on the Spectrum X are used for one channel of UHD.
SDI card 1 (left-hand side when facing rear panel)
SDI card 2 (right-hand side when facing rear panel)
13
2 4
6 8
5 7
SDI card 2
1, 2, 5, 6: IN 2
3, 4, 7, 8: OUT, Secondary or HD/SD branded*
*“HD/SD-branded” refers to Independent Branding mode.
NOTE: For input of non-UHD content, use I/O 2
UHD links
Input: A, B, C, D = I/O connectors 2, 6, 1, 5
Output: A, B, C, D = I/O connectors 4, 8, 3, 7
Configuration
I/O 1
I/O 2
I/O 3
I/O 4
I/O 5
I/O 6
I/O 7
I/O 8
UHD
Channel (UC) 1
External Input 1
External Input 1
Out, Primary
Out, Primary
External Input 1
External Input 1
Out, Primary
Out, Primary
(C) (A) (B)
(D)(C) (A) (D) (B)
Configuration
I/O 1
I/O 2
I/O 3
I/O 4
I/O 5
I/O 6
I/O 7
I/O 8
UHD
Channel (UC) 1
External Input 2
External Input 2
Out, Secondary
Out, Secondary
External Input 2
External Input 2
Out, Secondary
Out, Secondary
(C) (A) (B)
(D)(C) (A) (D) (B)

+7 495 926 4608 (Russia, CIS), +81 3 5565 6737 (Japan), +86 10 6569 5580 (China, mainland)
Harmonic Technical Support: +888 673 4896 (Americas), +65 6542 0050 (Asia Pacific), + 44 1252 555 450 (EMEA),
Quick start steps for Spectrum X in internal storage configuration
For detailed installation steps, refer to the Spectrum System Installation Guide.
Caution: Electrostatic discharge can damage components. Observe normal ESD
(Electrostatic Discharge) procedures when handling Spectrum X components.
006-0185-001 Rev. D
GPIO and RS-422 connector pinout
The breakout cable provided for the 60 pin DSUB connector on Spectrum X includes
a GPIO connector, six RS-422 connectors, a Reference In connector, and four MFIO
connectors, which can be configured for LTC and/or AES audio when you attach players in
SystemManager. For full connector details and pinouts, see the Spectrum System Installation Guide.
DB-9 connector (female)
for both GPIO and RS-422
8 RS422_RX0-
3 RS422_RX0+
shell GND 3
2 RS422_TX0-
7 RS422_TX0+
RS-422 #1: for VDCP,
channel A
Pin Signal
1 GPIO0
2 GPIO1
3 GPIO2
4 GPIO3
5 GPIO4
6 GPIO5
7 GPIO6
8 GPIO7
9 GND 40
GPIO connector
Pin Signal
8 RS422_RX1-
3 RS422_RX1+
shell GND 28
2 RS422_TX1-
7 RS422_TX1+
RS-422 #2: for VDCP,
channel B
Pin Signal
8 RS422_RX2-
3 RS422_RX2+
shell GND 33
2 RS422_TX2-
7 RS422_TX2+
RS-422 #3: Oxtel and
EAS, “Serial 0” in
SystemManager
Pin Signal
8 RS422_RX3-
3 RS422_RX3+
shell GND 58
2 RS422_TX3-
7 RS422_TX3+
RS-422 #4: Oxtel and
EAS, “Serial 1” in
SystemManager
Pin Signal
8 RS422_RX4-
3 RS422_RX4+
shell GND 6
2 RS422_TX4-
7 RS422_TX4+
RS-422 #5: Oxtel and
EAS, “Serial 2” in
SystemManager
Pin Signal
8 RS422_RX5-
3 RS422_RX5+
shell GND 36
2 RS422_TX5-
7 RS422_TX5+
RS-422 #6: Oxtel and
EAS, “Serial 3” in
SystemManager
Pin Signal
1
9 6
5
For complete rack mounting instructions, refer to the instructions provided
with the rack mounting kit, or in the Spectrum System Installation Guide.
1. Rack mount the system
1. Align the bezel in front of the chassis so that the Harmonic logo appears
at the top left corner.
2. Connect the USB cable inside the bezel to the right-hand USB port on the
Spectrum X front panel.
3. Keeping the corners aligned, press the bezel straight onto the chassis.
The USB cable will form a loop that fits inside the metal panel of the bezel.
4. Hand-tighten the two captive thumb screws to secure the bezel in place.
2
3
3
Backside view of bezel
3. Install the bezel
1. Unpack the drives.
2. Press the green release button on the drive carrier to open the lever.
3. Insert the drive carrier into the bay, sliding the drive until it contacts the
backplane.
4. Close the drive carrier release handle to lock the drive into place.
4
3
Note: When installing a drive, ensure that the adjacent drive is fully
installed. Inserting a drive carrier and attempting to lock its handle next
to a partially installed carrier can damage the partially installed carrier's
shield spring and make it unusable.
To maintain proper system cooling, all externally accessible drive bays
must be populated with a drive carrier.
2. Install the drives
# Drives RAID set Capacity per drive Storage capacity
4 TB
3 + 1
4 SAS 12 TB
2 TB
3 + 1
4 SAS 6 TB
6 TB
3 + 1
4 SAS 18 TB
File system configurations

+7 495 926 4608 (Russia, CIS), +81 3 5565 6737 (Japan), +86 10 6569 5580 (China, mainland)
Harmonic Technical Support: +888 673 4896 (Americas), +65 6542 0050 (Asia Pacific), + 44 1252 555 450 (EMEA), 006-0185-001 Rev. D
To manage the Spectrum X, you can use either SystemManager or Spectrum
Management, which runs directly on the Spectrum X. If using Spectrum
Management, refer to the Spectrum release notes for log in details. If using
SystemManager, refer to the SystemManager Installation Guide for installation
details.
Refer to the Spectrum System Installation Guide for instructions on connecting
Spectrum X to an Emergency Alert System (EAS).
10. Connect to an EAS (optional)
4. Install SystemManager (optional)
10 Gb Ethernet Switch
(for 2022-6 traffic only)
10 Gb Ethernet I/O module
(optical SFP or copper)
To 2022-6 Inputs/Outputs
Spectrum X rear panel
Important: Connect the 10 Gb I/O module directly to the 10 Gb switch dedicated
to 2022-6 traffic. Do not connect the 10 Gb I/O module to any switch other than
the one that is dedicated to 2022-6 traffic.
The following diagram shows one example. For detailed instructions, see the
Spectrum System Installation Guide.
Note: Use 850nm MMF SR transceivers with LC fiber-optic connectors. Either
62.5um or 50um MMF fiber may be used. If using 62.5um, the maximum length
supported is 30 meters.
6. Connect to your 2022-6 network (optional)
Play 1
Graphics 1 Graphics 2
Play 2
GPIO
(3)
422
(4)
GPIO
(1)
422
(2)
RS-422
GPIO
Automation System Rear Panel
RS-422
To Spectrum X
All automation systems differ in their methods of interfacing with the Spectrum X.
The following diagram shows one example. Refer to your automation system’s
installation guide for interconnection details
Note that Spectrum X uses GPIO pin assignments or RS-422 to control graphics
automation. For details on using the breakout cable for GPIO and RS-422, refer to
the “Breakout cable” section in the Spectrum System Installation Guide.
7. Connect to an automation system (optional)
Use the breakout cable to connect reference video to at least one SDI I/O card
on the Spectrum X. On a Spectrum X with two SDI I/O cards, one card passes
reference to the other. You may connect a different type of reference (525 or
625) to each SDI I/O card. However, note that each player attached to a given
SDI I/O card must be configured for the same reference.
If using the 10 Gb I/O module, you can also use PTP reference.
For configuration details, see “Configuring network settings for the 10 Gb
I/O modules” in the SystemManager User Guide.
8. Connect reference video
Important: Failure to connect reference video may result in errors.
9. Connect audio and video I/O
Refer to the rear panel diagrams of the Spectrum X SDI I/O card in this guide for
reference when connecting audio and video I/O.
11. Connect AC power and power up
Note: To take full advantage of the dual redundant power supplies on the Spectrum X,
ensure that separate, isolated power sources are available.
Refer to the Spectrum System Installation Guide for instructions on connecting AC
power and powering up the system.
The following diagram shows one example. For detailed instructions, see the
Spectrum System Installation Guide.
5. Connect to your Gigabit Ethernet network
8
1
2
3
4
567
Gigabit Ethernet Switch
Gigabit
Ethernet
If using SystemManager If using Spectrum
Management
To client computer
LAN
Gb 1 Gb 2
SystemManager
Platform Rear Panel
Client computer
for file transfers
NIC 1
For transport stream ingest only
(Use separate VLAN or switch)
Spectrum X Rear Panel
Important:
Check with your network administratior before connecting to your
Ethernet network.
Use only a CAT 6 Ethernet cable, or better, for connecting to the Spectrum X.
Do not connect NICs used for transport stream ingest to the same VLAN used
for system management.
/