Page is loading ...

S
SS
SPIDER
PIDERPIDER
PIDER
Terminal
Technical Manual
C14832900A
12/00

METTLER TOLEDO is recognized around the world for manufacturing and marketing high quality scales and weighing
systems. With roots tracing back to 1901, the company takes pride in its long established record of employing
innovation, technology, and a close working relationship with its customers to meet the diverse needs of the global
marketplace. METTLER TOLEDO’s worldwide headquarters are in Greifensee, Switzerland. Corporate offices for the North
American Marketing Organization are in Columbus, Ohio.
©Mettler-Toledo, Inc., 2000, 1998
No part of this manual may be reproduced or transmitted in any form or by any means,
electronic or mechanical, including photocopying and recording, for any purpose without the
express written permission of Mettler-Toledo, Inc.
U.S. Government Restricted Rights: This documentation is furnished with Restricted Rights.

CUSTOMER FEEDBACK
Your feedback is important to us! If you have a problem with this product or its documentation, or a suggestion on how
we can serve you better, please fill out and send this form to us. Or, send your feedback via email to:
quality_feedback.mtwt@mt.com
. If you are in the United States, you can mail this postpaid form to the address on the
reverse side or fax it to (614) 438-4355. If you are outside the United States, please apply the appropriate amount of
postage before mailing.
Your Name: Date:
Organization Name:
METTLER TOLEDO Order Number:
Address: Part / Product Name:
Part / Model Number:
Serial Number:
Company Name for Installation:
Phone Number: ( ) Fax Number: ( ) Contact Name:
E-mail Address: Phone Number:
Please check the appropriate box to indicate how well this product met your expectations in its intended use?
Met and exceeded my needs
Met all needs
Met most needs
Met some needs
Did not meet my needs
Comments/Questions:
DO NOT WRITE IN SPACE BELOW; FOR METTLER TOLEDO USE ONLY
Retail Light Industrial Heavy Industrial Custom
RESPONSE: Include Root Cause Analysis and Corrective Action Taken.
B12745800A

FOLD THIS FLAP FIRST
BUSINESS REPLY MAIL
FIRST CLASS PERMIT NO. 414 COLUMBUS, OH
POSTAGE WILL BE PAID BY ADDRESSE
E
Mettler-Toledo, Inc.
Quality Manager - MTWI
P.O. Box 1705
Columbus, OH 43216
USA
NO POSTAGE
NECESSARY IF
MAILED IN THE
UNITED STATES

INTRODUCTION
This publication is provided solely as a guide for individuals who have received Technical
Training in servicing the METTLER TOLEDO product.
Information regarding METTLER TOLEDO Technical Training may be obtained by writing to:
METTLER TOLEDO
1900 Polaris Parkway
Columbus, Ohio USA 43240
Phone (US and Canada): 614-438-4511
Phone (International): 614-438-4888
FCC NOTICE
This equipment has been tested and found to comply with the limits of the United States of America FCC
rules for a Class A digital device, pursuant to Part 15 of the FCC Rules and the Radio Interference
Regulations of the Canadian Department of Communications. These limits are designed to provide
reasonable protection against harmful interference when the equipment is operated in a commercial
environment. This equipment generates, uses, and can radiate radio frequency energy and, if not
installed and used in accordance with the instruction manual, may cause harmful interference to radio
communications. Operation of this equipment in a residential area is likely to cause harmful
interference in which case the user will be required to correct the interference at his own expense.
ORDERING INFORMATION
It is most important that the correct part number is used when ordering parts. Parts orders are machine
processed, using only the part number and quantity as shown on the order. Orders are not edited to
determine if the part number and description agree.
METTLER TOLEDO RESERVES THE RIGHT TO MAKE REFINEMENTS
OR CHANGES WITHOUT NOTICE.
METTLER TOLEDO
and SPIDER are trademarks of Mettler-Toledo, Inc. All other brand or product
names are trademarks or registered trademarks of their respective companies.

PRECAUTIONS
• Read this manual before operating or servicing this equipment.
• Always take proper precautions when handling static sensitive devices.
• Do not connect or disconnect load cells or a scale base to the equipment
with power connected or damage may result.
• Always remove power and wait at least 30 seconds before disconnecting
any cables. Failure to observe this precaution may result in damage to, or
destruction of the equipment.
• Save this manual for future reference.
• Call METTLER TOLEDO for parts, information, and service.
WARNING
ONLY PERMIT QUALIFIED PERSONNEL TO SERVICE
THIS EQUIPMENT. EXERCISE CARE WHEN MAKING
CHECKS, TESTS AND ADJUSTMENTS THAT MUST BE
MADE WITH POWER ON. FAILING TO OBSERVE THESE
PRECAUTIONS CAN RESULT IN BODILY HARM.
CAUTION
OBSERVE PRECAUTIONS FOR HANDLING
ELECTROSTATIC SENSITIVE DEVICES.
WARNING
REMOVE POWER FROM THE SPIDER TERMINAL AND
WAIT A MINIMUM OF 30 SECONDS BEFORE
CONNECTING OR DISCONNECTING ANY CABLES FROM
PCBS OR LOAD CELLS AS DAMAGE MAY RESULT.

TABLE OF CONTENTS
1 Introduction ...................................................................................................1-1
Overview ............................................................................................................................ 1-1
Standard Features ...............................................................................................................1-1
Optional Features................................................................................................................ 1-1
Specifications ..................................................................................................................... 1-2
Physical Dimensions ........................................................................................................... 1-2
Power Requirements ............................................................................................................ 1-2
Terminal Specifications.........................................................................................................1-3
Standards Compliance......................................................................................................... 1-4
AC Power Line Voltage Variation ............................................................................................ 1-4
RFI Susceptibility ................................................................................................................. 1-4
UL Listing ........................................................................................................................... 1-4
CSA Certification .................................................................................................................. 1-4
Weights and Measures Approval............................................................................................ 1-4
2 Installation ....................................................................................................2-1
Environment ....................................................................................................................... 2-1
Package Contents............................................................................................................... 2-1
Electrical Connections ......................................................................................................... 2-2
Serial Port Connections ........................................................................................................ 2-2
Power Supply Connections ................................................................................................... 2-3
Power-up Sequence ............................................................................................................ 2-3
Legal-For-Trade Preparations................................................................................................ 2-3
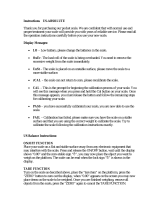
3 Service Mode Configuration.............................................................................3-1
Overview ............................................................................................................................ 3-1
Accessing Service Mode ...................................................................................................... 3-1
Navigating in Service Mode .................................................................................................. 3-2
Unit Program Block ............................................................................................................. 3-2
Ramp Program Block........................................................................................................... 3-3
Weighing Cell Program Block ............................................................................................... 3-3
Range Program Block .......................................................................................................... 3-4
Resolution Program Block .................................................................................................... 3-5
Calibration Program Block.................................................................................................... 3-5
Factory Reset Program Block................................................................................................ 3-6
List Program Block ..............................................................................................................3-7
Restricting Access to Master Mode........................................................................................ 3-7
Return Program Block.......................................................................................................... 3-7
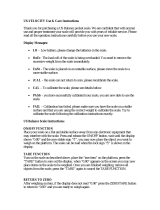
4 Master Mode Configuration ................................................................................ 1
Overview ................................................................................................................................1

Accessing Master Mode ...........................................................................................................1
Navigating in Master Mode.......................................................................................................2
Function Program Block ...........................................................................................................2
Auto Zero Correction Program Block..........................................................................................3
Auto Tare Program Block..........................................................................................................4
Automatic Shutdown Program Block..........................................................................................4
Power-Up (Save) Program Block ..............................................................................................4
Vibration Adapter Program Block ..............................................................................................5
Process Adapter Program Block................................................................................................5
Interface 1 Program Block........................................................................................................6
1. Reset Interface to Factory ......................................................................................................6
2. Communication Parameters Sub-block...................................................................................7
3. Operating Mode Sub-block....................................................................................................7
4. Data Definition Sub-block .....................................................................................................8
5. Define Print Format Sub-block ...............................................................................................9
6. Define Line Terminator Sub-block.........................................................................................10
7. Exit Interface 1 Sub-block ..................................................................................................10
Interface 2 Program Block (Optional)......................................................................................10
Control Mode Program Block ..................................................................................................11
List Program Block ................................................................................................................11
Restricting Access to Master Mode..........................................................................................11
Reset to Factory Program Block ..............................................................................................12
5 Operating Instructions........................................................................................ 1
General Information ................................................................................................................1
Terminal Display .....................................................................................................................1
Terminal Keypad .....................................................................................................................1
Basic Operator Functions .........................................................................................................2
Turning the SPIDER Terminal On and Off.....................................................................................2
Zeroing the Scale.....................................................................................................................3
Taring the Scale ......................................................................................................................3
Simple Weighing .....................................................................................................................4
Transferring Scale Data ............................................................................................................5
Weighing Operations With Auto Tare ..........................................................................................5
Advanced Operator Functions ...................................................................................................6
Unit Switching .........................................................................................................................6
Displaying Gross Weight ..........................................................................................................6
Piece Counting........................................................................................................................7
Formula Weighing ...................................................................................................................8
Accumulation..........................................................................................................................9
Dynamic Weighing ................................................................................................................10
6 Service and Maintenance ................................................................................6-1
Cleaning and Regular Maintenance....................................................................................... 6-1
Troubleshooting .................................................................................................................. 6-1
Error Codes and Descriptions ................................................................................................ 6-2

7 Parts and Accessories ....................................................................................7-1
SPIDER Terminal .................................................................................................................7-1
Optional Accessories ........................................................................................................... 7-2
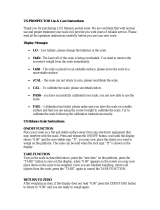
Appendices................................................................................................................ 1
Appendix 1: Geo Codes...........................................................................................................1
Appendix 2: Operating a SPIDER Terminal with PC.....................................................................3
Zero the Scale .........................................................................................................................3
Tare the Scale .........................................................................................................................4
Send Scale Data on Stability......................................................................................................4
Send Scale Data Immediately....................................................................................................4
Send Scale Data Continuously...................................................................................................5
Send the SPIDER Terminal Serial Number....................................................................................5
Reset the Interface ...................................................................................................................6
MT-SICS Error Messages...........................................................................................................6


Chapter 1: Introduction
Overview
(12/00) 1-1
1 Introduction
Overview
The SPIDER terminal is a flexible, general purpose terminal connected to a
SPIDER (GB) base that can be used for the following applications:
• Simple weighing
• Weigh-in operations
• Weigh-out operations
• Piece counting
• Formula weighing
• Dynamic weighing
• Accumulation
For added flexibility, the terminal can be mounted to the wall with an optional
wall-mount kit. The SPIDER terminal's inherent simplicity makes it easy to
perform various weighing and counting operations regardless of your familiarity
with METTLER TOLEDO products or scales.
Standard Features
The SPIDER terminal comes with the following standard features:
• Compact and rugged extruded aluminum industrial enclosure
• Integrated functions for special applications such as formula and/or dynamic
weighing
• Convenient 5-key keypad
• Large and easy-to-read LCD digital display
• RS232 bi-directional serial data interface
Optional Features
Serial RS-232C (0917-0219)
A second RS-232 serial interface can be installed in the SPIDER terminal. The
second interface is designed to operate hardware components using XON/XOFF
handshaking. The second serial interface can be used to connect serial
peripheral devices such as a printer, personal computer, or auxiliary display.
RS232C Interface Cable (0900-0313)
The Interface cable's 15 feet (4.6 meter) length allows attachment of
computers, printers and other peripherals to the scale's serial interfaces.

METTLER TOLEDO SPIDER Terminal Technical Manual
1-2 (12/00)
Battery Kit Attachment (0917-0222)
The battery attachment allows you to operate the SPIDER terminal away from a
conventional power supply. The battery kit uses four standard (or four
rechargeable) C-size batteries. A symbol in the SPIDER terminal display
indicates when battery power is too low for accurate operation.
Wall Mount Kit (0917-0220)
The optional wall mount kit lets you install the SPIDER terminal display terminal
on nearly any vertical surface. The stainless steel constructed kit contains all
mounting parts including screws and dowels.
Secondary Display (0917-0221)
You can connect a secondary remote display to the SPIDER terminal via any of
the serial interfaces. This remote provides display information only (no
keyboard control.)
Specifications
Physical Dimensions
The SPIDER terminal measures 9.25 in. (23.5 cm) wide, 5.63 in. (14.3 cm)
deep, and 2.5 in (6.35 cm) high.
Power Requirements
A 6 VDC (500 mA) AC adapter provides power to the SPIDER terminal. It can
also be powered by an optional battery pack that uses rechargeable or
conventional batteries. A symbol in the display indicates when battery power is
too low for accurate operation. NOTE: A SPIDER terminal with four analog load
cells has a maximum operating life of up to 25 hours with alkaline-manganese
batteries and up to 11 hours with NiCad rechargeable batteries.
9.25 in.
23.5 cm
5.63 in.
143cm
2.5 in.
6.35 cm

Chapter 1: Introduction
Specifications
(12/00) 1-3
Terminal Specifications
Specifications of the SPIDER Terminal
Resolution 1K to 5K divisions for non-certified applications (non legal-for-trade)
1K to 3 K divisions for certified applications (legal-for-trade)
Selection of resolutions exceeding 5
divisions is not recommended. The SPIDER
terminal may permit higher resolution choices, but could result in poor weighing
performance such as instability or non-repeatability.
Filters Vibration adapter (matching the ambient conditions)
Process adapter (matching the type of weighing)
Max. Display Range 5 increments over capacity
Zero Setting Range 1.2% of the total load cell capacity
Auto Zero Range 0.16% of the stated scale's weighing capacity
Start-up Zero Range
−1.4% to +12.6% of the total load cell capacity
Max. Preload 70% of the nominal load of the stated scale weighing capacity
Numeric Increments 1, 2, 5 multiples
Decimal Positions From 0.0002 to 200
Linearity 0.033 percent of the total load cell capacity
Units g, kg, t, lb
Interface
Baud Rate
Parity
Handshake
Max. Data Rate
Operating Mode
RS-232C bi-directional
300 to 9600 baud
8 bits (no parity), 7 bits (even/odd parity)
none, XON/XOFF, hardware
20 weight values per second
Printout at keystroke, printout on changing load, dialog (SICS)

METTLER TOLEDO SPIDER Terminal Technical Manual
1-4 (12/00)
Standards Compliance
AC Power Line Voltage
Variation
The SPIDER terminal meets NIST HB-44, Canadian Gazette Part 1, and OIML-
SP7/SP2 line voltage variation specifications as listed in the following table:
AC Power Line Voltages
AC Line Voltage Line Frequency in Hz
Line Voltage Variation Specification Minimum Nominal Maximum Minimum Nominal Maximum
NIST HB-44 100 120 130 59.5 60 60.5
Canadian 108 120 132 58.8 60 61.2
OIML-SP7/SP2 102
187
204
120
220
240
132
242
264
58.8
49.0
49.0
60
50
50
61.2
51
51
RFI Susceptibility
The SPIDER terminal meets USA, Canadian, VDE 0871 Class B, UK
requirements for RFI susceptibility as listed in the following table with a
maximum of one display increment of change when calibrated for
recommended builds.
Radio Interference Frequency Field Strength
26-1000 MHz 3 volts/meter
UL Listing
The 120 VAC power adapter complies with UL requirements and carries the UL
label.
CSA Certification
The 120 VAC power adapter complies with CSA requirements and carries the
CSA label.
Weights and Measures
Approval
The SPIDER terminal is NTEP Class III 5000d approved (CoC 96-184). The
SPIDER terminal is Industry Canada approval for 5000d (AM5168).

Chapter 2: Installation
Environment
(12/00) 2-1
2 Installation
Environment
Before installing the scale, note the following:
• Vibration•Vibration diminishes the scale's ability to measure accurately.
Electrical machinery such as conveyors and drill presses can cause
inaccurate, non-repeatable readings. The scale may also read inaccurately if
it is not balanced properly.
• Air Currents•Moving air can cause the scale to read an additional force
(additional weight) and have the same affect as vibration.
• Temperature Stability•Scales at temperatures lower than room temperature
can read inaccurately as the scale measures the change in resistance of the
strain gauges when weight is applied to the scale. To ensure accurate
readings, let the scale warm-up approximately 30 minutes before using it.
• Electrical Influences•Fluctuations in the electrical power supply can affect
performance and possibly damage the load cell. The scale should be set
apart from equipment that generates static electricity. "Clean" power should
be used at all times to avoid damage.
• Friction•A scale cannot measure accurately if an object is rubbing or
pressing against the platter.
• Moisture/Humidity•Moisture and humidity can corrode electrical circuitry.
• Other
• Operate the scale at –10° C to +40° C (+14° F to 104° F).
• Do not locate or operate the scale in a hazardous area.
• Do not locate or operate the scale in a wet area.
• Place the scale in a stable location with little or no vibration.
• Do not place the scale in a location subject to excessive drafts.
Package Contents
The package contents includes:
• SPIDER scale
• Technical manual
• AC adapter (configured to national codes)
• Scale capacity, increment, and units labels
Contact your METTLER TOLEDO representative immediately if any components
are missing or damaged.
If you have moved a certified unit,
please contact METTLER TOLEDO to
have the scale recalibrated and
certified at its new location.

METTLER TOLEDO SPIDER Technical Manual
2-2 (12/00)
Electrical
Connections
The SPIDER terminal is attached and configured to the GB base. No wiring is
required.
Serial Port Connections
The SPIDER terminal is equipped with an RS-232C serial port that is accessible
from the rear of the terminal. This serial port is a standard sub-miniature DB-9
female serial connection that can be used for compatible serial devices such
as a printer or personal computer. The following diagram shows the pin
assignments of the serial port connector:
Pin Signal
1 NC No connection
2 TxD Send line of SPIDER terminal
3 RxD Receive line of SPIDER terminal
4 DSR Receive handshake (I-face 2 only)
5 GND Signal ground
6 DTR Send handshake (I-face 2 only)
7 NC No connection
8 NC No connection
9 NC No connection
The following METTLER TOLEDO devices use the RS-232 connection shown
below:
SPIDER
terminal
Device METTLER TOLEDO Serial Printers
2 3 8806 8807 8845
5 7 8846 8856 8857
8861 8865
Using interface cable number 09000313, ensures both electrical and
mechanical compatibility between the terminal and printers above.
SPIDER
terminal
Device TB-2
METTLER TOLEDO Serial Accessories
2 2 8617 9323 9325
5 3

Chapter 2: Installation
Power-up Sequence
(12/00) 2-3
Chapter 4, Master Mode Configuration, provides additional information
describing how to configure data for printing through the serial port connection.
The Appendix section entitled Operating Instructions Using a PC describes how
to use the SPIDER terminal from a PC connected through the serial port.
Power Supply
Connections
Apply power by inserting the molded end of the power cable to the rear of the
terminal then plugging the modular power supply into a properly grounded AC
power outlet.
Power-up Sequence
The SPIDER terminal goes through a series of self tests when it is turned on.
These tests confirm normal operation. The power-up sequence is as follows:
1. All segments of the display window are lit. This verifies operation of all
segments.
2. The display shows the terminal software version numbers.
3. The terminal advances to normal operating mode.
The total power-up sequence requires approximately 6 seconds.
Legal-For-Trade
Preparations
If you are using the SPIDER terminal with an approved scale in a legal-for-trade
application, you must configure it as such when installing it.
• Select the "Approv" option in the Weighing Cell program block, Approval
sub-block (in Service mode). This restricts the options in other program
blocks to those that provide approved operations.
You can physically seal the terminal to prevent tampering or alteration of its
calibration.
• Place a paper seal over one of the left end cap screws (A) and one of the
two center end cap screws (B).
You can also seal the terminal using the included cross drilled screws and
sealing wiring along with a lead seal.
If the display shows NO after the
power-up sequence, the scale must
capture zero before displa
y
in
g
wei
g
ht.

METTLER TOLEDO SPIDER Technical Manual
2-4 (12/00)
SPIDER Terminal
W & M Sealing

Chapter 3: Service Mode Configuration
Overview
(12/00) 3-1
3 Service Mode Configuration
Overview
WARNING
ONLY PERMIT QUALIFIED PERSONNEL TO PROGRAM METTLER
TOLEDO EQUIPMENT. EXERCISE CARE WHEN CREATING
PROGRAMS OR MAKING PROGRAM CHANGES WHEN OUTPUTS
ARE CONNECTED TO EXTERNAL EQUIPMENT. FAILURE TO
OBSERVE THESE PRECAUTIONS CAN RESULT IN BODILY HARM
AND/OR PROPERTY DAMAGE.
The Service Mode lets you configure those parameters governing scale and
system setup and calibration. As you configure the program blocks in Service
Mode, please keep in mind that the terminal’s display is designed for digital
numeric characters. Some alphabetical characters cannot be created accurately,
and it may take some time to become accustomed to the alpha characters.
Accessing Service Mode
1. Turn the terminal off by pressing the ON/OFF button on the keypad.
2. Open the terminal.
3. Slide the circuit board from the enclosure as you did when attaching the
terminal to a scale base. (Refer to Chapter 2 of this manual.)
4. Press and hold the red Service Mode access button located to the left of the
display as you switch the power to the terminal back on. Hold the red button
in until the display verification is complete. The display reads Service
indicating that you are in Service Mode.
5. Slide the circuit board back into the case and close the unit.
If you cannot reach the button safely
w
ith
y
our fin
g
ertip, use a non-
conductive instrument to press the
button. Do not use a metal tool
because it may damage sensitive
components.

METTLER TOLEDO SPIDER Technical Manual
3-2 (12/00)
Navigating in Service
Mode
You will use only two keys on the SPIDER terminal keypad to configure the
program blocks of Service Mode.
ENTER—The ENTER key is used to accept the displayed parameter. ENTER
corresponds to a “Yes” response. Pressing ENTER at the Service prompt
immediately after accessing Service mode brings up the first program block in
Service mode.
TARE—The TARE key is used to refuse the displayed parameter. Pressing TARE
corresponds to a “No” response. Pressing TARE at the Service prompt
immediately after accessing Service Mode exits this mode.
Unit Program Block
The Unit program block lets you select the basic weighing unit for the SPIDER
terminal. To select a weighing unit:
1. At the Service prompt, press ENTER to access Service Mode.
2. At the Unit 1 prompt, press ENTER to access Unit 1. Use the TARE key to
• Kilogram (kg)
• Metric ton (t)
• Gram (g)
• Pound (lb)
3. Press ENTER to confirm the displayed weighing unit. The SPIDER terminal
automatically proceeds to the next Service Mode program block.
Service
Unit 1
Ramp
Cell
Range
Resolu
CAL
Fac Res
List
Restr
Return
/