Samsung WF80F5E5U4W/KJ Owner's manual
- Category
- Washing machines
- Type
- Owner's manual

WF70F5E5W
WF70F5E4W
WF70F5E3W
WF70F5E5Q
WF70F5E4Q
WF70F5E3Q
WF70F5E5U
WF70F5E4U
WF70F5E3U
WF70F5E5P
WF70F5E4P
WF70F5E3P
WF80F5E5W
WF80F5E4W
WF80F5E3W
WF80F5E5Q
WF80F5E4Q
WF80F5E3Q
WF80F5E5U
WF80F5E4U
WF80F5E3U
WF80F5E5P
WF80F5E4P
WF80F5E3P
Washing machine
User manual
imagine the possibilities
Thank you for purchasing this Samsung product.
To receive a more complete service, please register
your product at
www.samsung.com/register
Untitled-1 1 2013-04-30 �� 3:09:45

2
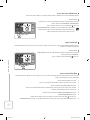
Features of your new Samsung washing
machine
Your new washing machine will change the way you feel about doing laundry. From its specialised Eco
Bubble function to its energy efficiency, your new Samsung washing machine has all the benefits that
makes washing laundry as easy and pleasant as possible.
Eco Bubble Wash
Samsung’s effective Eco Bubble function delivers improved cleanliness with advanced fabric care. The Eco
Bubble function distributes detergent evenly and penetrates fabrics faster and deeper.
Smart Check
Samsung’s Smart Check, an automatic error-monitoring system, detects and diagnoses problems at an early
stage and provides quick and easy solutions.
15’ Quick Wash
You don’t have time to waste! We know you are busy and the 15’ Quick Wash cycle helps you save time.
Now you can wash your favourite clothes (up to 2 kg) in 15 minutes!
Eco Drum Clean
Clean your drum with one button! Using the Eco Drum Clean cycle helps to keep your washing machine
clean without chemical detergent or bleach. Keep the drum clean and odourless with this specialized
cleaning cycle.
Untitled-1 2 2013-04-30 �� 3:09:45

3
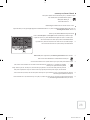
Features of your new samsung washing machine
Baby Care
Your washing machine includes the Baby Care cycle that adds protection to clothing of children with
sensitive skin. This cycle reduces skin irritation in children by minimizing detergent residue. In addition, this
cycle classifies laundry into various types and performs the wash according to the laundry characteristics so
that children’s clothing feels refreshingly clean whenever they are worn.
Delay End
Delay a cycle for up to 19 hours in one-hour increments, increasing the convenience of using your washing
machine especially when you need to go out.
Child Lock
The Child Lock function ensures that curious little hands are kept out of your washing machine. This safety
feature stops your children from operating the washing machine and alerts you when it is activated.
Digital Graphic Display
The digital graphic display control panel is clear and easy to use ensuring minimum fuss and hassle. And
while it is easy to operate, the digital graphic display enables you to make quick and accurate adjustments to
your wash for excellent washing results.
This manual contains important information on the installation, use and care of your new Samsung washing
machine. Refer to it for descriptions of the control panel, instructions on how to use the washing machine
and tips for making the most of its state-of-the-art features and functions. Refer to the “Troubleshooting
and information codes” section on page 37 to see what to do if something goes wrong with your new
washing machine.
Untitled-1 3 2013-04-30 �� 3:09:45

4
Safety information
Congratulations on your new Samsung washing machine. This manual contains important information
on the installation, use and care of your appliance. Please take some time to read this manual to take full
advantage of your washing machine’s many benefits and features.
What you need to know about the safety instructions
Please read this manual thoroughly to ensure that you know how to safely and efficiently operate the
extensive features and functions of your new appliance. Please store the manual in a safe location close
to the appliance for future reference. Use this appliance only for its intended purpose as described in this
instruction manual.
Warnings and Important Safety Instructions in this manual do not cover all possible conditions and
situations that may occur. It is your responsibility to use common sense, caution and care when installing,
maintaining and operating your washing machine.
Because the following operating instructions cover various models, the characteristics of your washing
machine may differ slightly from those described in this manual and not all warning signs may be applicable.
If you have any questions or concerns, contact your nearest service centre or find help and information
online at www.samsung.com.
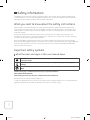
Important safety symbols
What the icons and signs in this user manual mean:
WARNING: Hazards or unsafe practices that may result in severe personal injury, death and/or
property damage.
CAUTION: Hazards or unsafe practices that may result in personal injury and/or property
damage.
NOTE
These warning signs are here to prevent injury to yourself and others.
Please follow them explicitly.
After reading this manual, store it in a safe place for future reference.
Read all instructions before using the appliance.
As with any equipment that uses electricity and moving parts, potential hazards exist. To safely operate this
appliance, familiarize yourself with its operation and exercise care when using it.
Untitled-1 4 2013-04-30 �� 3:09:46

5
Safety information
Important safety precautions
WARNING: To reduce the risk of re, electric shock, or injury to persons when using your
appliance, follow basic precautions, including the following:
Do not let children (or pets) play in or on your washing machine. The
washing machine door does not open easily from the inside and
children may be seriously injured if trapped inside.
This appliance can be used by children aged from 8 years and above
and persons with reduced physical, sensory or mental capabilities
or lack of experience and knowledge if they have been given
supervision or instruction concerning use of the appliance in a safe
way and understand the hazards involved. Children shall not play
with the appliance. Cleaning and user maintenance shall not be
made by children without supervision.
Children should be supervised to ensure that they do not play with
the appliance.
If the power plug or power cord is damaged, it must be replaced by
the manufacturer, a service agent or a similarly qualified person.
This appliance should be positioned so that the power plug, the
water supply taps, and the drain pipes are accessible.
For washing machines with ventilation openings on the base, ensure
that the opening is not obstructed by a carpet or any other obstacles.
Please use the new hoses. Do not use the old hoses.
Untitled-1 5 2013-04-30 �� 3:09:46

6
WARNING: Critical installation WARNINGS
The installation of this appliance must be performed by a qualified technician or service company.
• Failure to do so may result in electric shock, fire, an explosion, problems with the product, or injury.
The appliance is heavy, therefore take care when lifting it.
Plug the power cord into an AC 220 - 240 V / 50 Hz wall socket or higher and use the socket for this
appliance only. Never use an extension cord.
• Sharing a wall socket with other appliances using a power strip or extending the power cord may result
in electric shock or fire.
• Ensure that the power voltage, frequency, and current are the same as those of the product
specifications. Failure to do so may result in electric shock or fire. Plug the power plug into the wall
socket firmly.
Remove all foreign substances such as dust or water from the power plug terminals and contact points
using a dry cloth on a regular basis.
• Unplug the power plug and clean it with a dry cloth.
• Failure to do so may result in electric shock or fire.
Plug the power plug into the wall socket so that the cord is running towards the floor.
• If you plug the power plug into the socket in the opposite direction, the electric wires within the cable
may be damaged and this may result in electric shock or fire.
Keep all packaging materials out of the reach of children as these may be dangerous.
• If a child places a bag over its head, it may suffocate.
When the appliance, power plug or power cord is damaged, contact your nearest service centre.
This appliance must be properly grounded.
Do not ground the appliance to a gas pipe, plastic water pipe, or telephone line.
• This may result in electric shock, fire, an explosion, or problems with the product.
• Never plug the power cord into a socket that is not grounded correctly and make sure that it is in
accordance with local and national regulations.
Do not install this appliance near a heater or any inflammable material.
Do not install this appliance in a humid, oily or dusty location, or in a location exposed to direct sunlight or
water (rain drops).
Do not install this appliance in a location exposed to low temperatures.
• Frost may cause the tubes to burst.
Do not install this appliance in a location where gas may leak.
• This may result in electric shock or fire.
Do not use an electric transformer.
• This may result in electric shock or fire.
Do not use a damaged power plug, damaged power cord, or loose wall socket.
• This may result in electric shock or fire.
Do not pull or excessively bend the power cord.
Do not twist or tie the power cord.
Do not hook the power cord over a metal object, place a heavy object on the power cord, insert the power
cord between objects, or push the power cord into the space behind the appliance.
• This may result in electric shock or fire.
Do not pull the power cord when unplugging the power plug.
• Unplug the power plug by holding the plug.
Untitled-1 6 2013-04-30 �� 3:09:46

7
Safety information
• Failure to do so may result in electric shock or fire.
CAUTION: Installation CAUTIONS
This appliance should be positioned in such a way that the power plug is easily accessible.
• Failure to do so may result in electric shock or fire due to electric leakage.
Install your appliance on a solid, level floor that can support its weight.
• Failure to do so may result in abnormal vibrations, movement, noise, or problems with the product.
WARNING: Critical usage WARNINGS
If the appliance is flooded, turn off the water & power supplies immediately and contact your nearest service
centre.
• Do not touch the power plug with wet hands.
• Failure to do so may result in electric shock.
If the appliance generates a strange noise, a burning smell, or smoke, unplug the power plug immediately
and contact your nearest service centre.
• Failure to do so may result in electric shock or fire.
In the event of a gas leak (such as propane gas, LP gas, etc.), ventilate immediately without touching the
power plug. Do not touch the appliance or power cord.
• Do not use a ventilating fan.
• A spark may result in an explosion or fire.
Do not let children play in or on the washing machine. In addition, when disposing of the appliance, remove
the washing machine door lever.
• If trapped inside the product, children may suffocate to death.
Make sure to remove the packaging (sponge, styrofoam) attached to the bottom of the washing machine
before using it.
Do not wash items contaminated with gasoline, kerosene, benzene, paint thinner, alcohol or other
inflammable or explosive substances.
• This may result in electric shock, fire, or an explosion.
Do not open the washing machine door by force while it is operating (high-temperature washing/drying/
spinning).
• Water flowing out of the washing machine may result in burns or cause the floor to be slippery. This
may result in injury.
• Opening the door by force may result in damage to the product or injury.
Do not insert your hand under the washing machine while an operation is in progress.
• This may result in injury.
Do not touch the power plug with wet hands.
• This may result in electric shock.
Do not turn the appliance off by unplugging the power plug while an operation is in progress.
• Plugging the power plug into the wall socket again may cause a spark and result in electric shock or fire.
Do not let children or the infirm use this washing machine without proper supervision. Do not let children
climb in or onto the appliance.
• This may result in electric shock, burns or injury.
Do not insert your hand or a metal object under the washing machine while it is operating.
• This may result in injury.
Untitled-1 7 2013-04-30 �� 3:09:46

8
Do not unplug the appliance by pulling the power cord. Always grip the plug firmly and pull it straight out
of the outlet.
• Damage to the power cord may cause a short-circuit, fire and/or electric shock.
Do not attempt to repair, disassemble, or modify the appliance yourself.
• Do not use a fuse (such as copper, steel wire, etc.) other than a standard fuse.
• When the appliance needs to be repaired or reinstalled, contact your nearest service centre.
• Failure to do so may result in electric shock, fire, problems with the product, or injury.
If the water supply hose comes loose from the water tap and floods the appliance, unplug the power plug.
• Failure to do so may result in electric shock or fire.
Unplug the power plug when the appliance is not being used for long periods of time or during a thunder
or lightning storm.
• Failure to do so may result in electric shock or fire.
If any foreign substance enters into the appliance, unplug the power plug and contact you nearest Samsung
Customer Service.
• This may result in electric shock or fire.
CAUTION: Usage CAUTIONS
When the washing machine is contaminated by a foreign substance such as detergent, dirt, food waste, etc.,
unplug the power plug and clean the washing machine using a damp, soft cloth.
• Failure to do so may result in discolouration, deformation, damage, or rust.
The front glass may be broken by a strong impact. Take care when using the washing machine.
• If the glass is broken, it may result in injury.
After a water supply failure or when reconnecting the water supply hose, open the water tap slowly.
Open the water tap slowly after a long period of non-use.
• The air pressure in the water supply hose or the water pipe may damage a product part or result in a
water leak.
If a draining error occurs during an operation, check if there is a draining problem.
• If the washing machine is used when it is flooded because of a draining problem, it may result in electric
shock or fire.
Insert the laundry into the washing machine completely so that the laundry does not get caught in the
door.
• If laundry gets caught in the door, it may result in damage to the laundry or the washing machine, or
result in a water leak.
Turn the water supply off when the washing machine is not being used.
Ensure that the screws on the water supply hose connector are properly tightened.
• Failure to do so may result in property damage or injury.
Ensure that the rubber seal and front door glass are not contaminated by a foreign substance (e.g. waste,
thread, hair, etc.).
• If a foreign substance is caught in the door or the door is not completely closed, it may cause a water
leak.
Open the water tap and check if the water supply hose connector is firmly tightened and that there is no
water leak before using the product.
• If the screws on the water supply hose connector are loose, it may result in a water leak.
The product you have purchased is designed for domestic use only.
Using the product for business purposes qualifies as a product misuse. In this case, the product will not be
Untitled-1 8 2013-04-30 �� 3:09:46

9
Safety information
covered by the standard warranty provided by Samsung and no responsibility can be attributed to Samsung
for malfunctions or damages resulting from such misuse.
Do not stand on the appliance or place objects (such as laundry, lighted candles, lighted cigarettes, dishes,
chemicals, metal objects, etc.) on the appliance.
• This may result in electric shock, fire, problems with the product, or injury.
Do not spray volatile material such as insecticide onto the surface of the appliance.
• As well as being harmful to humans, this may result in electric shock, fire or problems with the product.
Do not place objects that generate electromagnetic fields near the washing machine.
• This may result in injury due to a malfunction.
Water drained during a high-temperature wash or drying cycle is hot. Do not touch the water.
• This may result in burns or injury.
Do not wash, spin, or dry water-proof seats, mats, or clothing (*) unless your appliance has a special cycle for
washing these items.
(*): Woollen bedding, rain covers, fishing vests, ski pants, sleeping bags, diaper covers, sweat suits, and
bicycle, motor cycle and car covers, etc.
• Do not wash thick or hard mats even if the washing machine mark is on the care label. This may result in
injury or damage to the washing machine, walls, floor, or clothing due to abnormal vibrations.
• Do not wash throw rugs or doormats with rubber backing. The rubber backing may come off and stick
to inside the drum, and this may result in malfunction such as a drainage error.
Do not operate the washing machine when the detergent drawer is removed.
• This may result in electric shock or injury due to a water leak.
Do not touch the insides of the drum during or just after drying as it is hot.
• This may result in burns.
Do not insert your hand into the detergent drawer.
• This may result in injury as your hand may be caught by the detergent input device.
Do not place any objects (such as shoes, food waste, animals) other than laundry into the washing machine.
• This may result in damage to the washing machine, or injury and death in the case of pets due to the
abnormal vibrations.
Do not press the buttons using sharp objects such as pins, knifes, fingernails, etc.
• This may result in electric shock or injury.
Do not wash laundry contaminated by oils, creams or lotions usually found in skincare shops or massage
clinics.
• This may cause the rubber seal to become deformed and result in a water leak.
Do not leave metal objects such as safety pins, hair pins or bleach in the drum for long periods of time.
• This may cause the drum to rust.
• If rust starts appearing on the surface of the drum, apply a (neutral) cleansing agent to the surface and
use a sponge to clean it. Never use a metal brush.
Do not use dry cleaning detergent directly and do not wash, rinse, or spin laundry contaminated by dry
cleaning detergent.
• This may result in spontaneous combustion or ignition due to the heat from the oxidation of the oil.
Do not use water from water cooling/heating devices.
• This may result in problems with the washing machine.
Do not use natural hand-washing soap for the washing machine.
• If it hardens and accumulates inside the washing machine, it may result in problems with the product,
discolouration, rust, or bad odours.
Untitled-1 9 2013-04-30 �� 3:09:46

10
Place socks and brassieres in a washing net and wash them with the other laundry.
Do not wash large laundry items such as bedding in the washing net.
• Failure to do so may result in injury due to abnormal vibrations.
Do not use hardened detergent.
• If it accumulates inside the washing machine, it may result in a water leak.
Make sure that the pockets of all the clothing items to be washed are empty.
• Hard, sharp objects such as coins, safety pins, nails, screws, or stones can cause extensive damage to the
appliance.
Do not wash clothing with large buckles, buttons or other heavy metal objects.
Do not leave the laundry which you have added detergent or applied stain remover or pretreatment onto
the laundry without washing it for a period of time.
• This may result in discoloration.
Sort the laundry by color on the basis of its colorfastness and select the recommended cycle, water
temperature and additional functions.
• This may result in discoloration or fabric damage.
Take care that children’s fingers are not caught in the door when you close it.
• Failure to do so may result in injury.
WARNING: Critical cleaning WARNINGS
Do not clean the appliance by spraying water directly onto it.
Do not use the a strong acidic cleaning agent.
Do not use benzene, thinner or alcohol to clean the appliance.
• This may result in discolouration, deformation, damage, electric shock or fire.
Before cleaning or performing maintenance, unplug the appliance from the wall socket.
• Failure to do so may result in electric shock or fire.
Untitled-1 10 2013-04-30 �� 3:09:46

11
Content
Content
Setting up your washing machine 13
Checking the parts . . . . . . . . . . . . . . . . . . . . . . . . . . . . . . . . . . . . . . . . . . . . . . . . . . . . . . . . . . . . . . . . . . . . . . . . . . . . . .13
Meeting the installation requirements . . . . . . . . . . . . . . . . . . . . . . . . . . . . . . . . . . . . . . . . . . . . . . . . . . . . . . . . . . .14
Electrical supply and grounding . . . . . . . . . . . . . . . . . . . . . . . . . . . . . . . . . . . . . . . . . . . . . . . . . . . . . . . . . . . . . . . . . .14
Water supply . . . . . . . . . . . . . . . . . . . . . . . . . . . . . . . . . . . . . . . . . . . . . . . . . . . . . . . . . . . . . . . . . . . . . . . . . . . . . . . . . . . . .14
Drain . . . . . . . . . . . . . . . . . . . . . . . . . . . . . . . . . . . . . . . . . . . . . . . . . . . . . . . . . . . . . . . . . . . . . . . . . . . . . . . . . . . . . . . . . . . . .15
Flooring . . . . . . . . . . . . . . . . . . . . . . . . . . . . . . . . . . . . . . . . . . . . . . . . . . . . . . . . . . . . . . . . . . . . . . . . . . . . . . . . . . . . . . . . . .15
Surrounding temperature . . . . . . . . . . . . . . . . . . . . . . . . . . . . . . . . . . . . . . . . . . . . . . . . . . . . . . . . . . . . . . . . . . . . . . . .15
Alcove or closet installation . . . . . . . . . . . . . . . . . . . . . . . . . . . . . . . . . . . . . . . . . . . . . . . . . . . . . . . . . . . . . . . . . . . . . . .15
Installing your washing machine . . . . . . . . . . . . . . . . . . . . . . . . . . . . . . . . . . . . . . . . . . . . . . . . . . . . . . . . . . . . . . . .16
Using your washing machine 21
Detergent and Additives Information . . . . . . . . . . . . . . . . . . . . . . . . . . . . . . . . . . . . . . . . . . . . . . . . . . . . . . . . . . . .21
Using the proper detergent . . . . . . . . . . . . . . . . . . . . . . . . . . . . . . . . . . . . . . . . . . . . . . . . . . . . . . . . . . . . . . . . . . . . . . .21
Using the detergent drawer . . . . . . . . . . . . . . . . . . . . . . . . . . . . . . . . . . . . . . . . . . . . . . . . . . . . . . . . . . . . . . . . . . . . . .21
Using liquid detergent (selected models) . . . . . . . . . . . . . . . . . . . . . . . . . . . . . . . . . . . . . . . . . . . . . . . . . . . . . . . . .22
Doing laundry for the rst time . . . . . . . . . . . . . . . . . . . . . . . . . . . . . . . . . . . . . . . . . . . . . . . . . . . . . . . . . . . . . . . . . .23
Basic instructions . . . . . . . . . . . . . . . . . . . . . . . . . . . . . . . . . . . . . . . . . . . . . . . . . . . . . . . . . . . . . . . . . . . . . . . . . . . . . . .23
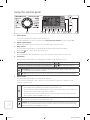
Using the control panel . . . . . . . . . . . . . . . . . . . . . . . . . . . . . . . . . . . . . . . . . . . . . . . . . . . . . . . . . . . . . . . . . . . . . . . . .24
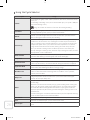
Using the Cycle Selector . . . . . . . . . . . . . . . . . . . . . . . . . . . . . . . . . . . . . . . . . . . . . . . . . . . . . . . . . . . . . . . . . . . . . . . . . .26
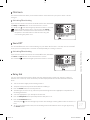
Child Lock . . . . . . . . . . . . . . . . . . . . . . . . . . . . . . . . . . . . . . . . . . . . . . . . . . . . . . . . . . . . . . . . . . . . . . . . . . . . . . . . . . . . . . . .27
Sound Off . . . . . . . . . . . . . . . . . . . . . . . . . . . . . . . . . . . . . . . . . . . . . . . . . . . . . . . . . . . . . . . . . . . . . . . . . . . . . . . . . . . . . . . .27
Delay End . . . . . . . . . . . . . . . . . . . . . . . . . . . . . . . . . . . . . . . . . . . . . . . . . . . . . . . . . . . . . . . . . . . . . . . . . . . . . . . . . . . . . . . .27
Smart Check . . . . . . . . . . . . . . . . . . . . . . . . . . . . . . . . . . . . . . . . . . . . . . . . . . . . . . . . . . . . . . . . . . . . . . . . . . . . . . . . . . . . . .28
Doing laundry . . . . . . . . . . . . . . . . . . . . . . . . . . . . . . . . . . . . . . . . . . . . . . . . . . . . . . . . . . . . . . . . . . . . . . . . . . . . . . . . . .29
Doing laundry using the Cycle Selector . . . . . . . . . . . . . . . . . . . . . . . . . . . . . . . . . . . . . . . . . . . . . . . . . . . . . . . . . . .29
Doing laundry manually . . . . . . . . . . . . . . . . . . . . . . . . . . . . . . . . . . . . . . . . . . . . . . . . . . . . . . . . . . . . . . . . . . . . . . . . . .30
Laundry guidelines . . . . . . . . . . . . . . . . . . . . . . . . . . . . . . . . . . . . . . . . . . . . . . . . . . . . . . . . . . . . . . . . . . . . . . . . . . . . . . .30
Cleaning your washing machine 32
Eco Drum Clean . . . . . . . . . . . . . . . . . . . . . . . . . . . . . . . . . . . . . . . . . . . . . . . . . . . . . . . . . . . . . . . . . . . . . . . . . . . . . . . .32
Cleaning procedures . . . . . . . . . . . . . . . . . . . . . . . . . . . . . . . . . . . . . . . . . . . . . . . . . . . . . . . . . . . . . . . . . . . . . . . . . . . . .32
Eco Drum Clean auto alarm function . . . . . . . . . . . . . . . . . . . . . . . . . . . . . . . . . . . . . . . . . . . . . . . . . . . . . . . . . . . . . .33
Draining the washing machine in an emergency . . . . . . . . . . . . . . . . . . . . . . . . . . . . . . . . . . . . . . . . . . . . . . . . .33
Cleaning the debris lter . . . . . . . . . . . . . . . . . . . . . . . . . . . . . . . . . . . . . . . . . . . . . . . . . . . . . . . . . . . . . . . . . . . . . . . . 34
Cleaning the exterior . . . . . . . . . . . . . . . . . . . . . . . . . . . . . . . . . . . . . . . . . . . . . . . . . . . . . . . . . . . . . . . . . . . . . . . . . . .34
Cleaning the detergent drawer and drawer recess . . . . . . . . . . . . . . . . . . . . . . . . . . . . . . . . . . . . . . . . . . . . . . .35
Untitled-1 11 2013-04-30 �� 3:09:46

12
Cleaning the mesh lter . . . . . . . . . . . . . . . . . . . . . . . . . . . . . . . . . . . . . . . . . . . . . . . . . . . . . . . . . . . . . . . . . . . . . . . . .35
Maintaining your washing machine 36
Repairing a frozen washing machine . . . . . . . . . . . . . . . . . . . . . . . . . . . . . . . . . . . . . . . . . . . . . . . . . . . . . . . . . . . .36
Storing your washing machine . . . . . . . . . . . . . . . . . . . . . . . . . . . . . . . . . . . . . . . . . . . . . . . . . . . . . . . . . . . . . . . . . .36
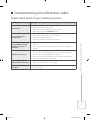
Troubleshooting and information codes 37
Check these points if your washing machine... . . . . . . . . . . . . . . . . . . . . . . . . . . . . . . . . . . . . . . . . . . . . . . . . . . .37
Information codes . . . . . . . . . . . . . . . . . . . . . . . . . . . . . . . . . . . . . . . . . . . . . . . . . . . . . . . . . . . . . . . . . . . . . . . . . . . . . .38
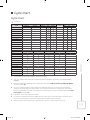
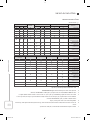
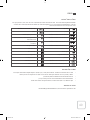
Cycle chart 39
Cycle chart . . . . . . . . . . . . . . . . . . . . . . . . . . . . . . . . . . . . . . . . . . . . . . . . . . . . . . . . . . . . . . . . . . . . . . . . . . . . . . . . . . . . . 39
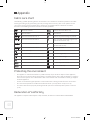
Appendix 40
Fabric care chart . . . . . . . . . . . . . . . . . . . . . . . . . . . . . . . . . . . . . . . . . . . . . . . . . . . . . . . . . . . . . . . . . . . . . . . . . . . . . . . .40
Protecting the environment . . . . . . . . . . . . . . . . . . . . . . . . . . . . . . . . . . . . . . . . . . . . . . . . . . . . . . . . . . . . . . . . . . . . .40
Declaration of conformity . . . . . . . . . . . . . . . . . . . . . . . . . . . . . . . . . . . . . . . . . . . . . . . . . . . . . . . . . . . . . . . . . . . . . . .40
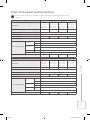
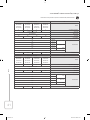
Sheet of household washing machines . . . . . . . . . . . . . . . . . . . . . . . . . . . . . . . . . . . . . . . . . . . . . . . . . . . . . . . . . .41
Untitled-1 12 2013-04-30 �� 3:09:46

13
Setting up your washing machine
Setting up your washing machine
Be sure to have your installer follow these instructions closely so that your new washing machine works
properly, and that you’re not at risk of injury when doing laundry.
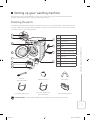
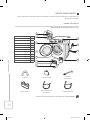
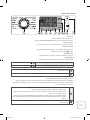
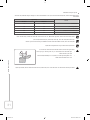
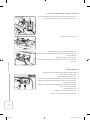
Checking the parts
Carefully unpack your washing machine, and make sure you’ve received all of the parts shown below. If your
washing machine was damaged during shipping or if you do not have all of the parts, contact the Samsung
Customer Service or your Samsung dealer.
1
10
11
12
3
4
5
6
7
8
2
9
1 Release lever
2 Detergent drawer
3 Control panel
4 Door
5 Drum
6 Debris filter
7 Emergency drain tube
8 Filter cover
9 Work top
10 Power plug
11 Drain hose
12 Levelling feet
Wrench
(selected models)
Bolt hole covers * Hose guide
Cold water supply hose
Hot water supply hose
(selected models)
Liquid detergent guide
Bolt hole covers * : The number of bolt hole covers depends on the model (3 to 5 covers).
Untitled-1 13 2013-04-30 �� 3:09:47

14
Meeting the installation requirements
Electrical supply and grounding
WARNING: Never use an extension cord.
Use only the power cord that comes with your washing machine.
When preparing the installation, ensure that your power supply offers:
• An AC 220 - 240 V / 50 Hz fuse or circuit breaker
• An individual branch circuit dedicated to your washing machine
Your washing machine must be grounded. If your washing machine malfunctions or breaks down,
grounding will reduce the risk of electric shock by providing a path of least resistance for the electric current.
Your washing machine comes with a power cord that has a three-prong grounding plug for use in a
properly installed and grounded outlet.
WARNING: Never connect the ground wire to plastic plumbing lines, gas lines, or hot water pipes.
Improperly connecting the equipment-grounding conductor can result in electric shock. Check with a
qualified electrician or serviceman if you are unsure if the washing machine is properly grounded.
CAUTION: Do not modify the plug provided with the washing machine. If it does not fit the outlet,
have a proper outlet installed by a qualified electrician.
Water supply
Your washing machine will fill properly when your water pressure is between 50 kPa to 800 kPa. A
water pressure less than 50 kPa may cause a water valve failure and not allow the water valve to shut
off completely. Alternatively, the washing machine controls may not handle the pressure and cause the
washing machine to turn off. (A fill-time limit has been built into the controls, designed to prevent overflows
or flooding if an internal hose becomes loose.)
The water taps must be within 120 cm of the back of your washing machine for the provided water supply
hoses to reach your washing machine.
Most plumbing supply stores sell water supply hoses of various lengths up to 305 cm long.
You can reduce the risk of leaks and water damage by:
• Making water taps easily accessible.
• Turning off water taps when the washing machine is not in use.
• Periodically checking the water supply hose fittings for leaks.
WARNING: Before using your washing machine for the first time, check all connections at the water
valve and taps for leaks.
Untitled-1 14 2013-04-30 �� 3:09:47

15
Setting up your washing machine
Drain
Samsung recommends a standpipe height of 65 cm. The drain hose must be routed through the drain hose
clip to the standpipe. The standpipe must be large enough to accept the outside diameter of the drain hose.
The drain hose is attached at the factory.
Flooring
For best performance, your washing machine must be installed on a solid floor. Wooden floors may need
to be reinforced to minimize vibrations and/or unbalanced loads. Carpeting and soft tile surfaces are
contributing factors to vibrations and the tendency for your washing machine to move slightly during the
spin cycle.
WARNING: Never install your washing machine on a platform or poorly supported structure.
Surrounding temperature
Do not install your washing machine in areas where the ambient temperature may drop below water’s
freezing point, since your washing machine always retains some water in the water valve, pump, and hose
areas. Frozen water in the lines can cause damage to the belts, the pump, and other components.
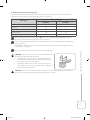
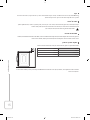
Alcove or closet installation
To operate safely and properly, your new washing machine requires the following minimum clearances:
Sides 25 mm
Top 25 mm
Rear * 50 mm
Front 500 mm
If both the washing machine and a dryer are installed together, the front of the alcove or closet must have
an unobstructed air opening of at least 500 mm. Your washing machine by itself does not require a specific
air opening.
Untitled-1 15 2013-04-30 �� 3:09:47

16
Installing your washing machine
CAUTION: Do not plug the power cord into a wall socket before the installation is complete.
WARNING: Packaging materials can be dangerous to children; keep all packaging material (plastic
bags, polystyrene, etc.) well out of the reach of children.
STEP 1 - Selecting a location
Before you install the washing machine, make sure the location:
• Has a hard, level surface without carpeting or flooring that may obstruct ventilation
• Is away from direct sunlight
• Has adequate ventilation
• Is not exposed to freezing temperatures (below 0 ˚C)
• Is away from heat sources such as oil or gas
• Has enough space so that the washing machine doesn’t stand on its power cord
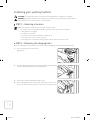
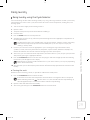
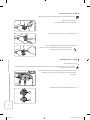
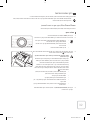
STEP 2 - Removing the shipping bolts
Before installing the washing machine, you must remove all shipping bolts from the back of the unit.
1. Loosen all the bolts with the wrench.
(*): Optional
2. Hold the shipping bolt with your hand and pull it through the wide
section of the hole. Repeat for each shipping bolt.
3. Fill the holes with the supplied bolt hole covers.
4. Store all shipping bolts in a safe location where they can be easily
retrieved in the event that you have to move the washing machine.
Untitled-1 16 2013-04-30 �� 3:09:47

17
Setting up your washing machine
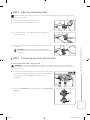
STEP 3 - Adjusting the levelling feet
When installing your washing machine, ensure that the power plug, the water supply, and the drain
are easily accessible.
1. Slide the washing machine into position.
2. Loosen all the lock nuts with the wrench.
3. Level your washing machine by turning the levelling feet as
necessary by hand.
4. When your washing machine is level, tighten the lock nuts using
the wrench.
CAUTION: Do not move your washing machine unless
you tighten the lock nuts. This may result in damage to the
leveling feet.
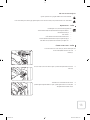
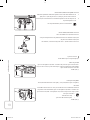
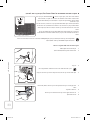
STEP 4 - Connecting the water and the drain
Connecting the water supply hose
WARNING: Do not connect multiple water supply hoses together. This may result in a water leak
and electric shock due to the water leak. If the hose is too short, replace the hose with a longer, high
pressure hose.
1. Connect the L-shaped arm fitting for the cold water supply hose to
the cold water supply intake at the back of the washing machine.
Then tighten it by turning part (A) clockwise by hand.
(*): Optional
A
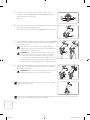
2. Remove the adaptor (B) from the other end of the water supply
hose (C).
B
C
Untitled-1 17 2013-04-30 �� 3:09:48

18
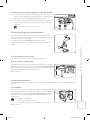
3. First, loosen the four screws on the adaptor using a ‘+’ type
screwdriver. Next, hold part (D) and turn part (E) following the
arrow until there is a 5 mm gap.
(*): 5 mm
E
D
4. Connect the adaptor to the water tap by tightening all the screws
firmly while lifting the adaptor upwards.
Then tighten the adaptor by turning part (E) following the arrow.
E
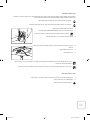
5. Connect the water supply hose to the adaptor. If you push part (F)
into the adaptor, the hose automatically connects to the adaptor
with a ‘clicking’ sound.
After you have connected the water supply hose to the
adaptor, ensure that it is connected correctly by pulling the
water supply hose downwards.
WARNING: Check if the water supply hose is not twisted
or bent. If the hose is twisted or bent, there is a danger of
a water leak and electric shock due to the water leak. If
necessary, you can reposition the water supply hose at the
washing machine end by loosening the L-shaped arm fitting,
rotating the hose, and retightening the L-shaped arm fitting.
F
6. Turn on the water supply and ensure that no water leaks from the
water supply intake, water tap or adaptor. If there is a water leak,
repeat the previous steps.
WARNING: Do not use your washing machine if there is a
water leak. This may result in electric shock or injury.
If the water tap has a screw type tap, connect the water supply
hose to the tap as shown.
Use the most conventional type of tap for the water supply. If the tap is square or too big, remove the
space ring before inserting the tap into the adaptor.
Untitled-1 18 2013-04-30 �� 3:09:49

19
Setting up your washing machine
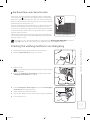
Connecting the hot water supply hose (selected models)
1. Connect the red L-shaped arm fitting for the hot water supply hose
to the hot water supply intake at the back of the washing machine.
Then tighten it by turning part (A) clockwise by hand.
2. Connect the other end of the hot water supply hose to your sink’s
hot water tap in the same way as you connected the cold water
supply hose.
To use only cold water, use the Y-piece.
A
Connecting the aqua hose (selected models)
The aqua hose was invented to ensure perfect leakage protection.
The aqua stop is attached to the aqua hose and automatically cuts the
water flow if the hose is damaged.
It also displays a warning indicator (A) on the aqua stop.
Connect the aqua hose by assembling the aqua stop on the tap as
shown.
A
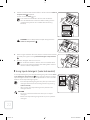
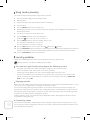
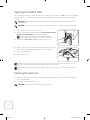
Connecting the drain hose
The end of the drain hose can be positioned in three ways:
Over the edge of a wash basin
The drain hose must be placed at a height between 60 cm and 90 cm.
To keep the drain hose spout bent, use the supplied plastic hose guide
(A). Secure the guide to the wall with a hook or to the tap with a piece
of string to prevent the drain hose from moving.
(*): 60 ~ 90 cm
A
ln a sink drain pipe branch
The drain pipe branch must be above the sink siphon so that the end of the hose is at least 60 cm above the
ground.
ln a standpipe
We recommend using a 65 cm high vertical pipe as a standpipe. It must
be no shorter than 60 cm and no longer than 90 cm. To keep the drain
hose spout bent, use the supplied plastic hose guide (A). Secure the
drain hose to the standpipe with tie straps to prevent the drain hose
from moving.
The standpipe drain requires:
• A minimum diameter of 5 cm.
• A minimum carry-away capacity of 60 litres per minute.
(*): 60 ~ 90 cm
Untitled-1 19 2013-04-30 �� 3:09:49

20
STEP 5 - Powering your washing machine
Plug the power cord into a wall socket, an AC 220 - 240 V / 50 Hz approved electrical outlet protected by
a fuse or circuit breaker. (For more information on the electrical and grounding requirements, refer to the
“Electrical supply and grounding” section on page 14.)
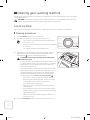
Test run
Make sure that you install your washing machine correctly by running the Rinse+Spin cycle after the
installation is complete.
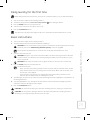
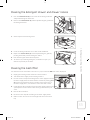
STEP 6 - Running Calibration Mode
Your Samsung washing machine detects the weight of the laundry automatically. For a more accurate
weight detection, it is recommended running Calibration Mode immediately after installing the washing
machine. Follow the steps below to run Calibration Mode.
Before running Calibration Mode, make sure that there is nothing in the drum or on top of the
washing machine.
1. Turn the washing machine off.
2. Press the Power button while holding down the Temp. and Delay End buttons simultaneously. The
washing machine will turn on and “CLB” will appear on the display.
3. Press the Start/Pause button to start Calibration Mode.
4. The drum will rotate clockwise and counter-clockwise for about 3 minutes.
5. When Calibration Mode is complete, “End” appears on the display and the washing machine will turn off
automatically.
6. The washing machine is now ready for use.
Untitled-1 20 2013-04-30 �� 3:09:49
Page is loading ...
Page is loading ...
Page is loading ...
Page is loading ...
Page is loading ...
Page is loading ...
Page is loading ...
Page is loading ...
Page is loading ...
Page is loading ...
Page is loading ...
Page is loading ...
Page is loading ...
Page is loading ...
Page is loading ...
Page is loading ...
Page is loading ...
Page is loading ...
Page is loading ...
Page is loading ...
Page is loading ...
Page is loading ...
Page is loading ...
Page is loading ...
Page is loading ...
Page is loading ...
Page is loading ...
Page is loading ...
Page is loading ...
Page is loading ...
Page is loading ...
Page is loading ...
Page is loading ...
Page is loading ...
Page is loading ...
Page is loading ...
Page is loading ...
Page is loading ...
Page is loading ...
Page is loading ...
Page is loading ...
Page is loading ...
Page is loading ...
Page is loading ...
Page is loading ...
Page is loading ...
Page is loading ...
Page is loading ...
Page is loading ...
Page is loading ...
Page is loading ...
Page is loading ...
Page is loading ...
Page is loading ...
Page is loading ...
Page is loading ...
Page is loading ...
Page is loading ...
Page is loading ...
Page is loading ...
Page is loading ...
Page is loading ...
Page is loading ...
Page is loading ...
Page is loading ...
Page is loading ...
Page is loading ...
Page is loading ...
-
 1
1
-
 2
2
-
 3
3
-
 4
4
-
 5
5
-
 6
6
-
 7
7
-
 8
8
-
 9
9
-
 10
10
-
 11
11
-
 12
12
-
 13
13
-
 14
14
-
 15
15
-
 16
16
-
 17
17
-
 18
18
-
 19
19
-
 20
20
-
 21
21
-
 22
22
-
 23
23
-
 24
24
-
 25
25
-
 26
26
-
 27
27
-
 28
28
-
 29
29
-
 30
30
-
 31
31
-
 32
32
-
 33
33
-
 34
34
-
 35
35
-
 36
36
-
 37
37
-
 38
38
-
 39
39
-
 40
40
-
 41
41
-
 42
42
-
 43
43
-
 44
44
-
 45
45
-
 46
46
-
 47
47
-
 48
48
-
 49
49
-
 50
50
-
 51
51
-
 52
52
-
 53
53
-
 54
54
-
 55
55
-
 56
56
-
 57
57
-
 58
58
-
 59
59
-
 60
60
-
 61
61
-
 62
62
-
 63
63
-
 64
64
-
 65
65
-
 66
66
-
 67
67
-
 68
68
-
 69
69
-
 70
70
-
 71
71
-
 72
72
-
 73
73
-
 74
74
-
 75
75
-
 76
76
-
 77
77
-
 78
78
-
 79
79
-
 80
80
-
 81
81
-
 82
82
-
 83
83
-
 84
84
-
 85
85
-
 86
86
-
 87
87
-
 88
88


Samsung WF80F5E5U4W/KJ Owner's manual
- Category
- Washing machines
- Type
- Owner's manual
Ask a question and I''ll find the answer in the document
Finding information in a document is now easier with AI
Related papers
-
Samsung WF70F5E2W4W Owner's manual
-
-
-
-
-
Samsung WW80J5345MW User manual
-
Samsung WW70J5355MW User manual
-
-
Samsung WW10H9400EW Owner's manual
-
Other documents
-
Indesit RPG 92 7 JS IL User guide
-
Candy EVOT 10061D/1-IS User manual
-
Terzismo CT6100 User manual
-
IKEA 201.840.41 User guide
-
Whirlpool TDLR 70213 User guide
-
LG VS8403SCW Owner's manual
-
White-Westinghouse WLCE07GHFWT1 Owner's manual
-
-
 Replay 133RED583.25 Datasheet
-
Aeg-Electrolux L725500 User manual
