Page is loading ...

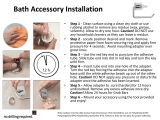
Bath Accessory Installation
• Step 1 - Clean surface using a clean dry cloth or use
rubbing alcohol to remove any residue (wax, grease,
solvents). Allow to dry one hour. Caution! DO NOT use
any household cleaners as they can leave a residue.
• Step 2 - Locate position desired and mark. Remove
protective paper from foam securing ring and apply firm
pressure for 4 seconds. Avoid mounting adapter over
grout lines.
• Step 3 – Use the red key end to puncture the adhesive
tube. Slide tube end into slot in red key and turn the key
until firm.
• Step 4 – Insert tube end into one hole of the adapter.
Turn the red key forcing the adhesive into the adapter
base until the white adhesive beads up out of the other
hole. Caution! DO NOT apply any pressure or disturb the
adapter once the adhesive has been inserted.
• Step 5 – Allow adapter to cure (harden) for 12 hours
undisturbed. Remove any excess adhesive once dry.
Caution! Allow 24 hours for Grab Bars
• Step 6 – Mount your accessory using the tool provided
and enjoy!
Note: Surface must be able to bear load of accessory. Not intended for use on Polyethylene (PE)
Polypropylene (PP), Polytetraflouroethylene (PTE, Teflon) as they do not allow for proper adhesion

Installation Tips-Two Post Accessories
• For accessories with more than
one adapter:
– Use small piece of packaging &
insert into base behind adapter
– Carefully insert adapters into the
accessory & lightly fasten with
tool (the packaging will keep the
adapter sitting tall which allows
for easy attachment of the
adhesive ring)
– Remove protective film from ring
– Hold accessory up to the marks
and press adapters firmly into
place
– Carefully remove accessory and
follow instructions for adhesive
insertion and curing

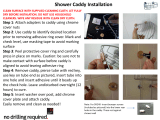
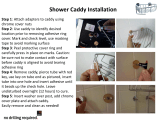
Shower Caddy Installation
Clean surface with alcohol pad and let dry.
Do not use household cleaners!
Step 1: Attach adapters to caddy using
chrome cover nuts
Step 2: Use caddy to identify desired
location prior to removing adhesive ring
cover. Mark and check level, use masking
tape to avoid marking surface
Step 3: Peel protective cover ring and
carefully press in place on marks. Caution:
be sure not to make contact with surface
before caddy is aligned to avoid tearing
adhesive ring
Step 4: Remove caddy, pierce tube with red
key, use key on tube end as pictured, insert
tube into one hole and insert adhesive until
it beads up the check hole. Leave
undisturbed overnight (12 hours) to cure.
Step 5: Insert washer over post, add chrome
cover plate and attach caddy.
Easily remove and clean as needed!

Adapter Set- 2 Adapters, 3-
adhesive tubes, 3-Red Keys,
6 stainless screws, 1 alcohol
pad
Clean surface with alcohol
pad, let dry fully. Do not clean
with household cleaners!
Align adapter and pre-attach to bar with screws. This steps provides
for easy alignment and eliminates the need to measure from post
to post. Be sure to mark walls for desired height prior to pre-setting
to wall.
Carefully remove cover ring from each side. Foam ring will hold adapters
in place on wall and provide a border for the adhesive when inserted.
Press bar at desired location firmly for 5 seconds. Remove bar. Foam ring
will hold adapter in desired position
Pierce adhesive tube with red key and then slide tube end into slit in tube.
Insert tube end firmly into center hole in adapter and slowly insert
adhesive by turning red key. Continue until all three vent holes show a
white bead as pictured. Do not press on adapter after inserting glue.
Allow adhesive to cure for 24 hours
undisturbed. Important not to
disturb the adapter after inserting
glue.
After adhesive has cured for 24
hours, remove the three beads of
glue from the small vent holes
Attach bar to adapters using the screws included. Tighten firmly. Slide
cover ring over base and turn clockwise until properly aligned and turn
to lock in place. Job complete!
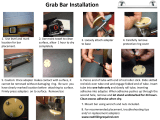
Grab Bar Installation Instructions (GB Series)

1. Use level and mark
location for bar
placement.
2. Use moist towel to clean
surface, allow 1 hour to dry
completely
3. Loosely attach adapter
to base
4. Carefully remove
protective ring cover
5. Caution: Once adapter makes contact with surface, it
cannot be removed without damaging ring. Be sure you
have clearly marked location before attaching to surface.
Firmly press adapters on to surface. Remove bar.
6. Pierce end of tube with end of red roller stick. Slide slotted
red stick over tube end and engage folded end of tube. Insert
tube into one hole only and slowly roll tube, inserting
adhesive into adapter. When adhesive pushes up through the
second hole, remove and let stand undisturbed for 24 hours.
Clean excess adhesive when dry.
7. Mount bar using wrench and nuts included.
8. For recommended placement, troubleshooting tips
and/ or replacement adapters:
www.nodrillingrequired.com
Assist Bar Installation

Shower Bar Installation
Step 1: Remove chrome cover cap from
each of the two chrome posts and carefully
loosen dual set screws
Step 2: Slide the adjustable holder onto
middle of the bar by squeezing the button.
Slide ends pieces onto bar and lightly
tighten dual set screws
Step 3: Position in shower to optimum
height and adjust chrome post to desired
position. Tighten dual set screws until firm
(do not over tighten)
Step 4: Clean surface with alcohol pad and
let dry completely. Do not use household
cleaners! Attach adapter to each end post
and peel and set in position. Unscrew
adapter and remove bar.
Step 5: Pierce adhesive tube with red key
and inject into one hole until it beads up
the opposite check hole. Let stand
undisturbed for 12 hours.
Step 6: Assemble bar to adapter and attach
the hand shower

Adapter Removal
• The nie wieder bohren adapter system can
be removed from any hard surface by
applying torsion
• Step 1 – Use a pair of adjustable grips and
firmly turn the adapter counterclockwise.
• Step 2 – Remove residual adhesive from
surface using a razor knife and wipe with
acetone remover as needed. For rough
surfaces a coarse brush can also be used
• Caution! Use care not to scar the surface
with the grips when removing the adapter
/