Page is loading ...

76669
A DIVISION OF DOUGLAS DYNAMICS, LLC
Vibrator Adapter Service Kit
Stainless Steel Hopper Spreaders
CAUTION
Read this document before installing the
Vibrator Adapter Service Kit.
CAUTION
Use standard methods and practices when
attaching spreader and installing accessories,
including proper personal protective safety
equipment.
WARNING
Do not exceed GVWR or GAWR ratings
as found on the driver-side vehicle door
cornerpost.
August 1, 2017
Lit. No. 76672, Rev. 01
INSTALLATION INSTRUCTIONS
1. Park the vehicle on a smooth, level, hard surface,
such as concrete. Turn the vehicle ignition to the
"OFF" position and remove the key.
2. Remove the 4 cap screws, at washers, and
locknuts attaching the vibrator to the hopper.
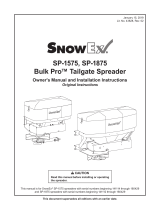
3. Position the supplied vibrator pad over the
mounting plate and reinstall the vibrator using
the supplied 3/8" x 2‑1/2" cap screws, 3/8" at
washers, and 3/8" locknuts. The cap screws with
washers must be inserted from the inside, with the
nuts on the outside, to avoid interference with the
conveyor chain.
3/8" Locknu
t
3/8" Flat
Washer
3/8" x 2-1/2"
Cap Screw
Vibrator
Vibrator Pad
Mounting Plate

76669
Lit. No. 76672, Rev. 01 2 August 1, 2017
The company reserves the right under its product improvement policy to change construction or design details and furnish equipment when
so altered without reference to illustrations or specications used. This equipment manufacturer or the vehicle manufacturer may require or
recommend optional equipment for spreaders. Do not exceed vehicle ratings with a spreader. The company offers a limited warranty for all
spreaders and accessories. See separately printed page for this important information.
Printed in U.S.A.
/