Page is loading ...

0UZ[Y\J[PVU4HU\HS
+=7<2
+=7,
+=+7SH`LY

Playable Disc / Supportive
Formats / Playback Functions
Safety Warnings
and Table of Contents
Product Overviews Connections System Set-up Troubleshooting
and Specification
GB-2
Safety Warnings
Read all the instructions carefully t
before using the unit and keep them
for future reference.
Retain the manual. If you pass the t
unit onto a third party make sure to
include this manual.
Check that the voltage marked on t
the rating label matches your mains
voltage.
Damage
Please inspect the unit for damage t
after unpacking.
Do not continue to operate the unit if t
you are in any doubt about it working
normally, or if it is damaged in any
way - switch o, withdraw the mains
plug and consult your dealer.
Location of Unit
The unit must be placed on a at t
stable surface and not subjected to
vibrations.
Do not place the unit on sloped or t
unstable surfaces as the unit may fall
o or tip over.
The mains socket must be located t
near the unit and should be easily
accessible.
This unit is designed for indoor use t
only.
Temperature
Avoid extreme degrees of t
temperature, either hot or cold. Place
the unit well away from heat sources
such as radiators or gas/electric res.
Avoid exposure to direct sunlight and t
other sources of heat.
Naked Flames
Never place any type of candle or t
naked ame on the top of or near the
unit.
Moisture
To reduce the risk of re, electric shock t
or product damage, do not expose
this unit to rain, moisture, dripping
or splashing. No objects lled with
liquids, such as vases, should be
placed on the unit.
If any liquid is split into the unit it can t
cause serious damage.
If you spill any liquid into the unit, t
switch it o at the mains immediately.
Withdraw the mains plug and consult
your dealer.
Ventilation
To prevent the risk of electric shock or t
re hazard due to overheating, ensure
that curtains and other materials do
not obstruct the ventilation vents.
Do not install or place this unit in t
a bookcase, built-in cabinet or in
another conned space. Ensure the
unit is well ventilated.
Safety
Always disconnect the unit from the t
mains supply before connecting/
disconnecting other devices or
moving the unit.
Unplug the unit from the mains socket t
during a lightning storm.
Mains Cable
Make sure the unit or unit stand is not t
resting on top of the mains cable, as
the weight of the unit may damage
the mains cable and create a safety
hazard.
If the mains cable is damaged it must t
be replaced by the manufacturer, its
service agent, or similarly qualied
persons in order to avoid a hazard.
Interference
Do not place the unit on or near t
appliances which may cause
electromagnetic interference. If you
do, it may adversely aect the working
of the unit, and cause a distorted
picture or sound.

Playable Disc / Supportive
Formats / Playback Functions
Safety Warnings
and Table of Contents
Product OverviewsConnectionsSystem Set-upTroubleshooting
and Specification
GB-3
Standby
The t
button on the remote
control does not switch o the unit
completely. The unit will continue to
draw electricity from the mains supply
while in standby. In the interests
of safety and to avoid unnecessary
energy consumption, never leave the
unit in standby while unattended for
long periods of time, e.g. overnight,
while on holiday or while out of the
house. Switch it o and disconnect the
mains plug from the mains socket.
Batteries
Batteries used in the remote control t
for this unit are easily swallowed by
young children and this is dangerous.
Keep loose batteries away from young t
children and make sure that the
battery holder tray is secure in the
remote control. Seek medical advice if
you believe a cell has been swallowed.
Please dispose of batteries correctly t
by following the guidance in this
manual.
Supervision
Children should be supervised to t
ensure that they do not play with the
unit and the remote control.
Never let anyone especially children t
push anything into the holes, slots or
any other openings in the case - this
could result in a fatal electric shock.
DVD
Class 1 Laser Productt
This unit utilizes a
laser. Use of controls,
adjustments or
performance of
procedures other than those specied
herein may result in hazardous
radiation exposure.
Before moving the unit, ensure the t
disc tray is empty.
Always remove the disc when the unit t
is not in use.
Failure to do so will risk severely t
damaging the disc and the unit.
Do not stack devices, heat from other t
devices may aect the performance of
the unit.
CAUTION
RISK OF ELECTRIC SHOCK
DO NOT OPEN
The lightning ash with
arrowhead symbol, within
an equilateral triangle,
is intended to alert the user to the
presence of uninsulated “dangerous
voltage” within the product’s
enclosure that may be of sucient
magnitude to constitute a rush of
electric shock.
The exclamation point
within an equilateral
triangle is intended to
alert the user to the presence of
important operating and maintenance
(servicing) instructions in the manual
accompanying the appliance.
Service
To reduce the risk of electric shock, do t
not remove screws. The unit does not
contain any user-serviceable parts.
Please leave all maintenance work to
qualied personnel.
Do not open any xed covers as this t
may expose dangerous voltages.
Maintenance
Ensure to unplug the unit from the t
mains socket before cleaning.
Do not use any type of abrasive pad t
or abrasive cleaning solutions as these
may damage the unit’s surface.
Do not use liquids to clean the unit.t
CLASS 1
LASER PRODUCT

Playable Disc / Supportive
Formats / Playback Functions
Safety Warnings
and Table of Contents
Product Overviews Connections System Set-up Troubleshooting
and Specification
GB-4
Electrical Information
Before using this appliance ensure that the voltage of your electricity supply is suitable
for that indicated on the rating plate of the appliance.
The ultimate disconnection from the power source is the mains plug. Always make
sure it is easily accessible to be unplugged in the event of an emergency.
This appliance is tted with a fused three pin mains plug to BS 1363 which will be
suitable for use in all houses tted with mains sockets to current specications.
If the tted mains plug is not suitable, remove the fuse and dispose of the mains plug
safely, immediately after removing it from the mains cable.
Fitting a new mains plug
If for any reason you need to t a new mains plug, the mains cable must be connected
as shown here. The wires in the mains cable tted to this appliance are coloured in
accordance with the following code:
If the colours of the wires in the mains
cable of this appliance do not correspond
with the coloured markings identifying
the terminals in your mains plug, proceed
as follows:
The wire which is coloured
The terminal marked E or coloured t
Green or Green/Yellow must not be
connected.
Blue: MUST be connected to the t
terminal which is marked with the letter
N (Neutral) or coloured Blue or Black.
Brown MUST be connected to the terminal which is marked with the letter L (Live) t
or coloured Brown or Red.
Before retting the mains plug cover, check that there are no cut or stray strands of
wire inside the mains plug. Only BSI or ASTA approved 3 Amp BS1362 fuses should be
used. If you are in any way unsure which mains plug or fuse to use, always refer to a
qualied electrician.
CONNECT GREEN AND YELLOW TO EARTH (E)
CONNECT
BLUE TO
NEUTRAL (N)
MAKE SURE THE OUTER
SHEATH OF THE MAINS
CABLE IS SECURELY HELD
BY THE CLAMP
CONNECT
BROWN TO
LIVE (L)
3 AMP FUSE
Class II construction double insulated. This product must not be connected to
earth.

Playable Disc / Supportive
Formats / Playback Functions
Safety Warnings
and Table of Contents
Product OverviewsConnectionsSystem Set-upTroubleshooting
and Specification
GB-5
Contents
Safety Warnings............................................................................................................2
Safety Information and Precaution ..............................................................................................2
Electrical Information .......................................................................................................................4
Contents ........................................................................................................................5
Unpacking the DVD Player ..........................................................................................7
Product Overview.........................................................................................................8
Front Panel ............................................................................................................................................8
Rear Panel..............................................................................................................................................9
Remote Control ................................................................................................................................10
Installating the Batteries ...............................................................................................................12
Handling the Remote Control.....................................................................................................13
Remote Control Operation Range.............................................................................................13
Connection................................................................................................................. 14
Connecting to a Devices with HDMI Cable ............................................................................14
Connecting to a TV with SCART Cable.....................................................................................14
Connecting to a Stereo System with an Audio Cable......................................................... 14
Connecting to the Mains Socket................................................................................................15
Compatible Disc Types .............................................................................................. 16
Start Up ...................................................................................................................... 17
Basic Playback............................................................................................................ 17
Basic Playback...................................................................................................................................17
Stop Playback....................................................................................................................................17
Previous and Next............................................................................................................................17
Fast Forward and Fast Reverse.................................................................................................... 18
Pause Playback ................................................................................................................................. 18
Single Step Playback.......................................................................................................................18
Volume Adjustment........................................................................................................................18
Advanced Playback ................................................................................................... 19
DVD/USB............................................................................................................................................. 19
Search .................................................................................................................................................. 19
Program...............................................................................................................................................19
OSD....................................................................................................................................................... 19

Playable Disc / Supportive
Formats / Playback Functions
Safety Warnings
and Table of Contents
Product Overviews Connections System Set-up Troubleshooting
and Specification
GB-6
Title .......................................................................................................................................................20
Subtitle Language ........................................................................................................................... 20
Repeat..................................................................................................................................................20
A-B Repeat..........................................................................................................................................20
Clear......................................................................................................................................................20
Zoom....................................................................................................................................................20
Angle....................................................................................................................................................21
Audio Channel..................................................................................................................................21
JPEG Disc Playback.......................................................................................................................... 21
USB Function..................................................................................................................................... 21
System Setup ............................................................................................................. 22
General Setup Page ........................................................................................................................ 22
Audio Setup Page............................................................................................................................23
Dolby Digital Setup Page.............................................................................................................. 24
Video Setup Page.............................................................................................................................25
HDMI Setup Page.............................................................................................................................26
Preference Setup Page...................................................................................................................26
Maintenance .............................................................................................................. 28
Troubleshooting ........................................................................................................ 29
Specications............................................................................................................. 30

GB-7
Playable Disc / Supportive
Formats / Playback Functions
Safety Warnings
and Table of Contents
Product OverviewsConnectionsSystem Set-upTroubleshooting
and Specification
0UZ[Y\J[PVU4HU\HS
+=7<2
+=7,
+=+7SH`LY
Remote Control
Part number
1-3000-A602-0000-R
DVD Player
Instruction Manual
Part number
1-3090-A602-0000-R
Quick Start Guide
Part number
1-3010-A599-0000-R
If items are missing or damaged, please contact Partmaster (UK only).
Tel: 0870 6001 338 for assistance.
Unpacking the DVD Player
Remove all packaging from DVD Player. Retain the packaging. If you dispose it please
do so according to local regulations.
12
3
4
5
6
789
0 10+

GB-8
Playable Disc / Supportive
Formats / Playback Functions
Safety Warnings
and Table of Contents
Product Overviews Connections System Set-up Troubleshooting
and Specification
STANDBY/ON
USB
PLAY/PAUSE STOP
Product Overview
Front Panel
12 3 4 5 6 7 89
No Control Function
1 STANDBY/ON button Turn the power on or restores the DVD player to
standby mode.
2 Power Indicator Illuminate green when the DVD player is power on.
Illuminate red when the DVD player is in standby
mode.
3 Disc Tray Load a disc into the disc drive.
4
OPEN/CLOSE button
Open and close the disc tray.
5 LED Screen Show information about the current status of the
DVD player.
6 Remote Control Sensor Receive infrared signals from the remote control.
7 USB Interface Allow connection for a USB Flash Drive.
8 PLAY/PAUSE button Start playback/Stop playback momentarily
9 STOP button Stop playback

GB-9
Playable Disc / Supportive
Formats / Playback Functions
Safety Warnings
and Table of Contents
Product OverviewsConnectionsSystem Set-upTroubleshooting
and Specification
Rear Panel
123
4
L
R
2-CH AUDIO OUT
RISK OF ELECTRIC SHOCK
DO NOT OPEN
2
U.S. Patent Nos. 6,836,549; 6,381,747; 7,050,698;
6,516,132; and 5,583,936.
Dolby and the double-D symbol are registered
trademarks of Dolby Laboratories.
CLASS 1 LASER PRODUCT
DVD PLAYER
110V-240V~ 50/60Hz
HDMI
MODEL: DVP435U AC: 110V-240V~ 50/60Hz
POWER: 12WS/N:
SCART OUTPUT
No Control Function
1 Power Line Input Connect the supplied mains cable to the mains
socket.
2 HDMI Output Connect to a TV, a monitor or an AV amplier
equipped with a HDMI input terminal.
3 2 Channels Audio Output Connect to a stereo system equipped with an
AUDIO input terminal.
4 SCART Output Connect to a TV or a monitor equipped with a
composite video input terminal.

GB-10
Playable Disc / Supportive
Formats / Playback Functions
Safety Warnings
and Table of Contents
Product Overviews Connections System Set-up Troubleshooting
and Specification
Remote Control
SEARCH
REPEAT A-B RPT
MENU
CLEA ANGLER
VOLUME
MUTEAUDIO
F.F W DF.REV NEXTPREV
ZOOM
SETUP
12
3
4
5
6
789
010+
SUBTITLE
OSD
PROG
TITLE
STOPPAUSE/STEP
/
DVD/USB
No Control Function
1 OPEN/CLOSE
To open or close the DVD disc tray.
2 DVD/USB To switch between DVD and USB as the input source.
3 OSD (On screen
Display)
To display information of the disc.
4 SUBTITLE To switch between dierent subtitle languages. (Available
languages depend on the DVD features)
116
17
21
18
20
22
23
25
24
26
27
19
2
3
4
7
9
10
11
14
5
12
6
15
13
8

GB-11
Playable Disc / Supportive
Formats / Playback Functions
Safety Warnings
and Table of Contents
Product OverviewsConnectionsSystem Set-upTroubleshooting
and Specification
No Control Function
5 TITLE To go back to previous menu or show title menu.
6 SEARCH To search and start playback from selected point on the disc.
7 REPEAT To select between dierent repeat modes – REPEAT
CHAPTER, REPEAT TITLE, REPEAT ALL.
8 A-B RPT To repeat playback between 2 particular points on a disc.
9 SETUP To display the Setup Menu of the DVD.
10
ENTER/PLAY
To conrm the selection or play the DVD disc.
11 ZOOM To enlarge the picture on the TV.
12 F.REV
To fast reverse during playback.
13 F.FWD
To fast forward during playback.
14 PAUSE/STEP
/
To play or move the playback forward frame by frame.
15 STOP
To stop the playback.
16
STANDBY
Turn the power on or restores the DVD player to standby
mode.
17 0–10+ To select the numeric items in a menu.
18 ANGLE To switch / change the camera angle during playback. (If it is
available in the DVD features)
19 CLEAR To clear and cancel the previous input information.
20 MENU To enter or exit the disc contents menu.
21 CURSOR
To move up, down, left and right in Setup Menu
/ Start the forward and reverse search during playback.
/ Allow slow forward and backward during playback.
22 PROG To program and view the selected starting point of a chapter
and title in DVD disc.
23
NEXT
To skip to next title, chapter or track.
24
PREV
To return back to previous title, chapter or track.
25 MUTE To mute and restore your DVD sound output.
26 AUDIO To change the audio mode.
27 VOLUME +/– To increase and decrease volume.

GB-12
Playable Disc / Supportive
Formats / Playback Functions
Safety Warnings
and Table of Contents
Product Overviews Connections System Set-up Troubleshooting
and Specification
Installating the Batteries
Press and lift the back cover up to open the battery 1.
compartment of the remote control.
Insert two AAA size batteries (not supplied). 2.
Close the battery compartment cover.3.
Handling the Batteries
Improper or incorrect use of batteries may cause corrosion or battery leakage, which t
could cause re, personal injury or damage to property.
When the batteries are exhausted, the remote will not function. Replace both t
batteries at the same time with new ones.
Use only the types of the batteries which are indicated in this manual.t
Do not install new batteries with used one and do not mix dierent types of t
batteries.
Do not dispose of the used batteries as domestic waste. Dispose of them in t
accordance with the local regulations.
Danger of explosion if battery is incorrectly replaced.
Replace only with the same or equivalent type.
Install the batteries correctly by following the polarity
(+ and -) indications in the battery compartment.

GB-13
Playable Disc / Supportive
Formats / Playback Functions
Safety Warnings
and Table of Contents
Product OverviewsConnectionsSystem Set-upTroubleshooting
and Specification
Handling the Remote Control
Take care of your ngernails when you press and hold the battery release tab.t
To avoid possible failure, read the following instructions and handle the remote t
control properly.
Do not drop or cause impact to the remote control.t
Do not spill water or any liquid on the remote control.t
Do not place the remote control on a wet object.t
Do not place the remote control under direct sunlight or near sources of excessive t
heat.
Remove the batteries from the remote control when not to be in use for a long t
period of time, as it could cause corrosion or battery leakage and may result in
physical injury and/or property damage including re.
Remote Control Operation Range
Point the remote control at the DVD player no more than 6 metres from the remote
control sensor and within 60° of the front of the DVD player. The operating distance
may vary depending on the brightness of the room.
67$1'%< 21
PLAY/ PAUSE STOP
USB
Within about 6 m
IR
SEARCH
REPEAT A-B RPT
MENU
CLEAR PAL/NTSC
SETUP
12
3
4
5
6
789
0 10+
SUBTITLE
OSD
TITLE
DVD/USB

GB-14
Playable Disc / Supportive
Formats / Playback Functions
Safety Warnings
and Table of Contents
Product Overviews Connections System Set-up Troubleshooting
and Specification
L
R
2-CH AUDIO OUT
RISK OF ELECTRIC SHOCK
DO NOT OPEN
2
U.S. Patent Nos. 6,836,549; 6,381,747; 7,050,698;
6,516,132; and 5,583,936.
Dolby and the double-D symbol are registered
trademarks of Dolby Laboratories.
CLASS 1 LASER PRODUCT
DVD PLAYER
110V-240V~ 50/60Hz
HDMI
MODEL: DVP435U AC: 110V-240V~ 50/60Hz
POWER: 12WS/N:
SCART OUTPUT
To SCART input
Television
Stereo system
/+40JHISL
:*(9;JHISL
(<+06JHISL
;V:*(9;V\[W\[
2
1
3
Connections
1. Connecting to a Devices with a HDMI Cable
Use the HDMI cable (not supplied) to connect between DVD player’s HDMI OUT and
TV’s HDMI IN.
2. Connecting to a TV with a SCART Cable
Use the SCART cable (not supplied) and connect between DVD player’s SCART OUT
and TV’s SCART IN.
3. Connecting to a Stereo System with an Audio Cable
Use the audio cables (not supplied) to connect AUDIO OUT (L/R) socket of the DVD
player to AUDIO IN on the Stereo System. (Audio Left = White; and Audio Right = Red)
If your DVD player will not be connected to the stereo system or AV receiver to hear better
sound quality, either SCART or HDMI connection is sufcient for both audio and video
connections between the DVD player and TV.

GB-15
Playable Disc / Supportive
Formats / Playback Functions
Safety Warnings
and Table of Contents
Product OverviewsConnectionsSystem Set-upTroubleshooting
and Specification
Connecting to the Mains Socket
After all connection are properly completed, 1.
connect the mains cable into the mains socket.
Never make or change any connections when the
DVD player are connected to the mains socket.
Press the 2. STANDBY/ON button on the DVD
player or the
button on the remote control to
turn the DVD player on.
When the DVD player is power on and there is no 3.
disc in it, the display panel will show “NONE” to
indicate there is no disc in the DVD Player.
For DVP435UK
For DVP435E

GB-16
Playable Disc / Supportive
Formats / Playback Functions
Safety Warnings
and Table of Contents
Product Overviews Connections System Set-up Troubleshooting
and Specification
Compatible Disc Types
Disc Types Disc Logo Recorded Content
DVD-VIDEO (Digital Versatile Disc)
AUDIO + VIDEO
DVD±RW (Audio/Video format or JPEG les)
DVD+ReWritable
AUDIO + VIDEO + JPEG
DVD±R (DVD Recordable - Audio/Video
format or JPEG les)
DVD+R
AUDIO + VIDEO + JPEG
CD-R (CD Recordable - Audio/Video format
or JPEG les)
AUDIO + VIDEO + JPEG
CD-RW (CD-Rewritable - Audio/Video
format or JPEG les)
AUDIO + VIDEO + JPEG
AUDIO-CD (Compact Disc Digital Audio)
AUDIO
Supported Formats
JPEG
Pictures encoding must comply with ISO format.t
This DVD player can only display DCF-standard still pictures or JPEG pictures such as t
TIFF.
Some recorded les may not be able to be played due to the type and format
of disc or condition of the recording.
Region Code
Both the DVD player and the discs are coded
by region. These regional codes must match in
order to play the disc. If the codes do not match,
the disc will not play.
The Region Number for this DVD player is
described on the rear panel of the DVD player.
Disc Type DVD-VIDEO
Region code

GB-17
Playable Disc / Supportive
Formats / Playback Functions
Safety Warnings
and Table of Contents
Product OverviewsConnectionsSystem Set-upTroubleshooting
and Specification
Start Up
Press the STANDBY/ON button on the DVD player or remote control. Turn on the TV
and select the video input connected to the DVD player.
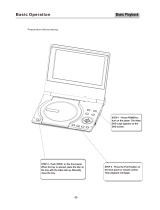
Basic Playback
Press the 1. OPEN/CLOSE button to open the disc tray, place a disc into the disc
tray with the label facing up.
For double-sided disc, load the side which you want to play facing down.t
There are two dierent disc sizes. Place the disc in the correct guide on the disc t
tray. If the disc is out of the guide, it may damage the disc and cause the DVD
player to malfunction.
Do not place a disc which is unplayable in this DVD player.t
Press the 2. OPEN/CLOSE
button to close the disc tray, the playback will
automatically start.
Some discs may not playback automatically, you can press the t ENTER/PLAY
button to start playback.
Depending on the disc, a menu may appear on the TV screen by pressing the 3.
MENU button. Press the
buttons on the remote control to select menu
options and press the ENTER/PLAY
button to start, or press digits to select a
menu options directly.
Stop Playback
Press the 1. STOP button to go to pre-stop mode, the TV screen will display
“Press Play Key to Continue”. As some disc the unit can recall the location where
stopped, such as DVDs and audio CDs.
Press the 2. ENTER/PLAY
button to playback to resume playback from the
location where playback is stopped or from the beginning of the disc.
Press the 3. STOP
button twice to stop completely.
Previous and Next
During playing, press the 1. PREV button will go to the start of the previous
chapter. Each press of this button will skip a chapter until the start of the disc.
Each press of the 2. NEXT
button during playing will skip the current chapter
and play the next one.

GB-18
Playable Disc / Supportive
Formats / Playback Functions
Safety Warnings
and Table of Contents
Product Overviews Connections System Set-up Troubleshooting
and Specification
Fast Forward and Fast Reverse
Press the 1. F.FWD button to fast forward through the disc. Each time the F.FWD
button is pressed, the fast forward motion speed changes.
Press the 2. ENTER/PLAY
button to resume normal playback.
Press the 3. F.REV
button to fast reverse through the disc. Each time the F.REV
button is pressed, the fast reverse motion speed changes.
Press the 4. ENTER/PLAY
button to resume normal playback.
Pause Playback
Press the 1. PAUSE/STEP
/
button to pause playback (still mode). The sound will
be muted during still mode.
Press the 2. ENTER/PLAY
button to resume normal playback.
Single Step Playback
Press the 1. PAUSE/STEP
/
button repeatedly during PAUSE mode to play in
step.
Press the 2. ENTER/PLAY
button to resume normal playback.
Volume Adjustment
Press the 1. VOL +/- button to adjust the volume.
Press the 2. MUTE button to switch the sound o. Press the MUTE button again or
the VOL +/- button to cancel this function.
“ ” may appear on the TV screen during operation. “ ” means that the
operation is not permitted by the DVD Player or the disc.
The DVD Player will switch to screen saver mode after idle for sometime. Press
any button to exit the screen saver.

GB-19
Playable Disc / Supportive
Formats / Playback Functions
Safety Warnings
and Table of Contents
Product OverviewsConnectionsSystem Set-upTroubleshooting
and Specification
Please do not pull out the USB when reading in order to avoid
damage to your USB device.
If no USB device is connected, detecting USB will show “EMPTY”.
If a USB device is detected, “USB1” will be displayed after “USB” is
selected.
Advanced Playback
The following functions are applicable only to DVD discs. If other disc formats are
played, the screen display and operation will be dierent.
DVD/USB
Press 1. DVD/USB button to display the screen menu.
Press the 2.
buttons on the remote control to navigate in the menu, and then
press the ENTER/PLAY
button to make your selection.
Search
Press the 1. SEARCH button once, and the screen will display the search menu.
Press the 2.
buttons to select item that you want, then press the
ENTER/PLAY
button to conrm.
Program
Press the 1. PROG button and the screen will display the info window.
Press the 2. 0-10+ buttons to input the desired chapter and title (for DVD movie) or
track number (for Audio CD).
Press the 3.
buttons to select the START logo and press the
ENTER/PLAY
button to play. At this time the DVD player will start program
playback and the screen will display the “PROGRAM” logo.
Press the 4. STOP
button twice or press the PROG button again and select the
STOP
button if you want to cancel this function.
OSD
Press the OSD button and the screen will display some information about disc, such
as: “Title Elapsed”, ”Title Remain”, ”Chapter Elapsed”, ”Chapter Remain” and ”Display
O”.

GB-20
Playable Disc / Supportive
Formats / Playback Functions
Safety Warnings
and Table of Contents
Product Overviews Connections System Set-up Troubleshooting
and Specification
Title
With some DVD discs, press the TITLE button to display the title menu, you can
press digits to select the chapters preferred. Press the ENTER/PLAY
button to play.
(Depending on the DVDs)
Subtitle Language
Press the 1. SUBTITLE button repeatedly to switch between dierent subtitle
languages that are available in the disc.
The screen will display “SUBTITLE 01/XX XXXXX”, where “01” indicates the ordinal 2.
number of this language; “XX” indicates total number of language; “XXXXXX”
indicates the name of the selected language. (The number of language depends
on disc).
Repeat
Press the REPEAT button repeatedly to select dierent repeat modes.
Press Once
Chapter (Repeat Chapter)
Press Twice
Title (Repeat Title)
Press Three Times
All (Repeat All)
Press Four Times All repeat functions are cancelled
A-B Repeat
Repeat a section between points A and B within a Title / Chapter / Track.
Press the 1. A-B RPT button to choose a starting point A.
Press the 2. A-B RPT button again to set an ending point B and complete the
setting.
The selected section A-B will be repeated. Press the 3. A-B RPT button the third time
to cancel and exit.
Clear
Press the CLEAR button during information input can cancel the previous input.
Zoom
Press the 1. ZOOM button to enlarge pictures. Each time the ZOOM button is
pressed, the picture enlarges in sequence.
Press the 2.
buttons to navigate in the enlarged picture.
/