
User Manual
Wireless
Flash
Transceiver
V6

2
Table of Contents
1. Getting to Know the Cactus V6 4
2. Cautions and Warnings 7
3. Major Specif ications 8
4. Package Contents 9
5. Nomenclature 10
6. LCD Panel 12
7. Co mpatibility 13
8. TTL Pass-through 17
9. Getting Started 19
10. Flash Prof ile: 29
Choosing, Learning, and Copying
11. Flash Triggering 37
12. Remote Manual Power Control 39

3
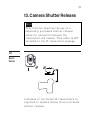
13. Camera Shutter Release 49
14. Advanced Operations 54
15. Personalizing the V6 59
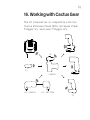
16. Working with Cactus Gear 63
17. LED Signal Guide 68
18. USB Connection 69
19. Optional Accessories 71
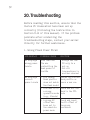
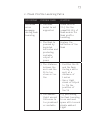
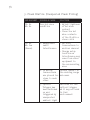
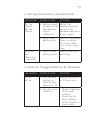
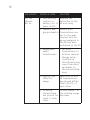
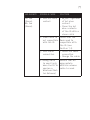
20. Troubleshooting 72
21. Notices 78
22. Warranty 81

4
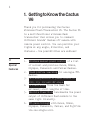
1. Getting to Know the Cactus
V6
Thank you for purchasing the Cactus
Wireless Flash Transceiver V6. The Cactus V6
i s a m u lt i f u n cti o n a l wi r ele s s a s h
transceiver that allows you to command
different brands’ ashes off camera with
remote power control. You can position your
lights at any angle, direction, and
distance — the possibilities are endless!
1. Wireless manual power control of a list
of current and previous Canon, Nikon,
Ol y m p u s, P a n a s o n i c a n d P e n t a x a s h e s.
2. Flash prof ile learning for analogue-TTL
ashes.
3. Full manipulation of power levels to
1/10, 1/3, 1/2 and 1EV steps.
4. Lo Power mode f ires the ash for
extremely short lengths of time.
5. Absolute Power Mode benchmarks the power
output of different ash models to the
same light intensity.
6. TTL pass-through with Canon, Nikon,
Olympus, Panasonic, Pentax, and Fujif ilm
via one single unit.
1.1
Special
Features

5
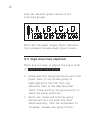
7. Built-in optical trigger enables
pre-ash triggering.
8. Group control allows you to control up to
four groups.
9. Relay mode triggers the camera shutter
a n d a s h i n s y n c.
10. Delay timer is conf igurable from
1 millisecond to 10 seconds.
11. Min i-USB port for optional power supply
and f irmware updates.
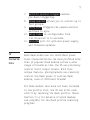
Each ash model has its individual power
level characteristics. We have prof iled more
than 30 popular ash models across a wide
range of brands so that the V6 can precisely
control their output levels. With this
unique feature, photographers can remotely
control the ash power of various ash
models, even of different brands!
F o r a s h m o d el s t h at h av e n o t b e e n i n c lu d e d
in the prof ile list, the V6 can still work
with it by learning its ash prof ile. Check
S e c t i o n 7.1.3 f o r d e t a il s of w h i c h a s h e s
are eligible for the ash prof ile learning
program.
1.2
Cactus V6
Core

6
Whether built-in or obtained from the
learning program, the ash prof ile stored
i n t h e V6 c a n v i r tu a l l y c o m m a n d t h e a s h t o
produce ANY power level within the maximum
o u t p u t, a n d e v e n e x c e e d s w h at t h e a s h m e n u
allows you to do:
1. Finer increment scales: The V6 can
adjust the power level of ash to 1/10 EV
step, a much f iner increment level than
t h e a s h m e n u it s e lf a ll o w s (s e e
Section 12.3 for setting up the EV step).
2. Extremely short f iring time: In Lo Power
mode, the V6 can f ire ashes for very
short lengths of time at extremely low
power levels (roughly equal to 1/256),
which is beyond the standard ash power
r a n g e (s e e S e c tio n 1 2.4 f o r e n a bli n g t h e
Lo Power output).
3. Unif ied power level scale for different
a s h m o d el s: T h e V 6 b e n c h m a r k s t h e l i g h t
intensity output of different ash
models in your set up and commands them
to f ire at the same power scale (see
Section 12.2 for adjusting absolute
p o w e r).
Ready to go? Let’s get on board and see what
the V6 can do!

7
2. Cautions and Warnings
Before using your V6, read the following
safety precautions to ensure correct and
safe use:
1. Turn OFF all your equipment (e.g., Cactus
units, ash units, cameras, etc.) before
changing batteries or making
connections. Observe the correct
polarity when changing batteries. There
is a danger of explosion if the batteries
are installed incorrectly.
2. Switch off the transceiver and remove
batteries during storage.
3. Do not permanently store the product in
a high temperature environment (i.e.,
under strong direct sunlight, near
cooking stoves/oven).
4. The Cactus V6 should never be
submerged in liquid or exposed to heavy
rain unless it is properly protected.
5. Do not operate the device in the presence
of a m m a b le g a s e s or f u m es.
6. Do not dissemble.
7. Do not crush and do not expose the V6 to
any shock or force such as hammering,
dropping, or stepping on it.

8
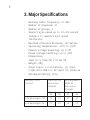
3. Major Specifications
• Working radio frequency: 2.4 GHz
• Number of channels: 16
• Number of groups: 4
• Support sync speed up to 1/1,000 second
(subject to camera’s sync speed
limitation)
• Maximum effective distance: 100 meters
• Operating temperature: -20°C to +50°C
• Camera voltage handling: up to 6V
• Flash voltage handling: up to 300V
• Dimensions:
72 m m (L) x 72 m m (W) x 42 m m (H)
• Weight: 68g
• Power input: 2 x AA battery, 3V, 50mA,
0.15W; mini USB 2.0, DC input 5V, 500mA~1A
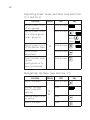
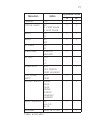
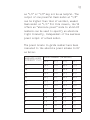
• Estimated battery life:
Battery life
(h o u rs)
Alkaline AA
Batteries
1000mAh
Rechargeable
Ni M H A A
Batteries
2500mAh
TX RX TX RX
LCD Backlight Off 40 21 67 34
LCD Backlight On 25 17 36 25

9
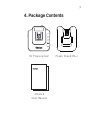
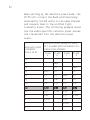
4. Package Contents
Album &
User Manual
Flash Stand FS-2V6 Transceiver

10
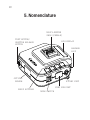
5. Nomenclature
LCD DISPLAY
M U LTI-SYSTE M
SHOE (FEMALE)
X-SYNC PORT
MINI USB PORT
M O D E S W I T C H
OPTICAL
SENSOR
LANYARD
LOOP
TEST BUTTON/
SHUTTER RELEASE
BUTTON
GROUP BUTTONS

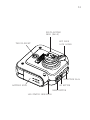
11
M U LTI-SYSTE M
SHOE (MALE)
HOT SHOE
LOCK LEVER
BATTERY DOOR
TRIPOD MOUNT
LED STATUS INDICATOR
MENU BUTTON
OK BUTTON
SELECTION DIAL

12
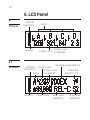
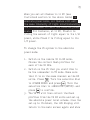
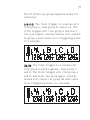
6. LCD Panel
BATTERY
INDICATOR
CHANNEL
GROUP
POWER LEVEL
POWER LEVEL
INCREMENT
WIRELESS
SENSITIVITY
CHANNEL
BATTERY
INDICATOR
6.1
TX mode
6.2
RX mode
GROUP
POWER LEVEL
POWER LEVEL
INCREMENT
SELECTED FLASH PROFILE
DELAY TIMER RELAY MODE
INDICATOR
SLAVE M ODE
INDICATOR

13
7. Compatibility
The Cactus V6 is both a wireless ash
trigger and wireless remote control. While
it triggers both portable ashes and studio
strobe lights, it also supports remote
c o nt r ol fe a t u r e s w it h s e l e ct e d a s h m o d e l s.
7.1.1 Cactus RF60
With the built-in Cactus V6 module, the
Cactus RF60 can be remotely commanded and
triggered by V6 TX (see Section 16.1.1).
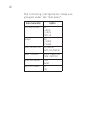
7.1.2 Flash Models with a Pre-installed Prof i le in
the Cactus V6
The Cactus V6 can remotely control the
fo l l o w i n g p o r t a ble a s h m o d el s:
7.1
Flash &
Studio
Strobes

14
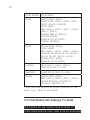
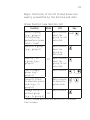
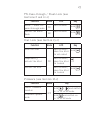
FLASH SYSTEM FLASH MODEL
CANON CACTUS AF45C, AF50C;
CANON 320EX, 420EX, 430EX*, 430EZ,
540EZ, 580EX*, 600EX-RT;
GOD OX V860C;
METZ 36AF-5, 44AF-1, 50A F-1, 52A F-1,
58AF-1, 58AF-2;
NISSIN Di866 II, MG8000;
PHOTTIX MITROS;
SIGMA EF-500 DG SUPER;
YONGNUO YN568EX*;
NIKON CACTUS AF45N, AF50N;
GO DOX V860N;
METZ 36AF-5, 44AF-1, 50AF-1, 58AF-2;
NIKON SB-24, SB-28, SB-500, SB-600,
SB-700, SB-800, SB-900, SB-910;
NISSIN Di700, D i866;
SIGMA EF-530 DG SUPER;
OLYMPUS METZ 44AF-1, 52AF-1, 58AF-2;
OLYMPUS FL-36R, FL-50R;
PANASONIC PANASONIC FL-360R, FL-500R;
PENTAX CACTUS AF45P, AF50P;
METZ 36AF-5, 44AF-1, 50AF-1, 58AF-2;
PENTAX AF360FGZ, AF360FGZ II,
AF540FGZ, AF540FGZ II;
* prof iles working with different versions of the
m o d e l (e.g ., 58 0 E X II a n d 5 80 E X)
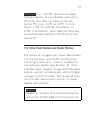
7.1.3 Flash Models with Analogue TTL Mode
The Cactus V6 can learn the prof iles of
other ash models that come with an analogue

15
TTL mode, i.e., the TTL operated analogue
q u e n c h si g n a ls. I f y o u r a s h e s c o m e w it h a
TTL mode that does not have an initial
b ef o r e T T L (e.g., E - T T L o r E - T T L I I f r o m
Canon, i-TTL or i-TTL BL from Nikon, or
P-TTL from Pentax), their ash prof iles may
be learned and remotely controlled by the
Cactus V6.
7.1.4 Other Flash Models and Studio Strobes
The Cactus V6 triggers all other ash models
via the hot shoe, and studio strobes with
the PC sync male port, 3.5mm or 6.35mm port
v i a o p tio n a l c a bl e s (s e e S e c tio n 19). T h i s
includes high trigger voltage portable ash
models, and all strobe models with a trigger
voltage of 300V or under. The Cactus V6 does
not provide remote power control of these
a s h e s a n d st r o b e s.
Caution:
Flashes or strobes with reversed polarity
connectors DO NOT WORK with the Cactus V6.

16
The Cactus V6 works with practically all
cameras that come with either (1) a standard
IS O h o t s h o e, o r (2) a f e m a l e s y n c p or t
connection.
To use the V6 as a wireless shutter release,
specif ic shutter cables are required. For
the list of optional accessories, see
Se ction 19.
7.3.1 Cactus V5 and LV5
The Cactus V6 is compatible with the
Wireless Flash Transceiver V5 and Laser
Trigger LV5. See Section 16.2 for details.
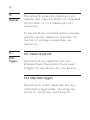
7.3.2 Other Flash Triggers
The Cactus V6 is NOT compatible with any
other ash trigger model, including the
Cactus V2, Cactus V2s, and Cactus V4.
7.3
Flash
Triggers
7.2
Cameras

17
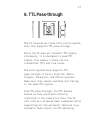
8. TTL Pass-through
The V6 transceiver comes with a multi-system
shoe that supports TTL pass-through.
While the V6 does not transmit TTL signal
wirelessly, it is designed to pass TTL
signal from camera to ash via the
transmitter (TX) and vice versa.
The multi-system shoe supports TTL
pass-through of Canon, Fujif ilm, Nikon,
Olympus, Panasonic, and Pentax systems.
Make sure that camera and ash unit belong
to the same TTL system.
Wit h T T L p a s s -t h r o u g h, t h e T T L a s h e s
behave as they would when directly
connected to the camera hot shoe. The V6
will work as a wireless ash commander while
s u p p o r t i n g a l l t h e a u t o m a ti c f e a t u r e s (e.g.,
automatic ash output via TTL metering,

18
AF assist light, second curtain sync, high
speed sync/FP shutter) provided by the TTL
ash system.
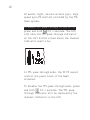
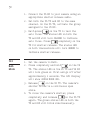
To enable TTL pass-through in the V6 TX,
press and hold for 2 seconds. The LCD
will show the TTL pass-through indicator
at the left bottom corner where the channel
indicator used to be.
In TTL pass-through mode, the V6 TX cannot
control the power level of the ash
attached.
To disable the TTL pass-through mode, press
and hold for 2 seconds. The TTL pass-
through indicator will be replaced by the
channel indicator on the LCD.

19
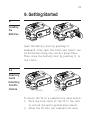
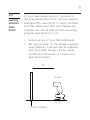
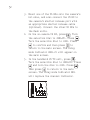
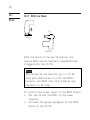
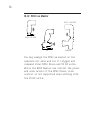
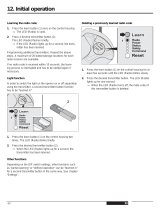
9. Getting Started
Open the battery door by pushing it
backward. Flip open the latch and insert two
AA batteries using the correct polarities.
Then close the battery door by pushing it to
the f r ont.
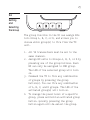
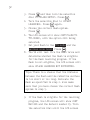
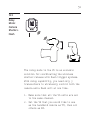
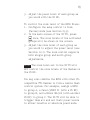
To mount the V6 on a camera’s hot shoe mount:
1. Turn the lock lever of the V6 to the left
t o u n l o c k t h e m u lti- s y st e m s h o e (m a le).
2. Slide the V6 into the camera’s hot shoe.
9.1
Installing
the
Batteries
9.2
Attaching
to and
from the
Camera
UNLOCK
LOCK
Detaching

20
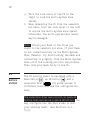
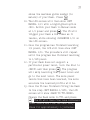
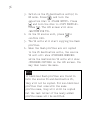
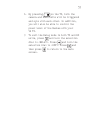
3. Turn the lock lever of the V6 to the
right to lock the multi-system shoe
(m a l e).
4. When detaching the V6 from the camera’s
hot shoe, turn the lock lever to the left
t o u n l o c k t h e m u lti- s y st e m s h o e (m a le).
Otherwise, the multi-system shoe (male)
may be damaged.
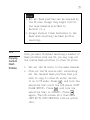
Note: At t a c h y o u r a s h t o t h e V 6 a s y o u
would to the camera’s hot shoe. If your ash
is not locked securely on the Multi-System
S h o e (fe m a l e), t r y h a lf-lo c k i n g t h e a s h a n d
retracting it slightly from the Multi-System
Shoe until the locking pin hits the pinhole.
T h e n lo c k y o u r a s h f u l l y t o t h e V 6.
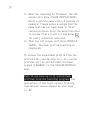
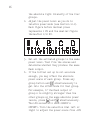
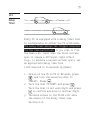
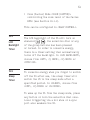
The V6 control panel is equipped with a
Menu button , an OK button , and a
selection dial for quick access to
different functions and the conf iguration
menu.
The selection dial has a built-in push-in
button that serves as a quick OK button. You
may conf igure how the dial works to suit
y o u r w o r k i n g h a bit. (s e e S e c tio n s 15.1 -
15.3).
9.3
Buttons
and Dial
Page is loading ...
Page is loading ...
Page is loading ...
Page is loading ...
Page is loading ...
Page is loading ...
Page is loading ...
Page is loading ...
Page is loading ...
Page is loading ...
Page is loading ...
Page is loading ...
Page is loading ...
Page is loading ...
Page is loading ...
Page is loading ...
Page is loading ...
Page is loading ...
Page is loading ...
Page is loading ...
Page is loading ...
Page is loading ...
Page is loading ...
Page is loading ...
Page is loading ...
Page is loading ...
Page is loading ...
Page is loading ...
Page is loading ...
Page is loading ...
Page is loading ...
Page is loading ...
Page is loading ...
Page is loading ...
Page is loading ...
Page is loading ...
Page is loading ...
Page is loading ...
Page is loading ...
Page is loading ...
Page is loading ...
Page is loading ...
Page is loading ...
Page is loading ...
Page is loading ...
Page is loading ...
Page is loading ...
Page is loading ...
Page is loading ...
Page is loading ...
Page is loading ...
Page is loading ...
Page is loading ...
Page is loading ...
Page is loading ...
Page is loading ...
Page is loading ...
Page is loading ...
Page is loading ...
Page is loading ...
Page is loading ...
Page is loading ...
Page is loading ...
Page is loading ...
-
 1
1
-
 2
2
-
 3
3
-
 4
4
-
 5
5
-
 6
6
-
 7
7
-
 8
8
-
 9
9
-
 10
10
-
 11
11
-
 12
12
-
 13
13
-
 14
14
-
 15
15
-
 16
16
-
 17
17
-
 18
18
-
 19
19
-
 20
20
-
 21
21
-
 22
22
-
 23
23
-
 24
24
-
 25
25
-
 26
26
-
 27
27
-
 28
28
-
 29
29
-
 30
30
-
 31
31
-
 32
32
-
 33
33
-
 34
34
-
 35
35
-
 36
36
-
 37
37
-
 38
38
-
 39
39
-
 40
40
-
 41
41
-
 42
42
-
 43
43
-
 44
44
-
 45
45
-
 46
46
-
 47
47
-
 48
48
-
 49
49
-
 50
50
-
 51
51
-
 52
52
-
 53
53
-
 54
54
-
 55
55
-
 56
56
-
 57
57
-
 58
58
-
 59
59
-
 60
60
-
 61
61
-
 62
62
-
 63
63
-
 64
64
-
 65
65
-
 66
66
-
 67
67
-
 68
68
-
 69
69
-
 70
70
-
 71
71
-
 72
72
-
 73
73
-
 74
74
-
 75
75
-
 76
76
-
 77
77
-
 78
78
-
 79
79
-
 80
80
-
 81
81
-
 82
82
-
 83
83
-
 84
84


Cactus Laser Trigger LV5 User manual
- Type
- User manual
- This manual is also suitable for
Ask a question and I''ll find the answer in the document
Finding information in a document is now easier with AI
Related papers

Other documents
-
Champion W036 Wireless Remote Control User manual
-
 Direct Drive 4054V002 Installation guide
-
Kogan PPCCTSCRSMA User guide
-
Cheetah V860 User manual
-
 Neewer 10036052 User guide
-
Insignia NS-NIKTTL Quick setup guide
-
-
Godox XT32C Owner's manual
-
Olympus FL-50R Shoe Mount Flash User manual
-
 Big Lots 810573547 User manual


