Page is loading ...

— 1 —
Aquatic • 8101 E. Kaiser Blvd. • Anaheim, CA 92808 • (800) 877-2005 • FAX (714) 998-5340 • www.aquaticbath.com
InstallationData
Acrylic Sectional Tub-Shower & Shower Modules
Fax on Demand # 3901
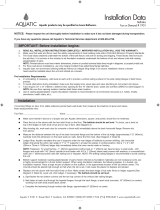
A. Pre-Installation Planning
1. Make sure framed-in pocket is of proper size per
Aquatic dimensions, square, and plumb; check
floor for levelness.
2. If fire rated walls are required inside the pocket,
approved materials must be in place prior to unit
installation. NOTE: Finished pocket must have
interior dimensions shown on framing diagrams
to permit installation.
3. If a shower door is to be installed, measure
enclosure opening after unit installation and before
ordering. NOTE: Where local codes specify
minimum door openings, showers may require
swing [not sliding] doors.
4. If a bath light is to be installed, cut out required area
in flat portion in center of the dome. Use a fine-tooth
or abrasive-grit blade. Cut from inside of dome.
Light fixture must have UL label and be water-
and steam-tight.
5. Foundation materials are recommended. Shimming
may be needed to level unit and for additional
support.
B. Pre-Installation Requirements
1. A 6” (150) round hole must be provided for
the 2” (50) IPS stub-up waste pipe and shower drain
fitting for shower stalls. [Fig. 1]
2. Front corner posts are double 2” x 4” (50 x 100)
studs for flush mounting, or triple 2” x 4” (50 x 100)
studs for recessed mounting. [Fig. 2]
3. The six 1” x 2” x 24” (25 x 50 x 610) mounting
plates installed on the front corner posts are
interrupted twice on each side by the base/wall
and wall/dome fastening flanges. Header plate
is one piece. [Fig. 1]
4. To avoid obstruction, make sure that shower elbow
and mixer valve stem are not protruding into the
pocket.
5. On the outside of the plumbing endwall of the unit,
mark location of the shower arm and mixer valve
per the suggested dimensions shown in Fig. 3.
Double check locations of marks and drill
1
/4” (5)
pilot holes.
6. From the inside of the unit, use proper size hole
saws with fine-tooth or abrasive-grit cutting edge, cut
holes for plumbing fixtures.
7. Fasten shower drain fitting at this time.
Nominal Size:
Dimensions: Inches (mm)
West Coast Units:
36ACTRIO 36” W x 36” D x 84” H (915 x 915 x 2135)
48ACTRI 48” W x 36” D x 84” H (1220 x 915 x 2135)
60ACTRI 60” W x 34” D x 84” H (1525 x 865 x 2135)
East Coast Units:
36ACTRIB 36” W x 36” D x 84” H (915 x 915 x 2135)
48ACTRIB 48” W x 36” D x 84” H (1220 x 915 x 2135)
60ACTRIB 60” W x 34” D x 84” H (1525 x 865 x 2135)
Fig. 1
DIMENSION 36ACTRIO 48ACTRI 60ACTRI
A 36” (915) 48” (1220) 60” (1525)
B 36” (915) 36” (915) 34” (864)
HEIGHT, WIDTH DIMENSIONAL TOLERANCE =0, -1/8” (
+
5mm)
76"
(1930)
77"
(1956)
Tub
Spout
Valve(s)
Valve(s)
Shower
Arm
12"
(305)
20"
(510)
16
1
/2"
(420)
Tub
Spout
Valve(s)
Shower
Arm
15"
(380)
20"
(510)
16
1
/2"
(420)
77"
(1956)
36¹⁄₄"
(920)
44"
(1117)
42"
(1067)
40 ³⁄₄"
(1035)
20"
(510)
Shower Arm
76"
(1930)
77"
(1956)
Tub
Spout
Valve(s)
Valve(s)
Shower
Arm
12"
(305)
20"
(510)
16
1
/2"
(420)
Tub
Spout
Valve(s)
Shower
Arm
15"
(380)
20"
(510)
16
1
/2"
(420)
77"
(1956)
36¹⁄₄"
(920)
44"
(1117)
42"
(1067)
40 ³⁄₄"
(1035)
20"
(510)
Shower Arm
Fig. 3 Valve and Shower Arm Locations
2" x 4" (50x100) 2" x 4" (50x100)
1" x 2" (25x50)
Plate
1" x 2" (25x50)
Plate
Drywall
Finished Edge
Drywall
Finished Edge
³⁄₈" (10)
³⁄₈" (10)
¹⁄₂" to ⁵⁄₈" (15)
Drywall
⁵⁄₈" (15)
Drywall to
assure coverage
of Mounting
Screws
Fig. 2
Flush Installation
Recessed Installation

InstallationData
Acrylic Sectional Tub-Shower & Shower Modules
Fax on Demand # 3901
C. Assembly/Installation
1. Disassemble unit as received into three separate sections
[base, wall & dome sections] and discard the four shipping
bolts. [Fig. 4}
2. Insert the four plastic fasteners [BathLocks™]
provided so they protrude upwards through each of the pre-
drilled holes where the shipping bolts were in the base and
wall sections. Use a hammer to tap in the fasteners.
3. To prevent scuffing while installing the unit, cover the entire bot-
tom of the unit with a piece of cardboard from the face pack in
which the unit was shipped.
4. Casting plaster or mortar mix are recommended foundation
materials to support bottom and prevent future settling of the
unit.
5. Carry base into bathroom and place into framing pocket.
Level lengthwise and widthwise using 3 ft. (915) level by
shimming under bottom.
6. If rear and/or side nailing flange do not touch the
corresponding studs, shims may be used to close the
gaps, or studs may be repositioned.
7. Pre-drill rear and side nailing flanges along top of base
section and fasten with #8 x 1
1
/2” (40) flat head screws
to all rear and side wall studs.
8. Fasten all front face pre-drilled holes into the two side ledger
strips with #8 x 1
1
/2” (40) flat head screws.
9. Silicone caulk all top base ledges, place wall section on
top of base section and press down onto two front plastic
fasteners [Bathlocks™] [and caulking] until seams are
closed. Tool and clean excess caulking per instruction
on caulking tube.
10. When fastening top nailing flanges as in step 7, make
sure to leave both corner studs and each side stud next
to it unfastened.
11. Place dome section on top of wall section [and repeat
step 9].
12. Align base, wall, and dome sections on both inside door col-
umns with 5 ft. (1585) straight edge and fasten all
front-face pre-drilled holes of wall and dome sections
[step 8], including header plate.
13. Make final plumbing connections to supply lines
and drain waste in accordance with plumbing code
requirements. [Fig. 3]
14. Finish front face of installation with drywall [Fig. 2]
15. To prevent staining, remove all debris before filling with
water for plumbing inspection. Drain and wipe clean
immediately afterwards.
D. Clean-Up
1. DO NOT REMOVE WARRANTY LABEL! Leave on the unit
for owner or occupant. [Code Requirement]
2. Use sponge with warm water and a liquid nonabrasive
detergent. DO NOT USE scouring pads, steel wool, metal
scrapers, sand paper or anything else that might scratch, mar
or dull the finish. Plaster, latex paint, or other foreign materi-
als may be removed with water, liquid detergent, and plastic
scraper. CAUTION: DO NOT USE heat, or solvent based
cleaning fluids.
3. Dull areas and light scratches may be removed by buffing
with a light colored automotive rubbing compound and
soft cloth. Entire unit can be waxed with light colored
automotive wax. DO NOT WAX BOTTOM OF UNIT.
4. PREVENT STAINING. Remove all debris before leak testing
for plumbing inspection. Drain and wipe clean immediately
after testing and inspection.
NOTE: Shower shown.
Tub/shower has same
installation
LITID3901
1521 No. Cooper, Ste. 500
Arlington, TX 76011
PH: 800-945-2726, 817-801-8300
FAX: 866-544-5353
Customer Service | Technical Services | Warranty Services
/