laurelmountainbath.com • 800.930.0050
— 1 —
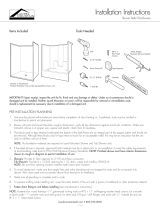
Installation Instructions
Shower Stalls and Tub-Showers (Sectional Units)
IMPORTANT! Upon receipt, inspect the unit for fit, finish and any damage or defect. Under no circumstances should a damaged unit
be installed. Neither Laurel Mountain or Lowe’s will be responsible for removal or reinstallation costs should a replacement be
necessary due to installation of a damaged unit.
Before installation begins:
a. READ ALL INSTALLATION INSTRUCTIONS COMPLETELY. IMPROPER INSTALLATION WILL VOID THE WARRANTY.
b. Make sure that walls and floors meet fire safety requirements of local building code and/or FHA/HUD Minimum Property Standards.
c. The blocks and/or legs attached underneath the bottom of the bath fixture are an integral part of the support system and should not be
removed. Although these blocks and/or legs need not touch for an acceptable install, this may be an indication that the unit and/or sub-floor
are out of level. NOTE: Finished alcove must have interior dimensions, shown on product technical data sheet rough-in diagrams, to
properly install unit.
Pre Installation Requirements
a. In remodeling, if necessary, add studs at each end to provide a vertical nailing surface for the side nailing flanges of bath fixture product.
b. To avoid obstruction during installation make sure that supply lines, spout pipe and valve plumbing do not project into alcove.
c. Shower stalls require a 6” diameter floor opening for 2” IPS drain fitting connection. [See Diagram 1]
d. Tub/showers require a 6” x 12” floor opening for the 1¹⁄₂” drain, waste and overflow (DWO) kit. [See Diagram 2]
NOTE: Be sure floor opening location matches left-hand or right-hand bath fixture drain location.
e. No foundation materials are required on LAUREL MOUNTAIN showers and tub/shower units.
INSTALLATION
If mounting fittings on tub or shower; from stable reference points (back wall studs, floor) measure the locations of spout and valves.
Note measurements here:
Tub Filler: Valve:
Shower Arm: Valve:
(Mark dimensions only if shower arm is plumbed within bath fixture wall area.)
n Make sure framed-in alcove is of proper size per LAUREL MOUNTAIN dimensions, square, and plumb; check floor for levelness.
n Disassemble unit as received into two/three separate sections (base and wall section/s) and save the connecting bolts from those units with
split walls. (If cartoned, separate sections and locate connecting bolts and plastic fasteners (BathLocks) provided.)
n Insert the three/four plastic fasteners (BathLocks) provided, into the base section, so they protrude upwards through each of the pre-drilled
holes where the connecting bolts were as originally received. Prior to inserting BathLocks, place a bead of silicone on the BathLock rim
where the ribbed post meets the flat disk. This will create a watertight seal once the BathLock is fully inserted. Use a hammer (lightly tapping)
to drive up the fasteners. [See Diagram 3: Detail B]
n To prevent scuffing while installing unit cover the entire bottom of the unit with a piece of cardboard or other protective material.
NOTE: Fasteners: To wood framing - 1” galvanized roofing nails or 1” pan head screws; to steel studs - drill flanges and studs with
3
⁄16”
(5mm) carbide bit and fasten with #10 x 1” sheet metal screws with washers; to concrete/block walls use 1” concrete nails
with nailing tool or impacter. NOTE: Pre drilling nailing flanges is recommended to avoid cracking the unit.
n Carry base into bathroom and place into framing pocket. Level lengthwise and widthwise using 3’ (915mm) level. Shim if necessary.
The unit should be set level.
n Pre-drill horizontal nailing flanges along top of base section and nail fasten with 1” galvanized roofing nails into each corresponding stud.
[See Diagram 3: Detail A]
n Pre-drill both (vertical) side nailing flanges and nail fasten to side studs 8” on center.
n For three-piece units with two sectional walls, use the connecting bolts to re-assemble the wall sections prior to installing onto base. Caulk
one side of vertical joint, then assemble wall sections with bolts through existing holes.
NOTE: Use 100% silicone sealant with mildew resistant properties to caulk unit.
n Place a silicone bead on top of the base section ledge where wall section mounts to base, creating a seal that incapsulates BathLock posts
at base. Make sure that the silicone bead is placed completely around the protruding BathLock post in order to create a watertight seal.
Align wall section predrilled holes to BathLock fasteners and press down securing wall section onto fasteners until seam is closed.
[See Diagram 3]
n a. Nail fasten top horizontal nailing flange of wall section to each stud. [See Diagram 3: Detail A]
b. Nail fasten both side vertical nailing flanges of wall section to vertical studs 8” on center.
n When other than cementitious backer board plaster is to be used, furring strips as thick as nailing flanges are recommended for installation
on studs above the installed LAUREL MOUNTAIN unit to assure walls will be flush. 100% silicone sealant with mildew resistant properties
should be applied between the backer board and horizontal surface of unit. Finished wall materials can be applied [See Diagram 3: Detail
A]. Finishing of other trades should be done in conformance with applicable codes and generally accepted building practices.
n Tub - Mounted Fittings: Refer to dimensions noted above; mark fitting locations. Using a hole saw (fine tooth or abrasive grit cutting edge),
make necessary openings for filler and valves, drilling from inside (smooth side) out.