Page is loading ...

Protect yourself and others by observing all safety information, warnings, and cautions. Failure to
comply with instructions could result in personal injury and/or damage to product or property.
Please retain instructions for future reference!
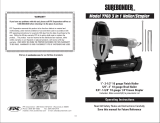
RANCN65
65MM COIL
NAILER

ADJUSTABLE
EXHAUST
AIR INLET
TRIGGER
MODE CONTROL
SINGLE / BUMP
DEPTH CONTROL
MAGAZINE RELEASE
NOTE: USE PLASTIC
COLLATED NAILS ONLY

Nail capacity (Qty): up to 300pcs
Nail size: 25 mm (1”) to 65mm (2-1/2”), 15deg, Plastic collated coil nails only.
Recommended operating pressure: 70-110 PSI (5-7.5 bar)
Maximum pressure: 8.3 bar (120 PSI)
Air inlet: Nitto style connector
Dimensions: 320 x 310 x 128 mm
Weight: 3.0 kg
• KEEP CHILDREN AWAY. All children should be kept away from the work area. Don’t let them
handle the tool.
• USE SAFETY GOGGLES AND EAR PROTECTION: Air tool operators and others in work area
should always wear safety glass to prevent the injury from fasteners and flying debris
when loading and unloading this tool. Maybe the noise would harm your hearing, wear the
ear protection to safeguard.
• NEVER USE OXYGEN, COMBUSTIBLE OR ANY OTHER BOTTLE GAS
as a power source or would cause explosion and serious personal injury.
• DO NOT CONNECT TOOL TO COMPRESSED AIR which pressure exceeds (8.3bar) 120psi.
• DO NOT PLACE OVER-LONG AIR HOSE in working area in case of the
• operator’s unexpected tripping .Make sure all connections are tight, the hose should be
near to air supply .
• CARRY THE TOOL ONLY BY THE HANDLE. Do not keep the trigger pull on safety yoke mecha-
nism to avoid unintentional firing of fastener.
• KEEP THE TOOL POINTED AWAY FROM YOURSELF and others at all time and keep hands, any
body parts away rear area to Safety guard against possible injury.
• DISCONNECT TOOL FROM AIR SUPPLY BEFORE LOADING fasteners to prevent a fastener from
being fired during connection.
• DO NOT KEEP THE TRIGGER OR SAFETY DEPRESSED during loading fasteners or the uninten-
tional firing of a fastener would cause personal injury.
• DISCONNECT TOOL FROM AIR SUPPLY HOSE and empty the compressor before performing
maintenance or when not in use.
• DO NOT DRIVE FASTENER ON SCAFFOLDINGS,LADDERS and on such similarly construction,
not working on airtight case, and vehicles. Don’t over reach, keep proper footing at all
times to ensure correct balance.
• DO NOT DRIVE FASTENERS CLOSE TO THE EDGE OF THE WORK PIECE.
• The work-piece would split allowing fastener to fly free or ricochet causing personal injury.
• DO NOT DRIVE FASTENER ON TOP OF NAILED FASTENER, or the fastener can ricochet causing
personal injury.
• NEVER USE A TOOL that is leaking air, had missing or damaged parts or requires repair and
make sure all the screws and securely tightened.
• MAKE DAILY INSPECTION FOR FREE MOVEMENT of trigger, safety mechanism and spring to
insure the tool can operate well.
• ONLY USE PARTS AND ACCESSORIES recommend by manufacturer.
GENERAL SAFETY
SPECIFICATIONS
IMPORTANT!: Read and understand all safety rules, operating
instructions before use.

• CLEAN work area Accidents occur where benches and work areas are cluttered or dirty,
floors must be kept clear.
• Make sure only use correct staplers as specified for your tool.(See Fastener specification)
15 Deg. coil nailer nailer for construction framing, pallet and crate assembly, deck construc-
tion, roof decks, fencing, sidewall sheathing and etc.
OPERATING INSTRUCTION
Description
WARNING!: Never free-fire the tool at high pressure
• Use clean, Dry and Regulated compressed air at 5-7.5bar (70-110psi)
• Never exceed maximum and minimum pressure. Too low or too high pressure would cause
noise, fast-worn or misfiring.
• When connecting air supply always keep hands and body from discharge area of tool.
• A filter-regulator-lubrication is required and should be located as close to tool as possible.
(see below)
• Keep air filter clean. A dirty filter will reduce the air pressure to the tool causing a reduction
in power and efficiency.
• Be sure all connections in air supply system are sealed to prevent air loss.
WARNING!: Always disconnect the tool from the compressed air before loading.
When loading the tool always point the tool away from yourself and others. Make
sure that you are not holding the tool with trigger depressed while loading the
tool.
Loading fastener and operation
• Disconnect the tool from the air supply Grasp the nailer firmly with one hand .Press the
latch with your thumb and pull the magazine back. Insert a strip of fasteners into maga-
zine Keeping it point down.
• Release the latch and pusher, slid the pusher against the nails until it contacts the nails and
lock into place. The tool is now ready for use.
• Connect the tool to the air supply. Make sure the air pressure is in the correct range de-
noted in the Technical Data.
GENERAL SAFETY Cont .....

• Then test the driving depth in a sample piece of wood before using. If the fasteners are
being driven too far or not far enough, adjust the regulator to provide less air pressure or
more air pressure.
Loading fastener and operation Cont .....
WARNING!: Never operate tool unless safety nose is contact with work-piece. Do
not operate tool without fasteners or damage to tool may result.
WARNING!: Never fire fasteners into air because fasteners may injury operator or
others and damage to tool may result.
MAINTENANCE
WARNING: Disconnect the tool from the air compressor before adjusting, clearing
jams, servicing, maintenance, relocating and when not in use.
• Regular lubrication, if your tool without using the in-liner automatic oilier, place 2 or 6
drops of pneumatic tool oil into the air inlet before each work day or after 2 hours of con-
tinuous use depending on the characteristic of work-piece or type of fasteners.
• Air-operated tools must be inspected periodically, and worn or broken parts must be re-
placed to keep the tool operating safely and efficiently. Check and change all worn or dam-
aged O-rings, seals, etc. Tight all the screws and caps in case personal injury.
• Make regular inspection for free movement of trigger, Spring and safety mechanism to
assure safe system is complete and functional: no loose and missing parts, no building or
sticking parts.
• Keep magazine and nose of tool clean and free of any dirt lint or abrasive particles.
• •Whentemperaturesarebelowfreezing,toolsshouldbekeptwarmbyanyconvenient,
safe method.

TROUBLESHOOTING
WARNING: If any of the following symptoms appears during your operating, stop
using the tool immediately, or serious personal injury could result. Only a qualified
persons or an authorized service centre can perform repairs or replacement of
tool.
SYMPTOM PROBLEM SOLUTIONS
Air leak near top of tool or
in trigger area
1. O-ring in trigger valve are
damage.
1. Check and replace O-ring.
2. Trigger valve head are dam-
age.
2. Check and replace.
3. Trigger valve stem ,seal or
O-ring are damaged.
3. Check and replace trigger valve
stem, seal or O-ring
Air leak near bottom of
tool.
1. Loose screws. 1. Tighten screws.
2. Worn or damaged O-rings
or bumper.
2. Check and replace O-rings or
bumper.
Air leak between body and
cylinder cap.
1. Loose screws. 1. Tighten screw.
2. Worn or damaged O-rings
or seals.
2. Check and replace O-rings or
bumper.
Blade driving fastener too
deep.
1. Worn bumper. 1. Replace bumper.
2. Air pressure is too high. 2. Adjust the air pressure.
Tool does not operate well:
can not drive fastener or
operate sluggishly.
1. Inadequate air supply. 1. Verify adequate air supply.
2. Inadequate lubrication. 2. Place 2 or 6 drops of oil into air
inlet.
3. Worn or damaged O-rings
or seals.
3. Check and replace O-rings or
seal.
4. Exhaust port in cylinder
head is blocked.
4. Replace damaged internal parts.

EXPLORED VIEW

For information on all ROSS products
please visit: www.rosstools.com.au
The ROSS logo and Bull device are trademarks of J.W. Ross Pty Ltd.
WARRANTY:
This product has been manufactured to a high quality standard. It is guaranteed
against faulty materials and workmanship for 36 months from the date of purchase.
Please retain your receipt as proof of purchase.
If the product is found to be defective within the relevant time period, we will either
replace all defective parts or, at our discretion, replace the unit free of charge.
This warranty will not apply:
(i) where this product has been subjected to misuse, abuse, accident or want of care;
(ii) where this product has been used for a purpose for which it was not designed or is
not suited;
(iii) where the service of this product has been undertaken by a non-authorised person
or company or if non-approved parts have been used;
(iv) where this product has been used for industrial purposes.
Should service become necessary during the warranty period, the purchaser should
contact an Authorised Service Centre or J W Ross. In order to obtain warranty service,
the purchaser must present the store receipt showing the name of the retailer and the
date of purchase.
The period of the warranty begins from the original date of purchase, notwithstanding
any subsequent repair or parts replacement.
Purchaser shall be responsible for all transport charges to and from the Authorised
Service Centre.
Damage in transit is not covered by this warranty. The purchaser should remove from
the product any liquids (if applicable) before sending the tool for service or repair.
Any accessories should be packed securely to prevent damage.
Warranty exclusions
Wear parts or service related parts required when performing normal and regular
maintenance of this product are not covered by warranty unless it is found to be defective
by an Authorised Service Centre. These include, but are not limited to:
accessories, bumpers, driver blades, “o” rings, seals, gaskets, air fittings, lubricants, tune-ups,
filters.
Distributed in Australia by J W Ross and Sons ( Australia ) Pty Ltd.
PO Box 352 North Ryde BC, NSW, 1670
Inquiries phone 1800 251 338
The J.W. Ross policy is one of continuous improvement and
the company reserves the right to alter designs, colours and
specifications without notice.
/