Page is loading ...

8807613-1 08/10
3-1/2 INCH CLIPPED HEAD FRAMING NAILER
CALIFORNIA PROPOSITION 65
WARNING: You can create dust
when you cut, sand, drill or grind
materials such as wood, paint,
metal, concrete, cement, or other
masonry. This dust often
contains chemicals known to
cause cancer, birth defects, or
other reproductive harm. Wear
protective gear.
WARNING: This product or its
power cord may contain
chemicals, including lead,
known to the State of California
to cause cancer and birth
defects or other reproductive
harm. Wash hands after
handling.
Important!
When using equipment, a few
safety precautions must be
observed to avoid injuries and
damage. Please read the complete
operating manual with due care.
Keep this manual in a safe place,
so that the information is available
at all times. If you give the
equipment to any other person,
give them these operating
instructions as well. We accept no
liability for damage or
accidents which arise due to
non-observance of these
instructions and the safety
information herein.
SPECIFICATIONS
Normal Operating Pressure:
70 PSI - 115 PSI
Maintenance: Oiling
Firing Mode: Sequential Fire/
Contact Fire
Fastener Size Range:
2 inches to 3-1/2 inches
Capacity: 90 pcs.
FEATURES
•360adjustable exhaust cover
•Comfortable rubber grip
•Lightweight magnesium
housing
•Adjustable depth of penetration
•Anti-dry firing mechanism
•Single sequential, full
sequential, and dual action
are exchangeable.
•No-Mar Tip protects work
surface.
Keep this manual and
receipt in a safe and dry
place for future reference.
CAUTION:
FOR YOUR OWN SAFETY
READ INSTRUCTION
MANUAL COMPLETELY
AND CAREFULLY BEFORE
OPERATING THIS 3-1/2
INCH CLIPPED HEAD
FRAMING NAILER.
Any failures made in
following the safety
regulations and
instructions may result in
an electric shock, fire
and/or serious injury.
EXPLANATION OF
NAILING ACTION
•SINGLE ACTUATION
MECHANISM: First, press the
safety against the wood; next,
pull the trigger to drive the
fastener. After fastening
once, fastening will not be
possible again until the trigger
KIT: 7613

2
is released and pressed again.
•CONTACT ACTUATION
MECHANISM: First, pull the
trigger; next, press the safety
against the wood to drive the
fastener. If the trigger is held
back, a fastener will be driven
each time the safety is pressed
against the wood.
•FULL SEQUENTIAL
ACTUATION MECHANISM:
First, press the safety against
the wood; next, pull the trigger
to drive the fastener. Follow the
same sequence to continue
driving fasteners.
GENERAL SAFETY
RULES
WORK AREA
•KEEP THE WORK AREA
CLEAN AND WELL LIT.
Cluttered benches and dark
areas increases the risk of
injury.
•DO NOT OPERATE THE
TOOL IN EXPLOSIVE
ATMOSPHERES, such as in
the presence of flammable
liquids, gases, or dust. The tool
may create a spark that could
ignite flammable liquids, gases,
or dust.
•KEEP VISITORS AWAY. Do
not let visitors handle the tool.
All visitors should be kept safely
away from the work area.
•NEVER ENGAGE IN
HORSEPLAY WITH THE
TOOL. Respect the tool as a
working implement.
PERSONAL SAFETY
•OPERATORS AND OTHERS IN
WORK AREA MUST WEAR
SAFETY GLASSES WITH SIDE
SHIELDS. Safety glasses must
conform to ANSI Z87.1
specifications.
•ALWAYS WEAR EAR AND
HEAD PROTECTION. Wear ear
protection to protect your ears
from loud noises. Wear head
protection to protect your head
from flying objects.
•USE SAFETY EQUIPMENT. A
dust mask, non-skid safety
shoes, and a hard hat must be
used for the applicable
conditions. Wear a full face
shield if you are producing metal
filings or wood chips.
•DRESS PROPERLY. Do not
wear loose clothing or jewelry.
Contain long hair. Keep hair,
clothing, and gloves away from
moving parts. Loose clothes,
jewelry, or long hair can be
caught in moving parts and
increase the risk of injury.
•STAY ALERT, WATCH WHAT
YOU ARE DOING AND USE
COMMON SENSE WHEN
OPERATING A POWER TOOL.
Do not use tool while tired or
under the influence of drugs,
alcohol, or medication. A
moment of inattention while
operating the tool may cause
serious injury.
•AVOID UNINTENTIONAL
FIRING. Keep fingers away from
trigger when not driving
fasteners, especially when
connecting the tool to the air
supply.
•DO NOT OVERREACH. Keep
proper footing and balance at all
times. Proper footing and balance
enables better control of the tool in
unexpected situations.
•MAKE SURE AIR HOSE IS FREE
OF SNAGS AND
OBSTRUCTIONS. DO NOT
ATTACH AN AIR HOSE OR TOOL
TO YOUR BODY. Entangled or
snarled hoses can cause a loss of
balance or footing in addition to
unintentional tool operation.
TOOL USE AND CARE
•NEVER POINT THE TOOL AT
YOURSELF OR OTHERS IN THE
WORK AREA. Always assume the
tool contains fasteners. Never point
the tool at yourself or others,
whether it contains fasteners or
not.
•KEEP FINGERS AWAY FROM
TRIGGER WHEN NOT DRIVING
FASTENERS TO AVOID
ACCIDENTAL FIRING. Never carry
the tool with the trigger depressed,
since you could unintentionally
drive a fastener and injure yourself
or someone else. Always carry the
tool by the handle.
•NEVER MODIFY OR ALTER THE
TOOL. Doing so may cause the
tool to malfunction and personal
injuries may result.
•KNOW THIS TOOL. Read this
manual carefully; learn its
applications and limitations, as well
as the specific potential hazards
related to this tool.
•USE ONLY FASTENERS THAT
ARE RECOMMENDED FOR
YOUR MODEL. Do not use the
wrong fasteners or load the
fasteners incorrectly.

3
•CHECK FOR MISALIGNMENT
OR BINDING OF MOVING
PARTS, BREAKAGE OF
PARTS, OR ANY OTHER
CONDITION THAT MAY
AFFECT THE TOOL’S
OPERATION. If damaged, have
the tool serviced by an
authorized technician before
using. Many accidents are
caused by poorly maintained
tools.
•CHECK SAFETY BEFORE
USE. Make sure the safety
operates properly. Never use
the tool if the safety is not
operating properly. Do not
tamper with or remove the
safety.
•DO NOT USE THE TOOL IF
THE TRIGGER DOES NOT
ACTUATE PROPERLY. Any
tool that cannot be controlled
with the trigger is dangerous
and must be repaired.
•NEVER USE A TOOL THAT IS
DEFECTIVE OR OPERATING
ABNORMALLY. If the tool
appears to be operating
unusually, making strange
noises, or otherwise appears
defective, stop using it
immediately and arrange for
repairs by an authorized service
center.
•MAINTAIN TOOLS WITH
CARE. Keep the tool clean and
lubricated for better and safer
performance.
•NEVER CARRY THE TOOL
BY THE AIR HOSE.
•STORE TOOLS OUT OF THE
REACH OF CHILDREN AND
UNTRAINED PEOPLE. Tools
•are dangerous in the hands of
untrained users.
•PLACE TOOL PROPERLY ON
THE WORK PIECE. Do not drive
fasteners on top of other
fasteners or with the tool at too
steep of an angle. The fasteners
can ricochet and cause serious
injury.
•DO NOT USE TOOL AS A
HAMMER.
•KEEP ALL SCREWS AND
COVERS TIGHTLY IN PLACE.
•KEEP FACE, HANDS, AND
FEET AWAY FROM FIRING
HEAD AT ALL TIMES.
•DO NOT DISCONNECT AIR
HOSE FROM TOOL WITH
YOUR FINGER ON THE
TRIGGER. The tool can fire
when reconnected to an air
supply.
•DO NOT LOAD FASTENERS
WITH TRIGGER PULLED OR
SAFETY DEPRESSED.
•NEVER PLACE A HAND OR
ANY PART OF THE BODY IN
FASTENER DISCHARGE AREA
OF TOOL.
•DO NOT DRIVE FASTENERS
INTO THIN BOARDS OR NEAR
EDGES OF WORK PIECE.
•DISCONNECT AIR HOSE
FROM TOOL WHEN:
1. Doing maintenance and
inspection
2. Loading fasteners
3. Turning the adjuster and top
cover
4. Clearing a jam
5. It is not in use
6. Leaving the work area
7. Moving it to another location
8. Handing it to another person
NOTE: Never attempt to clear a
jam or repair the tool unless you
have disconnected the air hose
from the tool and removed all
remaining fasteners from the tool.
TOOL SERVICE
•USE ONLY ACCESSORIES
THAT ARE IDENTIFIED BY THE
MANUFACTURER FOR THE
SPECIFIC TOOL MODEL.
•USE OF UNAUTHORIZED
PARTS OR FAILURE TO
FOLLOW MAINTENANCE
INSTRUCTIONS MAY CREATE A
RISK OF INJURY.
•USE ONLY THE LUBRICANTS
SUPPLIED WITH THE TOOL OR
SPECIFIED BY THE
MANUFACTURER.
•TOOL SERVICE MUST ONLY BE
PERFORMED BY A QUALIFIED
REPAIR PERSONNEL.
AIR SOURCE
•NEVER USE OXYGEN OR
OTHER BOTTLED GASES AS A
POWER SOURCE. Explosion may
occur. Combustible gases and
other bottled gases are dangerous
and may cause the tool to explode.
•DO NOT EXCEED THE
MAXIMUM RECOMMENDED AIR
PRESSURE MARKED ON THE
TOOL. Use only clean, dry,
regulated, compressed air within

4
the rated pressure range
marked on the tool. Never
connect the tool to pressure that
could potentially exceed 200
PSI.
•DO NOT ABUSE THE AIR
HOSE. Protect all hoses from
kinks, restrictions, solvents, or
sharp objects. Keep air hose
away from heat, oil, sharp
edges, or moving parts.
Replace damaged hoses
immediately. Damaged hoses
can burst or whip around.
•CHECK ALL FITTINGS,
HOSES, PIPES,
CONNECTIONS, AND
COMPRESSOR BEFORE
EACH USE. Repair or replace
damaged or leaking hoses and
connections immediately.
Damage to a hose or
connection may cause a
pressure hose to break and
whip around the work area,
which may lead to injury.
FUNCTIONAL
DESCRIPTION
(See Fig 1)
WARNING
Disconnect the tool from the air
source before making any
adjustments, changing
accessories, or storing the tool.
Such precautionary safety
measures reduce the risk of
unintentional tool operation.
ASSEMBLY/
INSTALLATION
Follow the instructions below to
prepare your tool for operation.
1. All tool operators and their
immediate supervisors must
become familiar with the
operator safety instructions
before operating the tool.
2. Included with each tool is
one copy of these
Operating/Safety Instructions.
Keep this publication for future
reference.
3. Select a hose with a
minimum inner diameter of 1/4
inch and a maximum length of
100 feet.
WARNING
To reduce the risk of injury from
a hose bursting, select hoses
that are rated at a maximum of
200 PSI.
4. Select fittings that are
appropriately sized for the
selected hoses. The tool and
air hose must have a hose
coupling such that all pressure
is removed from the tool when
the coupling joint is
disconnected.
WARNING
Never use non-relieving couplers
and/or female quick disconnect
couplings on the tool. Non-
relieving coupling and female
couplings will trap high pressure

5
air in the tool when the air line is
disconnected. This will leave the
tool charged with enough air
after it has been disconnected
to drive a nail. Only MALE
pneumatic type air connectors
should be fitted to the tool, so
that high pressure air in the tool
is vented as soon as the air line
is disconnected.
5. Set the regulator at the air
delivery system to a PSI that
falls within the tool’s operating
range of 70-115 PSI. The
correct pressure is the lowest
pressure that will do the job.
OPERATION
LUBRICATION
WARNING
USE ONLY THE AIR TOOL
LUBRICANTS SUPPLIED
WITH THE TOOL. Do not use
other lubricants as they may
damage the tool. If the tool is
not used with an in-line
lubrication system on the air
supply, it is necessary to
periodically lubricate the tool
with air tool lubrication.
Under low use, lubricate once a
day. Under heavy use, lubricate
twice a day.
To lubricate, insert 2-3 drops of
lubricant into the air supply
fitting attached to the tool
handle (Figure 2). Using too
much oil will cause it to collect
in the tool and be noticeable in
the exhaust.
Do not use detergent oil, WD-40,
transmission fluid, motor oil, or
other lubrication not specifically
designed as air tool lubricants.
These lubricants will cause
accelerated wear to the seals, O-
rings, and bumpers in the tool,
resulting in poor tool
performance and frequent
maintenance.
ADJUSTING AIR
PRESSURE
Adjust the air pressure at
recommended operating
pressure, 70-115 PSI, according
to the length of nails and the
hardness of the work piece.
The correct air pressure is the
lowest pressure that will do the
job. Using the tool at a higher
than required air pressure
unnecessarily over stresses the
tool. Do not exceed 120 PSI (see
Figure 3).
CONNECTING AIR
SUPPLY
WARNING
Never use oxygen or other bottled
gases as a power source.
Explosion may occur. Combustible
gases are dangerous and may
cause the tool to explode.
WARNING
Never connect the tool to an air
source that is capable of producing
air pressure exceeding 200 PSI.
Excessive pressure can cause
abnormal operation or cause the
tool to burst, resulting in personal
injury.
WARNING
Do not exceed maximum
recommended air pressure marked
on the tool. Verify prior to using the
tool that the air source has been
adjusted within the rated air
pressure range. Be sure the air
pressure gauge is operating
properly and check it at least twice
a day. Tools operated in excess of
their maximum pressure rating may
operate abnormally or burst,
resulting in personal injury.
To connect the tool to the
compressor, only use pneumatic air
hoses that meet the following
criteria:
1. Maximum hose pressure
rating: 200 PSI
2. Minimum hose inner
diameter: 1/4 inch
3. Maximum hose length:
100 feet

6
CONNECT THE AIR SUPPLY
(Refer to Figure 4)
•Snap the air hose onto the quick
connector.
•Check for air leakage. If leakage
is noted, cease using the tool
immediately and have it checked
by a qualified repair personnel.
•Be sure the air pressure gauge
is operating properly and check it
at least twice a day.
TOOL TESTING
DANGER
OPERATORS AND OTHERS IN
WORK AREA MUST WEAR
SAFETY GOGGLES WITH SIDE
SHIELDS, WHICH CONFORM
TO ANSI Z87.1
SPECIFICATION.
WARNING
NEVER USE TOOL UNLESS
SAFETY IS OPERATING
PROPERLY.Before actually
beginning the nailing work, test
the tool by using the checklist
below. Conduct the test in the
following order.
If abnormal operation occurs,
stop using the tool and have it
repaired by a qualified repair
personnel immediately.
1. Disconnect air hose and
remove all nails from the tool.
•ALL SCREWS MUST BE
TIGHTENED. If any screws are
loose, tighten them.
•THE SAFETY AND TRIGGER
MUST MOVE SMOOTHLY.
2. Adjust the air pressure to 70
PSI and then connect the air
hose.
•TOOL MUST NOT LEAK AIR.
3. Remove the finger from the
trigger ad press the safety
against the wood.
•THE TOOL MUST NOT
OPERATE.
4. Separate the safety from the
wood. Next, point the tool
downward, pull the trigger and
then wait in that position for 5
seconds or longer.
•THE TOOL MUST NOT
OPERATE.
5.
1.
Without touching the
trigger, depress the safety
against the work piece. Pull the
trigger.
•THE TOOL MUST OPERATE.
2.
Hold the trigger back while
separating the safety from the
wood. The tool will remain in
operated status (the driver
blade will remain at the
bottom).
3.
Remove the finger from the
trigger .
Tool operation will end (the
driver blade will return to the
top).
6. If no abnormal operation is
observed, you may load nails in
the tool. Drive nails into the
work piece that is the same
type to be used in the actual
application.
•THE TOOL MUST OPERATE
PROPERLY.
NAIL LOADING
(Refer to Figure 5)
WARNING
Always load nails into the tools
magazine before the air supply is
connected. Connecting the air
supply after loading nails reduces
the risk of unintentionally driving
a nail and injuring yourself or
someone else.
WARNING
When loading the tool’s
magazine, check that the nail tips
contact the wear rail and slide
smoothly against the surface of
the magazine. If the nails are not
loaded properly, the tool will
misfire and nails can be
deflected, causing the tool to
react in an unexpected manner
and damage the tool.
1. Disconnect the air supply.
2. Hold the tool handgrip
securely and pull pusher back
until it locks in latched position
at rear of magazine.
3. Insert nail strip into
magazine, with nail points
angled forward and down.
4. Pull pusher back, press
release lever, and slide pusher
forward against nails.
5. Tool is now loaded and
ready for normal operation.

7
METHODS OF
OPERATION
This tool is equipped with a
safety and does not operate
unless the safety is depressed.
There are two methods of
operation to drive nails with this
tool.
They are:
• Sequential Fire
• Contact Fire (red trigger)
SEQUENTIAL FIRE
1. Position the nail outlet on the
work piece with finger off the
trigger.
2. Depress the safety firmly
until it is completely depressed.
3. Pull the trigger to drive a nail.
4. Remove finger from trigger.
To continue nailing in a separate
location, move the tool along the
wood, repeating steps 2-5 as
required.
CONTACT FIRE
WARNING
To avoid double firing or
accidental firing due to recoil:
•Do not press the tool against the
wood with excessive force.
•Separate the tool from the wood
as it recoils after nailing.
CONTACT TRIGGER
LOAD
1. Disconnect the tool from the
air source.
2. Remove the O-ring from the
trigger pin (Fig 6).
3. Pull the trigger out.
4. Put the red trigger on.
5. Push the trigger pin back,
using a small hammer, if
necessary.
6. Put the O-ring back to fasten
the trigger pin.
7. Reattach the tool to the air
supply.
8. Grip the tool firmly to
maintain control. Position the
nose of the tool onto the work
surface.
9. Squeeze and hold the
trigger, push the tool against
the work surface to depress the
work piece contact and drive a
nail.
BOUNCE FIRE
1. Pull the trigger with the tool off
the work piece.
2. Depress the safety against the
work piece to drive a nail.
3. Move the tool along the work
piece with a bouncing motion.
Each depression of the safety
will drive a nail. As soon as the
desired number of nails has been
driven, remove your finger from
the trigger.
NOTE:
•Always handle nails and
package carefully. If nails are
dropped, the collating bond may
be broken, which will cause mis-
feeding and jamming.
•After nailing:
1. Disconnect the tool from the
air supply.
2. Remove all nails from the
tool.
3. Supply 5-10 drops of
pneumatic tool lubricant into
the air plug on the tool.
4. Open the petcock on the air
compressor tank to drain any
moisture.
COLD WEATHER
OPERATION
WARNING
DO NOT USE A FROZEN
TOOL. Allow the tool to thaw
before using. Moisture frozen in
the tool may impede internal
components resulting in the risk
of injury and/or tool damage.
When using the tool in cold
conditions, the tool will cycle
slower than usual while driving
the first nails. The cycle rate will
increase as the tool warms up.
Keep the tool warm to avoid
reduced cycle rate.
ADJUSTING THE NAILING
DEPTH
WARNING
Disconnect the tool from the air
source before making
adjustments. Such precautionary
measures reduce the risk of
unintentional tool operation.
1. Disconnect the tool from the
air supply.
2. Remove the nails from the

8
tool.
3. Adjust tool driving depth:
•To reduce nail depth, turn
the adjustment knob counter
clockwise (Fig 7).
•To drive the nail deeper, turn
the adjustment knob
clockwise (Fig 8).
4. Reload nails as described in
the NAIL LOADING section of
this manual (pg. 6).
5. Reconnect the air supply.
ADJUSTING THE
EXHAUST
The direction of the exhaust vent
can be changed by turning the
top cover (Fig 9).
USING THE NO-MAR TIP
(Refer to Figure 10)
WARNING
When attaching or detaching the
No-Mar Tip, be sure to remove
your finger from the trigger and
disconnect the air hose from the
nailer.
If you would like to protect the
surface of the work piece from
scratches or markings made by
the safety, attach the No-Mar Tip
to the safety.
To replace No-Mar Tip:
1. Disconnect the air hose from
the tool.
2. Put the No-Mar Tip to the toe
of the safety.
To remove the No-Mar Tip: Pull
the No-Mar Tip directly away
from the tool.
NOTE: The nose cap may
reduce nailing depth due to its
thickness. Readjustment of
nailing depth is required.
MAINTENANCE
JAM CLEARING
If a nail becomes jammed in the
tool, disconnect the air hose and
keep the tool pointed away from
you while clearing the jam.
1. Disconnect the tool from the
air supply.
2. Remove all nails.
3. Insert screwdriver into the
driving mechanism (Figure11).
4. Tap the screwdriver gently
with a hammer. The inserted
screwdriver should push the
driver blade back, freeing the
nail jam.
5. Remove the bent nail, using
needle-nose pliers, if
necessary.
6. Reconnect the tool to the air
supply.
7. Reload the tool with nails.
CLEANING
WARNING
When cleaning a tool, be careful
not to disassemble any portion of
the tool since internal
components may be misplaced
or safety components may be
improperly mounted. Certain
cleaning agents such as
gasoline, carbon tetrachloride,
ammonia, etc. may damage
plastic parts and O-rings.
WARNING
Do not attempt to clean by
inserting pointed objects through
openings in the tool. Sharp
edges may damage internal
components, causing a serious
hazard.
Ventilation openings, the work
contact element, and the trigger
must be kept clean and free of
foreign matter.
Periodically clean the tool with

9
compressed air.
Clean the magazine; remove
metal or wooden chips that may
have accumulated in the
magazine. Periodically clean the
magazine with compressed air.
STORAGE
WARNING
Keep out of the reach of children
and personnel unfamiliar with the
operation of the tool. Lock the
storage area. Tools are
dangerous in the hands of those
unfamiliar with the tool.
When not in use, the tool should
be disconnected and locked in a
warm, dry place. When tool will
not be in use for an extended
period of time, apply a thin coat
of lubricant to the steel parts to
avoid rust.
Do not store the tool in a cold
weather environment (see COLD
WEATHER OPERATION, pg. 7).
HOOK-UP INSTRUCTIONS
FOR TOOL TO AIR
SUPPLY
NOTE: For better performance,
install a 3/8 inch quick plug (1/4
inch NPT threads) with an inside
diameter of 0.315 inch on the
nailer and a 3/8 inch quick
coupler on the air hose.
1. With the ON/OFF switch in
the OFF position, plug the
compressor into an electrical
outlet.
2. Close the pressure regulator
by turning it all the way to the
left. Turn the compressor ON
and let it pump all the way up to
automatic shut-off pressure.
3. Attach air hose to regulator
outlet. Adjust the pressure
regulator by turning the knob to
the right so that the outlet
pressure is between 70 PSI
and 115 PSI.
4. Load fasteners into the
nailer.
5. Point the nailer in a safe
direction while attaching the air
hose.
6. Nailer is now ready for use.
You may need to adjust the
outlet pressure to achieve
proper fastener depth.
MINIMUM COMPONENTS
REQUIRED FOR HOOK-UP
Air Compressor: The air
compressor must be able to
maintain a minimum of 70 PSI
when the nailer is being used. An
adequate air supply can cause a
loss of power and inconsistent
driving.
Pressure Regulator: A pressure
regulator is required to control
the operating pressure of the
nailer between 70 PSI and115
PSI.
Air Supply Hose: Always use air
supply hoses with a minimum
working pressure rating equal to
or greater than the pressure from
the power source, or 150 PSI,
whichever is greater. Use 1/4
inch air hose for runs up to 50
feet and a 3/8 inch air hose for
runs 50 feet and longer.

10
Symptom Possible Cause(s) Corrective Action
Air Leaking near the top of
the tool or in the trigger
area
Loose screws Tighten screws
Worn or damaged O-rings or seals Install overhaul kit
Air leaking near the
bottom of the tool
Loose screws Tighten screws
Worn or damaged O-rings or seals Install overhaul kit
Tool does nothing or
operates sluggishly
Inadequate air supply
Make sure the air compressor is set
between 70 PSI and 110 PSI
Tool is too dry
Add about 2-3 drops of lubrication into
the air connector
Exhaust blocked Clean exhaust channel
Worn or damaged O-rings or seals Install overhaul kit
Fasteners are jammed in
the tool frequently
Driver channel is worn Fix the drive channel
Piston is broken or worn Replace the piston
Bent fasteners
Remove the bent fasteners, replace
with the right fasteners
Dirty magazine Clean magazine
Loose magazine Tighten screws
Wrong fasteners Verify that
fasteners are the correct size

11
North American Tool (NAT) Industries makes every effort to ensure that this product meets high
quality and durability standards. NAT warrants to the original retail consumer a 1-year limited warranty
from the date the product was purchased at retail and each product is free from defects in materials.
Warranty does not apply to defects due directly or indirectly to misuse, abuse, negligence or
accidents, repairs or alterations, or a lack of maintenance. NAT shall in no event be liable for death,
injuries to persons or property, or for incidental, special or consequential damages arising from the use
of our products. To receive service under warranty, the original manufacturer part must be returned for
examination by an authorized service center. Shipping and handling charges may apply. If a defect is
found, NAT will either repair or replace the product at its discretion.

7613-1 08/10
3-1/2 INCH CLIPPED HEAD FRAMING NAILER
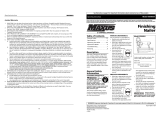
12

13
No. Description QTY
1 Set Screw 1
2 Gasket 1
3 Washer 1
4 Exhaust Cover 1
5 Plastic Washer 1
6 Hex Bolt 4
7 Spring Washer 5
8 Flat Washer 5
9 Air Cap 1
10 Seal 1
11 Iron Ring 1
12 Inner Lining 1
13 Spring 1
14 Head Valve Piston 1
15 Gasket 1
16 O-Ring 1
17 O-Ring 2
18 Collar 1
19 O-Ring 1
20 Iron Ring 1
21 Cylinder 1
22 O-Ring 2
23 Ring 1
24 O-Ring 1
25 Piston 1
26 Driver Blade 1
27 Gasket 1
28 Body 1
29 Gasket 1
30 O-Ring 1
No. Description QTY
31 Driver Guide 1
32 Spring Washer 4
33 Hex Bolt 4
34 Spring Washer 2
35 Hex Bolt 2
36 Spring 1
37 Safety 1
38 Regulating Nut 1
39 Spring 2
40 Ball 2
41 Clip 1
42 Nut 1
43 Safety 1
44 No-Mar Tip 1
45 Clip 1
46 Gasket 1
47 Flat Washer 5
48 Spring Washer 5
49 Hex Bolt 2
50 Hex Bolt 1
51 Bushing 1
52 Magazine Latch 1
53 Latch Bushing 1
54 Spring 1
55 Nut 1
56 Screw 2
57 Magazine 1
58 Cover Plate 1
59 Nail Guide 1
60 Tail Hanger 1

13
No. Description QTY
61 Nut 3
62 Hex Bolt 2
63 Pin 1
64 Hex Bolt 2
65 Pusher Guide 4
66 Pusher Unit 1
67 Clip 1
68 Pin 2
69 Nut 2
70 Limiting Block 2
71 Spindle 1
72 Bushing 1
73 Plastic Bushing 1
74 Pusher Spring 1
75 Pin 1
76 Pin 2
77 Safety Guide 1
78 O-Ring 1
79 O-Ring 1
80 Trigger Valve Body 1
No. Description QTY
81 O-Ring 1
82 O-Ring 1
83 O-Ring 1
84 Trigger Valve Body 1
85 Spring 1
86 Pin 2
87 O-Ring 2
88 Trigger Valve Stem 1
89 Inner Trigger Valve Seat 1
90 Compression Spring 1
91 Pin 1
92 Trigger Plate 1
93 O-Ring 1
94 Trigger 1
95 Pin 1
96 O-Ring 2
97 End Cap 1
98 Air Plug 1
99 Hand Grip 1

7613-2 08/10
15 GAUGE 2-1/2 INCH FINISH NAILER
CALIFORNIA PROPOSITION 65
WARNING: You can create dust
when you cut, sand, drill or grind
materials such as wood, paint,
metal, concrete, cement, or other
masonry. This dust often
contains chemicals known to
cause cancer, birth defects, or
other reproductive harm. Wear
protective gear.
WARNING: This product or its
power cord may contain
chemicals, including lead,
known to the State of California
to cause cancer and birth
defects or other reproductive
harm. Wash hands after
handling.
Important!
When using equipment, a few
safety precautions must be
observed to avoid injuries and
damage. Please read the complete
operating manual with due care.
Keep this manual in a safe place,
so that the information is available
at all times. If you give the
equipment to any other person,
give them these operating
instructions as well. We accept no
liability for damage or
accidents which arise due to
non-observance of these
instructions and the safety
information herein.
SPECIFICATIONS
Normal Operating Pressure:
70-110 PSI
Magazine Capacity: 100 nails
Firing Mode: Sequential Fire/
Contact Fire
Fastener Size Range:
15 ga.:
1.25 in. -
2.5 in.
FEATURES
•New designed light die cast
aluminum/magnesium body
•A rotating switch that can be
set to rapid-fire or sequential
fire
•Quick-release latch for jams
•Adjustable depth of penetration
•360 adjustable exhaust
cover
•Soft rubber grip handle
•No-mar tip protects work
surface
Application:
•Sheathing
•External softwood trim
•Framing
•Paneling
CAUTION:
FOR YOUR OWN SAFETY
READ INSTRUCTION
MANUAL COMPLETELY
AND CAREFULLY BEFORE
OPERATING THIS ENGINE
CLEANING GUN.
Any failures made in
following the safety
regulations and
instructions may result in
an electric shock, fire
and/or serious injury.
EXPLANATION OF
NAILING ACTION
•SINGLE ACTUATION
MECHANISM: First, press the
safety against the wood; next,
pull the trigger to drive the
fastener. After fastening
once, fastening will not be
possible again until the trigger
is released and pressed
again.
KIT: 7613

2
•CONTACT ACTUATION
MECHANISM: First, pull the
trigger; next, press the safety
against the wood to drive the
fastener. If the trigger is held
back, a fastener will be driven
each time the safety is pressed
against the wood.
•FULL SEQUENTIAL
ACTUATION MECHANISM:
First, press the safety against
the wood; next, pull the trigger
to drive the fastener. Follow the
same sequence to continue
driving fasteners.
GENERAL SAFETY
RULES
WORK AREA
•KEEP THE WORK AREA
CLEAN AND WELL LIT.
Cluttered benches and dark
areas increase the risk of injury.
•DO NOT OPERATE THE
TOOL IN EXPLOSIVE
ATMOSPHERES, such as in
the presence of flammable
liquids, gases, or dust. The tool
may create a spark that could
ignite flammable liquids, gases,
or dust.
•KEEP VISITORS AWAY. Do
not let visitors handle the tool.
All visitors should be kept safely
away from the work area.
•NEVER ENGAGE IN
HORSEPLAY WITH THE
TOOL. Respect the tool as a
working implement.
PERSONAL SAFETY
•OPERATORS AND OTHERS
IN WORK AREA MUST WEAR
SAFETY GLASSES WITH SIDE
SHIELDS. Safety glasses must
conform to ANSI Z87.1
specifications.
•ALWAYS WEAR EAR AND
HEAD PROTECTION. Wear ear
protection to protect your ears
from loud noises. Wear head
protection to protect your head
from flying objects.
•USE SAFETY EQUIPMENT. A
dust mask, non-skid safety
shoes, and a hard hat must be
used for the applicable
conditions. Wear a full face
shield if you are producing metal
filings or wood chips.
•DRESS PROPERLY. Do not
wear loose clothing or jewelry.
Contain long hair. Keep hair,
clothing, and gloves away from
moving parts. Loose clothes,
jewelry, or long hair can be
caught in moving parts and
increase the risk of injury.
•STAY ALERT, WATCH WHAT
YOU ARE DOING AND USE
COMMON SENSE WHEN
OPERATING A POWER TOOL.
Do not use tool while tired or
under the influence of drugs,
alcohol, or medication. A
moment of inattention while
operating the tool may cause
serious injury.
•AVOID UNINTENTIONAL
FIRING. Keep fingers away from
trigger when not driving
fasteners, especially when
connecting the tool to the air
supply.
•DO NOT OVERREACH. Keep
proper footing and balance at all
times. Proper footing and
balance enables better control of
the tool in unexpected situations.
•MAKE SURE AIR HOSE IS
FREE OF SNAGS AND
OBSTRUCTIONS. DO NOT
ATTACH AN AIR HOSE OR
TOOL TO YOUR BODY.
Entangled or snarled hoses can
cause a loss of balance or footing
in addition to unintentional tool
operation.
TOOL USE AND CARE
•NEVER POINT THE TOOL AT
YOURSELF OR OTHERS IN
THE WORK AREA. Always
assume the tool contains
fasteners. Never point the tool at
yourself or others, whether it
contains fasteners or not.
•KEEP FINGERS AWAY FROM
TRIGGER WHEN NOT DRIVING
FASTENERS TO AVOID
ACCIDENTAL FIRING. Never
carry the tool with the trigger
depressed, since you could
unintentionally drive a fastener
and injure yourself or someone
else. Always carry the tool by the
handle.
•NEVER MODIFY OR ALTER
THE TOOL. Doing so may cause
the tool to malfunction and
personal injuries may result.
•KNOW THIS TOOL. Read
manual carefully; learn its
applications and limitations, as
well as the specific potential
hazards related to this tool.
•USE ONLY FASTENERS THAT
ARE RECOMMENDED FOR
YOUR MODEL. Do not use the
wrong fasteners or load the
fasteners incorrectly.

3
•CHECK FOR MISALIGNMENT
OR BINDING OF MOVING
PARTS, BREAKAGE OF
PARTS, OR ANY OTHER
CONDITION THAT MAY
AFFECT THE TOOL’S
OPERATION. If damaged, have
the tool serviced by an
authorized technician before
using. Many accidents are
caused by poorly maintained
tools.
•CHECK SAFETY BEFORE
USE. Make sure the safety
operates properly. Never use
the tool if the safety is not
operating properly. Do not
tamper with or remove the
safety.
•DO NOT USE THE TOOL IF
THE TRIGGER DOES NOT
ACTUATE PROPERLY. Any
tool that cannot be controlled
with the trigger is dangerous
and must be repaired.
•NEVER USE A TOOL THAT IS
DEFECTIVE OR OPERATING
ABNORMALLY. If the tool
appears to be operating
unusually, making strange
noises, or otherwise appears
defective, stop using it
immediately and arrange for
repairs by an authorized service
center.
•MAINTAIN TOOLS WITH
CARE. Keep the tool clean and
lubricated for better and safer
performance.
•NEVER CARRY THE TOOL
BY THE AIR HOSE.
•STORE TOOLS OUT OF THE
REACH OF CHILDREN AND
UNTRAINED PEOPLE. Tools
are dangerous in the hands of
untrained users.
•PLACE TOOL PROPERLY ON
THE WORK PIECE. Do not drive
fasteners on top of other
fasteners or with the tool at too
steep of an angle; the fasteners
can ricochet and cause serious
injury.
•DO NOT USE TOOL AS A
HAMMER.
•KEEP ALL SCREWS AND
COVERS TIGHTLY IN PLACE.
•KEEP FACE, HANDS, AND
FEET AWAY FROM FIRING
HEAD AT ALL TIMES.
•DO NOT DISCONNECT AIR
HOSE FROM TOOL WITH
YOUR FINGER ON THE
TRIGGER. The tool can fire
when reconnected to an air
supply.
•DO NOT LOAD FASTENERS
WITH TRIGGER PULLED OR
SAFETY DEPRESSED.
•NEVER PLACE A HAND OR
ANY PART OF THE BODY IN
FASTENER DISCHARGE AREA
OF TOOL.
•DO NOT DRIVE FASTENERS
INTO THIN BOARDS OR NEAR
EDGES OF WORK PIECE.
•DISCONNECT AIR HOSE
FROM TOOL WHEN:
1. Doing maintenance and
inspection
2. Loading fasteners
3. Turning the adjuster and top
cover
4. Clearing a jam
5. It is not in use
6. Leaving the work area
7. Moving it to another
location
8. Handing it to another
person
NOTE: Never attempt to clear a
jam or repair the tool unless you
have disconnected the air hose
from the tool and removed all
remaining fasteners from the
tool.
TOOL SERVICE
•USE ONLY ACCESSORIES
THAT ARE IDENTIFIED BY
THE MANUFACTURER FOR
THE SPECIFIC TOOL MODEL.
•USE OF UNAUTHORIZED
PARTS OR FAILURE TO
FOLLOW MAINTENANCE
INSTRUCTIONS MAY CREATE
A RISK OF INJURY.
•USE ONLY THE LUBRICANTS
SUPPLIED WITH THE TOOL
OR SPECIFIED BY THE
MANUFACTURER.
•TOOL SERVICE MUST ONLY
BE PERFORMED BY A
QUALIFIED REPAIR
PERSONNEL.
AIR SOURCE
•NEVER USE OXYGEN OR
OTHER BOTTLED GASES AS
A POWER SOURCE. Explosion
may occur. Combustible gases
and other bottled gases are
dangerous and may cause the
tool to explode.
•DO NOT EXCEED THE
MAXIMUM RECOMMENDED
AIR PRESSURE MARKED ON
THE TOOL. Use only clean,

4
•dry, regulated, compressed air
within the rated pressure range
marked on the tool. Never
connect the tool to pressure that
could potentially exceed 200
PSI.
•DO NOT ABUSE THE AIR
HOSE.
Protect all hoses from kinks,
restrictions, solvents, or sharp
objects. Keep air hose away
from heat, oil, sharp edges, or
moving parts. Replace
damaged hoses immediately.
Damaged hoses can burst or
whip around.
•CHECK ALL FITTINGS,
HOSES, PIPES,
CONNECTIONS, AND
COMPRESSOR BEFORE
EACH USE. Repair or replace
damaged or leaking hoses and
connections immediately.
Damage to a hose or
connection may cause a
pressure hose to break and
whip around the work area,
which may lead to injury.
FUNCTIONAL
DESCRIPTION
(See FIG 1)
WARNING
Disconnect the tool from the air
source before making any
adjustments, changing
accessories, or storing the tool.
Such precautionary safety
measures reduce the risk of
unintentional tool operation.
ASSEMBLY/
INSTALLATION
Follow the instructions below to
prepare your tool for operation.
1. All tool operators and their
immediate supervisors must
become familiar with the
operator safety instructions
before operating the tool.
2. Included with each tool is
one copy of these
Operating/Safety Instructions.
Keep this publication for future
reference.
3. Select a hose with a
minimum inner diameter of 1/4
inch and a maximum length of
100 feet.
WARNING
To reduce the risk of injury from
a hose bursting, select hoses
that are rated at a maximum of
200 PSI.
4. Select fittings that are
appropriately sized for the
selected hoses. The tool and
air hose must have a hose
coupling such that all pressure
is removed from the tool when
the coupling joint is
disconnected.
WARNING
Never use non-relieving
couplers and/or female quick
disconnect couplings on the
tool. Non-relieving coupling and
female couplings will trap high
pressure air in the tool when the
air line is disconnected. This will
leave the tool charged with
enough air after it has been
disconnected to drive a nail.
Only MALE pneumatic type air

5
connectors should be fitted to
the tool, so that high pressure
air in the tool is vented as soon
as the air line is disconnected.
5. Set the regulator at the air
delivery system to a PSI that
falls within the tool’s operating
range of 70-110 PSI. The
correct pressure is the lowest
pressure that will do the job.
OPERATION
LUBRICATION
WARNING
USE ONLY THE AIR TOOL
LUBRICANTS SUPPLIED
WITH THE TOOL. Do not use
other lubricants as they may
damage the tool. If the tool is
not used with an in-line
lubrication system on the air
supply, it is necessary to
periodically lubricate the tool
with air tool lubrication.
Under low use, lubricate once a
day. Under heavy use, lubricate
twice a day.
To lubricate, insert 2-3 drops of
lubricant into the air supply
fitting attached to the tool
handle (FIG 2). Using too much
oil will cause it to collect in the
tool and be noticeable in the
exhaust.
Do not use detergent oil, WD-40,
transmission fluid, motor oil, or
other lubrication not specifically
designed as air tool lubricants.
These lubricants will cause
accelerated wear to the seals, O-
rings, and bumpers in the tool,
resulting in poor tool
performance and frequent
maintenance.
ADJUSTING AIR
PRESSURE
Adjust the air pressure at
recommended operating
pressure 70-110 PSI according
to the length of nails and the
hardness of the work piece.
The correct air pressure is the
lowest pressure that will do the
job. Using the tool at a higher
than required air pressure
unnecessarily over stresses the
tool. Do not exceed 110 PSI.
CONNECTING AIR
SUPPLY
WARNING
Never use oxygen or other
bottled gases as a power source.
Explosion may occur.
Combustible gases are
dangerous and may cause the
tool to explode.
WARNING
Never connect the tool to an air
source that is capable of
producing air pressure exceeding
200 PSI. Excessive pressure can
cause abnormal operation or
cause the tool to burst, resulting
in personal injury.
WARNING
Do not exceed maximum
recommended air pressure
marked on the tool. Verify prior
to using the tool that the air
source
has been adjusted within the
rated air pressure range. Be
sure the air pressure gauge is
operating properly and check it
at least twice a day. Tools
operated in excess of their
maximum pressure rating may
operate abnormally or burst,
resulting in personal injury.
To connect the tool to the
compressor, only use
pneumatic air hoses that meet
the following criteria:
1. Maximum hose pressure
rating: 200 PSI
2. Minimum hose inner
diameter: 1/4 inch
3. Maximum hose length: 100
feet
CONNECT THE AIR SUPPLY
•Snap the air hose onto the
quick connector.
•Check for air leakage. If
leakage is noted, cease using
the tool immediately and have it
checked by a qualified repair
personnel.
•Be sure the air pressure gauge
is operating properly and check
it at least twice a day.

6
TOOL TESTING
DANGER
OPERATORS AND OTHERS IN
WORK AREA MUST WEAR
SAFETY GOGGLES WITH SIDE
SHIELDS, WHICH CONFORM
TO ANSI Z87.1
SPECIFICATION.
WARNING
NEVER USE TOOL UNLESS
SAFETY IS OPERATING
PROPERLY.Before actually
beginning the nailing work, test
the tool by using the checklist
below. Conduct the test in the
following order.
If abnormal operation occurs,
stop using the tool and have it
repaired by a qualified repair
personnel immediately.
1. Disconnect air hose and
remove all nails from the tool.
•ALL SCREWS MUST BE
TIGHTENED. If any screws are
loose, tighten them.
2. Adjust the air pressure to 70
PSI and then connect the air
hose. Do not load any nails into
the tool. Set the switching to
the upward position.
SINGLE ACTUATION
MECHANISM
Set the button to the upward
position completely as shown in
FIG 5. Otherwise, it will not
operate properly.
CONTACT ACTUATION
MECHANISM
Set the button to the downward
position completely as shown in
FIG 6. Otherwise, it will not
operate properly.
•THE TOOL MUST NOT LEAK
AIR.
3. Remove the finger from the
trigger and press the safety
against the wood.
•THE TOOL MUST NOT
OPERATE.
4. Separate the safety from the
wood. Next, point the tool
downward, pull the trigger and
then wait in that position for 5
seconds or longer.
•THE TOOL MUST NOT
OPERATE.
5.
1.
Without touching the
trigger, depress the safety
against the work piece. Pull the
trigger.
•THE TOOL MUST OPERATE.
2.
Hold the trigger back while
separating the safety from the
wood. The tool will remain in
operated status (the driver
blade will remain at the
bottom).
3.
Remove the finger from the
trigger .
Tool operation will end
(the
driver blade will return to the top).
6. If no abnormal operation is
observed, you may load nails in
the tool. Drive nails into the
work piece that is the same
type to be used in the actual
application.
•THE TOOL MUST OPERATE
PROPERLY.
NAIL LOADING
WARNING
Always load nails into the tool’s
magazine before the air supply is
connected. Connecting the air
supply after loading nails reduces
the risk of unintentionally driving
a nail and injuring yourself or
someone else.
WARNING
When loading the tool’s
magazine, check that the nail tips
contact the wear rail and slide
smoothly against the surface of
the magazine. If the nails are not
loaded properly, the tool will
misfire and nails can be
deflected, causing the tool to
react in an unexpected manner
and damage the tool.
1. Disconnect the air supply.
2. Insert the nail strip into the
back of the magazine (FIG 7).
/