Page is loading ...

TO PREVENT SERIOUS INJURY, READ AND UNDERSTAND ALL WARNINGS AND INSTRUCTIONS BEFORE USE.
WARNING: When using tool, basic safety precautions should always be followed to reduce the risk of personal injury
and damage to equipment. Read all instructions before using this tool!
1. Pinch Danger. If not properly used, the scissor-like action of this tool may cause pinch injury. Wear protective
gloves and be careful to avoid pinch injury.
2. Small pieces choking hazard. During riveting, small pins are left as waste. Dispose of rivets and all small
pieces properly.
3. Prevent eye injury. Wear ANSI approved eye protection when using this tool to prevent eye injury.
4. Keep children away. Do not let children handle rivets, rivet pins or other small parts.
Warning: The warnings, cautions, and instructions discussed in this instruction manual cannot cover all possible
conditions and situations that may occur. It must be understood by the operator that common sense and caution are
factors which cannot be built into this product, but must be supplied by the operator.
NOTE: Rivets, rivet nuts and anchor rivets are not supplied with this kit. They must be purchased separately.
To install Blind Rivets (3/16”, 5/32”, 1/8” or 3/32”):
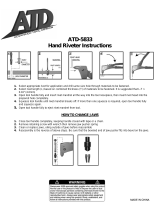
1. Drill the proper sized hole for the rivet you are using.
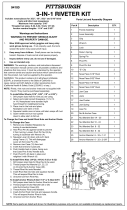
2. Select and install the correct Nosepiece (11, 12, 13 or 14). Nosepieces have a standard right hand thread
for installing and removing.
3. Place the rivet in the hole, and place the Nosepiece over the stem of the rivet.
4. Squeeze the handle once or twice until the stem snaps off the rivet.
5. Open the handle and turn the tool upside down to allow the stem to fall out.
To install Nut Rivets and Rivet Anchors, you must change the Case. Rivet Nuts and Rivet Anchors use the
same Case.
Changing the Case:
1. Remove any installed Nosepiece by turning it counterclockwise.
2. Hold the Pivot Pin (8) against the handle to prevent it turning. Loosen the Pivot Pin Nut (9) by turning it
clockwise with the Wrench (4).
3. Squeeze the Lever (2) down, and pull it back along the Frame (1). This will disengage the Lever (2) from the
Axis Pin (19).
4. Remove the Jaw Case (15) from the tool.
5. Insert the Nut & Anchor Case (20).
6. Push the Handle back in place, being sure that the Case Pins fit into the Handle slots.
7. Push the Pivot Pin (8) back in place, and retighten it with the Wrench (4).
To install Rivet Nuts (¼-20, 110-24, 8-32 or 6-32):
1. Drill the proper sized hole for the Rivet Nut to be used.
2. Thread the proper Nut Mandrel (21, 22, 23 or 24) onto the Nut & Anchor Case (20).
3. Thread the Rivet Nut onto the Mandrel.
4. Insert the Rivet Nut into the hole and squeeze the handle. This will expand the Rivet Nut in the hole.
5. Unscrew the tool from the Rivet Nut.
To install Anchor Rivets (6-32x1-¼” or 6-32x2-3/8”):
1. Drill the proper sized hole for the Anchor Rivet to be used.
2. Thread the proper Anchor Mandrel (25 or 26) onto the Nut & Anchor Case (20).
3. Thread the Anchor Rivet onto the Mandrel.
4. Insert the Anchor Rivet into the hole and squeeze the handle. This will expand the Anchor Rivet in the hole.
5. Unscrew the tool from the Anchor Rivet.
NOTE: Some parts are listed and shown for illustration purposes only and are not available individually as replacement parts.
#traPnoitpircseD.YTQ#traPnoitpircseD.YTQ
1ylbmessAemarF141teviR"23/3eceiPesoN1
2ylbmessAreveL151esaCwaJ1
3pirG261swaJ2
4hcnerW17
1rehsuPwaJ1
5kcoL181gnirpSwaJ1
6gnirpSnruteR191niPsixA1
7niPgnirpS102esaCrohcnA&tuN1
8niPtoviP11202-4/1teSlerdnaMtuN1
9tuNniPtovi
P12242-01teSlerdnaMtuN1
01pilC"S"23223-8teSlerdnaMtuN1
11teviR"61/3eceiPesoN14223-6teSlerdnaMtuN1
21teviR"23/5eceiPesoN15
2"¼-1x23-6lerdnaMrohcnA1
31teviR"8/1eceiPesoN162"8/3-2x23-6lerdnaMrohcnA1
Assembly Diagram
Parts List
/


