Page is loading ...

Service Manual

1
K
O
N
M

2

3
©2016 STANLEY Black & Decker
All rights reserved.
The information provided may not be reproduced and/or made public in any way and through any means (electronically or
mechanically) without prior explicit and written permission from STANLEY Engineered Fastening. The information provided is based
on the data known at the moment of the introduction of this product. STANLEY Engineered Fastening pursues a policy of continuous
product improvement and therefore the products may be subject to change. The information provided is applicable to the product
as delivered by STANLEY Engineered Fastening. Therefore, STANLEY Engineered Fastening cannot be held liable for any damage
resulting from deviations from the original specifications of the product.
The information available has been composed with the utmost care. However, STANLEY Engineered Fastening will not accept any
liability with respect to any faults in the information nor for the consequences thereof. STANLEY Engineered Fastening will not
accept any liability for damage resulting from activities carried out by third parties. The working names, trade names, registered
trademarks, etc. used by STANLEY Engineered Fastening should not be considered as being free, pursuant to the legislation with
respect to the protection of trade marks.
CONTENT
1. Safety Definitions 4
1.1. GENERAL SAFETY 4
1.2. POWER TOOL USE AND CARE 4
1.3. IMPORTANT SAFETY INSTRUCTIONS FOR ALL BATTERY CHARGERS 5
1.4. IMPORTANT SAFETY INSTRUCTIONS FOR ALL BATTERY PACKS 6
1.5. SPECIFIC SAFETY INSTRUCTIONS FOR LITHIUM-ION (LI-ION) 7
1.6. RESIDUAL RISKS 7
1.7. LABELS AND ICONS 7
2. SPECIFICATIONS 8
2.1. TECHNICAL DATA 8
2.2. PLACING SPECIFICATIONS 10
2.3. PACKAGE CONTENTS 10
2.4. MAIN COMPONENTS LIST 11
2.5. OPTIONAL ACCESSORIES 11
3. Tool Use & Set up 12
4. Operating Instructions 12
4.1. NOSE EQUIPMENT 12
4.2. CHARGERS 13
4.3. BATTERY PACKS 14
5. Operating Procedure 14
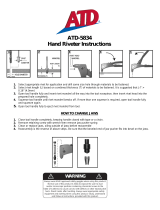
5.1. Proper Hand Position 15
5.2. Tool Operation 15
6. Servicing the tool 16
6.1. Maintenance frequency 16
6.2. Cleaning 16
6.3. Spare Parts – Tools 17
6.4. Rechargeable Battery Pack 17
6.5. Protecting the Environment 17
7. Jaws, Jaw Guide, Jaw Pusher and Jaw Pusher Spring 18
8. SA Nose Housing and SA Nose Piece 22
9. Operation Test and Appearance check 24
10. Accessories 25
11. Exploded View 27
12. BOM 28
13. Troubleshooting Guide 34

4
1. Safety Definitions
The definitions below describe the level of severity for each signal word. Please read the manual and pay
attention to these symbols.
DANGER: Indicates an imminently hazardous situation which, if not avoided, will result in death or
serious injury.
CAUTION: Indicates a potentially hazardous situation which, if not avoided, may result in minor or
moderate injury.
WARNING: Indicates a potentially hazardous situation which, if not avoided, could result in death or
serious injury.
NOTICE: Indicates a practice not related to personal injury which, if not avoided, may result in property
damage.
Denotes risk of electric shock
Denotes risk of fire
Improper operation or maintenance of this product could result in serious injury and property damage.
Read and understand all warnings and operating instructions before using this equipment. When using
power tools, basic safety precautions must always be followed to reduce the risk of personal injury.
1.1. GENERAL SAFETY
WARNING! Read all safety warnings and all instructions. Failure to follow the warnings and instructions
may result in electric shock, fire and/or serious injury.
SAVE ALL WARNINGS AND INSTRUCTIONS FOR FUTURE REFERENCE
The term “power tool” in the warnings refers to your mains-operated (corded) power tool or battery-operated
(cordless) power tool.
• Do not use outside the design intent of Placing STANLEY Engineered Fastening Blind Fasteners.
• Use only parts, fasteners, and accessories recommended by the manufacturer.
• Use Power Tool only with specifically designated battery packs.
1.2. POWER TOOL USE AND CARE
• The tool must be maintained in a safe working condition at all times and examined at regular intervals for damage and
function by trained personnel. Any dismantling procedure will be undertaken only by trained personnel. Do not dismantle
this tool without prior reference to the maintenance instructions.

5
• Do not modify the tool in any way. Any modification to the tool is undertaken by the customer and will be the customer’s
entire responsibility and void any applicable warranties.
• Disconnect the battery from the tool before performing any maintenance, attempting to adjust, fit or remove a nose
assembly.
• Prior to use, check for misalignment or binding of moving parts, breakage of parts, and any other condition that affects the
tool’s operation. If damaged, have the tool serviced before using. Remove any adjusting key or wrench before use.
• Prior to use, inspect battery for damage. Do not drop battery. A sharp impact may cause internal damage and lead to
premature battery failure.
• Keep work area clean and well lit.
• Dress properly. Do not wear loose clothing or jewelry. Keep your hair, clothing and gloves away from moving parts. Loose
clothes, jewelry or long hair can be caught in moving parts.
• Adopt a firm footing or a stable position before operating the tool.
• Operators and others in work area must wear ANSI Z87.1 CAN/CSA Z94.3 approved safety glasses with side shields. Always
wear safety glasses and ear protection during operation.
• Adequate clearance is required for the tool operator’s hands before proceeding.
• Do not operate a tool that is directed towards any person(s).
• DO NOT operate tool with the nose housing removed.
• Do not operate the tool or the charger in an explosive atmosphere or environment allowing exposure to combustible fluids
or gasses.
• Do not operate the tool or the charger in an environment allowing exposure to moisture or rain to avoid risk of electric
shock.
• Do not abuse the tool by dropping or using it as a hammer.
• Keep dirt and foreign matter out of the air vents of the tool as this will cause the tool to malfunction.
• Keep tool handles dry, clean, and free from oil and grease.
• When carrying the tool from place to place keep hands away from the trigger to avoid inadvertent activation.
• Never leave operating tool unattended.
• Disconnect battery when tool is not in use.
1.3. IMPORTANT SAFETY INSTRUCTIONS FOR ALL BATTERY CHARGERS
SAVE THESE INSTRUCTIONS: This manual contains important safety and operating instructions for compatible battery chargers
(refer to Technical Data).
• Before using charger, read all instructions and cautionary markings on charger, battery pack, and product using battery
pack.
WARNING: Shock hazard. Do not allow any liquid to get inside charger. Electric shock may result.
WARNING: We recommend the use of a residual current device with a residual current rating of 30mA or less.
CAUTION: Burn hazard. To reduce the risk of injury, charge only DEWALT®/POP®Avdel® rechargeable batteries. Other
types of batteries may burst causing personal injury and damage.
CAUTION: Children should be supervised to ensure that they do not play with the appliance.

6
NOTICE: Under certain conditions, with the charger plugged into the power supply, the exposed charging contacts inside the
charger can be shorted by foreign material. Foreign materials of a conductive nature such as, but not limited to, steel wool,
aluminium foil or any build-up of metallic particles should be kept away from charger cavities. Always unplug the charger from
the power supply when there is no battery pack in the cavity. Unplug charger before attempting to clean
• DO NOT attempt to charge the battery pack with any chargers other than the ones in this manual. The charger and battery
pack are specifically designed to work together.
• These chargers are not intended for any uses other than charging DEWALT®/POP®Avdel® rechargeable batteries. Any other
uses may result in risk of fire, electric shock or electrocution.
• Do not expose charger to rain or snow.
• Pull by plug rather than cord when disconnecting charger. This will reduce risk of damage to electric plug and cord.
• Make sure that cord is located so that it will not be stepped on, tripped over, or otherwise subjected to damage or stress.
• Do not use an extension cord unless it is absolutely necessary. Use of improper extension cord could result in risk of fire,
electric shock, or electrocution.
• Do not place any object on top of charger or place the charger on a soft surface that might block the ventilation slots and
result in excessive internal heat. Place the charger in a position away from any heat source. The charger is ventilated
through slots in the top and the bottom of the housing.
• Do not operate charger with damaged cord or plug—have them replaced immediately.
• Do not operate charger if it has received a sharp blow, been dropped, or otherwise damaged in any way. Take it to an
authorised service centre.
• Do not disassemble charger; take it to an authorised service centre when service or repair is required. Incorrect reassembly
may result in a risk of electric shock, electrocution or fire.
• Disconnect the charger from the outlet before attempting any cleaning. This will reduce the risk of electric shock. Removing
the battery pack will not reduce this risk.
• NEVER attempt to connect two chargers together.
• The charger is designed to operate on standard household electrical power (refer to charger specifications). Do not attempt
to use it on any other voltage. This does not apply to the vehicular charger.
1.4. IMPORTANT SAFETY INSTRUCTIONS FOR ALL BATTERY PACKS
When ordering replacement battery packs, be sure to include catalog number and voltage.
The battery pack is not fully charged out of the carton. Before using the battery pack and charger, read the safety instructions
below. Then follow charging procedures outlined.
READ ALL INSTRUCTIONS
• Do not charge or use battery in explosive atmospheres, such as in the presence of flammable liquids, gases or dust. Inserting
or removing the battery from the charger may ignite the dust or fumes.
• Never force battery pack into charger. Do not modify battery pack in any way to fit into a non-compatible charger as battery
pack may rupture causing serious personal injury.
• Charge the battery packs only in DEWALT®/POP®Avdel® chargers.
• DO NOT splash or immerse in water or other liquids.
• Do not store or use the tool and battery pack in locations where the temperature may reach or exceed 40 ˚C (104 ˚F) (such as
outside sheds or metal buildings in summer).
• When battery pack is not in use, keep it away from other metal objects like paper clips, coins, keys, nails, screws or other
small metal objects that can make a connection from one terminal to another.
• Do not discard batteries into water.

7
WARNING: Never attempt to open the battery pack for any reason. If battery pack case is cracked or damaged, do not
insert into charger. Do not crush, drop or damage battery pack. Do not use a battery pack or charger that has received a sharp
blow, been dropped, run over or damaged in any way (i.e., pierced with a nail, hit with a hammer, stepped on). Electric shock or
electrocution may result. Damaged battery packs should be returned to service centre for recycling.
WARNING: Fire hazard. Do not store or carry the battery pack so that metal objects can contact exposed battery
terminals. When transporting individual battery packs, make sure that the battery terminals are protected and well insulated
from materials that could contact them and cause a short circuit.
CAUTION: When not in use, place tool on its side on a stable surface where it will not cause a tripping or falling hazard.
Some tools with large battery packs will stand upright on the battery pack but may be easily knocked over.
1.5. SPECIFIC SAFETY INSTRUCTIONS FOR LITHIUM-ION (LI-ION)
1. Do not incinerate the battery pack even if it is severely damaged or is completely worn out. The battery pack can explode
in a fire. Toxic fumes and materials are created when lithium-ion battery packs are burned.
2. If battery contents come into contact with the skin, immediately wash area with mild soap and water. If battery liquid
gets into the eye, rinse water over the open eye for 15 minutes or until irritation ceases. If medical attention is needed, the
battery electrolyte is composed of a mixture of liquid organic carbonates and lithium salts.
3. Contents of opened battery cells may cause respiratory irritation. Provide fresh air. If symptoms persists, seek medical
attention.
WARNING: Burn hazard. Battery liquid may be flammable if exposed to spark or flame.
1.6. RESIDUAL RISKS
In spite of the application of the relevant safety regulations and the implementation of safety devices,
certain residual risks cannot be avoided. These are:
− Impairment of hearing
− Risk of personal injury due flying particles
− Risk of burns due to accessories becoming hot during operation.
− Risk of personal injury due to prolonged use.
1.7. LABELS AND ICONS
Markings on Tool
DATE CODE POSITION: The Date Code, which includes the year, month and location of manufacture, is printed into the
housing surface that forms the mounting joint between tool and battery.
Labels on charger and battery pack
In addition to the pictographs used in this manual, the labels on the charger and the battery pack show the following
pictographs.
Read instruction manual before use.
Charge only between 4 °C and 40 °C.

8
Read instruction manual before use.
Discard the battery pack with due care for the
environment.
Battery charging.
Do not incinerate the battery pack.
Battery charged.
Only for indoor use.
Hot/cold pack delay.
Your DeWALT charger is double insulated in
accordance withEN60335; therefore no earth
wire is required.
Do not charge damaged battery packs.
Do not expose to water.
Charge DeWALT/POP-Avdel battery packs only
with designated DeWALT/POP-Avdel chargers.
Charging battery packs other than the
designated DeWALT/POP-Avdel batteries with a
DeWALT/POP-Avdel charger may make them
burst or lead to other dangerous situations.
Have defective cords replaced
immediately.
Risk of electric shock.
STANLEY Engineered Fastening policy
is one of continuous product development and improvement
and we reserve the right to change the specification
of any product without prior notice.
2. SPECIFICATIONS
2.1. TECHNICAL DATA
2.1.1.
ProSet® PB2500
Voltage
V
18 nom/20 max
Type
1/2
Battery Type
Li-ion
Weight (without battery pack)
kg
1.35
Lpa (sound pressure)
dB(A)
74
Kpa (sound pressure uncertainty)
dB(A)
3
Lwa (sound power)
dB(A)
85
Kwa (sound power uncertainty)
dB(A)
3
Vibration total values (triax vector sum) determined according to EN 60745:
Vibration emission value ah
ah =
m/s2
< 2.5
Uncertainty K =
m/s2
1.5

9
2.1.2.
Model
PB2500 2.0 Ah
PB2500 4.0Ah
Weight
kg [lbs]
1.7 [3.75]
2.0 [4.41]
Length
mm [in]
320 [12.6]
320 [12.6]
Height
mm [in]
240 [9,4]
260 [10,2]
Stroke
mm [in]
25 [0.984]
25 [0.984]
Pulling Force
N [lbf]
8,500 [1911]
8,500 [1911]
Rivet Range
nom. dia.
mm [in]
ø 2,4 [3/32”]) thru ø 4,8 [3/16”])
2.1.3.
Battery Pack*
Battery type
Li-ion
Voltage
V
DC
18 nom/20 max
Capacity
Ah
2.0/4.0
Weight
Kg
0.40/0.61
Charging duration
min
30/60
Charger*
NA
JP
QW/GB/XE
Battery type
Li-ion
Li-ion
Li-ion
Battery type Mains voltage
V
AC
120
100
230
Input frequency
Hz
60
50/60
50
Weight
kg
0.50
0.50
0.50
Fuses
Europe
230 V tools 10 Amperes. mains
U.K. & Ireland
230 V tools 3 Amperes. in plugs
* PB Series tools are compatible with DEWALT/POP-Avdel 18V nom/20V max Li-Ion slide type batteries
** Charging duration is based on the DCB115 DEWALT Charging units
2.1.4.
Nom. Rivet Dia.
Mm [in]
Battery 2.0Ah
Battery 4.0Ah
Ø 2,4 [3/32]
1,700
3,400
Ø 3,2 [1/8]
1,600
3,200
Ø 4,0 [5/32]
1,400
2,800
Ø 4,8 [3/16]
1,200
2,400
Note: These values are listed as a guide only and are estimates based on a fully charged battery. Results may
vary depending on rivet material, tool/battery condition and work environment.

10
2.2. PLACING SPECIFICATIONS
Rivet Type
2.4mm
[3/32´´]
3.0mm
3.2mm
[1/8´´]
4.0mm
[5/32´´]
4.3mm
4.8mm
[3/16´´]
5.0mm 6.0mm 7.0mm
OPEN END
●
●
●
●
●
CLOSED END
●
●
●
HR (except SSHR)
●
●
●
SSD SSHR
●
●
TL
●
●
Pull-Thru
●
T-Rivet (Emhart)
●
Avex®
●
●
●
●
Stavex®
●
●
●
Avinox®
●
●
●
Avibulb®
●
●
●
LSR / Bulbex®
●
●
●
T-Lok®
●
●
Avdel® SR
●
●
●
Interlock®
●
Monobolt®
●
Aveseal®(STD)
●
●
●
●
Q Rivet
●
●
Klamp-Tite BAPK®
●
Klamp-Tite BAPKTR®
●
VGrip
●
Note: For details on the nose equipment please refer to the accessories manual.
2.3. PACKAGE CONTENTS
This package contains:
1 Cordless Installation Tool*
1 Charger
1 Lithium Ion battery pack
1 set Nose Equipment Accessories (3.2mm, 4.0mm, 4.8mm)
1 Kit Box
1 Instruction Manual
* If the Model Number purchased is a bare tool then only the Cordless Installation Tool will be supplied with a standard
set of 3.2mm [1/8“], 4.0mm
[5/32“] and 4.8mm [3/16“] Open End Nose Equipment installed.

11
2.4. MAIN COMPONENTS LIST
A
Nose pieces
L
Manual
B
Nose housing
M
Charger lamp
C
Nose housing nut
N
Charger
D
Collector lock
O
Battery charger connection
E
Collector shutter
P
Jaw guide
F
Shutter guide sleeve
Q
Jaws
G
Motor housing
R
Jaw pusher
H
Exhaust vent
S
Spring
I
Handle
T
Pulling head
J
Switch
U
Front clutch
K
Battery pack 2.0 Ah
W
Collector space
K2
Battery pack 4.0 Ah
Y
Rivet
2.5. OPTIONAL ACCESSORIES
WARNING: Since accessories, other than those offered by POP-Avdel® have not been tested with this
product, use of such accessories with this tool could be hazardous. To reduce the risk of injury, only
POP- Avdel® recommended accessories should be used with this product.
Consult your dealer for further information on the appropriate accessories.
WARNING: To reduce the risk of serious personal injury, disconnect battery pack before making any
adjustments or removing/installing attachments or accessories.
For a complete list of nose equipment and other accessories available for the PB Series, please visit our
website
http://www.stanleyengineeredfastening.com/resource-center/document-library

12
3. Tool Use & Set up
The PB Series of tools are designed for installation of STANLEY Engineered Fastening Blind
Fasteners.
DO NOT use under wet conditions or in presence of flammable liquids or gases.
READ ALL SAFETY WARNINGS AND INSTRUCTIONS BEFORE PUTTING TOOL INTO SERVICE.
Electrical Safety
The electric motor has been designed for one voltage only. Always check that the battery pack
voltage corresponds to the voltage on the rating plate. Also make sure that the voltage of your
charger corresponds to that of your mains.
Your DeWalt/POP-Avdel charger is double insulated in accordance with EN60335;
therefore no earth wire is required.
Using an Extension Cable
An extension cord should not be used unless absolutely necessary. Use an approved extension
cable suitable for the power input of your charger (see Technical Data). The minimum
conductor size is 1 mm2; the maximum length is 30 m.
When using a cable reel, always unwind the cable completely.
Before Use
• Select relevant size nose equipment and install
• Ensure that the battery is fully charged
• Insert Battery Pack into the tool
•Quickly pull and release the trigger to set the tool to the home position.
4. Operating Instructions
ALWAYS wear approved hearing and eye protection at all times when using
installation equipment
WARNING: Before adjusting tool, always remove the battery pack.
4.1. NOSE EQUIPMENT
Mounting the nosepiece (fig. 7).
• Select the correct nosepiece for the rivet to be installed. Ref. Nose Piece chart.
• Tighten the nosepiece into the nose housing (B) by turning it clockwise using 11 mm spanner.

13
Mounting the jaw pusher (fig. 4 & 5)
• Select the correct jaw pusher or jaw pusher assembly (R) that matches the Nose Piece selected. Ref.
the Accessories Manual for appropriate nose equipment
• Insert jaw pusher (R) into jaw pusher spring (S).
• Reassemble jaw set (Q) and jaw guide (P) onto front clutch (U)
Note: Do NOT use spanners to mount jaw guide (P) onto front clutch (U). Manual tightening of Jaw
guide (P) is enough to lock onto front clutch (U)
4.2. CHARGERS
Your tool uses a
DEWALT/POP-AVDEL
charger. Be sure to read all safety instructions before using your charger. The
charger requires no adjustment and is designed to be as easy as possible to operate.
Charging Procedure (fig. 2)
•
Plug the charger into an appropriate outlet before inserting the battery pack. (Refer to the Charger
Specifications in Section 2)
•
Insert the battery pack (K) into the charger, making sure the pack is fully seated in the charger. The red
(charging) light will blink continuously indicating that the charging-process has started.
•
The completion of charge will be indicated by the red light remaining ON continuously. The pack is fully
charged and may be used at this time or left in the charger.
NOTE: To ensure maximum performance and life of Li-Ion battery packs, charge the battery pack fully before
first use.
Charging Process
Refer to the table below for the state of charge of the battery pack.
Charge indicators
charging
fully charged
hot/cold pack delay*
*The red light will continue to blink, but a yellow indicator light will be illuminated during operation. Once the battery
has reached an appropriate temperature, the yellow light will turn off and the charger will resume the charging
procedure.
This charger will not charge a faulty battery pack. The charger will indicate faulty battery by refusing to light.
NOTE: This could also mean a problem with a charger.
If the charger indicates a problem, take the charger and battery pack to be tested at an authorised service centre.

14
Hot/Cold Pack Delay
When the charger detects a battery that is too hot or too cold, it automatically starts a hot/cold pack delay, suspending
charging until the battery has reached an appropriate temperature. The charger then automatically switches to the pack
charging mode. This feature ensures maximum battery life.
A cold battery pack will charge at about half the rate of a warm battery pack. The battery pack will charge at that slower
rate throughout the entire charging cycle and will not return to maximum charge rate even if the battery warms.
Lithium-Ion Battery Packs only
STANLEY Engineered Fastening PB Series Li-Ion tools are designed with an Electronic Protection System that will protect
the battery against overloading, overheating or deep discharge.
The tool will automatically turn off if the Electronic Protection System engages. If this occurs, place the Li-Ion battery on
the charger until it is fully charged.
4.3. BATTERY PACKS
Your tool is designed to work specifically with
DEWALT/POP-Avdel 18V/20V max Li-Ion battery packs.
Inserting and Removing the Battery Pack from the Tool (fig. 3)
NOTE: For best results, make sure your battery pack is fully charged. The tool will shut off without warning
when the battery is fully discharged.
TO INSTALL THE BATTERY PACK INTO THE HANDLE
• Align the battery pack (K) with the rails inside the tool’s handle (fig. 3).
• Slide it into the handle until the battery pack is firmly seated in the tool and ensure that it does not
disengage.
TO REMOVE THE BATTERY PACK FROM TO THE HANDLE
• Press battery release button and firmly pull the battery pack out of the tool handle.
• Insert battery pack into the charger as described in the charger section for this manual.
Storage Recommendations
•
The best storage place is one that is cool and dry away from direct sunlight and excess heat or cold. For
optimum battery performance and life, store battery packs at room temperature when not in use.
•
For long storage, it is recommended to store a fully charged battery pack in a cool, dry place out of the charger
for optimal results.
NOTE: Battery packs should not be stored completely depleted of charge. The battery pack will need to be recharged
before use.
5. Operating Procedure
WARNING: Always observe the safety instructions and applicable regulations.
WARNING: To reduce the risk of serious personal injury, disconnect battery pack
before making any adjustments or removing/installing attachments or accessories.

15
WARNING: To reduce the risk of serious personal injury, ALWAYS use proper hand
position.
WARNING: To reduce the risk of serious personal injury, ALWAYS hold securely in
anticipation of a sudden reaction.
5.1. Proper Hand Position
Proper hand position requires one hand on the main handle (I) fig. 1.
5.2. Tool Operation
Installing a blind rivet (fig. 8)
To install a blind rivet
• Place the blind rivet (Y) in the nose piece (A)
• Position the tool (fig.9)
• Pull and hold the switch (J) until the rivet is fully set in the application (fig. 10).
• When the blind rivet (Y) has been set completely, release the switch (J). The tool will return to its initial
position automatically. The mandrel is automatically dropped into the mandrel collector (W).
If you release the switch (J) before the end of the setting stroke, the tool will immediately return to its initial
position. If the blind rivet (Y) has not been set completely, repeat the previous steps.
Reset function (fig.9)
If the tool does not move to its initial position after releasing the switch or stops during the setting stroke,
reset the tool to home by quickly pulling and releasing the switch (J). If this does not resolve the issue, remove
the battery, re-insert and then repeat the prior step.
If the issue persists, contact your local service representative.
Emptying the mandrel collector (W) (fig. 6)
The mandrel collector is used to collect the waste mandrels. The mandrel collector must be emptied
depending on the size of the blind rivets used.
Nom. Rivet Dia.
Approx. Capacity (PB2500)
2.4 mm [3/32“]
600
3.2 mm [1/8“]
360
4.0 mm [5/32“]
200
4.8 mm [3/16“]
150
• Tilt the tool back to allow all waste mandrels to fall into the mandrel collector.
• Open the mandrel collector (W) by sliding the Collector Lock (D) towards the nose housing nut (C) and
raise the cover (E).
• Empty the waste mandrels into an appropriate recycling container or waste bin
• To close the mandrel collector (W), lower the cover (E) until the Collector Lock (D) clicks into place.

16
6. Servicing the tool
6.1. Maintenance frequency
Item
Frequency
General Tool Inspection
Daily
Clean & lubricate Nose Equipment
5,000 rivets
Clean & grease Ball Screw and Thrust Bearing
50,000 rivets*
*Recommend contacting authorized service centre
6.2. Cleaning
ALWAYS wear approved eye protection at all times when cleaning equipment
Tool Exterior
Keep the brushless motor exhaust vent openings (H) free from dust and dirt. If necessary, use a soft, moist
cloth to remove dust and dirt from the exhaust vents.
Blow dirt and dust out of the main power tool housing with dry air as often as dirt is seen collecting in and
around the exhaust vents (H).
WARNING: Wear approved eye protection and approved dust mask when performing this procedure.
WARNING: Never use solvents or other harsh chemicals for cleaning the non-metallic parts of the tool.
These chemicals may weaken the materials used in these parts. Use a cloth dampened only with water and
mild soap. Never let any liquid get inside the tool; never immerse any part of the tool into a liquid.
Cleaning the Nose Equipment (fig. 4 & 5)
• Loosen the nose housing nut (C). Remove the nose housing (B).
• Press the front clutch (U) and loosen the jaw guide (P). Release the front clutch (U).
• Remove the jaws (Q) and the jaw pusher (R).
• Remove the spring (S)
• Clean the inside of the nose housing (B) using a dry cloth.
• Clean the jaws (Q) and the jaw pusher (R) using a dry cloth. If necessary, replace the jaws (Q) and the jaw
pusher (R).
• Clean the pulling head (T) using a dry cloth.
• Apply grease to the inside of the jaw guide (P) where the jaws (Q) make contact. A Molybdenum
Disulphide based grease is recommended.
• Insert jaw pusher (R) into jaw pusher spring (S)
• Reassemble jaw set (Q) and Mount the jaw pusher(R) onto Pulling head (T)
• Press front clutch (U) and tighten the jaw guide (P). Release front clutch (U).
• Mount the nose housing (B). Tighten the nose housing nut (C).
• Perform tool reset function to ensure the tool is at the initial home position as described in section 5.2

17
Charger Cleaning Instructions
WARNING: Shock hazard. Disconnect the charger from the AC outlet before cleaning.
Dirt and grease may be removed from the exterior of the charger using a cloth or soft non-metallic brush.
DO NOT use water or any cleaning solutions.
6.3. Spare Parts – Tools
For spare parts we refer you to the specific service manuals which you can find on our website at
http://www.stanleyengineeredfastening.com/resource-center/document-library
6.4. Rechargeable Battery Pack
This long life battery pack must be recharged when it fails to produce sufficient power on jobs which were
easily done before. At the end of its technical life, discard it with due care for our environment:
• Run the battery pack down completely, then remove it from the tool.
• Li-Ion cells are recyclable. Take them to your dealer or a local recycling station. The collected battery
packs will be recycled or disposed of properly.
6.5. Protecting the Environment
Separate collection. This product must not be disposed of with normal household waste.
Should you find one day that your POP-Avdel® product needs replacement, or if it is of no further use
to you, do not dispose of it with household waste. Make this product available for separate collection.
Separate collection of used products and packaging allows materials to be recycled and used again. Re-
use of recycled materials helps prevent environmental pollution and reduces the demand for raw
materials.
Local regulations may provide for separate collection of electrical products from the household, at
municipal waste sites or by the retailer when you purchase a new product.
You can check the location of your nearest authorised repair agent by contacting your local POP-Avdel®
office at the address indicated in this manual. Alternatively, a list of authorised POP-Avdel® repair
agents and full details of our after-sales service and contacts are available on the Internet at:
www.StanleyEngineeredFastening.com

18
7. Jaws, Jaw Guide, Jaw Pusher and Jaw Pusher Spring
BOM for Jaws, Jaw Guide, SA Jaw pusher and Jaw Pusher Spring
JAWS
13300
1set
JP
71210-15001
1set
NA, QW, GB, XE, XD
JAW GUIDE
DPN275-001
1
SA JAW PUSHER, 6
TP124-549
1
JP
TP154-500
1
NA, QW, GB, XE, XD
JAW PUSHER ASSEMBLY, 5
TP124-548
1
JP
TP154-505
1
NA, QW, GB, XE, XD
JAW PUSHER ASSEMBLY, 4
TP124-635
1
JP
TP154-502
1
NA, QW, GB, XE, XD
JAW PUSHER SPRING
TP114-652
1
*See BOM page for option
Apply grease to the inside of the Jaw Guide.
Grease recommended:
Molybdenum disulfide grease
Jaw Guide
Grease
Apply grease
SA Jaw Pusher, 4
Jaw Guide
SA Jaw Pusher, 6
Jaws
Jaw Pusher Spring
SA Jaw Pusher, 5

19
Put the Jaws into the Jaw Guide (as shown) so
that the teeth are on the inside.
After inserting the Jaws, check that they are
set correctly.
Put the Jaw Pusher Spring into the Pulling
Head.
Jaw Guide
Jaws
Jaw Guide
Jaws
Jaw Pusher Spring
Pulling Head
/