
The complete Package consists of :
• 1 SN0108 or SN0116 Serial Console Server
• 1 Power Cord
• 1 Rack Mount Kit (Brackets and Philips Head Hex M3 x 8 screws)
• 1 Foot Pad Set (4 pcs.)
• 1 Software CD
• 1 User Instructions
Important Notice
Considering environmental protection, ATEN does not provide a fully printed user manual for
this product. If the information contained in the Quick Start Guide is not enough for you to
configure and operate your product, please visit our website www.aten.com, and download the
full user manual.
3
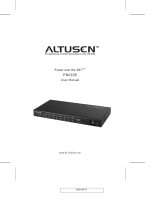
Package Contents
1
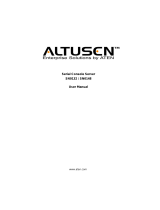
1 Power Socket
2 Power Switch
3 LAN Port
4 Serial Ports
SN0108 / SN0116 (Rear View)
4
Requirements
1 2 3 4
* The diagram shows the SN0116. The SN0108 only has 8 serial ports.
2
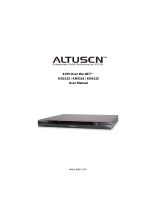
SN0108 / SN0116 (Front View)
1 Port LEDs
2 Reset Switch
3 10/100 Mbps Data LED
4 Link LED
5 Power LED
1
2 3 4 5
* The diagram shows the SN0116 model. The SN0108 only has one row LEDs *
To ascertain and set an IP address for the SN0108/SN0116:
• Run IPInstaller.exe
• Click "Enumerate" to refresh the Device List if necessary
• Select the device• Select "Obtain an IP address automatically (DHCP)"
• Click "Set IP" and wait for the IP setting procedure to finish
Note: If your installation uses fixed IP addresses, select " Specify an IP address", key
in the appropriate IP information for the IP address, Submask, and Gateway, then
click " Set IP"
1. Open your browser and specify the IP address of the SN0108/SN0116 you want to
access in the browser's URL location bar.
2. A Security Alert dialog box appears. Accept the certificate. A login dialog box, like
the one below, appears:
3. Provide a valid Username and Password (set by the SN0108/SN0116 administrator),
then Click Login to continue.
If you are the administrator, and are logging in for the first time, use the default
Username: administrator; and the default Password: password.
Note: For security purposes, we strongly recommend you remove these and give
yourself a unique Username and Password with the appropriate Administrator
permissions. This setting can be found under "General" setting in the main
screen.
After you have successfully logged in, the SN0108/SN0116 Main Screen appears:
7
Operation
8
Specifications
The most convenient way to operate the SN0108/SN0116 is with an internet
browser.
Function
Serial
Connectors
To Devices
To LAN
Power Connector
LEDs Link (LAN)
10/100 Mbps
RS-232 Ports
Power
Switches
Reset
Power
Power Consumption
I/P Rating
SN0108 SN0116
1 x RJ 45 Socket
1 x 3-prong AC Sockett
1 (green)
1 (orange/green)
8 (green) 16 (green)
1 (blue)
1 Semi-recessed pushbutton
1 Rocker
120V/8W;
230V/8W
100-240VAC; 50/60Hz; 1A
8 x Serial device jacks 16 x Serial device jacks
A
B
C
A
C
B
Environment Operating
Temp.
Storage
Temp.
Humidity
Physical Properties Housing
Weight
Dimensions
(L x W x H)
* Battery Replacement
This equipment is provided with a replaceable lithium battery: CR2032 3V.
Replacement by an incorrect type may result In an explosion.
CAUTION!
RISK OF EXPLOSION IF BATTERY IS REPLACED BY AN
INCORRECT TYPE. DISPOSE OF USED BATTERIES ACCORDING TO
THE INSTRUCTIONS.
3
2
1
5
Installation
SA0141
(DB9-F,DTE-DTE)
4
5
(DB9, DCE)
SA0142
(DB9-M, DTE-DCE)
• Sun's Java 2 JRE 1.4.2 or higher must be installed on your computer. Java is available for
free download from the Sun Java website: http://java.sun.com
• The devices that connect to the SN0108 / SN0116 must support the RS-232 protocol or
RS-232 terminal operations
• Virtual COM port driver (Real COM port) support requires Windows 98 or higher
(Windows systems); or Linux kernel 2.2 or higher (Linux systems).
1. For each server or serial device, plug an RJ-45 to serial adapter into its serial port.
2. Use standard Ethernet cable to connect the adapter to any available port on the SN0108 /
SN0116's rear panel.
3. If you choose to install a serial modem for OOB operation, use standard Ethernet cable to
connect any available port on the SN0108 / SN0116's rear panel to a DTE to DCE serial
adapter, then plug the adapter into the modem's serial port.
Note: This step is optional.
4. Plug the cable that connects the SN0108 / SN0116 to the network or the Internet into its LAN
port.
5. Use the AC power cord provided with this package to connect the SN0108 / SN0116's Power
Socket to an AC power source.
6. Turn on the computers.
All information, documentation, firmware, software utilities, and specifications contained in this package are subject to change without prior
notification by the manufacturer. Please visit our website http://www.aten.com/download/?cid=dds for the most up-to-date versions.
Online Registration
• http://eservice.aten.com
Technical Phone Support
International:
• 886-2-8692-6959
China:
• 86-10-5255-0110
Japan:
• 81-3-5615-5811
Korea:
• 82-2-467-6789
North America:
• 1-888-999-ATEN Ext: 4988
United Kingdom:
• 44-8-4481-58923
ATEN Altusen
™
© Copyright 2014 ATEN
®
International Co., Ltd. www.aten.com
Altusen and the Altusen logo are trademarks of ATEN International Co., Ltd.
All rights reserved. All other trademarks are the property of their respective owners.
This product is RoHS compliant PAPE-1214-C01G Printing Date: 10/2014
SN0108/SN0116 Serial Console Server
Quick Start Guide
0-40˚C
-20-60˚C
0-80% RH, Non-Condensing
Metal
3.3kg
3.4 kg
43.72 x 20.98 x 4.40 cm (19”/1U)
-
 1
1

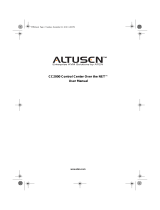
ATEN SN0116 Quick start guide
- Type
- Quick start guide
- This manual is also suitable for
Ask a question and I''ll find the answer in the document
Finding information in a document is now easier with AI
Related papers
Other documents
-
 Altusen ALTUSEN PN0108 User manual
-
 Altusen SN0108 User manual
-
ATEN Technology NETTM SN0108 User manual
-
 Altusen ALTUSEN CC2000 User manual
-
-
 Altusen SN0148 User manual
-
 Altusen KN2132 User manual
-
Altusen KN2132 User manual
-
 Altusen KM0032 User manual
-
 Altusen KM0032 User manual


