Page is loading ...

TO THE INSTALLER: BE SURE TO LEAVE THIS MANUAL WITH THE OWNER.
CM-1005
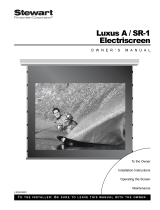
Luxus
Communicator
To the Owner
Installation Instructions
Operating the Screen
Maintenance
OWNER’S MANUAL

Printed in U.S.A.
©2003-2005 Stewart Filmscreen Corporation
Stewart Filmscreen reserves the right to make changes to the product specified in this document.
From time to time, this document is updated. Current versions of documentation are posted on the Stewart Filmscreen website at
www.stewartfilm.com.

Contents
To the Owner . . . . . . . . . . . . . . . . . . . . . . . . . . . . . . . . . . . . . . 2
Preparing the Installation . . . . . . . . . . . . . . . . . . . . . . . . . . . . . 2
Hanging the Case . . . . . . . . . . . . . . . . . . . . . . . . . . . . . . . . . . 3
Operating the Screen . . . . . . . . . . . . . . . . . . . . . . . . . . . . . . . 6
Screen Care and Cleaning . . . . . . . . . . . . . . . . . . . . . . . . . . . 8
Luxus Communicator: Owner’s Manual 1
Luxus
Communicator
OWNER’S MANUAL

Congratulations on your purchase of the finest optical viewing screen
available anywhere in the world!
The Luxus Communicator uses side-tab tensioning to maintain a flat optical
field. The screen material is the highest quality optical material available for
a projection screen.
Please take a moment to review this manual; it will help ensure you many
years of trouble-free service from your new Stewart Filmscreen product.
Preparation
Specifications regarding the individual screen dimensions, weight, and
mounting type are provided by the factory when the unit is ordered. Before
beginning the installation:
Check the specifications for the type of mounting to be used.
Ensure that the mounting area is prepared.
Check the size and weight of the screen to be installed so that
you can plan for the number of people required for the mounting
procedure.
You will need:
Enough ladders for the personnel supporting the screen during
the mounting process
A level
Fasteners appropriate for the surface on which the screen is
being mounted (See instructions for the type of mount for
recommendations.)
Appropriate tools for the fasteners used
2 Stewart Filmscreen Corporation
TO THE OWNER
Before proceeding with the installation of this screen,
take time to thoroughly read and understand these
installation and operation instructions.
There are no user-serviceable parts contained within
the unit.
P
REPARING THE INSTALLATION

Professional mounting techniques should be used. Stewart Filmscreen
Corporation cannot be liable for substandard or faulty installations.
The Luxus Communicator is ready to install into the wall or ceiling.
The screen can be installed directly to the support structure or suspended.
If the unit is to be mounted to plaster, drywall, masonry, or other type of
surface, use an appropriate fastener. These might include toggle or molly
bolts or similar fasteners.
Unpacking
Remove the outer plastic covering and white wrapping paper surrounding
the screen case.
Standard wall mount
1. Install the screen onto the support structure making sure that the
case is flush with the finished ceiling, if any. Mount screen
through the holes in the wall mount brackets.
– If mounting onto a wood substructure, the supplied wood screws
may be used.
– If the unit is to be mounted to plaster, drywall, masonry, or other
type of surface, use an appropriate fastener. (These might include
toggle or molly bolts or similar fasteners.)
2. Make sure the unit is level, from front to back and from left to
right.
Luxus Communicator: Owner’s Manual 3
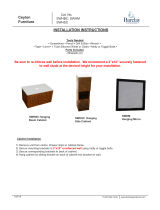
HANGING THE CASE
Figure 1: Wall mount
Wall bracket

Optional ceiling mount
You can install the screen so that the case is recessed and the bottom is
flush with dry wall or a suspended ceiling. Refer to Figure 2.
1. Remove the two existing cap screws on the top side of the case.
You will use the screws in the next step.
2. Attach the supplied ceiling mount brackets to the top of the
screen case using the cap screws removed in step 1.
3. Install the unit onto the support structure making sure that the
bottom of the case is flush with the finished ceiling.
4. Make sure the unit is level, from front to back and from left to
right.
4 Stewart Filmscreen Corporation
Figure 2. Ceiling mount
Support structure
Dry wall or
suspended ceiling

Optional suspended mount using eye bolts
Note: When the suspended installation option is ordered, eye bolts are
supplied.
1. Remove the cap screw on the top side of the case (furthest from
the end plate). Install the eye bolt into the internally threaded nut
from which you removed the cap screw. Repeat the procedure to
install the eye bolt on the opposite end of the case.
2. Suspend the unit from the eye bolts on the unit using chains,
cables, Unistrut, threaded rod, or turnbuckles. Refer to Figure 3.
3. Make sure the unit is level, from front to back and from left to
right.
Luxus Communicator: Owner’s Manual 5
Figure 3. Suspended mount

In general, when the screen is not in use, you should store it in the fully
retracted position. When lowering or retracting the screen, be sure to use
the handle. If the screen is mounted high and you cannot reach the handle,
attach the optional pull cord to the handle.
Lowering the screen
Use the handle to lower the screen, applying constant, even, downward
pressure. Pull the screen down until the STOP label at the top of the screen
is visible. While still holding the handle, stop the downward motion, and
gently let the screen retract slightly into the case until the spring stop
engages to hold the screen in position.
Keep the following in mind:
Always use the handle (or attached cord); do not attempt to unroll
the screen from the sides.
Pull straight down on the handle.
Do not pull the screen forward when lowering it.
Retracting the screen
The screen uses spring tension to retract into the case.
1. Grasp the handle and gently pull downward slightly to release the
spring stop.
2. While still holding the handle, allow the screen to feed into the
case, at a medium speed. The screen automatically retracts into
the housing and the batten fits into the slot.
Keep the following in mind:
Do not let go of the handle (or cord) during retraction.
If the screen retracts too slowly, the spring mechanism will stop
the screen.
It may take a few times operating the spring mechanism to get
the proper feel of the return action.
6 Stewart Filmscreen Corporation
OPERATING THE SCREEN
Caution
Do not lower the
screen past the Stop
label at the top of the
screen.

Releasing a screen locked in the “down” position
In some cases, the screen may become locked. This may occur when
lowered past the Stop label at the top of the screen. To unlock and retract
the screen, do the following.
1. Grasp the batten with both hands and lift it approximately 1.5”
(3.8 cm).
2. Quickly snap the screen and batten straight downward.
3. The downward snap releases the roller tube lock. The roller will
quickly begin retracting. As it does, hold on to the batten to
control retraction speed. Do not let go of the batten as damage
could occur to the unit.
4. Retract the screen normally (see p. 6).
Luxus Communicator: Owner’s Manual 7
Grasp batten
Raise slightly, then pull straight down.
Figure 4. Releasing a locked screen

With reasonable care, you may expect many years of trouble-free use of
your Stewart projection screen.
We encourage you to keep your screen clean. To protect your screen when
it is not in use, store it in the fully retracted position.
Avoid getting any foreign material on the screen, as cleaning may prove
very difficult. It may not be possible to remove scratches, paint, ink, etc.
General maintenance
The screen surface on your screen is delicate. Special attention to these
instructions should be followed when cleaning.
A draftsman-style brush may be used to lightly whisk away any
loose dirt or dust particles. (This type of brush is usually available
at office supply stores.) Stewart Filmscreen has an optional
screen cleaning kit that contains the proper type of brush.
Contact your dealer if you would like to obtain this cleaning kit.
Particles left on the screen when it is retracted into the case may
form an impression on the screen surface. Periodically wipe the
back of the screen with a clean damp cloth.
For tougher spots, use a solution of mild detergent and water.
Rub lightly using a sponge. Blot with a damp sponge to absorb
excess water. Residual water marks will evaporate within a few
minutes. Let the screen air dry completely before retracting.
Do not use any other cleaning materials on the screen. Contact the factory
if you have questions about removing difficult spots.
Replacement parts and service
No user-serviceable parts are contained within the unit. Contact your dealer
or the factory if you require part replacement or service.
8 Stewart Filmscreen Corporation
SCREEN CARE AND CLEANING
Warning
The Luxus Communicator has a powerful spring
mechanism. Do NOT disassemble the housing of the
Communicator.

This warranty covers defects in materials and workmanship for a period of
one (1) year from the date of installation, not to exceed fifteen (15) months
from the date of shipment, provided this product is installed in a normal
environment and maintained according to written instructions in the product
Owner’s Manual. Stewart Filmscreen warrants against loss of usefulness,
discoloration or deterioration of optical quality within the warranty period as
a result of manufacturing or material defects.
A factory authorized returned screen arriving prepaid to our facility for
inspection and proved defective due to an inherent manufacturing fault will
be repaired or replaced by Stewart Filmscreen Corp. This warranty
expressly does not cover any costs of removal, installation, framing, or other
incidental costs to replacing the screen or returning it to the manufacturer.
Should you encounter a perceived product fault or problem, contact your
dealer regarding application of this warranty.
Luxus Communicator: Owner’s Manual 9
PRODUCT WARRANTY

www.stewartfilm.com
1-800-762-4999
Fax (310) 326-6870
/