Schneider Electric EVH4S03N2 User manual

Type
User manual

Schneider Electric EVH4S03N2 is a smart EV charger designed for safe and efficient charging of electric vehicles at home. With a power rating of 3.7 kW and a charging current of 16A, it can quickly charge your EV, reducing charging time and increasing convenience. The EVH4S03N2 features an integrated 6 mA RDC-DD filter, providing additional protection against electrical faults and ensuring safe charging.

Schneider Electric EVH4S03N2 is a smart EV charger designed for safe and efficient charging of electric vehicles at home. With a power rating of 3.7 kW and a charging current of 16A, it can quickly charge your EV, reducing charging time and increasing convenience. The EVH4S03N2 features an integrated 6 mA RDC-DD filter, providing additional protection against electrical faults and ensuring safe charging.

10/2021 1/12
JYT9298600-00_EN
EVlink Home - EVH4SppNp
Customer Care Center
en User manual
EVH4S03N2
EVH4S07N2
EVH4S11N2
EVH4S03NC
EVH4S07NC
EVH4S11NC
JYT9298600-00_EN
JYT9298600-00_EN 2/12
The Schneider Electric brand and any trademarks of Schneider Electric SE and its subsidiaries referred to in this guide are the property of Schneider Electric SE
or its subsidiaries. All other brands may be trademarks of their respective owners.
This guide and its content are protected under applicable copyright laws and furnished for informational use only. No part of this guide may be reproduced or
transmitted in any form or by any means electronic, mechanical, photocopying, recording, or otherwise), for any purpose, without the prior written permission of
Schneider Electric.
Schneider Electric does not grant any right or license for commercial use of the guide or its content, except for a non exclusive and personal license to consult it
on an «as is» Schneider Electric products and equipment should be installed, operated, serviced, and maintained only by qualied personnel.
As standards, specications, and designs change from time to time, information contained in this guide may be subject to change without notice.
To the extent permitted by applicable law, no responsibility or liability is assumed by Schneider Electric and its subsidiaries for any errors or omissions in the
informational content of this material or consequences arising out of or resulting from the use of the information contained herein.
Safety
Important information
Read these instructions carefully, and look at the equipment to become familiar with the device before trying to install, operate, or maintain it. The
following special messages may appear throughout this documentation or on the equipment to warn of potential hazards or to call attention to
information that claries or simplies a procedure.
The addition of this symbol to a “Danger” or «Warning» safety label indicates that an electrical hazard exists which will result in personal injury if the
instructions are not followed.
This is the safety alert symbol. It is used to alert you to potential personal injury hazards. Obey all safety messages that follow this symbol to avoid
possible injury or death.
DANGER
DANGER indicates a hazardous situation which, if not avoided, will result in death or serious injury.
WARNING
WARNING indicates a hazardous situation which, if not avoided, could result in death or serious injury.
CAUTION
CAUTION indicates a hazardous situation which, if not avoided, could result in minor or moderate injury.
NOTICE
NOTICE is used to address practices not related to physical injury.
PLEASE NOTE
bThe installation, maintenance and eventual replacement of this device must only be carried out by a qualied electrician.
bThis device must not be repaired.
bAll applicable local, regional and national regulations must be complied with during the installation, use, maintenance and replacement of this device.
bThis device should not be installed if, when unpacking it, you observe that it is damaged.
bSchneider Electric cannot be held responsible in the event of non-compliance with the instructions in this document and in the documents to which it refers.
bThe service instruction must be observed throughout the life time of this device.
JYT9298600-00_EN 3/12
Symbol Content
Failure to follow safety instructions can result in death, injury, and equipment damage.
Refuse to bear any claims arising from this.
b Electrical hazard
Only trained, qualied and authorized electrical professionals are responsible for installation.
The rst time to commission and maintain the charger, it should comply with existing standards and installation regulations when performing the
aforementioned operations.
See chapter "A Installation Instructions" for details. Electrical hazard / re hazard
v Must regularly check the charging connector (including cable) in charger for damage and check whether the case is damaged (visual
inspection).
v If the charger is damaged, it must be turned o and replaced immediately.
v Do not perform the charger maintenance work without authorization. Only the manufacturer can perform the operation (replace the charger).
v Do not modify or modify the charger.
v Never remove signs such as safety symbols, warnings, nameplates, signs or pipeline markings.
b No extension cable shall be used when connecting the electric vehicle to the electric vehicle power supply device.
b Only connect electric vehicles or their charging equipment. Do not connect other loads (power tools, etc.).
b Hold the connector when pulling the charging connector, and do not pull the cable.
b Do not bend, squeeze or tilt the charging connector so that it is mechanically damaged.
b Do not touch the heat source, dirt or water on the contact surface.
b Some vehicles may generate toxic or explosive gases in the indoor area during charging, so an external ventilation system must be provided.
b When using an integrated charger to charge your electric car, please read the vehicle's tips and instructions carefully.
b Never clean the charging point by spraying it with water (Hose for garden watering, high pressure cleaners, etc)
1Contents
10/2021 1/12
JYT6393700-00
EVlink Home - EVH4SppNp
Customer Care Center
en User manual
EVH4S03N2
EVH4S07N2
EVH4S11N2
EVH4S03NC
EVH4S07NC
EVH4S11NC
JYT6393700-00
10/2021 1/12
JYT6393700-00
EVlink Home - EVH4SppNp
Customer Care Center
en User manual
EVH4S03N2
EVH4S07N2
EVH4S11N2
EVH4S03NC
EVH4S07NC
EVH4S11NC
JYT6393700-00
M8x60 wall plugs x 4
M6x50 screws x 4
M6 washers x 4
M8 (6 mm²) ring terminals x3
Crimping collar x 1
JYT9298600-00_EN 4/12
2Description
2.1 Product references
Reference Short Description Power supply Power rating Electrical protection
EVH4S03N2 EVlink Home 1P T2 3,7 kW 16A - with RDC-DD T2 outlet 3.7 kW 16A with 6 mA RDC-DD lter
EVH4S07N2 EVlink Home 1P T2 7,4 Kw 32A - with RDC-DD T2 outlet 7.4 kW 32A with 6 mA RDC-DD lter
EVH4S11N2 EVlink Home 3P T2 11 kW 16A - with RDC-DD T2 outlet 11 kW 16A with 6 mA RDC-DD lter
EVH4S03NC EVlink Home 1P attached cable 5 m 3.7 kW 16A - with RDC-DD Attached cable 5 m 3.7 kW 16A with 6 mA RDC-DD lter
EVH4S07NC EVlink Home 1P attached cable 5 m 7,4 Kw 32A - with RDC-DD Attached cable 5 m 7.4 kW 32A with 6 mA RDC-DD lter
EVH4S11NC EVlink Home 3P attached cable 5 m 11 kW 16A - with RDC-DD Attached cable 5 m 11 kW 16A with 6 mA RDC-DD lter
2.2 Dimensions and weight
Model EVH4S03N2 (Charger with charging cable: cable, type2) EVH4S07N2
EVH4S03NC (Charger with T2 outlet: socket, type2) EVH4S07NC
EVH4S11N2 (Charger with charging cable: cable, type2)
EVH4S11NC (Charger with T2 outlet: socket, type2)
Power rating 3.7 and 7.4 kW 11 kW
Dimensions 282 mm × 409 mm × 148 mm
Weight approx. 4.4 kg approx. 5.7 kg
Installation Wall-mounted
2.3 Product description
b This charging station is an electrical appliance that supplies electric energy to charge plug-in electric vehicles for indoor and private outdoor areas.
b When installing and using the charger, ensure that you comply with local regulations.
b The intended use of the equipment includes, in all cases, the environmental conditions established for the equipment.
C
D
B
A
ACable winding trough When not in use, wind the charging cable around the charging station’s trough to avoid tripping hazards and equipment damage.
BEmergency stop button Only to be used in an emergency. In normal use, stop the charge via the EV. The button can be reset by rotating it 90° clockwise.
CLED status indicator Green constant: available
Blue pulsing: charging
Blue constant: charge complete (charging current < 1A for 20 minutes).
Red constant: fault. Stop using the charger
DCharging outlet Plug in your T2 charging cable
JYT9298600-00_EN 5/12
2Description
2.3 Product description
B
C
D
E
A
ACable winding trough When not in use, wind the charging cable around the charging station’s trough to avoid tripping hazards and equipment damage.
BEmergency stop button Only to be used in an emergency. In normal use, stop the charge via the EV. The button can be reset by rotating it.
CConnector unlock button Push the button to unlock the charging connector.
DLED status indicator Green constant: available
Blue pulsing: charging
Blue constant: charge complete (charging current < 1A for 20 minutes)
Red constant: fault. Stop using the charger
ECharging connector dock Dock the charging connector when not in use to avoid tripping hazards and equipment damage.
JYT9298600-00_EN 6/12
3Characteristics
3.1 General data
b Ingress protection rating: according to IEC 60529
v IP54 for EVlink Home
v IP55 for EVlink Home with attached cable
b Impact protection rating: IK10 (IEC 62262)
b Socket for T2 cable or T2 attached cable according to IEC 62196-1 and IEC 62196-2
b Operating temperature: -30° C to +50° C
b Storage temperature: -40° C to +80° C
b Relative humidity: 5-95 %
b Rated voltage (depending on model):
v For 3.7 and 7.4 kW: 230 V AC, 50 Hz
v For 11 kW: 400 V AC, 50 Hz
b Rated charging current: 16 A for 3.7 kW, 32 A for 7.4 kW and 16 A for 11 kW
b Diagram of the earthing system: TN-S, TN-C-S, TT
b Designed for indoor and outdoor use
3.2 Certication
b IEC/EN 61851-1 ed 3.0
b IEC 61851-21 - 2
b EN 61000-6-1
b EN 61000-6-3
3.3 Environnement
b Compliant with the RoHS European directive
b Compliance with the REACH European regulation
3.4 Accessories
b EVlink Home Anti-tripping system, single-phase (EVA1HPC1)
b EVlink Home Anti-tripping system, three-phase (EVA1HPC3)
b EVlink AC charger testing tool (EVA1SADS)
4Protection
DANGER
HAZARD OF ELECTRIC SHOCK, EXPLOSION OR ARC FLASH
Do not install automatic reset systems on the residual current protection device.
Failure to follow these instructions will result in death or serious injury.
Upstream protections
b EV measure the earth resistance and will only start charging if it’s lower than the threshold dened by the EV manufacturer. Refer to the vehicle’s technical documentation.
b The choice of electrical protections and wire gauges must comply with local regulations and the information below as well as the constraints of the electrical installation. In
particular, the selected protection must not only satisfy the requirements of IEC 61851-1 ed 3.0 but must also limit the value of I²t to less than 75 000 A²s in case of a
short-circuit.
Charging station rated current 16 A 1-Ph 32 A 1-Ph 16 A 3-Ph
Protection against overload and short circuits 20 A curve B or C (1) 40 A curve B or C (1) 20 A curve C
Dierential protection 30 mA type A 30 mA type A 30 mA type A
(1) According to selectivity with upstream protections
Recommended protection: Acti9 iC60
b A shunt trip release (Mx) controlled by the charging station must be installed to enable to activate the upstream circuit-breaker tripping.
b The protections described below should only be taken as suggestions and Schneider Electric cannot be held liable.
Recommendations for lightning protection
One surge arrester per charger is recommended for high keraunic levels, mandatory if required by local regulations.
Power cable requirements
b The maximum wire gauge should not exceed 6 mm².
b It is strongly recommended to use exible cables when connecting the charging station to the power supply.
b It is strongly recommended to crimp ring terminals onto the wires of the power cable.
JYT9298600-00_EN 7/12
5Wiring
Switchboard
EV charger
K1 K2
30 mA type A
PE
PE
Mx
NL1
NL1
Single-phase
Switchboard
EV charger
K1 K2
30 mA type A
PE
PE
Mx
N
NL1L2L3
L1 L2 L3
Three-phase
Mx : Shunt trip release
6Connection
DANGER
HAZARD OF ELECTRIC SHOCK, EXPLOSION OR ARC FLASH
b Disconnect the mains power supply before working on the charger.
b Use a Voltage Tester of appropriate rating.
b Do not turn on the charging station if the earth resistance measured is higher than the threshold dened in the enforceable regulations.
b Connection to a Shunt trip release (Mx). It is not supplied with the charging station.
Failure to follow these instructions will result in death or serious injury.
6.1 Shunt trip release (Mx)
1. Install a shunt trip release (Mx) as described in the wiring diagram (Section 5) to ensure operator safety and in compliance with IEC 61851-1.
2. Connect the shunt trip release (Mx) with 1.5 mm² 2-core cable with insulation for 230V no wider than 5 mm.
3. Take the rubber gasket and poke out 1 of the 2 rubber plugs.
4. Pass the 2 wires connecting the shunt trip release (Mx) through the now empty plug.
5. Inside the EVlink Home charger, insert 1 wire from the shunt trip release (Mx) into the K2 terminal of the connector.
6. Connect the second wire from the shunt trip release (Mx) to the L1 screw terminal using a red (1.5 mm²) ring terminal (do not wrap the bare wire around the screw terminal).
7. Connect a wire to the Neutral screw terminal using a red (1.5 mm²) ring terminal and insert the other end into the K1 terminal of the connector (insert thin screwdriver into
connector’s largest hole and push down to open clamp).
6.2 Wire-up power supply
TE N L1 L2 L3
1
2
3
4
x 3
5x 2 6
7
3G6 (mono) /
5G6 (tri)
EVlink Home 1P EVlink Home 3P
TE NL1L2L3TE NL1L2L3
JYT9298600-00_EN 8/12
6Connection
6.3 Secure inspection hatch
TE N L1 L2 L3
2
1
x 6
6.4 Clamp power cable
< 14 mm
> 14 mm
JYT9298600-00_EN 9/12
7Installation
DANGER
HAZARD OF ELECTRIC SHOCK, EXPLOSION OR ARC FLASH
b Disconnect power supply before working on this equipment.
b Use a voltage tester of suitable rating.
b Do not start the charging station if the ground resistance measured is greater than the threshold dened by the applicable law.
b Install the over-current and residual current protections as described in the instructions and recommendations chapter (Chapter 6).
b Do not use a system which automatically resets the residual current circuit breaker.
Failure to follow these instructions will result in death or serious injury.
WARNING
RISK OF DAMAGING THE CHARGING STATION
b Protect the charging station from dust and water while xing the bracket.
b Attach the charging station to a at surface.
b Use screws, washers and wall plugs suitable for the wall material.
Failure to follow these instructions can result in death, serious injury, or equipment damage.
7.1 Mark installation area
PZ2
b Check the installation area before marking it on the wall.
It is recommended to situate the top of the charging station
between 0.8 to 1.6 m above the ground.
0.8 to 1.6 M
126
80
303.5
1300
1452
b Place the drilling template at a suitable height, and mark
the support screws on the wall with a pencil.
b Ensure you allow sucient space around the charger to
wind the cable and access the stop button (left-hand side).
Recommended installation procedure
1. Mark area using Installation Template sheet
2. Drill holes through template
3. Fix screws and bracket to holes
4. WARNING: disconnect power supply
5. Wire shunt trip release (Mx) to charger
6. Wire power supply to charger
7. Secure charger’s inspection hatch
8. Clamp charger’s power cable
9. Mount charger onto screws and bracket
10. Fix bracket to charger
11. Install anti-tripping system (optional)
12. Reconnect power supply
JYT9298600-00_EN 10/12
7Installation
7.2 Drill, x and mount
60 mm
1x 4
Ø 8
2x 4
Ø 8 x 60 mm
7 mm
3x 2
PZ2
4x 2
PZ2
5
6x 2
PZ2
8Inspection
DANGER
HAZARD OF ELECTRIC SHOCK, EXPLOSION OR ARC FLASH
Wear suitable personal protective equipment (PPE) and follow all safety procedures.
Failure to follow these instructions will result in death or serious injury.
b Check that the inspection hatch is correctly screwed down.
b Ensure that the power cable is securely fastened by the crimping collar.
b Check that the cover of the charging station is intact and hasn’t suered any obvious mechanical damage or deformation.
b Check that the charging station is securely fastened to the wall.
b Check that nothing is impeding the connection of the charging cable to the charger socket.
JYT9298600-00_EN 11/12
9Conguration
b Check that the Emergency Button is unlocked by rotating it 90° clockwise.
1
10 Cable storage
DANGER
HAZARD OF ELECTRIC SHOCK, EXPLOSION OR ARC FLASH
Regularly check the integrity of the cable.
Failure to follow these instructions will result in death or serious injury.
b Ensure that the charging connector and charging cable are securely stored between charging sessions.
b Wrap the charging cable around the charging station’s cable trough.
b If the EVlink Home is installed indoors, protect the connector by covering it with the dust cap.
b If the EVlink Home is installed outdoors, store the connector by plugging it into the socket of the charger.
Schneider Electric Industries SAS
35, rue Joseph Monier
CS 30323
F - 92506 Rueil Malmaison Cedex
www.se.com
JYT9298600-00_EN 12/12
© 2021 Schneider Electric - All rights reserved.
JYT9298600-00_EN
UK Importer
Schneider Electric Limited
Staord Park 5
Telford, TF3 3BL
United Kingdom
12 Charger status indicators
LED color LED behaviour Charger Status
Green Constant Standby
Blue Pulsing Charging
Blue Constant Charge complete (< 1 A for 20 minutes)
Red Constant Fault: please refer to section 14 (Basic troubleshooting)
11 Operation
11.1 Connecting the EV charger
1. Connect the charging cable’s plug into the EV charger’s outlet.
2. Connect the charging cable’s connector into the EV’s inlet.
3. The charger’s indicator LED will change from a constant green to pulsing blue.
11.2 Disconnecting the electric vehicle
WARNING
RISK OF INJURY
Do not use brute force to unplug the charging connector from the EV as it is mechanically locked .
Failure to follow these instructions can result in death, serious injury, or equipment damage.
1. Stop the charging session via the EV to unlock the connector.
2. Unplug the charger’s connector from the EV’s inlet.
3. Wind the charging cable around the EV charger’s winding trough.
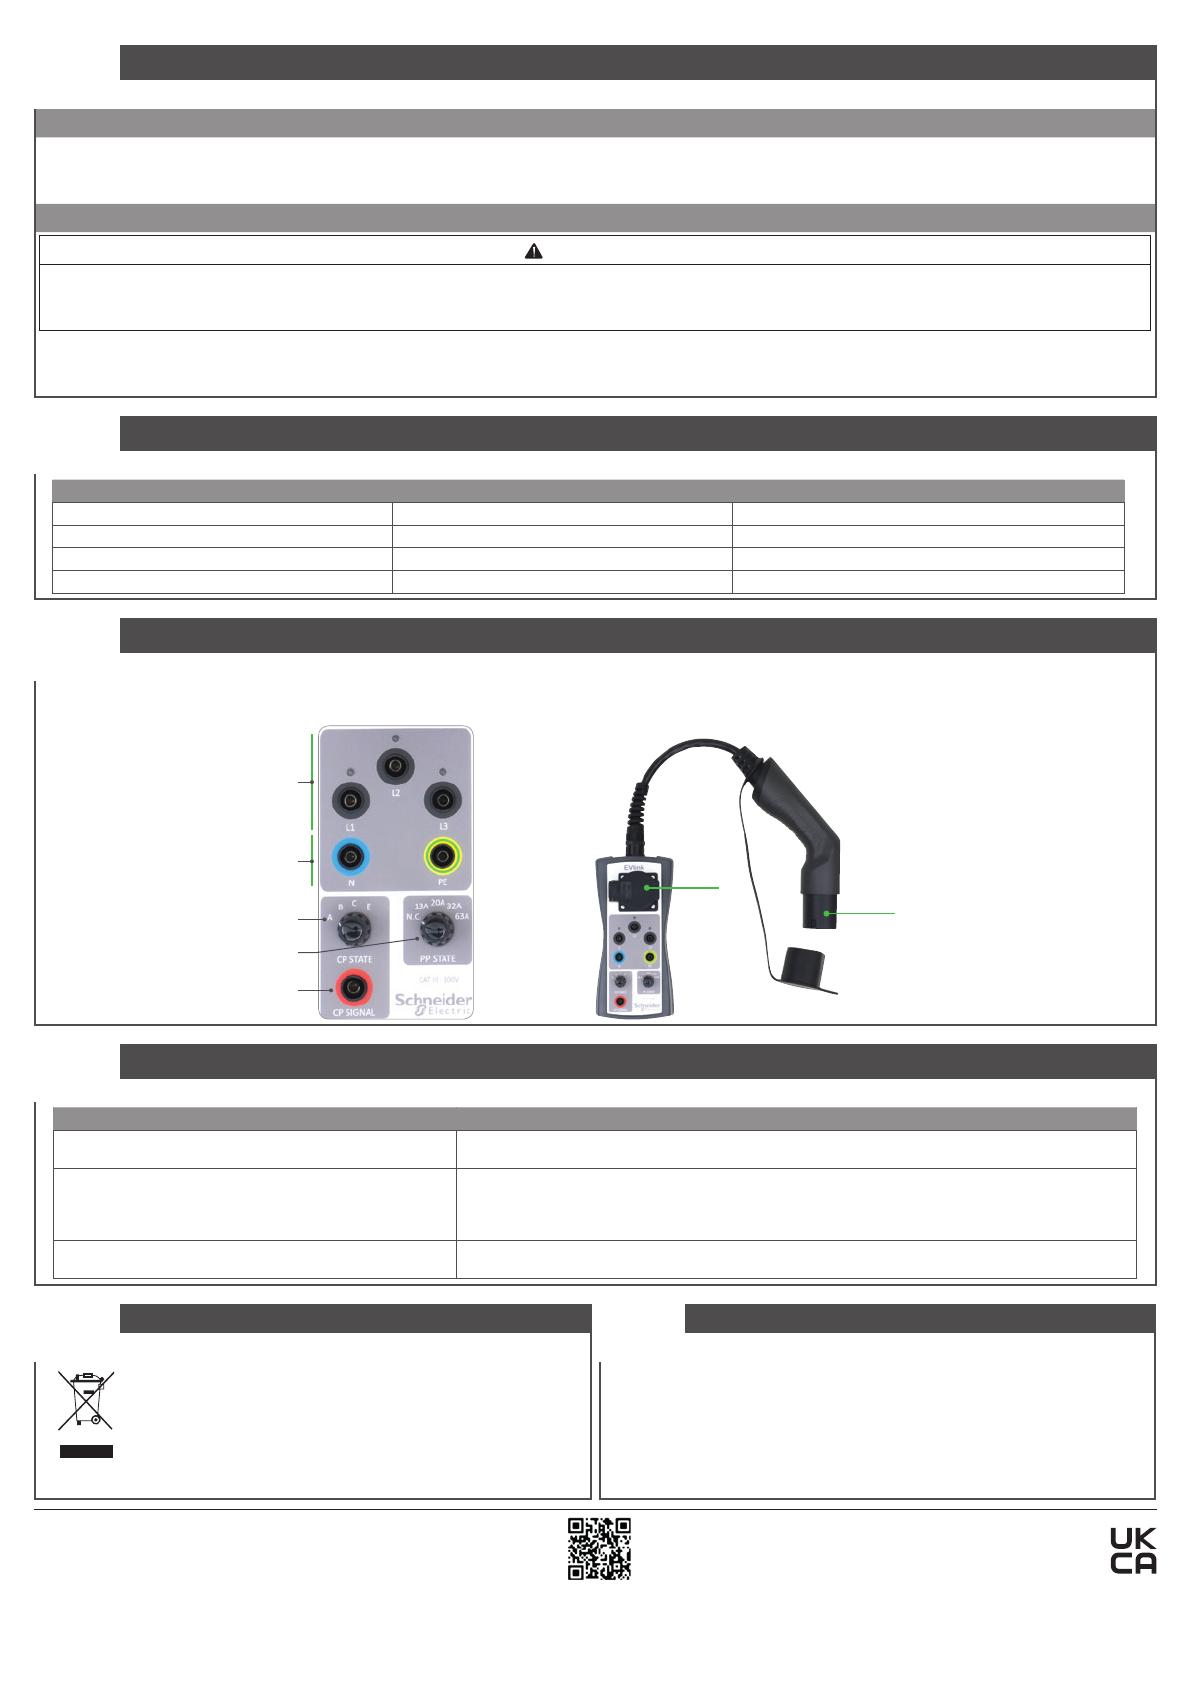
13 Testing EV charger
b In the absence of an EV, you can check the charging station is working correctly using the EVlink AC charger testing tool (EVA1SADS).
b The EVlink AC charger testing tool (EVA1SADS) is not included with the EVlink Home charging station.
Type F
outlet Type 2
socket
Power On indicator lights
on the L1, L2, L3 phases
Vehicle status selector
CP pilot wire measurement socket
Measurement sockets for
the protection conductor PE,
the neutral N and the L1, L2, L3 phases
Charging cable rating selector
14 Basic troubleshooting
Symptom Possible causes and solutions
Connector plugged into EV but not charging b Verify that the connector was inserted properly by unplugging and plugging it back into the EV’s outlet.
b Verify the charging sequence by following the procedure described in Section 11.
Charger’s LED illuminated red b Verify that the Emergency Button isn’t locked by rotating it 90° clockwise to unlock it.
b If not, switch o the power supply to the charger, unplug the connector from the EV, reconnect the power
supply, wait for the charger to become ready (LED glows green), before reconnecting the connector to the EV.
b Failing that, check that the power supply is securely wired to the charger’s PE (Protective Earth) terminal.
Charger’s LED o b No power supply. Switch o the power supply to the charger, charger possibly damaged. Please contact
Schneider Electric’s Customer Care Centre.
15 Recycle
The packaging materials from this equipment can be recycled.
The product and all accessories marked with this symbol are
electrical and electronic components that must be disposed of
separately from household waste.
Please help protect the environment by disposing waste in
appropriate containers.
Thank you for helping to protect the environment.
16 Warranty
Do not open the charger or remove the cover .
Contractual warranty: 18 months.
  • Page 1 1
  • Page 2 2
  • Page 3 3
  • Page 4 4
  • Page 5 5
  • Page 6 6
  • Page 7 7
  • Page 8 8
  • Page 9 9
  • Page 10 10
  • Page 11 11
  • Page 12 12

Schneider Electric EVH4S03N2 User manual

Type
User manual

Schneider Electric EVH4S03N2 is a smart EV charger designed for safe and efficient charging of electric vehicles at home. With a power rating of 3.7 kW and a charging current of 16A, it can quickly charge your EV, reducing charging time and increasing convenience. The EVH4S03N2 features an integrated 6 mA RDC-DD filter, providing additional protection against electrical faults and ensuring safe charging.

Ask a question and I''ll find the answer in the document

Finding information in a document is now easier with AI