Page is loading ...

Specifications
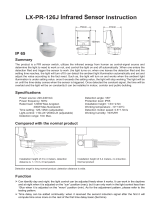
Summary
1.The product is a PIR sensor and intelligent light, utilizes the infrared energy from human as control-signal
source and determine the light to need to work or not, and control the light on and off automatically .
2. When one enters the detection filed and trigger the sensor to work ,the light turns on; when one leaves the
detection filed and the setting time reaches, the light will turn off.
3. It can detect the ambient light illumination automatically and set and adjust the value according to the fact
need. Such as, the light will turn on and works when the ambient light illumination is under setting value. once
it exceeds the setting value, the light will stop working.
4. The light will be on until the time-delay comes when the sensor is triggered. Once detected the constant
signal, the time will be overlaid and the light will be on constantly.
5. Standard lamp holder is E27 lamp holder can be customized. Rated load and type refer to the specifications,
the saving-energy light is recommended.
6. It can be installed in indoor, corridor and public-building.
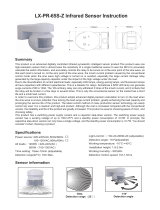
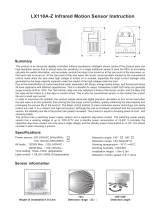
117.5mm
Ф130mm
72mm
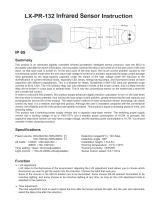
● Realize the ambient light illumination automatically.
● Adjust the detect time-delay discretionarily.
● Adjust the ambient light illumination discretionarily
● Various light source of E27 type can be installed.
● Available in ceiling mount and wall mount.
● Detect the infrared radiation signal from human body.
LX-PR-68A Infrared Sensor Lamp Instruction
Power source:220-240VAC
Power frequency: 50Hz
Rated load:40W Max. (tungsten & fluorescent & LED)
Time setting: half light mode(only for incandescent light
source and LED bulb lampThe LED bulb
lamp must with dimming function).
delay time:10S12min (adjustable)
delay time:30S2h (adjustable)
normal mode
delay time:10S12min(adjustable)
Detection range: 6-8m
Light-control: 10-2000LUXadjustable
Detection angle:120°/100°
Installation height:2.5~3.5mceiling/1.5~3m(wall)
Working temperature: -1040
Working humidity: <93%RH
Detection speed: 0.6 ~1.5m/s
Lamp socket type: E27(Standard)
Available lamp type:
(Before installation fixed, according to the type of light
source then choice switch position.)

Detection angle Detection angle
100° 120° 100° 120°
Sensor information
Procedure of installation
ceiling mountingwall mounting
Fig.1
Fig.2
Fig.3
wall mounting
Pencil Electric drill Hammer Screwdriver
Note:Please bring the following tools
Warning!
1. Please keep it away from the children.
2.This product can installed for outdoor, but we suggest
that against for the rain/storm & High lights.
2X
2X
Quantity
Packing list in
Φ6 Plastic Expansion
3x30 Screw
1. Mark the place where the product is installed. 4. Connect the power wiring.
2. Drill the hole with inflated screw. 5. Fix the product to the wall with screw.
3. Fix the inflated screw with hammer.
① ② ③ ④ ⑤

Connection-wire diagram
Structure and function display
ceiling mounting
• Turn off the power.
• The bottom-stand is fixed on the selected position with inflated screw.
• Connect the power into the connection-wire column of the sensor according to connection-wire diagram.
• Tighten the screw and switch on the power to test.
• Installation is ok.
1. Unscrew the terminal screw.
2. Put the power line through the line hole to connect
on the wiring L; N terminal.
3. Fix the screw.
Ceiling
N
L
Sensor
Time knob
Light-control knob
Lamp adapter
Time knob
: set and adjust the time that the light turns on under
indicator signal condition to turn off under no indicator signal
condition.
Sensor
: assemble signal from human body and trigger the
sensor lamp to work.
Light-control knob
: set and adjust the ambient light
illumination, the ambient light illumination dividing point both
lights and little lights.
Lamp adapter
: install the light source.
The product have normal mode and half light mode.
In the half light mode, the light slow and with half light function.
In the normal mode,the light fast on almost out, no half light
function.
Note: before installation fixed, according to the type of
light source then choice switch position !
Open the button on the (10s-12min), it is normal mode, the
light fast on almost out ,no half light function.
Open the button on the (30s-2h), delay time more than 10
minutes, when haven’t detection within10 minutes, the light will
be enter into half light mode, once have moving the light enter
into full light mode,haven’t any detection within set time, the light
enter into dark state.
Open the button on the (10s-12min), the delay time more
than 3 minutes,when haven’t detection within 3 minutes,the light
will be enter into half light mode once have moving , the light
enter into full light mode, haven’t any detection within set time,
the light enter into dark state.
①②③
Delay time:10S 12min (normal mode)
Fig.4
Fig.5
Fig.6
Fig.7
Delay time:30S 2h half bright state:10min later
(half light mode)
Delay time:10S 12min half bright state:3min later
(half light mode)
Note: only for incandescent light source and LED bulb lamp.
The LED bulb lamp must with dimming function
Note: Through the delay knob to adjust the delay time of the concrete.
Bottom of lamp holder

2. Turn the LUX knob clockwise to , turn the TIME knob clockwise to max, the load starts to work .Under the no
inductor signals condition, the load should stop working within 12 minutes.
3. Turn the LUX knob clockwise to , turn the TIME knob anti-clockwise to min; the ambient-light more than 10lux
during test, the indicator lamp will stop working as the load stop working; If you cover the detection window with the
opaque objects (towel elc), the load should work. Under the no inductor signals
condition, the load should stop working
within 10sec. (When the knob in position ① ③,as fig.6)
Lux knob
: when the light begins to turn on, set the ambient light
illumination by adjusting the LUX knob to the appropriate location.
Time knob
: In order to set the time from on to off, adjust he
TIME knob to the appropriate location .
Function setting
Operating principle of the light-control
Operating principle of time-setting
when turn the LUX knob to
the light will be off even
though there are movements
the light will be on with
human passing by
the light will be on with
human passing by
the light will be on with
human passing by
the ambient light illumination
is similar to
the ambient light illumination
is similar to
the ambient light illumination
is similar to
the ambient light illumination
is similar to
when turn the LUX knob to
Within the time setting Within the time setting Within the time setting
Once the time setting past
the light will be on once receive
the signal from human passing
by the detection range.
the light will be always on and
the time setting will be overlaid
when human go through the
detection time and again.
the light will be on even if there
is no any movement.
the light will be off when there is
no any movement .
1. Turn the LUX knob clockwise to max , turn the TIME knob anti-clockwise to min, after switching on the power
approx 30sec, the controlled load start to work. As the light is off, the inductor gets signal and starts to work, as the
light is on, the inductor stops working. Under the no inductor signals condition, the load should stop working within
Test
Fig.8
+ -
LUXTIME

1. Keep the sensor face to the area where human usually move.
2. Keep the sensor face to the position of the ambient light in order to get much more exact illuminance setting.
3. The detection range is different between ceiling mount and wall mount.
4. If detect the signal again within the time-delay, the time-delay will be over lied.
5. LUX knob: the luminance of working conditions. When the knob switches, it means it can detect all day, when the
knob switches, it will only work below the luminance <10 LUX.
6. TIME knob:It is a period that the light turns on slowly to no any signal gradually, till out of work.
1. Should be installed by electrician or experienced man.
2. Should be installed in indoor in order to avoid the rainwater.
3. Avoid installing it on the unrest objects.
4. Avoid installing it on the flammable objects.
5. There shouldn’t be hindrance in front of the detection window effecting detection.
6. There shouldn’t be moving object in front of the detection window.
7. Avoid installing it near air temperature alteration zones such as air condition, central heating, etc.
8. Considering your safety, please don’t open the cover when you find the hitch after installation.
Pay attention to installation
Remark
Notes
the sensor face to
the sensor face to
environment
the sensor face to the
light source ceiling mount and
wall mount in the front of window
the base of installation applicable environment
in front of the
detection window
the base of installation
avoid the air condition
the area where people move the direction of light source avoid the rainwater the detection filed is different no hitch
avoid installing it on the unrest objects
avoid installing it on the
flammable objects
Warning!
● Please confirm with prefessional installation.
● For safety purposes, please cut off power before installation and removal operations.
● Any losses caused by improper operation,the manufacturer does not undertake any
responsibility.
We are committed to promoting the product quality and reliability, however, all theelectronic
components have certain probabilities to become ineffective, which will cause some
troubles.When designing, we have paid attention to redundant designs and adopted safety
quota to avoid any troubles.
This instruction, without our permission, should not be copied for any other purposes.
/