Page is loading ...

FRONT COIL-OVER CONVERSION
2007-2017 JEEP JK WRANGLER
2 & 4 DOOR MODELS
JKS2510
www.jksmfg.com | [email protected] | 517-278-1226
RV. 071717
INSTALLATION
INSTRUCTIONS

GETTING STARTED
Read all warnings, instructions, notes and cautions before you begin the installation.
WHO SHOULD INSTALL THIS?
We recommend that this system be installed by a professional mechanic. The installer will need professional knowledge of
special tools required for installation as well as assembly and disassembly procedures.
STAYING SAFE AND LEGAL
• If you fail to drive your lifted and modified vehicle safely it may result in serious injury or death.
• Exercise caution: A lifted vehicle is at greater risk for rollovers or loss of control, especially during abrupt maneuvers.
• Always wear your seat belt, reduce your speed and avoid sharp turns.
• Never operate your vehicle under the influence of drugs or alcohol.
• Consult local and state laws for the legality of your ride height.
BEFORE YOU BEGIN INSTALLATION
• Needed items: OE service manual for your vehicle, safety glasses, and any special tools as indicated in these instructions as well as
the following tools: assorted metric and standard wrenches, hammer, hydraulic floor jack and a set of jack stands.
• Ride Height: Measure the initial ride height of your vehicle prior to installation. Final ride height may vary depending on the factory
height of your vehicle.
• Tires and rims: Larger tire and rim combinations can increase leverage and cause additional stress to suspension, steering, and
related components. When installing larger than OE tires and rims, the following components should be inspected for wear every
2500-5000 miles: ball joints, tie rod ends, wheel bearings, track bar bushings, pitman arm.
• Drive line vibrations: Some vehicles may experience drive line vibration after installation of this suspension system. Possible remedies
for this include: tuning angles, replacement of slider on shaft, lengthening or truing of shaft, and/or replacing u-joints.
THANK YOU FOR CHOOSING JKS
TIRE FITMENT
2.5" LIFT
33x12.50 on 16x8 with 3.75" max backspacing
INSTALLATION TIME
Approximately 6-8 hours
SPECIAL TOOLS REQUIRED
Metric/Standard Socket Wrench Set
7/32, 7/16", ½" & 9/16" Drill or Step Bit
3" cut-off wheel
4-½" angle grinder
Sawzall

JSPEC2510 | 3
PRE-INSTALLATION NOTES
a. This kit is designed as an upgrade to a 2.5"-4" lift system. Additional components are necessary for installation on a
stock vehicle.
b. Will not work with vehicles equipped with front alignment cams. Longer or adjustable front lower control arms will be
required to adjust caster.
c. 2012-2017 VEHICLES WILL REQUIRE exhaust extension kit part # 8150 for adequate driveshaft to exhaust clearance.
d. Requires a minimum of 1.25" of bump additional bump stop height from factory. This is available from as part #
JKS1112.
e. Not compatible with longer 2.5" diameter coil overs. Install product with JKS recommended Fox 2.5" coil overs only.
Some 2.0" coilovers may fit, but it is up to the installer to verify fitment, bump travel, driveshaft clearance, etc.
f. Requires cutting of the factory shock mounts and is not designed to allow the vehicle to go back to stock configuration.
01. FRONT DISASSEMBLY
a. Disconnect the front track bar (21mm) from the axle. Save bolt and nut tab.
b. Raise the vehicle and support the frame with jack stands behind the front lower control arm pockets.
c. Remove the wheels.
d. Disconnect the sway bar links from the axle.
e. Disconnect the front brake line brackets from the frame rails (10mm). 2011-17 models: Disconnect the brakelines from
the axle below the coil spring. Remove the axle bracket from the brake line. Save hardware.
f. Rubicon models: Disconnect the front locker wires from the differential.
g. Remove the 4 bolts mounting the front driveshaft to the pinion flange (15mm). This is done to ensure the driveshaft does
not bind when removing the coil springs. [1]
1
h. Support the front axle with a hydraulic jack. Remove the front shocks from the vehicle.
i. Lower the front axle and remove the coil springs. As the axle is lowered, verify all brake and electrical wires have
enough slack and the driveshaft clears the pinion flange.
02. BUMP STOP INSTALLATION
This conversion requires 1-¼" of additional bump stop. Directions for the recommended JKS1112 bump stop kit are included
here for convenience. If installing Fox hydraulic bump stops, refer to those instructions.

4 | JKS2510
a. Make a mark in the center of the lower coil spring mound pad. Drill a 27/64” hole at the mark; if this drill is
unavailable use a 7/16". [2]
b. Thread the hole using the provided ½" tap.
Tip: Use a 12 point 5/16" (8mm) socket that fits the head of the tap with a rachet to cut the threads.
2
c. Attach the bump stop extension to the axle through the hole that was made earlier using the provided ½” x 1-½” bolt
and split washer. Torque to 40 ft-lbs.
d. Repeat the bump stop installation on the other side of the vehicle.
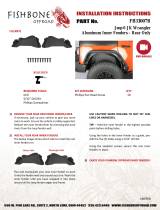
03. SHOCK MOUNT & INNER WHEEL WELL MODIFICATION
a. Remove the inner fender liner by removing the screws around the perimeter of the fender.
REMOVE FRAME SHOCK MOUNT
b. Using a small (3") cut off wheel (recommended) remove the shock mount from the vehicle. Clean up the cut areas with
a flap disc grinder. Paint exposed metal. [3,4]
3
4
c. Repeat the this procedure on the opposite side.

JSPEC2510 | 5
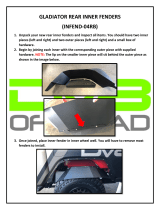
DRIVER SIDE WHEEL WELL TRIMMING
The inner fender plastic tray must be cut to provide coilover mount clearance. This is done to fit the longest shock possible. A 3"
cutoff wheel or high speed saw is recommended.
d. On the drivers side, trim the area shown above the coil bucket on the drivers side for bolt clearance. [5]
5
e. The bottom of the plastic tray must be trimmed to provide clearance for the coilover bracket. Test the bracket fitment by
temporarily holding up the main coil-over mount to the frame and lining up the OE brake line mounting hole to the lower
hole in the bracket. Clearance as necessary. [6,7]
6
7

6 | JKS2510
PASSENGER SIDE WHEEL WELL TRIMMING
f. On the passengers side, trim the area shown below the battery tray. Once again test fit the bracket for clearance and
trim as necessary.
8
9
04. UPPER COIL-OVER MOUNT INSTALLATION
All upper coil-over mount hardware is located in bolt pack J116
a. Remove the material shown from the upper coil seat for coil-over clearance with a cutoff wheel or grinder.
b. Place the upper mount brace on top of the coil spring mount. Place the drill template under the coil spring mount with
the notch facing out and the large hole of the template lined up with the hole in the frame. Loosely fasten with the
provided ½" x 1-¼" bolt, nut, and washers.
10

JSPEC2510 | 7
11
12
c. Remove the factory brake line U-Nuts from the frame.
d. Drill out the factory brake line hole mounting hole using a ½" drill
e. Place the main coilover mount against the frame and brace. Loosely fasten the brace to the upper mount with the
provided 7/16" x 1" hardware.
Note - Verify clearance to plastic inner fender trimmed earlier and remove any interference as necessary.
f. Line up the factory brake line mounting hole to the lower hole in the bracket. Attach using the 7/16" bolt and nut tab.
The nut tab is accessed through the large hole in the frame towards the rear of the wheel well.
13
g. Once all hardware has been installed, tighten the hardware to locate the rest of the mounting holes.
h. Mark the 2 holes to be drilled through the side of the frame and the 3 holes to be drilled at the coil spring mount.

8 | JKS2510
14
i. Remove the mounts and drill the holes to ½".
j. Re-install the mount and brace, leaving out the drill template. The 7/16" flat head bolt will be installed in the
countersunk hole on the main bracket.
k. Clip the ABS wire to the back of the 2 holes in the coil-over mount.
l. Re-from the brake hard lines so the brake line can be fastened to the frame just below the coil-over mount. Drill a 7/32"
hole at this location and fasten with the provided ¼" self tapping bolt.
m. Torque 7/16" hardware to 50 ft-lbs (9 bolts).
n. Torque ½" hardware to 80 ft-lbs (1 bolt).
o. Repeat the procedure on the opposite side.
05. LOWER COIL-OVER MOUNT INSTALLATION
All upper coil-over mount hardware is located in bolt pack J117
a. Measure in 2" from the center of the shock mount and make a vertical cut line. Cut off the shock mount at this location.
A sawzall is recommended.
15

JSPEC2510 | 9
b. Drill out the remaining hole in the shock mount to 9/16"
c. Remove the material shown from the lower coil seat for coil-over clearance.
16
d. Remove the control arm nut. Place the control arm mount cam plate in between the cam stops on the axle mount.
Note: The axle bracket kit is not compactible with an off center control arm bolt from an alignment bolt or cam washer.
Longer or adjustable replacement control arms will be required to adjust the caster on the vehicle.
e. Place the axle mount in place and fasten with the ½" x 1-¾" bolt up through the bracket, 5/8" spacer, and shock
mount. Also ensure the control arm bolt lines up with the hole in the bracket.
17
f. Mark the position of the hole in the side of the coil mount. Remove the bracket and drill the hole to 9/16".
g. Reinstall the bracket to the axle. Use the ½" x 1-¼" bolt through the side. Tighten the two ½" bolts to 80 ft lbs. Tighten
the factory control arm bolt to 117 ft-lbs.
h. Install the brake line clip on the brake line and fasten to the bracket with the ¼" hardware so the line wraps close to the
spring bucket and will clear the coil-over once installed.
i. Repeat the procedure on the opposite side.

10 | JKS2510
06. COIL-OVER INSTALLATION
a. With the upper and lower brackets installed on both sides, install the coilovers to the upper mount using the ½" x 4-½"
bolt from the rear to front.
Tip: The coilover misalignment spacers may need to be compressed with a pair of channel lock pliers to fit into the bracket.
b. Mount the reservoir to the coilover mount using the provided clamps. They are designed to slide over the mount seat in
the slot cut in the bracket (not through the slot).
18
c. Raise the axle to mount the coilover into the lower mount. Fasten with the ½" x 2-¾" bolt.
d. 2012-17 models, install the exhaust extensions using the instructions provided in the JKS8150 kit, sold separately.
e. Rubicon models: Reattach the locker wire harness to the differential.
f. Reattach the front driveshaft to the axle flange. Use Loctite on the bolts. Torque to 81 ft-lbs.

JSPEC2510 | 11
07. INNER FENDER TRIMMING
a. Trim inner fenders to clear the reservoir and coilover mount on both sides.
b. Fasten the inner fenders to the body with the original hardware.
08. FINAL INSTALLATION STEPS
a. Install the wheels and torque to the lug nuts to 125 ft-lbs.
b. Lower the vehicle to the ground and bounce the vehicle to settle the suspension. Torque the front lower control arm bolts
at the axle to 110 ft-lbs.
c. Attach the front track bar to the axle with the OE hardware. Have an assistance turn the steering wheel to aid in
aligning the track bar bolt. Torque the frame and axle track bar bolts to 125 ft-lbs.
d. Re-connect the sway bar links.
e. Adjust the steering wheel to center with the adjustment collar on the drag link. Once centered torque the bolts to 26
ft-lbs.
f. Check all hardware torque after 500 miles.
19 20

12 | JKS2510
JKS2510 COILOVER MOUNT BOX KIT
Part No. Qty Description
03271 1 Axle Bracket - Drv
03272 1 Axle Bracket - Pass
A289 1 Coilover Mount Brace -Drv
A290 1 Coilover Mount Brace - Pass
69 1 ¾” x 1-3/8” Sleeve
03275 1 Coilover Frame Mount - Drv
03276 1 Coilover Frame Mount - Pass
03277 1 Upper Mount Nut Tab - Drv
03278 1 Upper Mount Nut Tab - Pass
01457 2 Axle Mount Spacer
01394 2 LCA Cam Plate
03279 1 Drill Template
J116 1 Bolt Pack Upper Mount Hardware
16 7/16"-14 x 1" bolt
2 7/16"-14 x 1-¼" flat socket head bolt
28 7/16" SAE flat washer
12 7/16"-14 prevailing torque nut
2 ½"-13 x 1-¼" bolt
2 ½"-13 x 4-½" bolt
4 ½"-13 prevailing torque nut
8 ½"SAE flat washer
2 ¼"-20 x ¾" self tapping bolt
J117 1 Bolt Pack Lower Mount Hardware
2 ¼"-20 x ¾" bolt
4 ¼" SAE flat washer
2 ¼" prevailing torque nut
2 ½"-13 x 1-¼" bolt
2 ½"-13 x 1-¾" bolt
2 ½"-13 x 2-¾" bolt
12 ½" SAE flat washer
6 ½"-13 prevailing torque nut
2 Wire Clip
JKS2510 KIT COMPONENTS
/