4
This control is a temperature control and is not to
be used as a temperature limit control.
To prevent scald injury, do not use this control to
heat water for bathing, washing, hot tub or similar
applications.
The factory default setpoint for this control is 45°F (7°C) for
Cool and 120°F (49°C) for Heat. Setpoint temperature can be
adjusted using the or keys. A power loss does not lose
the settings. All menu item selections and setpoint setting are
stored in a permanent memory.
The user determines the temperature operating range. To
determine the temperature range, the user must select
the Set Point (SP) as the Cut Out or Cut In temperature,
Differential (dFF) and enter a set point temperature. Cut out
is when the load is turned off and cut in is when the load is
turned on.
NOTE: The Heat/ Cool switch (SW1) MUST be in the proper
position BEFORE setting options.
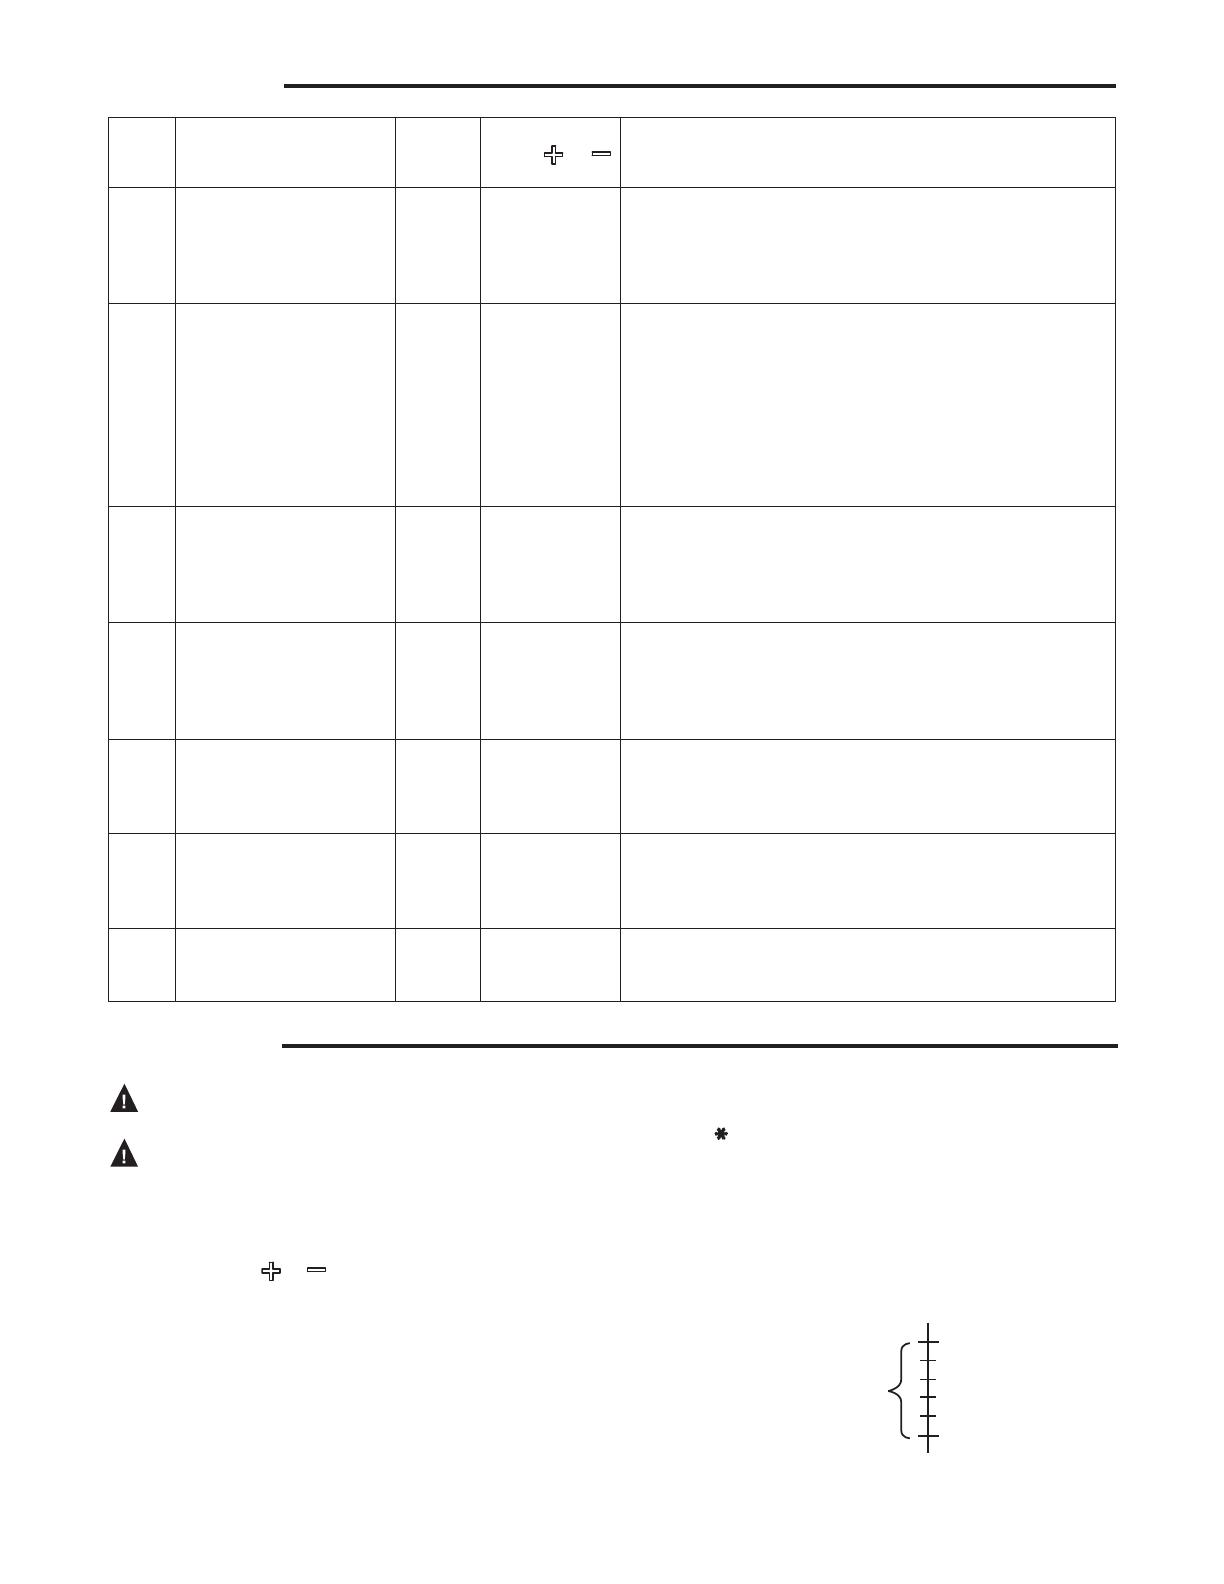
OPERATION
Menu
Item Description
Factory
Default
Options
Press or
to select Comments
dL Display Light Off On or Off Selects the LCD display light Off or On. With this selected
Off, the display light will illuminate any time a keypad button
is pressed to provide better viewing in low lighting condi-
tions, and go off after 10 seconds. If On is selected, the
display light will be On continuously.
ASd Anti Short-Cycle Delay Cool
1
Heat
0
0 to 12 Selects the minimum time (in minutes) that the load con-
tacts will remain open after a cycle before closing again.
This will prevent the compressor or other load from be-
ing damaged by cycling too soon. A blinking Snowflake
or Flame icon indicates that the control has a demand to
energize the load, but is waiting for the delay time to elapse.
A setting of 0 indicates no time and the feature is disabled.
SW1 must be set to the proper position before checking this
setting.
LP Lock Front Panel Keypad Off On or Off When selected Off, the keypad can be used as normal.
When selected On, prevents unauthorized access to the
control settings by locking out all keys. To unlock the control
when it is locked, press and hold the Menu key for 5 sec-
onds.
OFS Ambient Temperature
Offset
0 -4, -3, -2, -1, 0,
1, 2, 3, 4
This control is calibrated at the factory, but the “sensed"
temperature may read different because of mounting/in-
stallation, or other factors. This item allows the displayed
temperature to be shifted the number of degrees set to
compensate for this difference
bIn Binary Input Off On or Off The default setting of Off will have no affect on the opera-
tion of the thermostat. When set to On, it allows an external
binary input (switch or relay) to start a temperature set back.
See Set Back (Sb).
Sb Set Back 0 0 to 50 Selects the number of degrees the thermostat will change
the setpoint temperature when the external binary input
signal is received. 0 will cause no temperature change to
occur. See Binary Input (bin).
AL Alarm 0 0 to 99 Selects the time delay (in minutes) before a Temperature
Out of Range alarm output is sent.
A setting of 0 disables the alarm relay.
USER MENU
COOL/REFRIGERATION
To use as a Cooling control, SW1 must be set to Cool. The
snowflake ( ) icon will display.
If control is in Cool mode, and Set Point is selected as the
Cut In:
Temperature
Operating = Setpoint – Differential
Range Temperature
(minus)
Example:
40° Setpoint (Cut In)
35°
SW1 = Cool
Set Point (SP) = Cut In
Dif
ferential = 5
Setpoint temperature = 40°
Temperature
Range


