Page is loading ...

AIO ROBOTICS
QUICK START
USER GUIDE
Congratulations on purchasing
ZEUS: The world’s first all-in-one 3D printer.
This guide is designed to help you unpack and load the
included accessories and filament correctly. Follow
the simple instructions and you’ll experience your first
successful printout in around 10 minutes.
www.zeus.aiorobotics.com
TM
ZEUS: Changing the language of 3D printing.
noun: ZEUS
all-in-one 3D printer that lets you scan, print, copy, fax and edit objects all in one machine.
verb: ZEUS
third person present: ZEUSES · past tense: ZEUSED · current tense: ZEUSING
1. If you ZEUS your prototypes you will simply be able to go to market faster.
2. I ZEUSED the prototypes so I could go to market faster.
3. By ZEUSING parts I needed to repair the vintage car, I saved on shipping time and cost.
4. The architect ZEUSES her designs so she can show her client the buidling to scale.
What will you ZEUS? Email us pictures of what you’ve ZEUSED along with a brief
description and your next order of filament could be FREE!
e: cont[email protected]om
AUTO-CALIBRATION
of 3D scanner camera
1.7 GHz PROCESSOR
for on-board meshing and slicing
SMART PROBING MECHANISM
for auto bed leveling
7” Touchscreen
for an unprecedented
user experience
3D SCANNER
Sculptures and hard to find parts are easy to copy.
The ZEUS OS soware seamlessly manages data so your
scans are ready to print (or fax) with the touch of a button.
3D PRINTER
Experience superior quality
print-outs thanks to cutting edge
extruder technology.
THE THUNDERBOLT EXTRUDER
with full metal design has a dual
cooling mechanism and smart
auto-probing.

5.1
5.2
3.1
3.3
WHAT’S INSIDE
A
B
C
D
A. ZEUS machine
B. White filament (stored into the ZEUS)
C. Accessory box containing turn table,
glue stick, wifi dongle and calibration
pattern.
D. Accessory box containing power supply
1
UNPACKING ZEUS
2
POWERING ZEUS
3
LOADING THE ACCESSORIES
4
LOADING THE FILAMENT
5
PRINTING
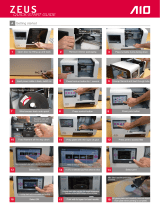
Open main box top aps. Lift out box D, top
layer of foam, then box C from front side.
Reach down inside protective bag, lift
ZEUS from base and up out of the box.
Place the ZEUS machine on a stable
surface.
Lift open ZEUS front door with the handle. Carefully remove inside lament box B. Carefully remove the inside protective foam.
Remove powercable from box D. Remove glue stick + wi dongle from box C. Remove turntable from box C.
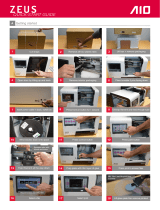
Turn ZEUS to back. Insert power cable at side
up into round outlet and push right switch to 1d.
Turn ZEUS to front. Press and hold button
for 1 second. It will blink then remain green.
With front touch screen lit up,
your ZEUS is now powered up.
Take the unwrapped glass turntable, with the
3 pins facing DOWN and gently place inside.
Gently rotate the plate with your nger
until you hear it drop into place.
Insert the wi- dongle from box C
into one of the front USB ports.
Unwrap lament box B. Open ZEUS side door.
Find white guide tube top right then push
the lament into the tube until it enters other
With one hand over the top in the main area,
gently pull it through another few inches
Slide o the small black spools from left side of ZEUS. With the pie shapes facing in, click into place on each side of lament spool
With the bar code facing you, gently rotate the lament spool clockwise to tighten any slack. Place onto side metal stick. Close side door.
The lament is now ready to load into the extruder. Press control button once, then the press park button to bring extruder head forward.
Take the end of the threaded lament & feed all the way down into the top center hole of the extruder. With other hand use your thumb &
index nger to squeeze right side extruder tabs together. This allows you to feed lament all the way down into the extuder head.
For your rst print, you’ll need to prep the plate with glue stick. Cover the estimated base surface area of your printout Press print button.
Choose your le. Either a gcode or .STL. Press gcode to select a preloaded le. You can preview the le. Zoom in and rotate to view.
When happy with your choice, select PRINT. ZEUS will start the print after correct temperature is reached, outer probing, height and
position of plate is measured and after nozzle has self cleaned on the rubber pad. After the printing has stopped lift out plate and
remove printout.Please note that print times vary. It can take just a few minutes or several hours depending on the size and density of
the object.
1.1
1.2
1.3
1.4
1.5
1.6
1.7
1.8
1.9
2.1
2.2
2.3
3.2
4.1
4.2
4.3
4.4
4.5 4.6
4.7
4.8
4.9
4.10 4.11 4.12
4.13 4.14 4.15
5.3
5.4 5.5
5.6
/


