Page is loading ...

PLEASE READ CAREFULLY & KEEP FOR FUTURE REFERENCE
Code: DSK004
Childrens Desk

Treated properly it should be a faithful servant for years - and we hope you get the
same amount of pleasure from it. Before you do
l please take a few minutes to read these instructions
l we suggest you carefully unpack everything, lay it out on a clean, flat floor and
identify everything on the parts list in these instructions. Do not throw away any
packaging until you are sure you have all the parts.
If you have any problems assembling the product please call our customer services
on 01985 300588 and we will try and help. If for any reason you wish to return the
product, you must disassemble the product and pack in the original packaging.
Taking care of your product
Your furniture should require no more than a regular dust off with a soft cloth. If the furniture is
not painted then a superior wood polish can be used - but never use polishes containing
silicone.
If necessary it can be cleaned with a damp cloth with a mild detergent solution - and then
dried with a lint-free cloth. Never clean with abrasives or chemical cleaners.
Direct sunlight or heat from a radiator can stain, discolour warp or crack furniture.
We know furniture can be heavy but try not to drag furniture across the floor as this can
damage it.
Thank you for buying a
Periodically check all fittings to ensure that none have come loose.
Keep away from direct sources of heat, such as electric, gas or wood fires.
Do not allow children to climb on the furniture. Larger items of furniture should be
properly (and professionally) secured to the wall to prevent them toppling over.
Using this furniture other than for its intended purpose could cause damage to
the structure or serious injury to your child.
The furniture should not be used if any structural part is broken or missing.
PRODUCT SAFETY
piece of furniture
If you have any problems please do contact us for help on e
mail [email protected] or phone our
CUSTOMER SERVICES 01985 300588

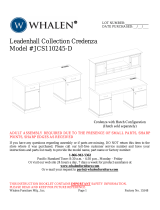
Parts
Tools Req
Screwdriver
2 x Allen Key
Fittings
Top
Right Side
Left Side
Base
Rear brace
plinth
modesty panel
Open side
22 x Large Cam Pins
22 x Large Cams
16 x Dowels
2 x Bolts 3cm
2 x sleeve nuts
2 x Small Cam Pins
2x Small Cams
1 x Door stop
2 x Hinges
2 x Hinge plates
2 x Bolts 5cm
2 x Screws 1cm
1 x Wall strap Kit
1 x Drawer base
2 x Drawer Sides (left & Right)
1 x Drawer Front
1 x Drawer Back
1 x door
6 x feet

X 12
X 8
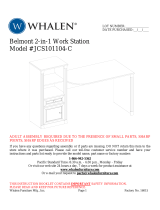
Fit the sides
12 x dowels, 8 x large cam pins and 4 x feet
Screw the cam pins into the smaller holes on each side. Insert the wooden dowels
into the holes on the sides and top edges as shown. Now insert the feet into the
holes at the bottom of each side.
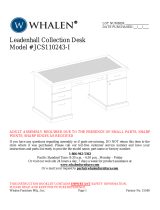
Assemble the unit
8 x large cams, 2 x dowels and 2 x large cams
Fit the dowels and cam pins, connecting the plinth to the base.
Align the plinth, base, back and rear brace as shown. Engage the fixings and push
the parts together to create a box like carcass. Now insert the large cams into the
cam pin holes, rotate to tighten the carcass together.
x 4
X 2
X 2

X 10
Fit the top
Select which side you would like the storage unit. (storage unit on the left for these
instructions)
insert 10 large cam pins into the smaller holes as shown
Fit the open side
2 x large cam pins and 2 x feet
insert the cam pins into the holes as shown (left side storage position) If right side
select the opposite set of holes.
now insert the two feet into the bottom of the side.
X 2
x 2
Image of right side fittings

Make the desk
2 x large cams, 2 x 3cm bolts, 2 x sleeve nuts and 2 x Allen keys.
Connect the modesty panel to the open side connecting the two parts with the
two large cams. Now fix the modesty panel to the rear rail of the storage unit using
the two 3cm bolts and 2 sleeve nuts.
2 x
2 x Bolts 3cm
Fit the top
10 x large cam pins
Lower the top onto the desk frame aligning the cam pins and dowels that you
have already fitted. Once the top is firmly fitted onto the desk, insert the cams and
rotate to tighten

Make the drawer
2 x Small Cams 2 x small cam pins
Fix 2 small cam pins into each drawer front.
Insert 2 small cams into each drawer side, left and right (see image for orientation)
Gently slide the drawer sides over the cam pins, inserting the drawer base at the same
time (this helps with alignment)
Note: Base edge with corners removed locate into the drawer front.
Wheel position at the rear
x 2
Make the drawer
2 x Bolts 5cm and an Allen key
Orientate the drawer back with the groove facing down.
Align the drawer back so that the end dowels engage into the holes in each drawer
side. Once aligned, press the two drawer sides together to form the box. Insert 1 x bolt
into each drawer side and rotate to tighten.
Now rotate the cams in the drawer sides to secure the parts.
x 2
Slip the drawer into the carcass

Fit the door
2x hinge plates, door stop and 2 x 1cm screws.
Fix the hinge plates to the carcass sides as shown. Note that the door can be fitted
on the left or right of the carcass depending on your choice.
Now fit the door stop using 2 x 1cm screws
Fit the door
2x Hinges
Fix the hinges into the large holes on each door and screw in place.
X 2

Rotate the front screw inwards and outwards to adjust the door
Rotate the rear screw to lock the hinge to the hinge plate
Adjust the Door
Hinge plate screws for up and down
Front screw for in and out
Rear screw for front to back
Fit the door
slide the door onto the hinge plates and connect the back screw to fix.

Locate the Desk
Gently lift the carcass into location. Fix the wall strap to the rear of the carcass and
connect to the wall.
Little Folks Furniture do not supply wall fixings due to the wide ranging differences of
wall construction.
Warning: This work should only be carried out by a competent person or a
professional.
1 x Wall strap Kit
/