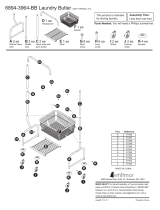
Haier HLP21N User manual

Category
Washing machines
Type
User manual

Haier HLP21N is a fully-featured washing machine with various functions to help you keep your clothes clean and fresh. It boasts various innovative features such as a transparent view window, music buzzer, automatic power-off function, alarm against breakdown, and imbalance-revising function. With three water level options, you can select the most suitable level for your laundry load.

Haier HLP21N is a fully-featured washing machine with various functions to help you keep your clothes clean and fresh. It boasts various innovative features such as a transparent view window, music buzzer, automatic power-off function, alarm against breakdown, and imbalance-revising function. With three water level options, you can select the most suitable level for your laundry load.

©2008 Haier Washing Machine
STATUS
QUICK WASH
NORMAL
WASH
RINSE
SPIN
POWER
ON/OFF
START
PAUSE
CYCLE
HIGH
HEAVY
WATER
LEVEL
MEDIUM
LOW
HLP21N
Service Manual
Model No: HLP21N
Issue
Rev.
Chapter 1: General Infromation
1-1. Table of Contents
Document control
Chapter 1. General Information ............................................................................... 2
1-1. Table of Contents 2
1-2. General Guidelines 3
1-3. Caution and Warning symbols 3
.........................................................................................................
1
Chapter 2. Product Feature
2-1.
Features 4
2-2. Specification 5
1-4. Function indication symbols 3
.......................................................................................
4
Chapter 3. Safety Precautions
3-1.
Safety 6
3-2.
Warning and cautions 7
Chapter 4. Installation and accessory parts
.....................................................................
.............................................................
6
8
..........
4-2. Installation the button plate
4-3. Adjustment of the installation position
4-1. Key points in installation
4-5. Usage of the drain hose
4-6. Usage of the operation knobs
4-4. How to change the direction of the drain hose
4-8. Key points in disassembly
4-8-1. Points of attention in maintenance
4-7. Product briefs
4-8-2. Points of attention in assembly
Chapter 5. Parts and functions
...................................................................................
Chapter 6. Maintenance service and trouble shooting
.............................................
6-1.
Trouble alarm and solve method
6-2. Test program(test without water)
6-3. Trouble shooting charts
6-3-1. No action(the indicator is off)
6-3-2. No water filling
6-3-3. No rotation in washing or(rotate to one direction)
6-3-4. No draining
6-3-5. Keep filling water
6-3-6. Too much spinning noise
6-3-7. No spinning
6-3-8. Too much noise in washing
6-3-9. The tub rotates to one direction(in washing)
6-3-10. Time-out in brake
Chapter 7. Wiring diagram
.................................................................
25
.........................
- 2 -
3-3. Net dimensions
8
8
8
9
9
10
11
12
14
14
15
16
17
17
18
19
19
20
20
21
21
22
22
23
23
24
1-2. General Guidelines
When servicing,observe the original lead dress.If a short circuit is found, replace all parts which are
overheated or damaged by the short circuit.After servicing ,see to it that all the protective devices such as
insulation barriers ,insulation papers shields are properly installed .Confirm that the screws,parts and wiring
which were removed in order to service are put in the original positions, or whether there are the portions
which are deteriorated around the service places serviced or not. And be sure safety of that.
1-3. Caution and Warning symbols
(You will see them in Matters needing attention)
Any instructions in this service manual with this Warning “sign must be followed strictly.
To prevent damage to the washing machine, any instructions in this manual with this “Stop “sign
must be followed strictly.
1-4. Function indication symbols
(You will see them in the specification table)
Signify the washing machine has this function.
Signify the washing machine doesnt have this function.
- 3 -
Service Manual
Model No: HLP21N
Issue
Rev.
<
X
2
Chapter2 Product Features
New "smiling face" appearance: The appearance of this washing machine
is novel.It looks like a smiling face , bringing you good feeling.
Transparent view window, new appearance:It adopts transparent view
window on the top lid. Therefore the user can see the washing directly without
having to open the top lid. It is more convenient to use.
Heavy:
It has special "HEAVY" function applicable for very dirty laundries.
Washboard type stainless steel inner tub: The stainless steel inner tub of
this washing machine is washboard type.It can kneed laundries adequately
and wash cleaner,reducing abrasion at the same time.
Smaller volume,larger capacity: It adopts limited design to make good use
of room,smaller volume and larger capacity.
Music buzzer: Adopt the nationally initial music buzzer. The former boring
buzzer is replaced by the nice music, bringing you more interesting life.
Automatic power-off function: If the washing machine is not started after
the power is switched on, or the washing is finished, the power will be
switched off automatically for the sake of safety.
Alarm against breakdown: the washing machine will alarm with abnormal
display and buzzer when the drain hose is not put down, or when top lid is
open, or the automatic program can not be performed.
Imbalance-revising function: during spinning, if the laundries are slanting
and bumping the tub, the washing machine will add one rinse automatically to
revise the imbalance.
-4-
Service Manual
Model No: HLP21N
Issue
Rev.
2-1. Features
2-2.
SPECIFICATIONS
-5-
HLP21N
1
1
Z
Be sure to use three-phase power receptacle.
Ensure that the earth terminal of the power
receptacle is earthed reliably.
If the power line is bad, to avoid risk it is required to have it replaced by the technicians
of our special shop or our agent or the after-sale service department. Keep the pin of
the power plug clean.
Be sure to pull the plug off when the
machine is idle or when cleaning the
machine.
Do not put the machine at damp place like
the bathroom. Never wash it with water.
Do not use water hotter than 50
In case the washing machine is installed
on ground with carpet, do not block the
ventilation hole with carpet.
soft items
The ventilation holes
at the bottom
Do not let the machine share one receptacle
with other electric appliances. If the power
plug is damaged, or the plugging into the
receptacle is loose, do not use the plug any
more.
Do not wash water-proof laundries like
the raincoat, bike covers etc. to avoid
abnormal vibrations in spinning.
-6-
Service Manual
Model No: HLP21N
Issue
Rev.
Chapter3 Safety precautions
3-1.
Safety
Do not decompose, repair or alter the
machine by yourself.
Do not put any hot or heavy items (such
as the kettle with hot water ) on the
washing machine.
Do not wash laundries with volatile
materials (such as thinner, petrol etc.)
The handicapped or children without
care shall not use the machine.
Keep the machine away from direct
sunlight and heat source like the heater.
Do not stretch hands into the working
machine. It is dangerous even if the
rotation is slow. Take special care of
the children.
Petrol
Th
inn
er
Please keep the lint filter in good condition,
and install it to proper position. If the lint
filter is lost or damaged, please contact
the local after-sales service department of
our company.
Service Manual
Model No: HLP21N
Issue
Rev.
3-2.Warning and cautions
-7-
FRONT
Unit:mm
760
447
438
After open the package, please lean
the washing machine gently down to
soft items (towel cloth, blanket, etc.).
Install the bottom plate to the bottom
of the machine with the eight screws
by a cross screwdriver, then lift the
machine up gently.
See to the figure.
Screw
Bottom plate
Soft items
4-1.Key points in installation
4-2 Install the button plate
Please install and adjust the washing machine according to the requirement
of this manual. It is important for your safe and proper using the machine.
Service Manual
Model No: HLP21N
Issue
Rev.
3-3.Net dimension
-8-
Chapter4 Installation and accessory parts
The largest allowed slope of the shank base of the machine is 2 .
Slanting or rough ground will result in unstable running or stoppage
Confirm it's horizontal:
Adjust the adjustable foot:
Hang up the lead line to
confirm it is horizontal.
1) Please lift the foot side slightly in adjusting the foots. Loosen
the adjustable nut, and twist the foot.
2) Fasten the nut after adjustment.
<2
4-3 Adjustment of the installation position
Loosen Fasten
High
Low
adjustable nut
adjustable foot
1.Lean the machine down gently with the
front surface facing the ground. Loosen
the eight screws by a cross screwdriver.
Take off the bottom plate
3.Extend the drain hose from the left side.
Push the drain hose into the groove with
hands.
4.Install the bottom plate (method as stated in p6),
then lift the machine up gently.
2.Pull out the drain hose from the right side
groove.
Back
Front
Bottom plate
Soft item
Use this groove after
direction changing
Push the drain
hose into the
groove with hands
4-4 How to change the direction of the drain hose
-9-
Service Manual
Model No: HLP21N
Issue
Rev.
4-5 Usage of the drain hose
The drainage shall be smooth with the drain hose.
1.put the drain hose up to suitable position.
2.Do not step on or press the drain hose.
<1.2m
Figure 3
Figure 2
Figure 1
1. Insert a new flat washer into each end of the inlet hoses. Firmly seat
the washers in the coupling. ( As figure 1)
2. ttach the water inlethoses to the water faucet . Using
pliers,tighten the coupling . ( As figure 2)
NOTE: Do not overtighten. Damage to the valves can result.
Respectively a
5. Check for leaks
(1). Swing the water inlet hose gently to confirm if it's suitable.
(2). Turn on the water faucets and check for leaks. A small amount of
water might enter the washers. You will drain this later.
3. Run water through the faucets and inlet hoses, into a bucket or laundry
tub, to get rid of particles in the water lines that might clog the inlet
valves screens.
4. Attach the hose connected with the water faucet to the water valve.
( As figure 3)
NOTE: Do not overtighten. Damage to the valves can result.
Do not take off the water absorption cushion. Please check if the cushion
is dropped or damaged before each usage. If it happens please contact
our after-sale department immediately.
Water absorption cushion
Figure 4
(As Figure 4)
Service Manual
Model No: HLP21N
Issue
Rev.
-10-
STATUS
QUICK WASH
NORMAL
WASH
RINSE
SPIN
POWER
ON/OFF
START
PAUSE
CYCLE
HIGH
HEAVY
WATER
LEVEL
MEDIUM
LOW
HLP21N
Indicator mode and meaning
The indicator is off, indicating that the
program or mode is not selected.
The indicator is flashing, indicating the
running program.
The indicator is on, indicating the program
or mode selected and about to run.
The indicator is flashing rapidly, indicating
abnormal phenomenon.
"CYCLE" button
Push this button to select one or more programs from the five procedures:
heavy wash,quick wash,wash, rinse, spin.
If you push the "CYCLE" button for 7 times, it will resume.
Push the button once to switch on/off the power.
When the power is switched on, the "NORMAL"
indicator is on.
To switch on the power again after the power is
switched off, please wait for at least 3 second
before switch the power on.
The power will be switched off automatically
after the washing is finished.
"Power on/off" button
"Start/Pause" button
Push this button to perform automatic
"NORMAL" program when the machine is
started.
To start operating, push this button.
In operating, push the button to pause
the operating. Push it again to resume
operating.
Remarks: in pausing, the flashing
"Water level"button
Select suitable water level among three
water levels of "High" "Medium" "Low"
according to the quantity of the laundries
After water inlet as per the preset water level,
if more water is needed, please press the
button to
needed water level.
Once the "Start/Pause" button is pushed, you can
only select at midway during "HEAVY" and
"wash" procedure; if you need to select at midway
during procedures other than "HEAVY" and
"wash", you have to switch off the power for more
than 3 second before switch on the power again and
make new selection.
(Drain) The draining can only be performed
according to the stipulated time when there's water
in the tub. If there's no water in the tub, it will only
perform 10 second draining action, then enter next
step.
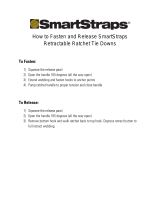
Times of pushing the
"
CYCLE" button
1
2
3
4
5
6
Selected procedure
program
Contents (the lighted indicators
indicate the programs about to run)
Wash, rinse, spin
(Normal program)
Wash only
Wash and rinse only
Rinse and spin only
Spin only
Quick wash Heavy Wash rinse spin
Heavy wash,
rinse, spin
Quick wash,
rinse, spin
Switch on the power
Remarks:
Description:
Push the "power switch" button to switch on the power. If the "start/pause" button is not pushed in 10 minutes, the washing machine will
switch off the power automatically.
In using, first push the "power switch" button, then push the "CYCLE" button to select program. After selection, push the "Start/Pause"
4-6 USAGE OF THE WATER LEVEL BUTTON
Quick wash Heavy Wash rinse spin
button to start washing.
Service Manual
Model No: HLP21N
Issue
Rev.
-11-
HIGH
WATER
LEVEL
MEDIUM
LOW
1)Computer sequencer
It adopts pouring seal with polyurethane on the surface. The light-emitting diode
is sealed with insulation bushing to avoid humidity. To avoid splashing, the surface
of computer plate and box and the operation components of the control panel seat
are coated with control panel film.
2)Structure of the top lid
The top lid adopts transparent view window structure. If the top lid is closed, you
can observe the running of the washing machine through the transparent lid.
Please pay attention in installation of the hangers that the spring of the hanger
at the motor side (two) is different from those installed on the other hangers (two).
4-7 Products Briefs
Service Manual
Model No: HLP21N
Issue
Rev.
4)Damping system
-12-
3)Power transmission system
During washing, the rotation of Motor 1 is transferred to Follower 5 from Drive Wheel 2 through
Belt 3. Meanwhile, Ratchet 7 will be braked by Pawl 8 through the action force of the spring, and
the movement will be transferred to Center Gear 9, and then be retarded and transferred to
Tie-rod 10 through a planetary gear mechanism consisting of Center Gear 9, Planet Gear 10 and
Spin Shaft 4 (inner gear), then Tie-rod 10 is connected to Pulsator 12 via a spline shaft.Therefore,
Pulsator 12 will move along with the clockwise and counterclockwise rotation of the Motor 1.
During spinning, the rotation of Motor 1 is transferred to Follower 5 from Drive Wheel 2 through
Belt 3. Meanwhile, Pawl 8 will leave Ratchet 7 by the action of the puller. Clutch Reed 6is twisted
tightly on the down part of Spin Shaft 4. The Spin tub 13 is connected to Spin shaft 4 with flange.
The movement of Motor 1 will be retarded by V-belt, and then transferred to Spin shaft 4 and
make the Spin tub 13 to spin.
The most obvious feature of this machine is that during washing, the
pulsator and inner tub rotate to opposite direction, and thus make double
washing effect. It is realized as following three points:
The retarder of this washing machine is different from former ones. It
adopts dual ratchet and dual pawl structure. The brake arm has two
action steps: the first step is applicable for washing mode: the brake belt
is opened to make the brake wheel free. But the pawl does not leave the
ratchet. The clutch spring keeps loose; the second step is applicable for
spinning. The pawl leaves the ratchet. The clutch spring integrates the
input shaft and clutch shaft and performs the spinning with the drive of
motor.
There are two strokes of the drain motor: the first stroke is used in
washing. The second stroke is used in spinning.
Comparing with the former drain valve, this machine adopts dual
valve pipe as the substitution of the former single valve pipe, which can
guarantee that during washing the pulsator and the inner tub rotate to
opposite directions, and thus make hand-wash type washing. In spinning,
1.Retarder
2.Drain motor
3.Drain valve components
Operating Principle of the Hand-wash Type Washing Machine
Service Manual
Model No: HLP21N
Issue
Rev.
5)
-13-
4-8 Key points in disassembly
4-8-1 Points of attention in maintenance
1)General attention
2)Points of attention in usage of electric components
The part of control panel seat
Be sure to pull off the power plug in disassembly or maintenance
Use stipulated crimp terminals in connecting the wires between the
conducting wires as far as possible, and fix with suitable tools, and
insulate with insulation tape completely.
In inserting the conducting wires, be sure to plug the pins to the root
and make it hard to be pulled out.
If welding is needed, be careful not to touch the plastic or other
insulation parts with the iron.
When connecting the wires, be sure not to make the wire touch the
mobile parts like the belt, radiating pulley and jib etc., and the sharp
protruding parts and the parts with high temperature (motor). Connect
and fix the wires as per their original mode.
If there's metal object at the wire fixing point, be sure to insulate with
insulation materials.
Retain the dismantled screws for future usage in installation.
In case that the power is on, the earthing circuit of the computer
sequencer can have 120V voltage to earth. Take care not to get
electric shock.
Store the computer sequencer and driver under 4 -30 . Avoid direct
sunlight.
In trouble-shooting, it may require hot-line work. Please be extremely
1)Method of opening the control panel
A.Open the back cover. Loosen the three locking belt fixed on the
cabinet (used
in inner wiring), to loosen the inner wiring.
B.Loosen the four screws used to install the control panel seat (rear and
side).
Lift the rear upwards. Loosen the control panel seat from the inlay of
Do not lift the control panel seat by force, otherwise the safety switch
control rod may get transformed, and the jointer part of the connecting
pipe of the water level sensor may be loosened, therefore influence
the normal operation of the microswitch and water level sensor.
After opening the control panel seat, hold it with one hand or lean it on
supporter like the wall. Do not put it down.
Attention:
Service Manual
Model No: HLP21N
Issue
Rev.
-14-
The cabinet and outer tub component
1) Method of disassembling
A.Loosen the two motor bolt unit to dismantle the motor. To adjust the
tension of the belt, loosen the bolts and move the motor left and right.
B.Loosen the four fastening screws to dismantle the delivery shield.
C.Loosen the three fastening bolts to dismantle the drain motor.
D.In dismantling the drain valve, first loosen the screws, then rotate
combination part with the drain hose, overflow hose and outer tub
slowly to make it loose. Then dismantle the drain valve.
E.In dismantling the inner tub, first take off the outer tub cover, then
dismantle the pulsator, finally dismantle the inner tub. Handle with care
when taking the inner tub off from the outer tub.
2) Points of attention in assembly
In installation of the drain valve, please smear a piece of 801 glue at
the connection part between the drain valve and outer tub and between
the overflow hose and drain hose to guarantee that the drain valve will
not leak.
In fastening the screws, make it tight without sliding.
Take care not to scratch the cabinet and influence the appearance of
the Machine.
4-8-2 Points of attention in assembly
Fix the wiring in the control panel seat to its original position. Do not
make it touch sharp corner and mobile position. The space surrounding
the computer sequencer is rather narrow. Please dispose it carefully
and do not make the transformer press the wires.
Confirm that the control panel seat is installed to proper position of
the cabinet. Pay attention on the adjusting of the gap between the
control panel seat and the cabinet.
Service Manual
Model No: HLP21N
Issue
Rev.
-15-
P FUNTIONS
Service Manual
Model No: HLP21N
Issue
Rev.
Chapt 5
ARTS AND
-16-
Top lid
Control panel
seat
Inner tub
Pulsator
Control panel
film
Cabinet
Cabinet,lower
Adjustable foot
Power cord
Hook
Drain
hose
Handle
Back cover
Fixed feet(four)
Water inlet valve
Adjustable foot
label
Spout
Watercourse
Phenomenon Reason How to solve
In wash/rinse/s pi n, the machi ne
stops (The "wash" "rinse"
"spin" indicator flash quickly)
The top lid is not closed. Close the top lid.
The draining does not work, or
the speed of draining is too
slow (the indicators of "ri nse"
"spin" flash)
Is the drain hose blocked
by foreign material?
Clean the foreign material.
Open and close the top lid once.
The safety switch acts. The
spinning can not work (t he
indicators of "wash" "rinse"
flash quickly)
Are the laundries put
slantingly
Is the machi ne sla nti ng?
Re-order the laundries. Close
the top lid.
Level the machine in right
position. Open and close the
top lid once.
The program pauses after
about 8 minutes of water inlet
(the indicators of "wash" "spi n"
flash quickly)
The water faucet is not
open.
The water inlet valve is
blocked.
The water pressure is too
low and the current is too
small.
Open the water faucet. Push
the "Start/Pause" button.
Clean the water inlet valve.
Push the "Start/Pause" button.
Wait for the normal water
pressure before use.
The machine does not act.
Is there power failure?
Is the power plug loose?
Use it when the power is on.
Insert the power plug tightly.
There's abnormal sound inside
the machine.
Is the machi ne sla nti ng?
Are the laundries slanting in
spinning?
Level the machine properly.
Re-order the laundries.
The water faucet leaks.
Is the jointer screw of the
water inlet hose is loose or
twisted awry?
Fasten the jointer screw
properly.
6-1.Trouble alarm and solve method
Chapt 6 MAINTENANCE SERVICE AND TROUBLE SHOOTING
Service Manual
Model No: HLP21N
Issue
Rev.
-17-
6-2.Test program(test without water)
Push and hold the "CYCLE" and "start/pause" buttons, then
power switch to enter Test A program. Push the "CYCLE
and Test C programs.
Remarks:the indicators in the list are (in turn): quick, wash, rinse, spin.
indicator off indicator on indicator flash
Display before
running
Display during
running
Test A
The buzzer rings intermittently six
times (0.4s connected, 0.8s shutoff).
The program indicator flashes six
times. The power is switched off
automatically after finishing.
Test B
It will perform 2 minutes washing
eve n without wa ter (d uring running ,
you can change the current
selection)Remarks: the water level
switch is invalid. The power is
switched off automatically after
finishing.
Test C
2 minutes spinningWhen it detects
abnormal conditions such as
imbalance spinning, or the top lid is
open, it will alarm. Open the top lid
then close it to resume normal
operation. The power is switched off
automatically after finishing.
Selection indicator
Test name Test content
When in alarm
push down the
" to select Test B
Service Manual
Model No: HLP21N
Issue
Rev.
-18-
6-3 Trouble-shooting charts
If you replace the computer sequencer without checking the other components
carefully, the computer sequencer may be damaged again. Therefore, please first
check if the other components working normally before replacing the sequencer in
6-3-1 No action(The indicator is off)
Confirm that there's no power failure,
and the power plug is inserted reliably.
The power switch is at "On" mode.
Measure the
voltage of the two ends of the
power input of the sequencer
Measure
the resistance
between the inner terminal of the
blue wire connected to the red twin-core
plastic part of the wire unit
and the power
Measure
the resistance
between the blue wire inner
terminal connected to the red twin-core
plastic part of the wire unit and the
blue wire (connecting to
power cord)
Measure
the resistance
between the blue single-core
plastic part inner terminal of the wire unit
and the brown wire
(connecting to
powe
Replace the sequencer
Replace
the power cord
Replace the wire unit
The resistance is 0
The resistance is 0
The resistance
is 0
infinite
infinite
infinite
Pull off the power plug
Not exist
N
Y
Exist
Y
N
Replace the fuse
Connect the fuse and the
wires of the two ends
Check if the fuse is burnt
Check if the
connection between the fuse
and the wires of the two ends are
well
At the same time please check if
the other electric components are
-19-
Service Manual
Model No: HLP21N
Issue
Rev.
6-3-2 No water filling
6-3-3 No rotation in washing(or rotate to one direction)
Con-
firm the action sound of
the water inlet
Mea
-sure the voltage of
the two ends of the water
inlet
Mea-
sure the voltage of the
two ends of the computer
sequenc
Remove the foreign materials of the water inlet valve filter
Replace the water inlet valve
Replace the wire unit
Replace the computer sequencer
At this time please check if the water inlet valve works normally
Switch on the power.Push the
"Start/Pause"button
Not exist
Not exist
Not exist
Exist
Exist
Exist
Start the test without
water.Enter no-water washing
Check the action of the motor
Measure the
voltage of the two ends of the motor
Measure the
voltage of the two ends of the
output of the computer
sequencer
If the motor overheat protector acts
If
the capacitor has
broken circuit or short
circui
Please check the transmission system carefully
If it is normal of the bearing part locking the clutch
Please check the reason
Replace the capacitor
Replace the wire unit
Replace the motor
Replace the computer sequencer
(At this time please check if the water
inlet valve works normally)
It acts
N
Not exist
N
N
Not exist
Exist
Y
Exist
Y
-20-
Service Manual
Model No: HLP21N
Issue
Rev.
  • Page 1 1
  • Page 2 2
  • Page 3 3
  • Page 4 4
  • Page 5 5
  • Page 6 6
  • Page 7 7
  • Page 8 8
  • Page 9 9
  • Page 10 10
  • Page 11 11
  • Page 12 12
  • Page 13 13
  • Page 14 14
  • Page 15 15
  • Page 16 16
  • Page 17 17
  • Page 18 18
  • Page 19 19
  • Page 20 20
  • Page 21 21
  • Page 22 22
  • Page 23 23
  • Page 24 24
  • Page 25 25
  • Page 26 26

Haier HLP21N User manual

Category
Washing machines
Type
User manual

Haier HLP21N is a fully-featured washing machine with various functions to help you keep your clothes clean and fresh. It boasts various innovative features such as a transparent view window, music buzzer, automatic power-off function, alarm against breakdown, and imbalance-revising function. With three water level options, you can select the most suitable level for your laundry load.

Ask a question and I''ll find the answer in the document

Finding information in a document is now easier with AI