Page is loading ...

Rev. 031210-JA
www.elitescreens.com inf[email protected]om
Raptor/Raptor Tension Series
Electric Floor Rising Front Projection Screen
User’s Guide

1
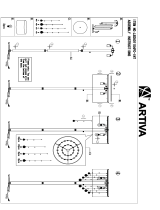
Components List
A (Base)
BCD (Partitions)
E (Support)
F (Veneer)
GH (Sides)
IJ (Doors)
KLMN (Back)
O (Cover)
P (Cover)
QR (Layer)
Hardware Pack
Connecting Bolt X 37 Connector Housing X 37 Shelf Support (nog) X 8 Screw X 8
Controllers
IR (Infrared)
Remote Control
RF (Radio Frequency)
Remote Control
3-way Wall Switch
(RJ45 Connection)
AA Batteries

2
Required Tool
Phillips Head Screwdriver
Use of connecting bolts when assembling the components
Step1: Use a Phillips Head Screwdriver to attach the Connecting Bolt to the furniture components
(unit-A).
Step2: Insert the exposed section of the connecting bolt on (unit-A) into the hole on the side-edge of
(unit-B). Insert the Connector Housing (Phillips cross head out) into the hole of (unit-B). *Note: The
connector housing has an opening in the threads that must align with the hole in the side-edge of (unit-B)
so that the connecting bolt will go in completely. If the connecting bolt does not go completely in, use the
screwdriver to rotate the connector housing until units A & B fit snugly together.
Step3: Once (unit-A) and (unit-B) fit tightly together, use the Phillips Head screwdriver to rotate the
Connector Housing clockwise until the joint is locked together.
unit-A
unit-A
unit-A
unit-B
unit-B
unit-A
unit-B
unit-A
unit-B
unit-A
unit-B

3
Operation
The screen module (component-P) can be used by itself on a flat, level surface or it can be combined with
Elite’s Raptor media stand housing as a fully assembled product. The power connection is located on the
screen module’s rear right-hand leg support and feeds conveniently through the cabinet housing to its
designated power source. The screen may be operated using the IR, RF, or 3-way wall switch.
3-way switch port

4
Assembly Step
1. Attach the Connecting Bolts to fixed to the base (component-A). Then attach the partitions
(components-B, C and D) via the connecting bolts as described on page 2.
X 6PCS
2. Install the Support (component-E) using the connecting bolts and housings.
X 6pcs
X 6pcs

5
3. Veneer (component-F) Installation.
X 6pcs
X 2pcs
4. Attach the Side boards (components-G & H) to the Base and Veneer (components-A & F).
X 2pcs
X 12pcs
5. Lock the Connector Housings to secure the media stand’s body.
X 4pcs
F

6
6. Turn over the media stand and lock the connector housings on the bottom.
X 8pcs
7. Attach the doors with the concealed hinges and install the back panels (components-K,L,M and N)
using the grooves in (components-G, B, C, D, & H).
X 8pcs

7
8. Install the Cover (component-O) and lock with the connector housings.
X 10pcs
X 10pcs
9. Put the screen module (component-P) into the assembled media stand. It must align with the shelf
supports (see enlarged image below) for a sccure fit and proper installation.
P
Designed for screen module assembly

8
10. Shelf installation: (adjustable) The shelf supports (nogs) have variable height placements.
X 8pcs
11. Complete
Infrared-Sensitive Safety Device (ISSD)
This is a safety feature to prevent injuries
caused by fingers, hair, etc. getting caught up
in the screen’s closing mechanism. If the
small infrared light beams are obstructed,
the screen closing operation will halt
immediately.

9
Caution
1. The stand should only be cleared up by dry wipes appropriate for furniture care.
2. The screen material may be cleaned with a damp cotton cloth but caution should be taken to avoid
getting moisture down into the rolled material or mechanical functions of the screen.
3. For optimal product longevity, put the screen in the down (closed) position when not in use.
4. Avoid touching the screen material either with fingers or any other foreign objects (Exception, see #2.
Cleaning methods).
5. To avoid heat damage or fire, keep away from open flames or excessively hot (beyond human
endurance) heat sources.
6. When in use, please don’t reach into the screen case.
7. Do not disassemble your screen and attempt your own troubleshooting. Contact Elite Screens
immediately regarding any technical difficulties (Ph. (USA): 877.511.1211 / Web (RMA?Warranty):
http://www.elitescreens.com/service_form.htm
8. Please treat your Raptor with the same care as any other piece of fine furniture.
9. Prolonged direct sunlight destroys synthetic materials. Please do not keep any projection screen
(Elite or other Manufacturer) in direct sunlight for a prolonged period of time.
Troubleshooting
In case of a malfunction.
1. Cease operation
2. Disconnect (unplug) power source
3. Contact Elite Screens immediately. (http://www.elitescreens.com/service_form.htm or
Ph: 877.511.1211
If the screen does not go up/down
1. Check the power cord and make sure that it is connected to a good power source.
2. Check the infrared-sensitive safety device (ISSD) for foreign items/obstructions?
3. Check the batteries in both the IR and RF remote control
4. Try to operate the screen up/down with the 3-way switch located on the left side of the cabinet
If all attempts to rectify the problem are unsuccessful, see Warranty Policy for further instructions.

10
Warranty Policy
*Valid in the US and Canada only
Two (2) year warranty parts and labor from defects in workmanship from purchase
date as follows.
Three (3) year parts and labor warranty from defects in workmanship for GEMR
(Government, Educational, Military, & Religious) purchases of new product only
Each party will be responsible for one way shipping during the warranty period.
(Different policy for DOA, see next.)
DOA (Defective On Arrival): Must be reported within 30 business days of receipt.
An RMA (Return Merchandise Authorization) number must be issued in order to
process a replacement. Elite Screens will replace the DOA (Defective On Arrival) unit
with a brand new replacement *(see exceptions below) and cover standard ground
shipping both ways. After the DOA unit is received and/or confirmed defective, Elite
Screens will send out a new *unit to the customer by ground service (subject to
inventory availability). Should a problem be reported after the 30-day grace period,
the item must be shipped to us for warranty repair.
Do not return any unauthorized items to Elite Screen, as they will be refused and
returned at your expense. The RMA number must be included on the outside label of
your shipping box. Our warehouse is not authorized to accept returns without an
RMA number on the shipping label.
Missing Parts must be reported within the 30-day (DOA) grace period. If reported
after 30 days, customer will be only be responsible for shipping and handling fees. If
reported after 30 days of receipt, customer is responsible for cost of the parts and
shipping & handling fees.
*A new or refurbished replacement will be sent out to the customer depending on the type of
purchase (new or refurbished) or based on stock availability.
For North America (USA/Canada) only
For Warranty and Service requests please fill out a RMA /Service Form at:
http://www.elitescreens.com/service_form.htm.
Please Visit this link for full Warranty information:
http://www.elitescreens.com/service.htm
For Customer Service and Technical questions, please contact Elite Screens at:
Telephone: (877) 511‐1211
Fax: (562)‐483‐8498
Remember to register your Product at www.elitescreens.com/register.htm

11
Contact Info
US & Canada Tech Support & Warranty Claim
Please contact us at service@elitescreens.com or call +1 877-511-1211 #3 Service
Europe Tech Support & Warranty Claim
Please contact us at service@elitescreens.eu or call +49-(0) 40-30392958
Asia Tech Support & Warranty Claim
Please contact us at service@elitescreens.com.cn or call +86-(0) 755-8461-7989
Taiwan Tech Support & Warranty Claim
Please contact us at service@elitescreens.com.tw or call +886-(02) 2747-8979
America:
Elite Screens Inc
16410 Manning Way
Cerritos, CA 90703 USA
Tel: +1-562-483-8198
Fax: +1-562-483-8498
info@elitescreens.com
www.elitescreens.com
Asia:
Elite Screens China Corp.
Longxi Duimianling Industry
Zone Longcheng Longgang
District, ShenZhen GuangDong,
China
Tel: +86-(0)755-8461-7989
Fax: +86-(0)755-8461-7669
info@elitescreens.com.cn
www.elitescreens.com.cn
Taiwan:
Elite Screens Taiwan Co. Ltd.
No.38, Alley 22, Lane 66, Sec. 5, Nanjing
E. Rd., Songshan District, Taipei City 105,
Taiwan
Tel: +886-2-2747-8979
Fax: +886-2-2747-8978
info@elitescreens.com.tw
www.elitscreens.com.tw
India:
Elite Screens India
Delhi, India
Tel: +91-22 2 2 2150373
Fax: +91-22 66459659
Info.india@elitescreens.com
www.elitescreens.in
Europe:
Elite Screens Europe GmbH
Elite Screens
Europe GmbH
Lübecker Straße 1
22087 Hamburg, Germany
Tel: +49-40-30392494
Fax: +49-40-49219200
info@elitescreens.eu
www.elitescreens.eu
France:
Elite Screens France S.A.S
11, Allée William Penn
92150 Suresnes, France
pascale.dautem[email protected]
www.elitescreens.com/fr
Tel: +33-1-45064735
Fax: +33-1-45064735
Latin America Contact:
erik.garcia@elitescreens.com
East Asia Contact:
info.ea@elitescreens.com
Japan Contact:
info.japan@elitescreens.com
/