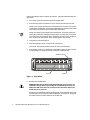
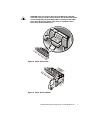
Dell PowerVault 201S (SCSI) storage system is a versatile and high-performance storage solution designed to meet the demanding needs of small businesses and workgroups. With its robust features and reliable performance, the PowerVault 201S is ideal for a wide range of applications, including file sharing, data backup, and email storage.
Dell PowerVault 201S (SCSI) storage system is a versatile and high-performance storage solution designed to meet the demanding needs of small businesses and workgroups. With its robust features and reliable performance, the PowerVault 201S is ideal for a wide range of applications, including file sharing, data backup, and email storage.


-
 1
1
-
 2
2
-
 3
3
-
 4
4
-
 5
5
-
 6
6
-
 7
7
-
 8
8
-
 9
9


Dell PowerVault 201S (SCSI) User guide
- Type
- User guide
- This manual is also suitable for
Dell PowerVault 201S (SCSI) storage system is a versatile and high-performance storage solution designed to meet the demanding needs of small businesses and workgroups. With its robust features and reliable performance, the PowerVault 201S is ideal for a wide range of applications, including file sharing, data backup, and email storage.
Ask a question and I''ll find the answer in the document
Finding information in a document is now easier with AI