Page is loading ...

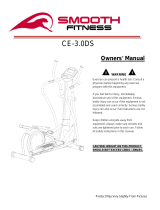
Model No: EFX420
BODYWORX
EFX420 ELLIPTICAL
Retain this owner’s manual for future reference. Read and follow all instructions in this owner’s manual.

CONTENT PAGE
WARRANTY REGISTRATION FORM 3
IMPORTANT SAFETY INSTRUCTIONS 4
SAFETY GUIDELINES 5
HARDWARE PACK LIST 6
ASSEMBLY INSTRUCTIONS 7-
12
CONSOLE INSTRUCTIONS 13-16
MAINTENANCE
17
EXPLODED DRAWINGS
18-19
PART LIST
20-22
EXERCISE INSTRUCTIONS
2
3
-24

Warranty Registration Form
Step 1
Visit our Website
Step 2
Enter Purchase Inrmation
Step 3
Call Our Toll Free Number
number-1800 005 770

Before beginning any tness program, you should obtain a complete physical examination
from your physician.
This exercise equipment is designed and built for optimum safety for home use. However,
certain precautions always apply whenever you operate any exercise equipment. Be sure to
read the entire manual before assembly and operation of this machine. Also, please note the
following safety precautions.
WHEN USING EXERCISE EQUIPMENT, YOU SHOULD ALWAYS TAKE BASIC PRECAUTIONS
INCLUDING THE FOLLOWING:
• Read all instructions before using the machine. These instructions are written to ensure your safety and to protect
the unit.
• Do not allow children on or near the equipment.
• Use the equipment only for its intended purpose as described in this guide.
• Do not use accessory attachments that are not recommended by the manufacturer. Such attachments might
cause injuries.
• Wear appropriate exercise clothing and shoes for your workout, no loose clothing. Do not wear shoes with
heels or leather soles. Ensure shoes are clean of dirt and embedded stones.
• Use care when getting on or off the unit.
• Do not over exert yourself or work to exhaustion.
• If you feel any pain or abnormal symptoms, stop your workout immediately and consult your physician.
• Never operate the unit after it has been dropped or damaged. Return the equipment to a service center for
examination and repair.
• Never drop or insert objects into any opening in the equipment.
• Always check the unit before each use. Make sure that all fasteners are secure and in good working condition.
• Do not use the equipment outdoors or near water.
• Only one person may use the machine at a time.
CHILDREN AND PETS
• Most exercise equipment is not recommended for small children. Children should not use the equipment
unless they are under strict adult supervision. To ensure safety, keep young children off the machine at all
times.
• Exercise equipment has many moving parts. In the interest of safety, keep others (especially children and
pets) at a safe distance while you exercise.
PERSONAL SAFETY DURING ASSEMBLY
• It is strongly recommended that a qualied dealer assemble the equipment. Assistance is required.
• Before beginning assembly, please take the time to read the instructions thoroughly.
• Read each step in the assembly instructions and follow the steps in sequence. Do not skip ahead. If you skip
ahead, you may learn later that you have to disassemble components and that you may have damaged the
equipment.
• Assemble and operate the machine on a solid, level surface. Locate the unit at least 1 meter from the walls or
furniture to provide easy access.
The machine is designed for your enjoyment. By following these precautions and using common sense, you will
have many safe and pleasurable hours of healthy exercise.
After assembly, you should check all functions to ensure correct operation. If you experience problems, rst
recheck the assembly instructions to locate any possible errors made during assembly.
Maximum User Weight: 130KG
IMPORTANT SAFETY
INSTRUCTIONS
4

Successful tness training programs have one prominent feature in common...safety. Fitness
training has some inherent dangers, as do all physical activities. The chance of injury can
be greatly reduced or completely removed by using correct techniques, proper breathing,
maintaining equipment in good working condition, and by wearing the appropriate clothing.
• It is highly recommended that you consult your physician before beginning any exercise program. This is
especially important for individuals over the age of 35, or persons with pre-existing health problems.
• Always warm up before starting a workout. Try to do a total body warm up before you start.
• Maintaining equipment in proper operating condition is of utmost importance for a safe training program.
• Keep hands, limbs, loose clothing and long hair well out of the way of all moving parts.
• Inspect the machine before each use for loose or worn parts. Ensure all nuts and bolts are fully tightened. If a
problem is found do not allow the machine to be used until all parts are tightened or worn or defective parts are
repaired or replaced.
SAFETY
GUIDELINES
5

Hardware Pack List
Bolt M8 x 80 2PCS
Curve Washer Ø 8x Ø 20 2PCS
Spring Washer Ø 8 2PCS
Nut M8 2PCS
Bolt M8 x 49 4PCS
Curve Washer Ø 8x Ø16 4PCS
Cap Nut M8 4PCS
Cap Nut S38 4PCS
Cap Nut S13 10PCS
Allen Wrench 6mm Multi Hex Tool/Phillips Screwdriver
S10, S13, S14, S15 1PC
Multi Hex Tool S14-19 2PCS
6

Assembly Instructions
STEP 1.
#52
X6
#28 #31
X2
#48 #49 #18 #68
X2
7

Assembly Instructions
STEP 2.
#28 #18 #60
X4
#28 #18 #31
X4
8

Assembly Instructions
STEP 3.
#16 #17 #18 #19 #29 #73
X2
9

Assembly Instructions
STEP 4.
#22
X4
#16
X2
#22 #41 #42 #63
X2
10

Assembly Instructions
STEP 5.
#22 #23 #56 #24 #56 #23 #22
X2
STEP 6.
#32
X4
11

Assembly Instructions
STEP 7.
#67 #60 #68
X4
STEP 8.
#28 #60
X2
#58
X4
STEP 9.
12

HR1560AZNB
START/STOP:
1. Start & Pauses workouts.
2. Start body fat measurement and quit the body fat program.
3. Operates only when in stop mode. Holding for 3 seconds will reset all function
values to be zero.
DOWN: Decrease value of selected workout parameter (TIME, DISTANCE, etc).
During the workout, it will decrease the resistance load.
UP: Increases value of selected workout parameter. During the workout, it will
increase the resistance load.
ENTER: To input desired value or work out mode.
TEST (RECOVERY): Press to enter into Recovery function when computer has
the heart rate value. Recovery is Fitness Level 1-6 after 1 minute. F1 is best, and
F6 is the worst.
MODE: Press to switch display form RPM to SPEED, ODO to DIST, WATT to
Calories during workout.
Workout Selection
After power-up using UP or DOWN keys to select then pressing ENTER to enter
the desired mode.
Setting Workout Parameters
After selecting your desired program, you may pre-set several workout
parameters for desired results.
13
Console Instructions

WORKOUT PARAMETERS:
TIME/DISTANCE/CALORIES/AGE
Note: Some parameters are not adjustable in certain programs.
Once a program has been selected, pressing ENTER, will make "Time" parameter
flash. Using UP OR DOWN KEY you may select desired time value. Press ENTER
KEY to input value.
Flashing prompt will move to the next parameter. Continue use of UP OR DOWN
K E Y. Press START/STOP to start workout.
More About Workout Parameters
Program Operation
Manual (P1)
Selecting "Manual" using UP OR DOWN KEY then pressing ENTER KEY. 1
st
parameter "Time" will flash so value can be adjusted using UP OR DOWN KEY.
Press ENTER KEY to save value & move to next parameter to be adjusted.
Continue through all desired parameters, pressing START/STOP to start workout.
Note: One of workout parameters counts down to be zero, it will have bi sounds
and stop the workout automatically. Press START KEY to continue the workout to
reach the unfinished workout parameter.
Pre-Programs (P2-P7)
There are 6 program profiles ready for use. All program profiles have 16
level of resistance.
Field
Setting
Range
Default
value
Increment/
Decrement
Description
Time 0:00~99:00 00:00 ±1:00
1. When display is 0:00, Time will increase.
2. When Time is 1:00~99:00, It will count
Down to 0.
Distance 0.00~999.0 0.00 ±1.0
1. When display is 0.0, Distance will
increase.
2. When distance is 1.0~999.0, it will count
Down to 0.
Calories 0~9950 0 ±50
1. When display is 0, Calories will increase.
2. When Calories is 50~9950, it will count
down to 0.
Age 10~99 30 ±1
Targe t HR will be based on Age. When
Heart Rate exceeds Target H.R, the number
of Heart Rate will flash in programs.
14

Setting Parameters for Pre-programs
Selecting one of pre-programs using UP OR DOWN KEY then pressing ENTER KEY.
1
st
parameter "Time" will flash so value can be adjusted using UP OR DOWN
KEY. Press ENTER KEY to save value & move to next parameter to be adjusted.
Continue through all desired parameters, pressing START/STOP to start workout.
Note: One of workout parameters counts down to be zero, it will have bi
sounds and stop the workout automatically. Press START KEY to
continue the workout to reach the unfinished workout parameter.
BODY FAT PROGRAM (P8)
Setting Data for Body Fat
Selecting "Body Fat Program" using UP OR DOWN KEY then pressing ENTER.
"Male" will flash so Gender can be adjusted using UP OR DOWN KEY, press ENTER
to save gender & move to next data.
"175" of Height will flash so Height can be adjusted to use UP OR DOWN KEY,
press ENTER KEY save value & move to next data.
"75"of Weight will flash so Weight can be adjusted to use UP OR DOWN KEY, press
ENTER KEY to save value & move to next data.
"30"of age will flash so Age can be adjusted using UP OR DOWN KEY, press ENTER
to save value.
Press START/STOP to start measurement, please also grasp hand pulse
grips.
After 15 seconds the display will show out Body Fat%, BMR, BMI & BODY TYPE.
NOTE:
Body Types: There are 5 body types divided according to the FAT% calculated.
BMR: Basal Metabolism Ratio.
BMI: Body Mass Index.
Press START/STOP KEY to return the main Display.
TARGET HEART RATE Program (P9)
Setting Parameter for TARGET H.R.
Selecting "TARGET H.R." using UP OR DOWN KEY then pressing ENTER KEY. 1
st
parameter "Time" will flash so value can be adjusted using UP OR DOWN KEY.
Press ENTER KEY to save value & move to next parameter to be adjusted.
Continue through all desired parameters, pressing START/STOP to start workout.
Note: If Pulse is above or below (±5) the set TARGET H.R., computer will
adjust the resistance load automatically. It will check every 20 seconds
approx. The resistance load will increase or decrease.
15

(Note: Each resistance load represents 2 level of loading) One of
workout parameters counts down to be zero, it will have bi sounds and
stop the workout automatically. Press START/STOP to continue the
workout to reach unfinished workout parameter.
HEART RATE CONTROL Program(P10-P12)
There are 3 selection for target pulse:
P10-60% TARGET H.R.=60% of (220-AGE)
P11-75% TARGET H.R.=75% of (220-AGE)
P12-85% TARGET H.R.=85% of (220-AGE)
Setting Parameters for HEART RATE CONTROL
Selecting "One of Heart Rate Control Program" using UP OR DOWN KEY then
pressing ENTER KEY. 1
st
parameter "Time" will flash so value can be adjusted
using UP OR DOWN KEY. Press ENTER KEY to save value & move to next
parameter to be adjusted.
Continue through all desired parameters, pressing START/STOP to start workout.
Note: If Pulse is above or below (±5) the set TARGET H.R., computer will
adjust the resistance load automatically. It will check Every 20 seconds
approx. The resistance load will increase or decrease (Note: each
resistance load represents 2 level of loading) One of workout
parameters counts down to be zero, it will have bi sounds and stop the
workout automatically. Press START/STOP KEY to continue the workout
to reach unfinished workout parameter.
User Program (P13)
User program allows user to set their own program that can be used immediately.
Setting Parameters for User Program
Selecting user using UP OR DOWN KEY then pressing ENTER KEY. 1
st
parameter
"Time" will flash so value can be adjusted using UP OR DOWN KEY. Press ENTER
KEY to save value & move to next parameter to be adjusted. Continue through all
desired parameters. After finished set up desired parameter, the level 1 will flash,
use UP OR DOWN KEY to adjust then pressing ENTER until finished. (There are
totally 10 times), Press START/STOP to start workout.
Note: One of workout parameters counts down to be zero, it will have bi
sounds and stop the workout automatically. Press START/STOP KEY to
continue the workout to reach unfinished workout parameter.
16

MAINTENANCE
Cleaning
The elliptical trainer can be cleaned with a soft cloth and mild detergent. Do not use
abrasives or solvents on plastic parts. Please wipe your perspiration off the elliptical trainer
after each use. Be careful not get excessive moisture on the computer display panel as this
might cause electrical hazards or electronics to fail.
Please keep the elliptical trainer, specially, the computer console, out of direct sunlight to
prevent screen damage.
Please inspect all assembly bolts and pedals on the machine for proper tightness every
week.
Storage
Store the elliptical trainer in a clean and dry environment away from children.
TROUBLESHOOTING
PROBLEM
SOLUTION
The elliptical trainer wobbles when in use.
Turn the rear stabilizer end cap on the rear
stabilizer as needed to level the elliptical
trainer.
There is no display on the computer
console.
1. Remove the computer console and verify
the wires that come from the computer
console are properly connected to the wires
that come from the front post.
2. Check if the batteries are correctly
positioned and battery springs are in proper
contact with batteries.
3. The batteries in the computer console
may be dead. Change to new batteries.
There is no heart rate reading or heart rate
reading or is erratic / inconsistent.
1. Make sure that the wire connections for
the hand pulse sensors are secure.
2. To ensure the pulse readout is more
precise, please always hold on to the
handlebar grip sensors with two hands
instead of just with one hand only when you
try to test your heart rate figures.
3. Gripping the hand pulse sensors too
tight. Try to maintain moderate pressure
while holding onto the hand pulse sensors.
The elliptical trainer makes a squeaking
noise when in use.
The bolts may be loose on the elliptical
trainer, please inspect the bolts and tighten
the loose bolts.
17

Exploded drawing
18

Exploded drawing
19

Parts List
No.
Description
Qty
001 Main Frame 1
002 Left Handrail Arm 1
003 Left Foot Tube 1
004 Right Foot Tube
1
005 Drive Tube
2
006 Right Handrail Arm 1
007 Connection Piece 2
008 Rear Main Frame 1
009 Front Post 1
010 Handlebar 1
011 Left Handrail 1
012 Right Handrail 1
013 Front Stabilizer 1
014 Handlebar End Cap 2
015 Handlebar Foam Grip 2
016 Cap Ø38 4
017 Bolt M8x20 13
018 Spring Washer Ø8
20
019 Curve Washer Ø8xØ33x2.0 4
020 Middle Wire L=1200mm 1
021 Table seat assembly 1
022 Cap S13 10
023 Bolt M8x16 8
024 Connect shaft Ø16x65.5 1
025 Plastic Bushing Ø32xØ16x20 4
026 Connect shaft for wheel Ø15x63.8 2
027 Metal Bushing Ø18x Ø8x10 4
028 Bolt M8x15 12
029 Big Washer Ø19xØ25x2.0 4
030 Tube Q235 2
031 Washer Ø8x Ø20x2.0 10
032 Bolt M8x25 4
033 Plastic Bushing 2
034 Plastic Bushing Ø38x24 12
035 Cover 1
036 Plastic Bushing Ø24.5x Ø16x14 4
20
/