Panasonic TH-P50XT50 Operating instructions

Category
Plasma TVs
Type
Operating instructions
Web Site: http://panasonic.net
© Panasonic Corporation 2012
M0412-0
Printed in Thailand
Customers Record
The model number and serial number of this product may be found on its rear panel. You should note this serial
number in the space provided below and retain this book, plus your purchase receipt, as a permanent record of
your purchase to aid in identification in the event of theft or loss, and for Warranty Service purposes.
Model Number Serial Number
Information on Disposal in other Countries outside the European Union
This symbol is only valid in the European Union. If you wish to discard this product, please contact
your local authorities or dealer and ask for the correct method of disposal.
[India Only]
For the purpose of recycling to facilitate effective utilization of resources, please return this product to
a nearby authorized collection center, registered dismantler or recycler, or Panasonic service center
when disposing of this product.
Please see the Panasonic website for further information on collection centers, etc.
http://www.panasonic.co.in/wps/portal/home
Operating Instructions
Plasma Television
Thank you for purchasing this Panasonic product.
Please read these instructions carefully before operating this product and
retain them for future reference.
The images shown in this manual are for illustrative purposes only.
English
TQB4TC0301
UT50D series XT50D series
UT50K series XT50K series
UT50M series XT50M series
UT50P series XT50P series
UT50Q series XT50Q series
UT50T series XT50T series
2
SDXC Logo is a trademark of
SD-3C, LLC.
“Full HD 3D Glasses™” logo and “Full HD 3D Glasses™”
word are trademark of Full HD 3D Glasses Initiative
DLNA
®
, the DLNA Logo and
DLNA CERTIFIED™ are
trademarks, service marks,
or certification marks of
the Digital Living Network
Alliance.
“AVCHD”, “AVCHD 3D” and
“AVCHD Progressive” are
trademarks of Panasonic
Corporation and Sony
Corporation.
Manufactured under license
from Dolby Laboratories.
Dolby and the double-D
symbol are trademarks of
Dolby Laboratories.
QuickTime and the
QuickTime logo are
trademarks or registered
trademarks of Apple
Inc., used under license
therefrom.
Manufactured under license under U.S. Patent Nos:
5,956,674; 5,974,380; 6,487,535 & other U.S. and
worldwide patents issued & pending. DTS, the Symbol,
& DTS and the Symbol together are registered
trademarks & DTS 2.0+Digital Out is a trademark of
DTS, Inc. Product includes software. © DTS, Inc. All
Rights Reserved.
DivX
®
, DivX Certified
®
, DivX
Plus
®
HD and associated
logos are trademarks of
Rovi Corporation or its
subsidiaries and are used
under license.
“RealD 3D” is a trademark of RealD.
The Bluetooth
®
word mark and logos are registered trademarks owned by the Bluetooth SIG, Inc. and any use
of such marks by Panasonic Corporation is under license. Other trademarks and trade names are those of their
respective owners.
HDMI, the HDMI Logo, and High-Definition Multimedia Interface are trademarks or registered trademarks of HDMI
Licensing LLC in the United States and other countries.
Windows is a registered trademark of Microsoft Corporation in the United States and other countries.
VGA is a trademark of International Business Machines Corporation.
S-VGA is a registered trademark of the Video Electronics Standard Association.
See page 95 for more information.
3
Contents
Be Sure to Read
Safety Precautions ···············································4
Quick Start Guide
Accessories / Options ···········································6
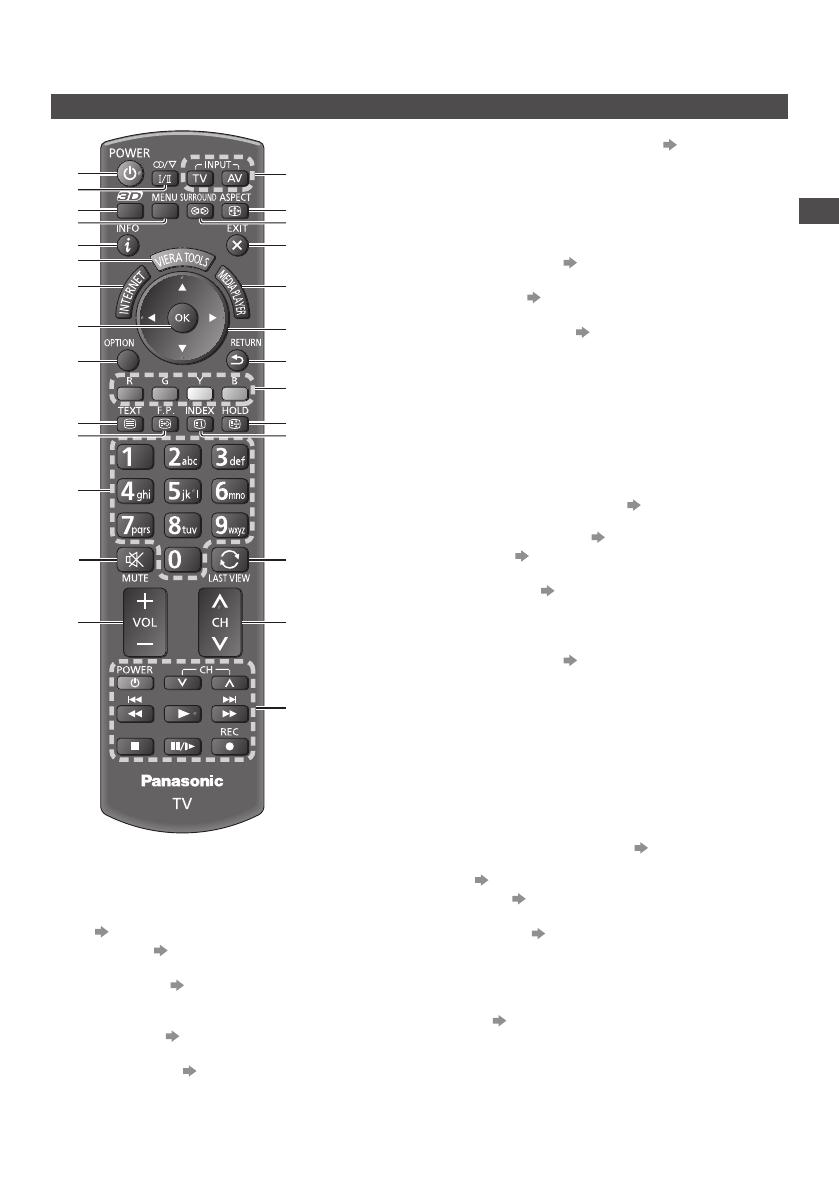
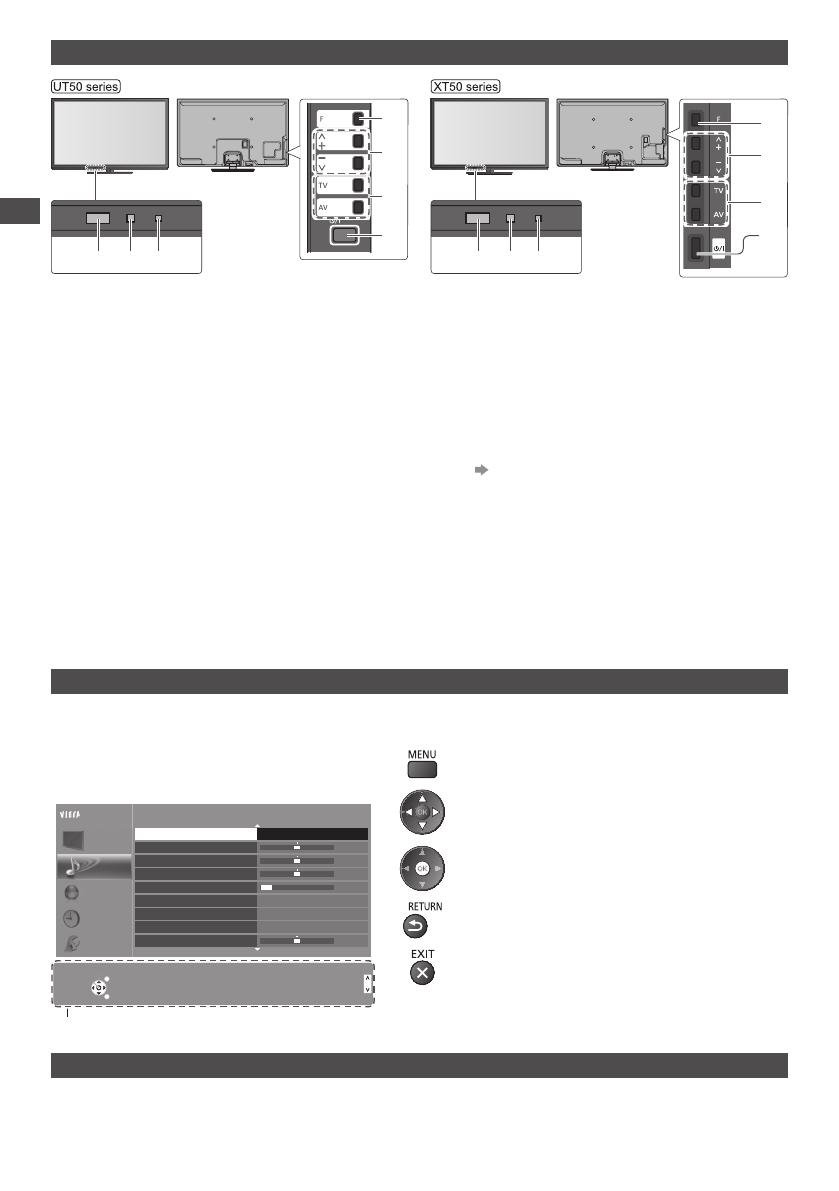
Identifying Controls ·············································11
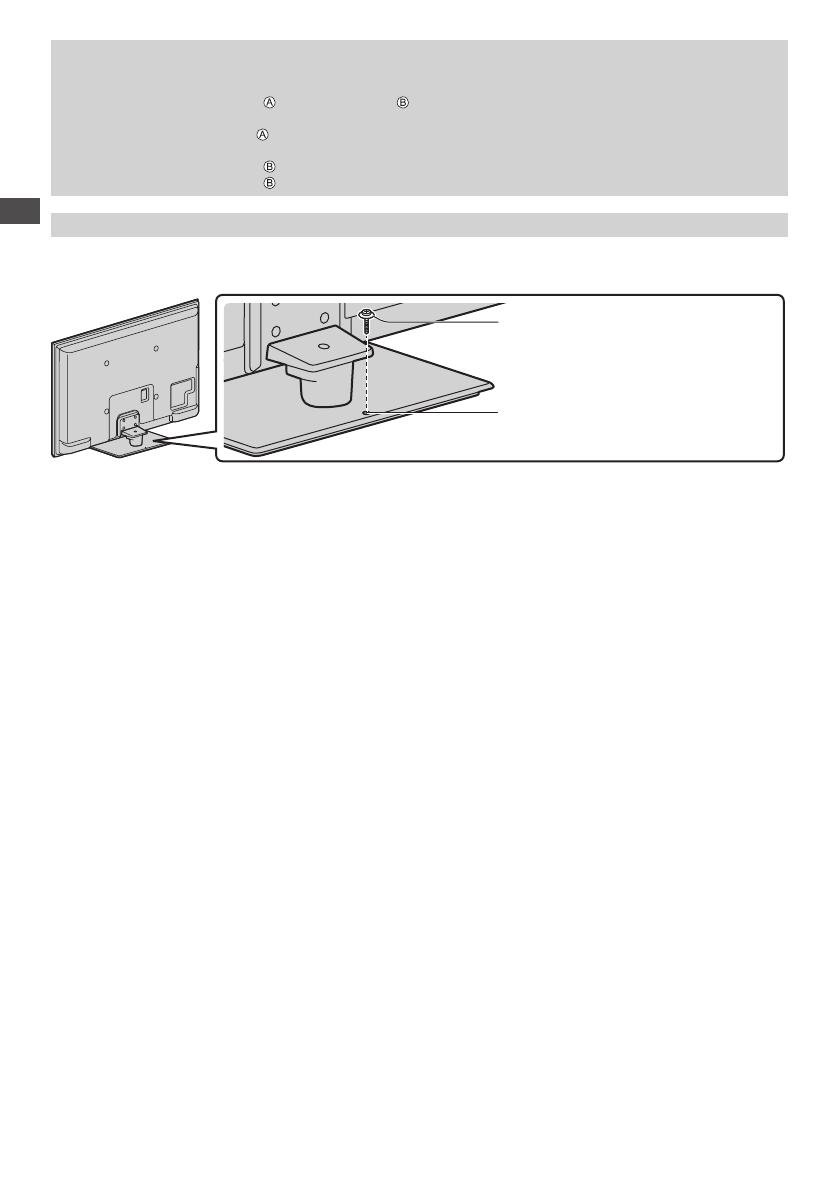
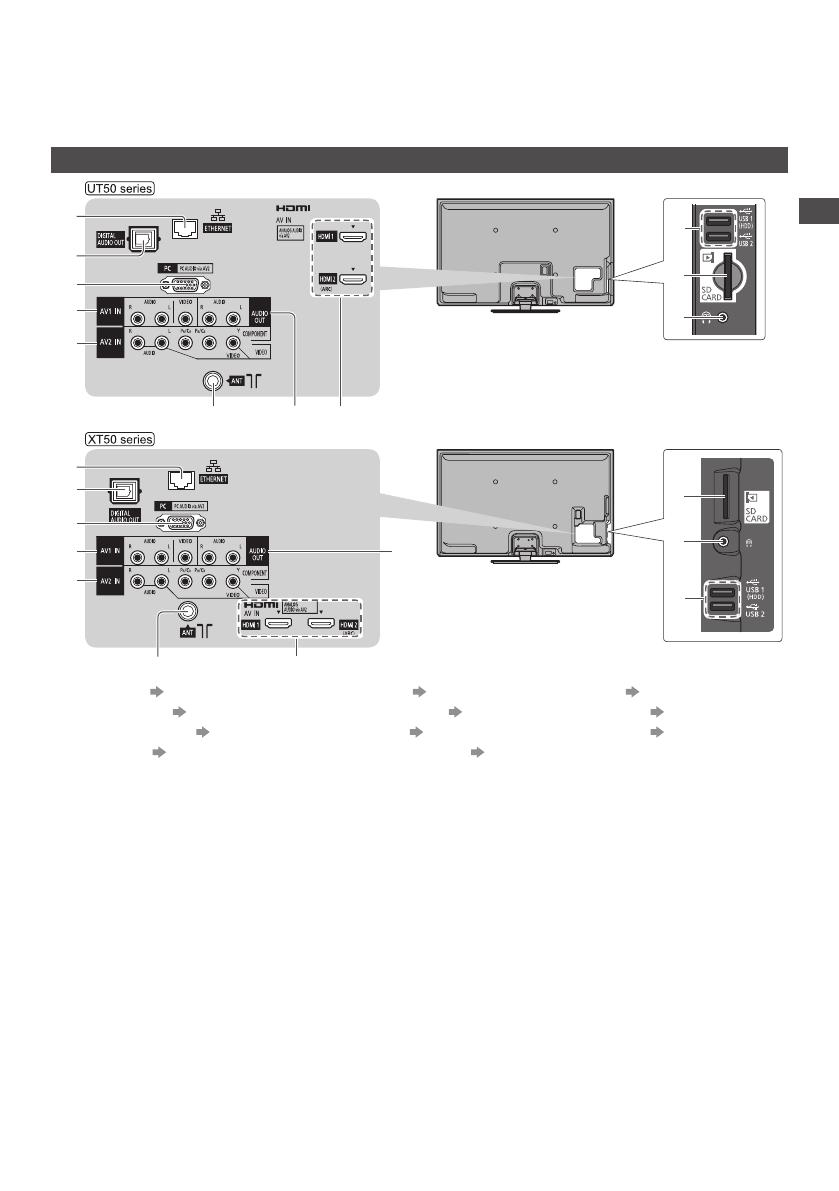
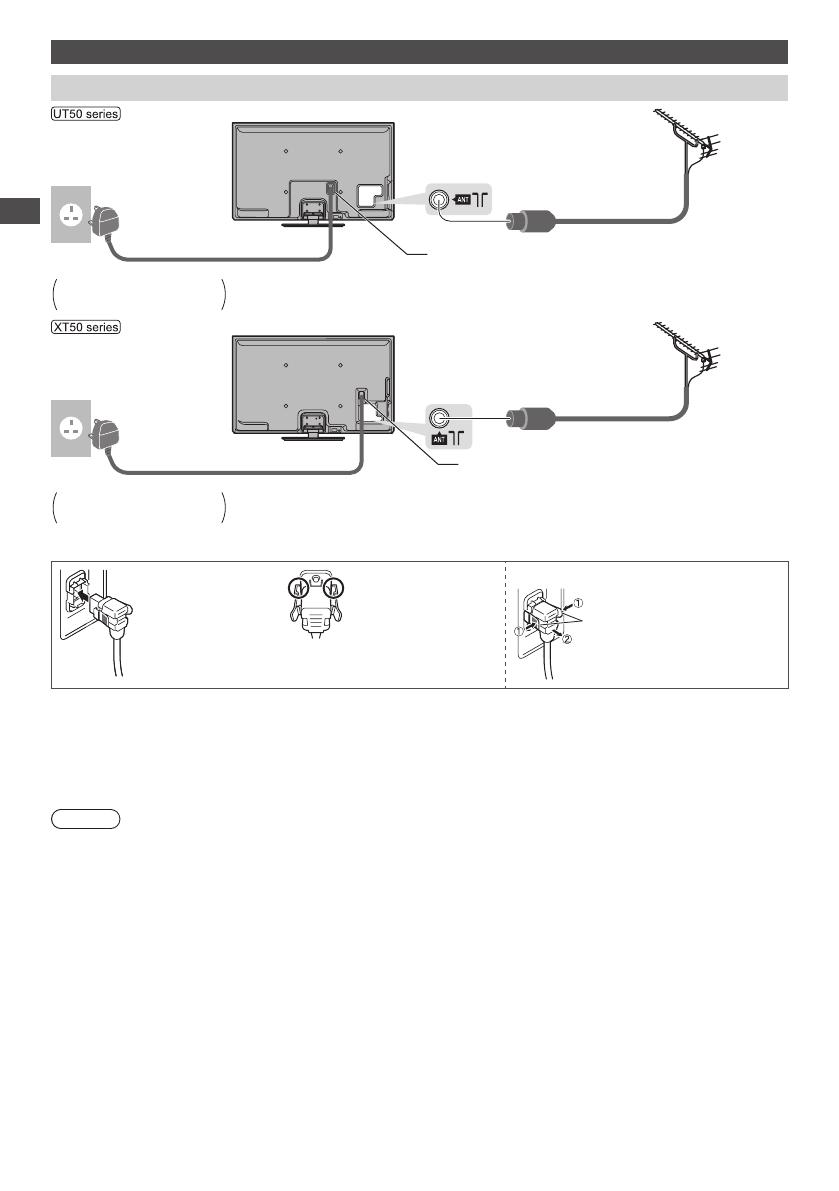
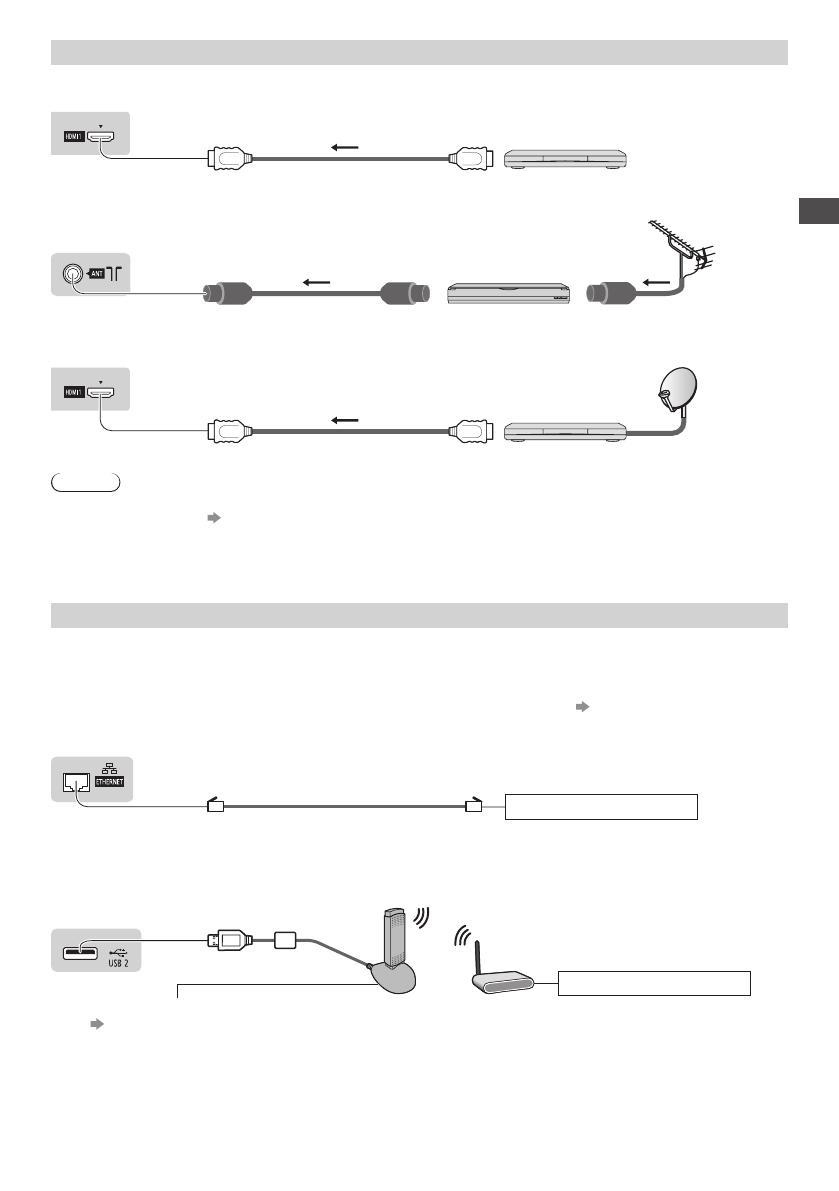
Basic Connection················································13
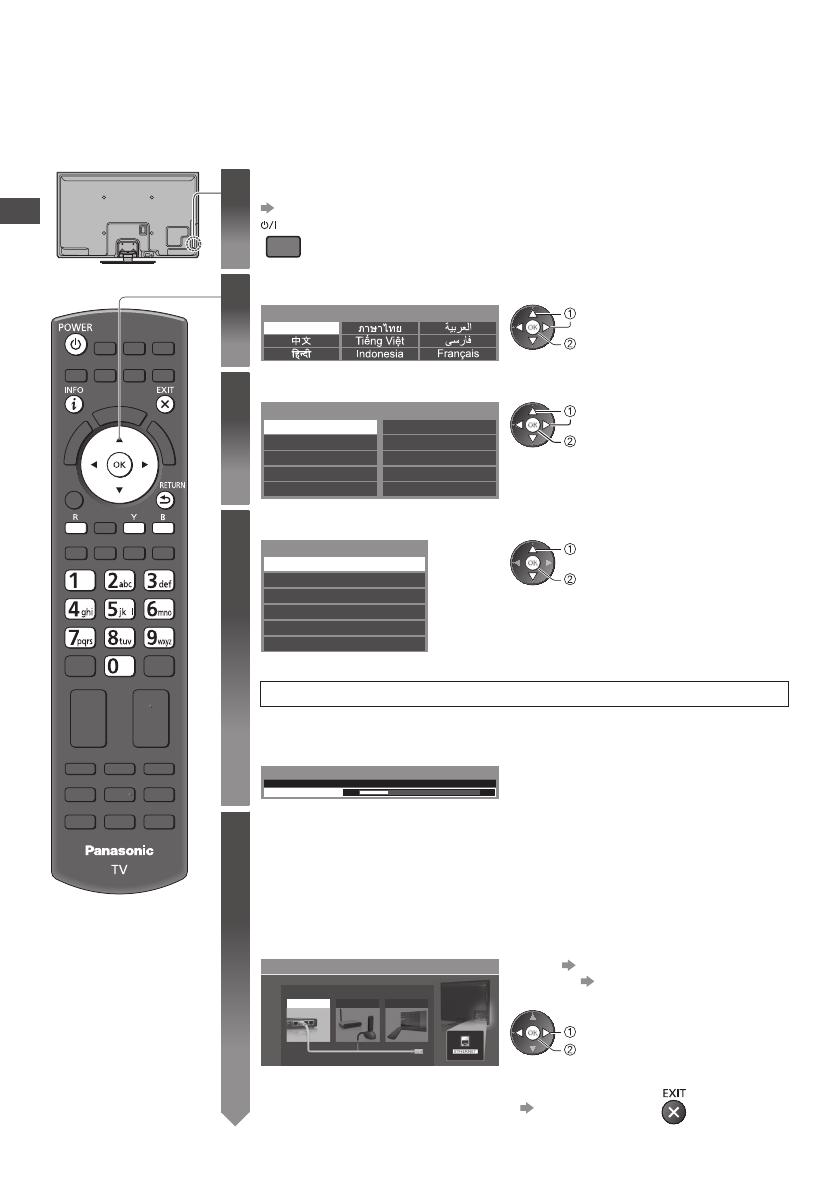
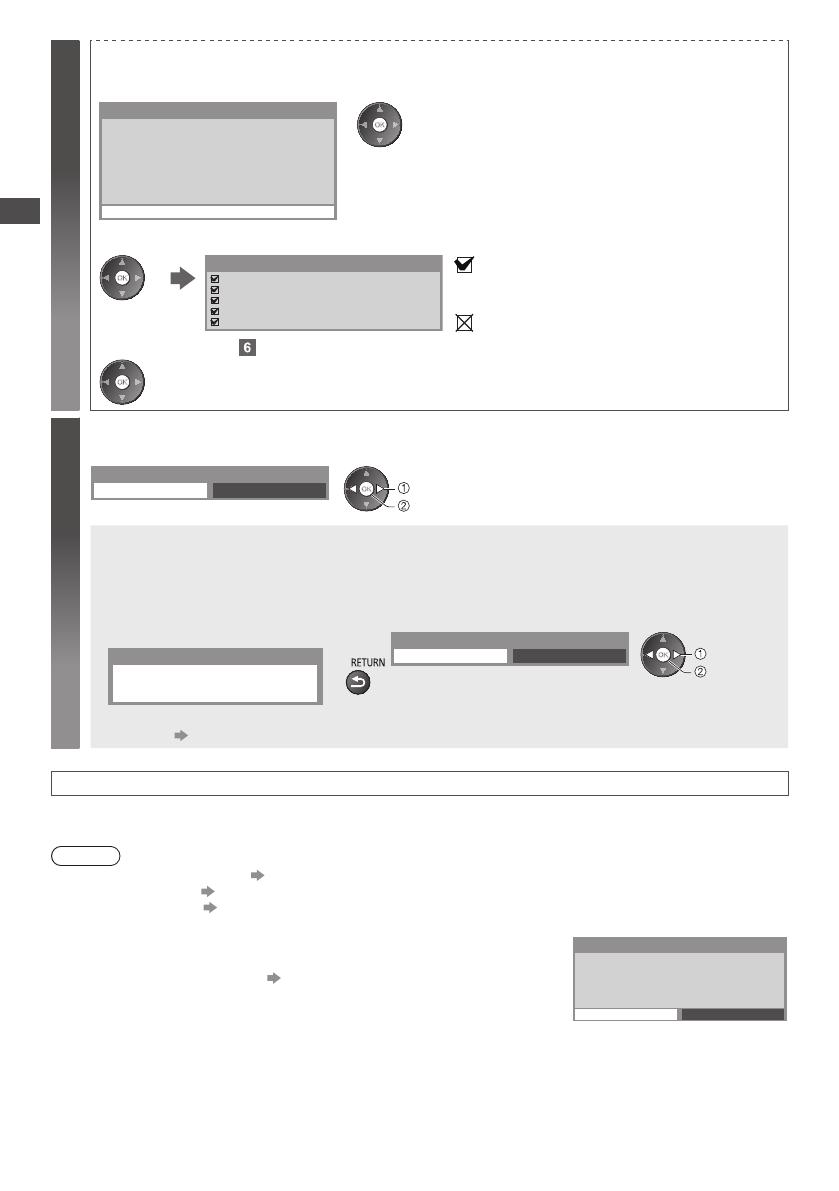
Auto Tuning ························································16
Enjoy your TV!
Basic
Using “VIERA Connect” ······································19
Watching TV ·······················································20
Viewing Teletext ··················································24
Watching External Inputs ····································26
Viewing 3D images ·············································28
How to Use VIERA TOOLS ································33
How to Use Menu Functions ······························34
Advanced
Tuning and Editing Channels ·····························41
Child Lock ···························································44
Shipping Condition ·············································45
Displaying PC Screen on TV ······························46
Advanced Picture Settings ·································47
Using Media Player ············································48
Using Network Services (DLNA / VIERA Connect)
····58
Link Functions (VIERA Link) ·······························68
External Equipment ············································75
Others
Technical Information··········································80
FAQs···································································89
Maintenance ·······················································91
Specifications ·····················································92
Licence ·······························································95
Panasonic does not guarantee operation and performance
of peripheral devices made by other manufacturers; and we
disclaim any liability or damage arising from operation and/
or performance from usage of such other maker’s peripheral
devices.
This product is licensed under the AVC patent portfolio
license for the personal and non-commercial use of a
consumer to (i) encode video in compliance with the AVC
Standard (“AVC Video”) and/or (ii) decode AVC Video that
was encoded by a consumer engaged in a personal and
non-commercial activity and/or was obtained from a video
provider licensed to provide AVC Video. No license is granted
or shall be implied for any other use.
Additional information may be obtained from MPEG LA, LLC.
See http://www.mpegla.com.
“Full HD 3D Glasses™” Logo indicates compatibility between
TV products and 3D Eyewear which are compliant with the
“Full HD 3D Glasses™” format, and does not indicate picture
quality of TV products.
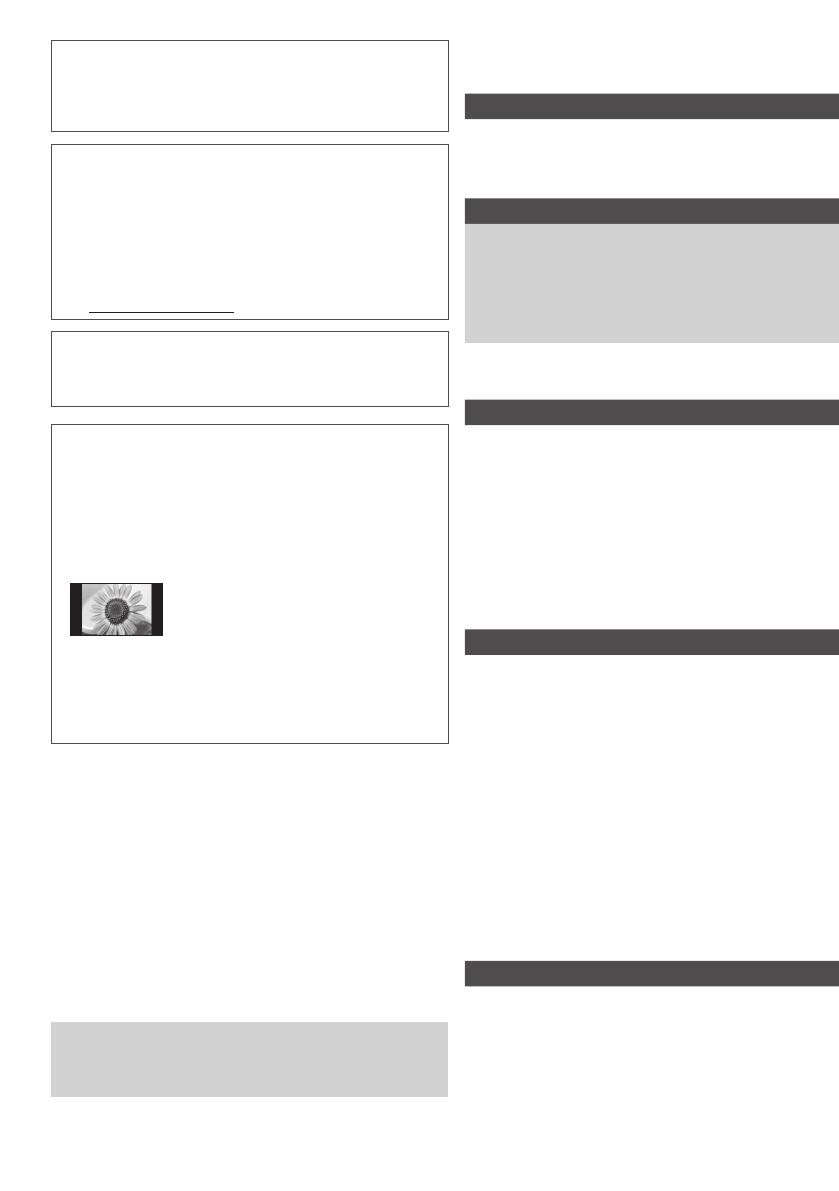
Do not display any still part of the image for
a long period
In such cases the still part of the image remains dimly on the
plasma screen (“image retention”). This is not considered a
malfunction and is not covered by the warranty.
Typical still image parts:
Channel number, channel logo and other logos
Still or moving pictures viewed in 4:3 or 14:9 aspect ratio
Video games
Images from PC
To avoid image retention, the contrast is lowered
automatically and the screen becomes dim after a few
minutes if no signals are sent or no operations are
performed. (p. 89)
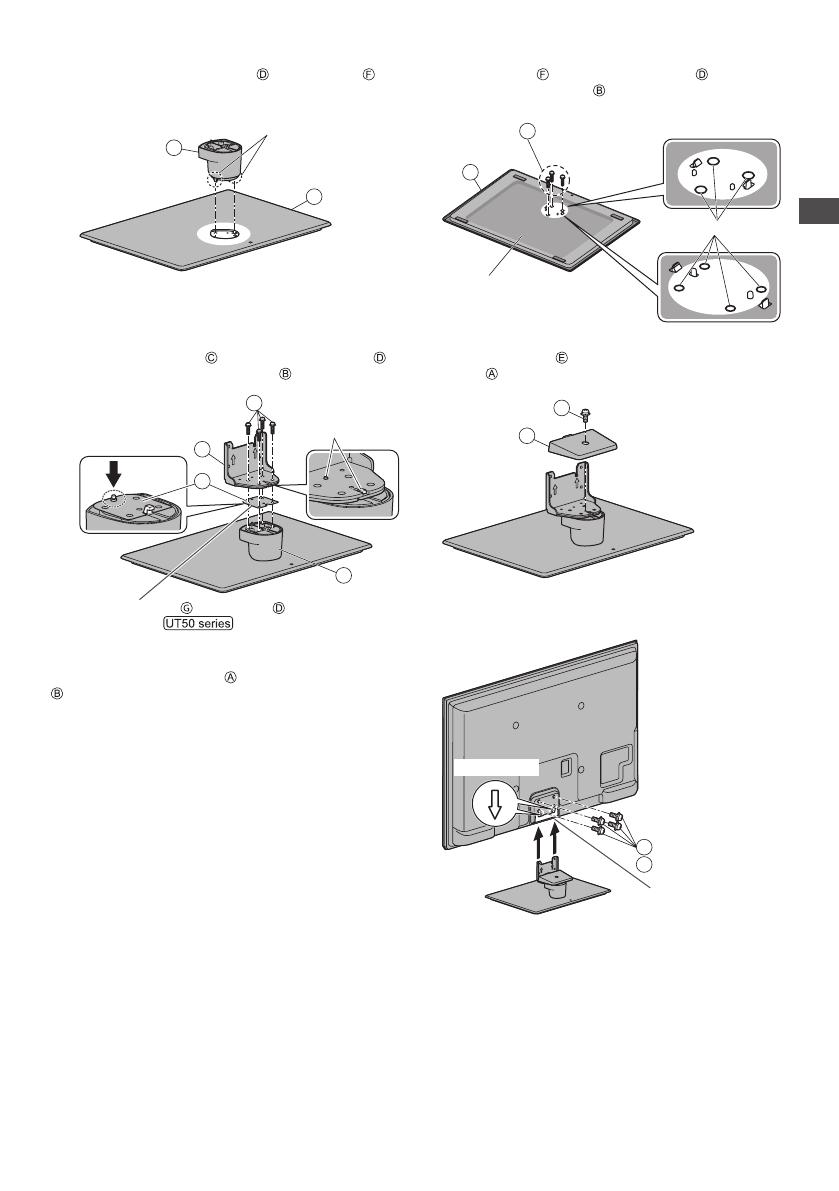
The illustration for UT50K series is used in this manual
unless otherwise mentioned.
Illustrations shown may be different between models and
countries.
Safety Precautions
4
Safety Precautions
Warning
Handling the mains plug and lead
Insert the mains plug fully into the socket outlet. (If the mains plug is loose, it could generate heat and cause fire.)
Ensure that the mains plug is easily accessible.
Ensure the earth pin on the mains plug is securely connected to prevent electrical shock.
An apparatus with CLASS I construction shall be connected to a mains socket outlet with a protective earthing
connection.
Do not touch the mains plug with a wet hand. (This may cause electrical shock.)
Do not use any mains lead other than that provided with this TV. (This may cause fire or electrical shock.)
Do not damage the mains lead. (A damaged lead may cause fire or electrical shock.)
Do not move the TV with the lead plugged in the socket outlet.
Do not place a heavy object on the lead or place the lead near a high-temperature object.
Do not twist the lead, bend it excessively or stretch it.
Do not pull on the lead. Hold onto the mains plug body when disconnecting the lead.
Do not use a damaged mains plug or socket outlet.
If you find any
abnormality, remove the
mains plug immediately!
Mains plug types vary between countries.
Power source
This TV is designed to operate on:
AC 220-240 V, 50 / 60 Hz
UT50P series, XT50P series:
AC 110-240 V, 50 / 60 Hz
Do not remove covers and NEVER
modify the TV yourself
Do not remove the rear cover as live parts are
accessible when it is removed. There are no user
serviceable parts inside. (High-voltage components
may cause serious electrical shock.)
Have the TV checked, adjusted, or repaired at your
local Panasonic dealer.
Do not expose to direct sunlight and
other sources of heat
Avoid exposing the TV to direct sunlight and other
sources of heat.
To prevent the spread
of fire, keep candles
or other open flames
away from this product
at all times
Do not expose to rain or excessive
moisture
To prevent damage which might result in electric shock
or fire, do not expose this TV to rain or excessive
moisture. This TV must not be exposed to dripping or
splashing water and objects filled with liquid, such as
vases, must not be placed on top of or above the TV.
Do not insert foreign objects into the TV
Do not allow any objects to drop into the TV through
the air vents. (Fire or electrical shock may result.)
Do not place the TV on sloped or
unstable surfaces, and ensure that the
TV does not hang over the edge of the
base
The TV may fall off or tip over.
Use only the dedicated pedestals /
mounting equipment
Using an unapproved pedestal or other fixtures may
make the TV unstable, risking injury. Be sure to ask
your local Panasonic dealer to perform setup.
Use approved pedestals (p. 8) / wall-hanging brackets
(p. 7).
Do not allow children to handle SD Card
As with any small object, SD Cards can be
swallowed by young children. Please remove SD
Card immediately after use and store out of reach of
children.
Safety Precautions
5
Caution
This appliance is intended for use in
tropical climates
When cleaning the TV, remove the mains
plug
Cleaning an energised TV may cause electrical shock.
When the TV is not going to be used for
a long period of time, remove the mains
plug
This TV will still consume some power even in the Off
mode, as long as the mains plug is still connected to a
live socket outlet.
Transport only in upright position
Transporting the TV with its display panel facing upward
or downward may cause damage to the internal circuitry.
Allow sufficient space around the TV for
radiated heat
Minimum distance
When using the
pedestal, keep the
space between the
bottom of the TV and
the surface where
the TV is set.
In case of using
Wall-hanging
bracket, follow the
manual of it.
10
10
10
7
(cm)
Do not block the rear air vents
Blocked ventilation by newspapers, table cloths,
curtains, etc. may cause overheating, fire or electrical
shock.
Do not expose your ears to excessive
volume from the headphones
Irreversible damage can be caused.
Do not apply strong force or impact to the
display panel
This may cause damage resulting in injury.
The TV is heavy. Handle the TV by 2 or
more people. Support as shown to avoid
injury by the TV tipping or falling.
Bluetooth
Warning
Radio waves
Do not use the TV in any medical institutions or locations with medical equipment. Radio waves from the TV may
interfere with the medical equipment and cause accidents due to the malfunction.
Do not use the TV near any automatic control equipment such as automatic doors or fire alarms. Radio waves from
the TV may interfere with the automatic control equipment and cause accidents due to the malfunction.
Keep the distance at least 22 cm from the TV when you have a cardiac pacemaker. Radio waves from the part may
interfere with the operation of the pacemaker.
Caution
Bluetooth
®
wireless technology
The TV uses the 2.4 GHz radio frequency ISM band (Bluetooth®). To avoid malfunctions or slow response caused
by radio wave interference, keep the TV away from the devices such as other wireless LAN devices, other Bluetooth
devices, microwaves, mobile phones and the devices that use 2.4 GHz signal.
Accessories / Options
6
Accessories / Options
Standard accessories
Remote Control
N2QAYB000750
Batteries for the
Remote Control (2)
R6 (AA)
(p. 7)
Pedestal
(p. 8)
Mains lead
(p. 14)
UT50K series, XT50K series
UT50M series, XT50M series
UT50P series, XT50P series
UT50D series, XT50D series
UT50Q series, XT50Q series
(UT50T series, XT50T series)
Operating Instructions
The shape of accessories may differ from the actual.
Accessories may not be placed all together. Take care not to throw them away unintentionally.
This product contains possibly dangerous parts (such as plastic bags), that can be breathed in or swallowed by
young children accidentally. Keep these parts out of reach of young children.
Optional accessories
Please contact your local Panasonic dealer to purchase the recommended optional accessories. For additional details,
please read the manual of the optional accessories.
Wireless Adaptor for VIERA
TY-WL20A
Caution
To use the Wireless LAN Adaptor, an access point needs to be obtained.
Depending on the area, this optional accessory may not be available.
Additional information for Wireless LAN Adaptor and access point may be on the
following website. (English only)
http://panasonic.jp/support/global/cs/tv/
UT50D series, XT50D series
UT50K series, XT50K series
UT50T series, XT50T series
TY-WL20M
UT50M series, XT50M series
UT50P series, XT50P series
UT50Q series, XT50Q series
3D Eyewear set
(Rechargeable type)
TY-ER3D4MW
TY-ER3D4SW
If you need 3D Eyewears, please purchase this optional accessory.
Use Panasonic 3D Eyewear for active 3D supporting Bluetooth wireless technology.
For more information (English only):
http://panasonic.net/avc/viera/3d/asia.html
Communication Camera
TY-CC20W
This camera can be used on VIERA Connect (p. 19, 67).
Depending on the area, this optional accessory may not be available.
For details, consult your local Panasonic dealer.
Accessories / Options
7
Wall-hanging bracket
TY-WK4P1RW
(42” / 50” class)
TY-WK5P1RW
(60” class)
Tilting angle for this TV:
0 (vertical) to 20 degrees (42” class) / 10 degrees (50” class) / 15 degrees (60” class)
0 (vertical) to 15 degrees (42” class, 50” class)
Rear of the TV
a
Depth of screw:
(42” / 50” class) minimum 17 mm,
maximum 35 mm
(60” class) minimum 17 mm,
maximum 37 mm
Diametre: M8
b
(View from the side)
Screw for fixing the TV onto the wall-hanging
bracket (not supplied with the TV)
Holes for wall-hanging bracket installation
a: 400 mm b: 300 mm (42” / 50” class)
a: 500 mm b: 300 mm (60” class)
Warning
Using other wall-hanging brackets, or installing a wall-hanging bracket by yourself have the risk of personal injury and
product damage. In order to maintain the unit’s performance and safety, be absolutely sure to ask your dealer or a
licensed contractor to secure the wall-hanging brackets. Any damage caused by installing without a qualified installer
will void your warranty.
Carefully read the instructions accompanying optional accessories, and be absolutely sure to take steps to prevent
the TV from falling off.
Handle the TV carefully during installation since subjecting it to impact or other forces may cause product damage.
Take care when fixing wall brackets to the wall. Always ensure that there are no electrical cables or pipes in the wall
before hanging bracket.
To prevent fall and injury, remove the TV from its fixed wall position when it is no longer in use.
Installing / removing remote’s batteries
1
Pull open
Hook
Caution
Incorrect installation may cause battery leakage and corrosion,
resulting in damage to the remote control.
Do not mix old and new batteries.
Do not mix different battery types (such as alkaline and manganese
batteries).
Do not use rechargeable (Ni-Cd) batteries.
Do not burn or break up batteries.
Batteries must not be exposed to excessive heat such as sunshine,
fire or the like.
Do not disassemble or modify the remote control.
2
Note the correct
polarity (+ or -)
Close
Accessories / Options
8
Attaching / removing the pedestal
Warning
Do not disassemble or modify the pedestal.
Otherwise the TV may fall over and become damaged, and personal injury may result.
Caution
Do not use any pedestal other than the one provided with this TV.
Otherwise the TV may fall over and become damaged, and personal injury may result.
Do not use the pedestal if it becomes warped or physically damaged.
If you use the pedestal while it is physically damaged, personal injury may result. Contact your local Panasonic
dealer immediately.
During set-up, make sure that all screws are securely tightened.
If insufficient care is taken to ensure screws are properly tightened during assembly, the pedestal will not be strong
enough to support the TV, and it might fall over and become damaged, and personal injury may result.
Ensure that the TV does not fall over.
If the TV is knocked or children climb onto the pedestal with the TV installed, the TV may fall over and personal injury
may result.
Two or more people are required to install and remove the TV.
If two or more people are not present, the TV may be dropped, and personal injury may result.
When removing the pedestal from the TV, do not remove the pedestal by the methods other than the specified
procedure. (p. 10)
Otherwise the TV and / or pedestal may fall over and become damaged, and personal injury may result.
Assembly screw
(5) (42” / 50” class)
(1) (60” class)
(black)
M4 × 10
Bracket
TXFBL5Z0081
(42” class)
(42” / 50” class)
TXFBL5Z0111
(50” class)
TXFBL5Z0054
(60” class)
Cover
TXFBL5Z0082
(42” / 50” class)
TXFBL5Z0056
(60” class)
Sheet
TMK4TX076
(50” class)
Assembly screw
(7) (42” / 50” class)
(12) (60” class)
(silver)
M5 × 16
Neck
TXFBL5Z0080
(42” / 50” class)
TXFBL5Z0085
(60” class)
Base
TBL5ZX0415 (42” class)
TBL5ZX0413 (50” class)
TBL5ZX0421 (60” class)
Accessories / Options
9
Assembling the pedestal
1
Insert the tabs of the neck into the base
firmly
2
Turn the base over and fix the neck securely
with assembly screws
Do not hold the neck when turning over the base.
B
F
Back of the base
Screw hole
42” / 50” class
60” class
(3) (42” / 50” class)
(4) (60” class)
F
D
Tabs (bottom)
3
Attach the bracket to the tabs of the neck
and fix with assembly screws
4
Attach the cover and fix securely with assembly
screw
B
C
D
G
Tabs (top)
Set the sheet on the neck .
(50” class)
E
A
Securing the TV
Use the assembly screws (42” / 50” class) or
(60” class) to fasten securely.
Tighten the four assembly screws loosely at first, then
tighten them firmly to fix securely.
Carry out the work on a horizontal and level surface.
A
B
Hole for pedestal
installation
Arrow mark
(42” / 50” class)
(60” class)
Accessories / Options
10
Removing the pedestal from the TV
Be sure to remove the pedestal in the following way when using the wall-hanging bracket or repacking the TV.
1 Remove the assembly screws
(42” / 50” class) or (60” class) from the TV.
2 Pull out the pedestal from the TV.
3 Remove the assembly screw
from the cover.
4 Pull out the cover.
5 Remove the assembly screws from the bracket.
6 Remove the assembly screws from the Back of stand and pull out the neck.
Preventing the TV from falling over (42” class)
Using the fall-prevent screw hole and a screw (commercially available), securely fix the body of the pedestal to the
installation surface.
The place where the pedestal is to be fixed should be thick enough and made of hard material.
Screw (not supplied)
Diametre: 3 mm
Length: 25-30 mm
Screw hole
Identifying Controls
1
15
16
18
21
19
20
22
23
25
26
27
17
24
2
4
6
11
3
5
9
7
8
10
12
13
14
11
Identifying Controls
Remote Control
1
Standby On / Off switch
Switches TV on or off standby.
2
Sound Selection
Changes multiplex sound mode (if available).
(p. 81)
3
3D button (p. 30)
Switches the viewing mode between 2D and 3D.
4
[Main Menu] (p. 34)
Press to access Picture, Sound, Network, Timer
and Setup Menus.
5
Information (p. 20)
Displays channel and programme information.
6
VIERA TOOLS (p. 33)
Displays some special feature icons and accesses
easily.
7
INTERNET ([VIERA Connect]) (p. 19, 67)
Displays VIERA Connect home screen.
8
OK
Confirms selections and choices.
Press after selecting channel positions to quickly
change channel.
Displays the Channel List.
9
[Option Menu] (p. 21)
Easy optional setting for viewing, sound, etc.
10
Teletext
(p. 24)
Switches to teletext mode.
11
Favourite Page
(p. 24)
Calls up the teletext page stored in blue button.
12
Numeric buttons
Changes channel and teletext pages.
Sets characters.
When in Standby mode, switches TV on.
13
Sound Mute
Switches sound mute on or off.
14
Volume Up / Down
15
Input mode selection
TV - switches TV mode. (p. 20)
AV - switches to AV input mode from Input
Selection list. (p. 26)
16
Aspect (p. 22)
Changes aspect ratio.
17
[Surround] (p. 38)
Switches surround sound setting.
18
Exit
Returns to the normal viewing screen.
19
[Media Player] (p. 49)
Switches to SD Card and USB device viewing /
listening mode.
20
Cursor buttons
Makes selections and adjustments.
21
Return
Returns to the previous menu / page.
22
Coloured buttons
Used for the selection, navigation and operation of
various functions.
23
Hold
Freeze / unfreeze picture (p. 21)
Holds the current teletext page (teletext mode)
(p. 24)
24
Index
(p. 24)
Returns to the teletext index page (teletext mode)
25
Last view (p. 23)
Switches to previously viewed channel or input
mode.
26
Channel Up / Down
27
Operations for contents, connected equipment,
etc. (p. 27, 49, 64, 73)
Some countries do not provide a teletext service.
Identifying Controls
12
Indicator / Control panel
1
Function select
[Volume] / [Contrast] / [Brightness] / [Colour] /
[Sharpness] / [Tint] (NTSC signal) / [Bass]
/
[Treble]
/ [Balance] / [Auto Tuning]
[Music] or [Speech] mode in the Sound Menu
2
Channel Up / Down, Value change (when using the
F button), Switching the TV on
3
Changes the input mode
4
Mains power On / Off switch
Use to switch the mains power.
If you turned the TV off during Standby mode
by the remote control last time, the TV will be
in Standby mode when you turn the TV on with
Mains power On / Off switch.
When pressing the control panel button (1 - 4), the
control panel guide appears on the left side of the
screen for 3 seconds to highlight the pressed button.
5
Remote control signal receiver
Do not place any objects between the TV remote
control signal receiver and remote control.
6
C.A.T.S. (Contrast Automatic Tracking System)
sensor
Senses brightness to adjust picture quality when
[Eco Mode] in the Picture Menu is set to [On].
(p. 35)
7
Power LED
Red: Standby
Green: On
The LED blinks when the TV receives a command
from the remote control.
3
1
4
2
5 6 7
Rear side of the TV
3
1
4
2
5 6 7
Side of the TV
Using the On Screen Displays - Operation guide
Many features available on this TV can be accessed via the On Screen Display menu.
Operation guide
Operation guide will help you to operate by using
the remote control.
Example: [Sound Menu]
1/2
0
0
0
11
0
Mode Music
Bass
Treble
Balance
Headphone Volume
Surround
Volume Control (VAO)
Auto Gain Control
Volume Correction
Off
TV
Main Menu
Picture
Sound
Network
Timer
Setup
Select
EXIT
Selects your favourite sound
mode.
Page up
Change
RETURN
Page down
Operation guide
S
elec
t
EXI
T
S
elects
y
our favourite sound
mode
.
Pa
g
e u
p
C
han
ge
ET
R
N
Pa
g
e dow
n
Off
How to use remote control
Open the main menu
Move the cursor / select from a range of options /
select the menu item (up and down only) / adjust
levels (left and right only)
Access the menu / store settings after adjustments
have been made or options have been set
Return to the previous menu
Exit the menu system and return to the normal
viewing screen
Auto power standby function
The TV will automatically go into Standby mode in the following conditions:
No signal is received and no operation is performed for 30 minutes in TV mode.
[Off Timer] is active in the Timer Menu. (p. 21)
No operation is performed for the period selected in [Auto Standby] (p. 39).
Basic Connection
13
Basic Connection
External equipment and cables shown are not supplied with this TV.
Please ensure that the unit is disconnected from the mains socket before attaching or disconnecting any leads.
When disconnecting the mains lead, be absolutely sure to disconnect the mains plug at the socket outlet first.
Terminals
6
9
10
11
7
1
3
4
2
5
8
6
8
9
11
10
7
1
3
4
2
5
1
USB 1 - 2 (p. 15, 48, 76, 78)
2
SD Card slot (p. 48)
3
Headphone jack (p. 76, 78)
4
HDMI1 - 2 (p. 15, 75, 77)
5
AUDIO OUT (p. 75, 77)
6
Antenna terminal (p. 14)
7
ETHERNET (p. 15, 59)
8
DIGITAL AUDIO OUT (p. 75, 77)
9
PC (p. 76, 78)
10
AV1 IN (p. 75, 77)
11
AV2 IN (p. 75 - 78)
Basic Connection
14
Connections
Mains lead and aerial
Mains lead
Aerial
RF cable
See below “Mains lead”
AC 220-240 V, 50 / 60 Hz
UT50P series:
AC 110-240 V, 50 / 60 Hz
TV
Mains lead
RF cable
Aerial
See below “Mains lead”
AC 220-240 V, 50 / 60 Hz
XT50P series:
AC 110-240 V, 50 / 60 Hz
TV
Mains lead
Push until both
side tabs click
Make sure that
the mains lead is
securely fixed
To remove from the TV:
tabs
Press both tabs
and pull on mains
connector to
release
Note
Keep RF (antenna) cable away from the mains lead to avoid and minimise mains interference pickup.
Do not place the RF cable under the TV.
To obtain optimum quality picture and sound, an aerial, the correct cable (75 Ω coaxial), and the correct terminating
plug are required.
If a communal aerial system is used, you may require the correct connection cable and plug between the wall aerial
socket and the TV.
Your local Television Service Centre or dealer may be able to assist you in obtaining the correct aerial system for your
particular area and the accessories required.
Any matters regarding aerial installation, upgrading of existing systems or accessories required, and the costs
incurred, are the responsibility of you, the Customer.
Basic Connection
15
AV devices
Player / 3D compatible player
TV
Player /
3D-compatible player
HDMI cable
DVD Recorder / VCR
TV
DVD Recorder / VCR
RF cable
Aerial
RF cable
Set top box
TV
Set top box
HDMI cable
Satellite
dish
Note
Check the type of terminals and cable plugs are correct when connecting.
VIERA Link connection (p. 68, 69)
Please also read the manual of the equipment being connected.
Keep the TV away from electronic equipment (video equipment, etc.) or equipment with an infrared sensor.
Otherwise, distortion of image / sound may occur or operation of other equipment may be interfered.
When using a HDMI cable, use the fully wired one.
Network
To enable the network service functions (VIERA Connect, etc.), you need to connect the TV to a broadband network
environment.
If you do not have any broadband network services, please consult your retailer for assistance.
Prepare the internet environment for wired connection or wireless connection.
Setup of the network connection will start after the tuning (when first using the TV). (p. 16 - 18)
Wired connection
TV
Internet environment
LAN cable (Shielded)
Use the Shielded Twist Pair (STP)
LAN cable.
Wireless connection
TV
Internet environment
Access point
Wireless LAN Adaptor
“Optional accessories” (p. 6)
Connect to the USB 1 or 2 port.
Auto Tuning
16
Auto Tuning
Search and store TV channels automatically.
These steps are not necessary if the setup has been completed by your local dealer.
Please complete connections (p. 13 - 15) and settings (if necessary) of the connected equipment before starting Auto
Tuning. For details of settings for the connected equipment, read the manual of the equipment.
1
Plug the TV into mains socket and switch on
(p. 12, 14)
Takes a few seconds to be displayed.
If the red LED shows on the TV, press the Standby On / Off switch on the
remote control.
2
Select your language
OSD Language
English
select
set
3
Select your country
Country
Thailand Vietnam
Saudi Arabia
United Arab Emirates
Malaysia India
Others Kuwait
Indonesia Singapore
select
set
4
Select your area
Channel Plan
Asia/W.Europe
NZ/Indonesia
China
CIS/E.Europe
CATV/Other
Hong Kong
select
access
When selecting [CATV/Other], press the
OK button, and then select the Channel
Plan from Indian CATV, South Africa,
American System, American CATV or
Japan CATV.
Auto Tuning starts
Auto Tuning will start to search for TV channels and store them.
The stored channels and sorted channel order vary depending on the area,
broadcasting system and conditions of signal reception.
CH 42
1 120
Auto Tuning
Scan
5
Setup the network connection
Setup the network connection to enable the network service functions such as VIERA
Connect, etc. (p. 19, 58).
To setup the wireless connection, the Wireless LAN Adaptor (optional accessory)
is required. Please note that this TV does not support wireless public access points.
Ensure the network connections (p. 15) and network environment are completed
before starting setup.
Select the network type
Network Setup
Select Wired or Wireless
Wired Wireless Set later
[Wired] “Wired connection” (p. 15)
[Wireless] “Wireless connection”
(p. 15)
select
access
To setup later on or skip this step
Select [Set later] or
Auto Tuning
17
5
[Wired]
1. Select [Auto]
Check network cable connection.
Check acquired IP address.
Check for devices using same IP address.
Check gateway connection.
Check server connection.
Connection Test
: succeeded
The test is successful
and the TV is
connected to the
network.
: failed
Check the settings and
connections. And then
select [Retry].
Acquire IP Address
Auto Manual
select
access
Automatically setup is done and the test of the
network connection starts.
To set manually, select [Manual] and set each item.
For details (p. 61)
2. Go to the next step
(Press twice)
[Wireless]
Access points found automatically are listed.
1. Select your desired access point
1
2
3
Access Point A
Access Point B
Access Point C
11n(2.4GHz)
11n(5GHz)
11n(5GHz)
Available Wireless Networks
No. Network Name(SSID) Status Wireless type
select
access
For the information of the
highlighted access point
: Encrypted access point
To search access points again
To set [WPS(Push button)] (p. 18)
To set manually (p. 63)
2. Access the encryption key input mode
Encryption Key Setting
Security type: WPA-PSK
Encryption type: TKIP
Please input the encryption key.
Encryption key
Connection will be made with the following settings:-
Network Name(SSID): Access Point A
If the selected access point is not encrypted, the confirmation
screen will be displayed. It is recommended to select the encrypted
access point.
3. Enter the encryption key of the access point (English only)
A B C D E F G H I J K L M N O P Q R S T
U V W X Y Z 0 1 2 3 4 5 6 7 8 9 ! : #
a b c d e f g h i j k l m n o p q r s t
u v w x y z ( ) + - . _ @ / % & ?
, ; = $ [ ] ~ < > { } | ` ^ \
*
Wireless Network Settings
Encryption key
Set characters
Store
select
set
You can set characters by using numeric buttons. (p. 87)
4. After the access point setting is finished, perform the connection test
Check wireless network connection.
Check acquired IP address.
Check for devices using same IP address.
Check gateway connection.
Check server connection.
Connection Test
: succeeded
The test is successful and the TV is connected to the
network.
: failed
Check the settings and connections. And then select
[Retry].
To set manually, select [Manual] and set each item.
For details
(p. 63)
5. Go to the next step
(Press twice)
Auto Tuning
18
5
[WPS(Push button)]
1. Press the WPS button on the access point until the light flashes
2. Connect the Wireless LAN Adaptor and the access point
1) Please press the ‘WPS’ button on the wireless
access point until its light flashes.
2) When the light is flashing select ‘Connect’ on
TV.
If you are unsure, please check the instruction
manual of the wireless access point.
WPS(Push button)
Connect
Ensure that your access point supports WPS for this setup.
WPS: Wi-Fi Protected Setup™
If the connection has failed, check the settings and positions of
your access point. And then, follow the on-screen instructions.
3. After the access point setting is finished, perform the connection test
Check wireless network connection.
Check acquired IP address.
Check for devices using same IP address.
Check gateway connection.
Check server connection.
Connection Test
: succeeded
The test is successful and the TV is connected to
the network.
: failed
Check the settings and connections. And then select
[Retry].
4. Go to the next step
(Press twice)
6
Select [Home]
Select [Home] viewing environment to use in your home environment.
Please select your viewing environment.
Home Shop
select
set
[Shop] viewing environment (for shop display only)
[Shop] viewing environment is the demonstration mode to explain main features of this TV.
Select [Home] viewing environment to use in your home environment.
You can return to viewing environment selection screen at the stage of Shop confirmation screen.
1 Return to viewing environment
selection screen
2 Select [Home]
Please select your viewing environment.
Home Shop
select
set
Shop
You have selected shop mode
To change viewing environment later on, you will need to initialise all settings by accessing Shipping
Condition. [Shipping Condition] (p. 45)
Auto Tuning is now complete and your TV is ready for viewing
If tuning has failed, check the connection of the RF cable, and then, follow the on-screen instructions.
Note
To edit or hide (skip) channels “Tuning and Editing Channels” (p. 41 - 43)
To retune all channels [Auto Tuning] in “Tuning and Editing Channels” (p. 42, 43)
To initialise all settings [Shipping Condition] (p. 45)
If you connect the Wireless LAN Adaptor later on, the confirmation screen
will be displayed for the setup.
Wireless LAN adaptor connected, do you want to
set it up?
No - Exit
No
Wireless LAN adaptor
Current network connection : Wireless
Yes
To setup the wireless connection (p. 62)
Using “VIERA Connect”
19
Using “VIERA Connect”
VIERA Connect is a gateway to the internet services unique to Panasonic.
VIERA Connect allows you to access some specific websites supported by Panasonic, and enjoy internet contents
such as videos, games, communication tools, etc. from VIERA Connect home screen.
Some features of the websites may not be available.
1
Turn power on
Mains power On / Off switch should be on.
(p. 12)
Every time you turn on the TV, VIERA Connect introduction banner appears. The
banner is subject to change.
Enjoy selected internet content with VIERA Connect.
Simply press the OK / INTERNET button
2
Access VIERA Connect
While the banner is displayed
or
Depending on the usage conditions, it may take a while to read all the data.
Messages might be displayed before VIERA Connect home screen.
Please read these instructions carefully and follow the on-screen instructions.
Example: VIERA Connect home screen
MORE
BACK
To go to the next level, select
[MORE].
To back to the previous level,
select [BACK].
To return to VIERA Connect home
screen
To exit from
VIERA Connect
To set the VIERA
Connect introduction
banner display off
[VIERA Connect
Banner] (p. 39)
Video communication requires an exclusive Communication Camera TY-CC20W.
“Optional accessories” (p. 6)
For details, read the manual of the Communication Camera.
You can connect a keyboard and a gamepad via USB port for character input and playing games in VIERA Connect.
You can also operate the TV with a keyboard or a gamepad other than VIERA Connect features.
For more information “USB connection” (p. 87)
Note
If you cannot access VIERA Connect, check the network connections (p. 15) and settings (p. 16 - 18).
For more information of VIERA Connect (p. 67)
  • Page 1 1
  • Page 2 2
  • Page 3 3
  • Page 4 4
  • Page 5 5
  • Page 6 6
  • Page 7 7
  • Page 8 8
  • Page 9 9
  • Page 10 10
  • Page 11 11
  • Page 12 12
  • Page 13 13
  • Page 14 14
  • Page 15 15
  • Page 16 16
  • Page 17 17
  • Page 18 18
  • Page 19 19
  • Page 20 20
  • Page 21 21
  • Page 22 22
  • Page 23 23
  • Page 24 24
  • Page 25 25
  • Page 26 26
  • Page 27 27
  • Page 28 28
  • Page 29 29
  • Page 30 30
  • Page 31 31
  • Page 32 32
  • Page 33 33
  • Page 34 34
  • Page 35 35
  • Page 36 36
  • Page 37 37
  • Page 38 38
  • Page 39 39
  • Page 40 40
  • Page 41 41
  • Page 42 42
  • Page 43 43
  • Page 44 44
  • Page 45 45
  • Page 46 46
  • Page 47 47
  • Page 48 48
  • Page 49 49
  • Page 50 50
  • Page 51 51
  • Page 52 52
  • Page 53 53
  • Page 54 54
  • Page 55 55
  • Page 56 56
  • Page 57 57
  • Page 58 58
  • Page 59 59
  • Page 60 60
  • Page 61 61
  • Page 62 62
  • Page 63 63
  • Page 64 64
  • Page 65 65
  • Page 66 66
  • Page 67 67
  • Page 68 68
  • Page 69 69
  • Page 70 70
  • Page 71 71
  • Page 72 72
  • Page 73 73
  • Page 74 74
  • Page 75 75
  • Page 76 76
  • Page 77 77
  • Page 78 78
  • Page 79 79
  • Page 80 80
  • Page 81 81
  • Page 82 82
  • Page 83 83
  • Page 84 84
  • Page 85 85
  • Page 86 86
  • Page 87 87
  • Page 88 88
  • Page 89 89
  • Page 90 90
  • Page 91 91
  • Page 92 92
  • Page 93 93
  • Page 94 94
  • Page 95 95
  • Page 96 96

Panasonic TH-P50XT50 Operating instructions

Category
Plasma TVs
Type
Operating instructions

Ask a question and I''ll find the answer in the document

Finding information in a document is now easier with AI