INTRODUZIONE
Complimenti per aver acquistato l’orologio da viaggio multiband con
proiezione dell’ora (RMB899P) di Oregon Scientific.
NOTA Si consiglia di tenere questo manuale a portata di mano du-
rante l’utilizzo del prodotto. Il manuale contiene pratiche e dettaglliate
istruzioni, dati tecnici e avvertenze che è necessario conoscere.
PANORAMICA DEL PRODOTTO
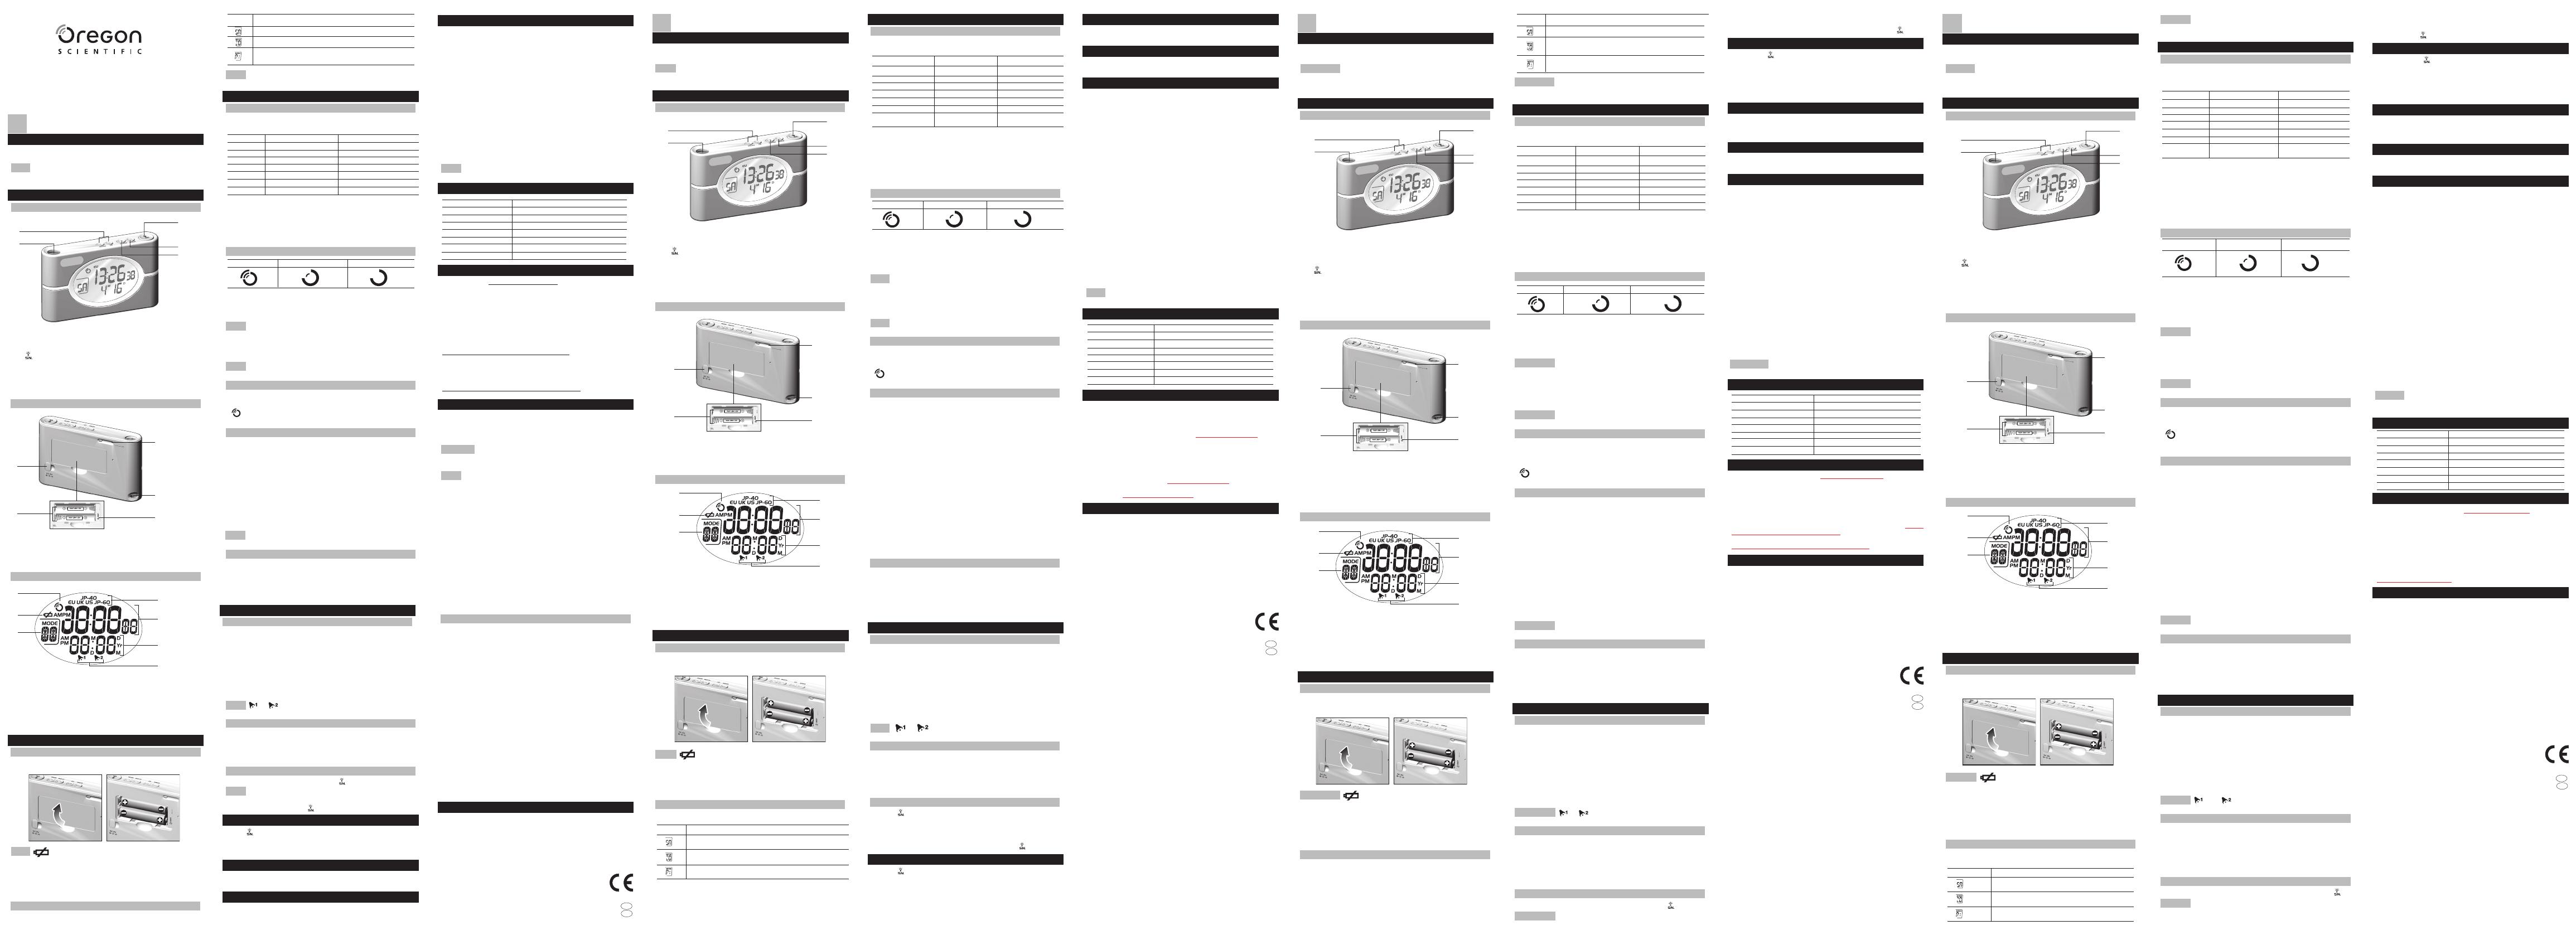
VISTA ANTERIORE
1. UP / DOWN: Aumenta / diminuisce il valore di un’impostazione;
tenere premuto per scorrere velocemente tra i valori
2. Proiettore: Proietta l’ora su parete o soffitto
3. : Attiva la funzione snooze o la retroilluminazione e la proiezione
dell’ora per 5 secondi
4. MODE: Premere per navigare tra le modalità di visualizzazione
dell’ora; tenere premuto per modificare le impostazioni di orologio
/ calendario
5. ALARM: Premere per passare dall’allarme 1 all’allarme 2 e vicev-
ersa; tenere premuto per modificare le impostazioni dell’allarme
VISTA POSTERIORE
1. Entrata per alimentatore AC
2. Vano batterie
3. LOCK: Spostare l’interruttore per bloccare o sbloccare i tasti
4. FOCUS: Girare per mettere a fuoco l’ora proiettata
5. RESET: Premere per eseguire un reset
DISPLAY LCD
1. Icona ricezione segnale radio
2. Icona batterie in esaurimento
3. Visualizza la modalità orologio corrente
4. Segnale radio attualmente in uso
5. Ora
6. Data / Ora allarme
7. L’allarme 1 o 2 è visualizzato o impostato
AVVIO DEL PRODOTTO
IMPOSTAZIONE
1. Inserire le batterie prima del primo utilizzo, rispettando la polarità
(+ e -):
NOTA appare quando le batterie sono quasi scariche.
2. Dopo aver inserito le batterie, l’unità chiederà immediatamente di
impostare il segnale di ricezione orologio (v. la sezione Ricezione
Orologio per le opzioni del segnale).
3. Premere UP o DOWN per scorrere le opzioni del segnale.
4. Premere MODE per confermare.
MODALITÀ OROLOGIO
Premere MODE per navigare tra le modalità orologio:
ICONA MODALITÀ
Modalità Orologio (Clock Mode): Orologio con secondi e
calendario
Modalità Fuso Orario (Zone Mode): Orologio a
radiocontrollato con secondi e fuso orario di riferimento
Modalità Ricezione Segnale (Signal Reception Mode):
Orologio con secondi e radiocontrollo ON / OFF
Se è stato selezionato il fuso orario di riferimento, questo verrà
visualizzato con l’ora in modalità Ricezione Segnale e Orologio.
OROLOGIO
RICEZIONE OROLOGIO
L’orologio sincronizza automaticamente l’ora e la data correnti quando
si trova nel raggio d’azione del segnale radio selezionato:
VISUALIZZAZIONE SEGNALE ZONA
OFF Nessun segnale Nessun segnale
EU DCF-77 Europa Centrale
UK MSF-60 UK
US WWVB-60 USA
JP-60 JP-60 Giappone – Ovest
JP-40 JP-40 Giappone – Est
JAPAN JP-60 e JP-40 Giappone – Ovest
ed Est
L’unità riceve un segnale quando si trova entro 1500 km (932 miglia)
dallo stesso.
Per modificare la zona di un segnale:
1. Tenere premuto MODE quando ci si trova nella visualizzazione
Modalità di ricezione del segnale orario.
2. Premere UP o DOWN per scorrere le opzioni del segnale.
3. Premere MODE per confermare.
RICEZIONE SEGNALE
FORTE DEBOLE NESSUN SEGNALE
Quando è in corso la ricerca di un segnale, l’icona della ricezione
lampeggia. Se il segnale radio è debole, possono occorrere fino a
24 ore per ricevere un segnale valido. Per una ricezione migliore,
posizionare l’orologio lontano da oggetti metallici e da elettrodomestici
e vicino a una finestra.
NOTA Questo prodotto potrebbe non funzionare in maniera corretta
in presenza di interferenze di natura elettrica. L’unità riprenderà a
funzionare normalmente quando l’interferenza cessa.
Per forzare la ricerca manuale di un segnale:
• Tenere premuto UP.
NOTA Quando ci si trova in Modalità Ricezione Segnale, se la ricezi-
one del segnale radio è disattivata verrà visualizzata la scritta “OFF”.
ATTIVAZIONE / DISATTIVAZIONE RICEZIONE OROLOGIO
Per attivare la ricezione del segnale di radiocontrollo dell’orologio,
tenere premuto UP. Per disattivarla, tenere premuto DOWN.
L’icona del segnale indica che l’opzione orologio è attiva (ON).
L’assenza di icone indica che è disattiva (OFF).
MODIFICA DELLE IMPOSTAZIONI DELL’OROLOGIO
Se non si ricevono segnali di radiocontrollo dell’orologio, o se si
desidera impostare l’orologio manualmente, è necessario disattivare la
ricezione, come sopra indicato.
Per modificare le impostazioni dell’orologio:
1. Premere MODE per navigare fino alla Modalità Orologio o Fuso
Orario (Clock o Zone Mode).
2. Per entrare nella modalità impostazioni, tenere premuto MODE per
2 secondi.
3. Premere UP / DOWN per modificare l’impostazione che lampeg-
gia.
4. Premere MODE per confermare.
5. Ripetere i passi 3 e 4 per modificare tutte le altre impostazioni.
La sequenza delle impostazioni in Modalità Orologio o Fuso
Orario è la seguente:
Fuso orario di riferimento, formato ora 12 / 24, ora, minuto, anno,
formato data / mese, mese, lingua della data e del giorno della set-
timana.
Le opzioni della lingua sono (E) inglese, (F) francese, (D) tedesco, (I)
italiano e (S) spagnolo.
FUSI ORARI
Se ci si trova in Europa, nel Regno Unito o in Giappone, è possibile
selezionare + / - 23 ore per impostare il proprio orologio su un fuso
orario diverso.
Se ci si trova negli Stati Uniti, è invece possibile selezionare P (Pacific
time +0), M (Mountain time +1), C (Central time +2), E (Eastern time
+3) oppure + / -23 ore per altri fusi orari.
ALLARMI
MPOSTAZIONE DEGLI ALLARMI
L’orologio dispone di 2 tipi di allarme.
Per impostare un allarme:
1. Premere ALARM per passare dalla visualizzazione di un allarme
all’altra e selezionare l’allarme 1 o l’allarme 2.
2. Tenere premuto ALARM per entrare nelle impostazioni dell’allarme.
L’impostazione allarme lampeggerà.
3. Selezionare ora e minuto. Premere UP o DOWN per
modificare le impostazioni.
4. Premere ALARM per confermare.
NOTA o viene visualizzato nella parte inferiore del
display quando l’allarme è attivato.
ATTIVAZIONE / DISATTIVAZIONE DEGLI ALLARMI
1. Premere ALARM per passare dall’allarme 1 all’allarme 2 e vice-
versa.
2. Premere UP o DOWN per attivare o disattivare l’allarme. Quando
l’allarme è disattivato viene visualizzata la scritta “OFF”.
Premere MODE per tornare alla Modalità Orologio.
SNOOZE / STOP ALLARME
Premere per arrestare l’allarme per 8 minuti.
Quando la funzione snooze è attiva, l’icona dell’allarme lampeggia.
Per spegnere l’allarme e reimpostarlo perchè suoni alla stessa ora del
giorno successivo, premere un tasto qualsiasi tranne .
PROIETTORE / RETROILLUMINAZIONE
Premere per proiettare l’ora (e per accendere la retroilluminazione)
per 5 secondi.
Agire su FOCUS per migliorare la nitidezza dell’ora proiettata.
Per proiettare l’ora continuamente, è necessario utilizzare
l’alimentatore AC.
BLOCCO TASTI
Per bloccare i tasti e per chiudere l’otturatore del proiettore, spostare
l’interruttore LOCK verso la freccia, come indicato sul retro dell’unità.
RESET
Per riportare l’unità alle impostazioni predefinite, inserire una punta
smussata nel foro RESET.
AVVERTENZE
Questo prodotto è progettato per offrire un funzionamento soddisfa-
cente purché venga maneggiato con cura. Attenersi alle seguenti
avvertenze:
• Non immergere l’unità in acqua. Se si versa del liquido sul
prodotto, asciugarlo immediatamente con un panno morbido
e liscio.
• Non pulire l’unità con materiali abrasivi o corrosivi. In questo
modo si possono graffiare le parti in plastica e corrodere i circuiti
elettronici.
• Non sottoporre l’unità a forza o a urti eccessivi, né esporre a
polvere e a oscillazioni di temperatura o di umidità che potreb-
bero causare il malfunzionamento del prodotto, la sua minore
durata, il danneggiamento delle batterie o la deformazione di
alcune parti.
• Non manomettere i componenti interni. In questo modo si
invalida la garanzia del prodotto e si possono provocare danni.
L’unità non contiene componenti che possono essere riparati
dall’utente.
• Usare solo batterie nuove del tipo e nel modo specificati nel
manuale per l’utente. Non mischiare batterie nuove con batterie
vecchie, dal momento che queste ultime potrebbero perdere
liquidi.
• A causa di problemi di stampa, le immagini di questo manuale
possono differire dalla realtà.
• Il contenuto di questo manuale non può essere ristampato senza
l’autorizzazione del fabbricante.
NOTA I dati tecnici del prodotto e il contenuto del manuale per
l’utente possono essere modificati senza preavviso.
DATI TECNICI
TIPO DESCRIZIONE
Ora Formato 12 / 24 ore
Allarme 2 minuti
Snooze 8 minuti
Tipo batteria 2 x AAA (UM-4) 1.5V
Dimensioni unità 60 x 100 x 20 mm (H x L x P)
Peso unità 175 g (senza batterie)
Alimentatore AC 3.0V
INFORMAZIONI SU OREGON SCIENTIFIC
Per avere maggiori informazioni sui nuovi prodotti Oregon Scientific,
come le fotocamere digitali, i lettori MP3, i computer didattici per ragazzi,
gli orologi con proiezione dell’ora, le stazioni barometriche, gli orologi da
polso multifunzione, gli strumenti per la cura della persona ed il fitness, ed
altro ancora, visita il nostro sito internet www.oregonscientific.it
Puoi trovare anche le informazioni necessarie per contattare il nostro
servizio clienti, le risposte ad alcune domande più frequenti (FAQ) o i
software da scaricare gratuitamente.
Sul nostro sito internet potrai trovare tutte le informazioni di cui hai
bisogno, ma se desideri contattare direttamente il nostro Servizio Con-
sumatori puoi visitare il sito www.oregonscientific.it oppure chiamare
al numero 199112277. Per ricerche di tipo internazionale puoi visitare
invece il sito www.oregonscientific.com.
DICHIARAZIONE DI CONFORMITÀ
Con la presente Oregon Scientific dichiara che questo Orologio da viag-
gio con proiezione (Modello RMB899P) è conforme ai requisiti essenziali
ed alle altre disposizioni pertinenti stabilite dalla direttiva 1999/5/CE.
Una copia firmata e datata della Dichiarazione di Conformità è disponibile,
su richiesta, tramite il servizio clienti della Oregon Scientific.
HINWEIS Wenn Sie die Zeitzone für die Zeitverschiebung eingestellt
haben, wird diese in der Zeitanzeige im Uhrzeit- und Signalempfangs-
modus berücksichtigt.
FUNKUHR
ZEITSIGNALEMPFANG
Diese Funkuhr synchronisiert automatisch die aktuelle Uhrzeit und
das Datum, wenn sie sich im Empfangsbereich eines von Ihnen
gewählten Funksignals befindet:
ANZEIGE SIGNAL STANDORT
OFF Kein Signal Kein Signal
EU DCF-77 Mitteleuropa
UK MSF-60 UK
US WWVB-60 US
JP-60 JP-60 Japan – Westlich
JP-40 JP-40 Japan – Östlich
JAPAN JP-60 und JP-40 Japan – Westlich
und Östlich
Die Signale werden vom Gerät empfangen, wenn es sich im Umkreis
von 1500 km eines Funksignals befindet.
So wählen Sie den Standort für das Funksignal aus:
1. Halten Sie MODE bei aktivierter Anzeige des Zone-Modus ge-
drückt.
2. Drücken Sie auf UP oder DOWN, um durch die Signaloptionen zu
blättern.
3. Drücken Sie zur Bestätigung auf MODE.
EMPFANGSSIGNAL
STARK SCHWACH KEIN SIGNAL
Das Empfangssignal beginnt zu blinken, wenn das Gerät nach einem
Signal sucht. Wenn das Signal schwach ist, kann es bis zu 24 Stun-
den dauern, bis ein gültiges Funksignal empfangen wird.Stellen Sie
das Gerät für einen optimalen Empfang in die Nähe eines Fensters,
aber nicht unmittelbar neben Gegenstände aus Metall oder elektrische
Geräte.
HINWEIS Dieses Produkt könnte eine Fehlfunktion aufweisen, wenn
eine Funkstörung auf der AC-Netzleitung auftritt. Das Gerät wird den
normalen Betrieb wiederaufnehmen, wenn die Störung nicht mehr
auftritt.
So veranlassen Sie eine manuelle Signalsuche:
• Halten Sie UP gedrückt.
HINWEIS Wenn Sie sich im Signalempfangs-Modus befinden, wird
“OFF” bei deaktivierten Funkzeitempfang angezeigt.
ZEITSIGNALEMPFANG AKTIVIEREN / DEAKTIVIEREN
Um den Zeitsignalempfang zu aktivieren, halten Sie UP gedrückt. Um
ihn zu deaktivieren, halten Sie DOWN gedrückt.
Das Signalsymbol gibt an, dass die Funkuhr-Funktion aktiviert
ist (ON). Wenn kein Symbol angezeigt wird, ist diese deaktiviert.
(OFF).
UHREINSTELLUNG ÄNDERN
Wenn Sie keine Zeitsignale empfangen können oder die Uhrzeit
manuell einstellen möchten, müssen Sie den Funkzeitempfang deak-
tivieren wie nachstehend dargestellt.
So ändern Sie die Uhreinstellungen:
1. Drücken Sie auf MODE, um in den Uhr- oder Zone-Modus zu
navigieren.
2. Halten Sie MODE 2 Sekunden lang gedrückt, um den Einstel-
lungsmodus aufzurufen.
3. Verwenden Sie UP / DOWN, um die blinkende Einstellung zu
ändern.
4. Drücken Sie zur Bestätigung auf MODE.
5. Wiederholen Sie die Schritte 3 und 4, um alle Einstellungen
zu ändern.
Die Reihenfolge der Einstellungen im Uhrzeit- oder Zone-Modus
lautet:
Zeitzone für Zeitverschiebung, 12- / 24-Stundenformat, Stunde,
Minute, Jahr, Datums- / Monatsformat, Monat, Datum und Sprache
des Wochentags.
HINWEIS Die Sprachoptionen sind (E) Englisch, (F) Französisch, (D)
Deutsch, (I) Italienisch und (S) Spanisch.
ZEITZONEN
Wenn Sie sich in Europa, Großbritannien oder Japan befinden,
können Sie + / - 23 Stunden wählen, um Ihre Uhr auf eine andere
Zeitzone einzustellen.
Wenn Sie sich in den USA befinden, können Sie P (Pacific Time +0),
M (Mountain Time +1), C (Central Time +2), E (Eastern Time +3) oder
+ / -23 Stunden für andere Zeitzonen wählen.
ALARM(E)
ALARM(E) EINSTELLEN
Die Uhr verfügt über 2 Alarme.
So stellen Sie einen Alarm ein:
1. Drücken Sie auf ALARM, um zwischen den Anzeigearten des
Alarms umzuschalten und Alarm 1 oder Alarm 2 auszuwählen.
2. Halten Sie ALARM gedrückt, um den Alarmeinstellungsmodus
aufzurufen. Die Alarmeinstellung beginnt zu blinken.
3. Wählen Sie Stunde und Minute aus. Drücken Sie auf UP oder
DOWN, um die Einstellungen zu ändern.
4. Drücken Sie zur Bestätigung auf ALARM.
HINWEIS oder erscheint bei aktiviertem Alarm im unteren
Teil der Anzeige.
ALARM(E) AKTIVIEREN / DEAKTIVIEREN
1. Drücken Sie auf ALARM, um zwischen Alarm 1 und 2 zu
wechseln.
2. Drücken Sie auf UP oder DOWN, um den Alarm zu aktivieren
oder zu deaktivieren. “OFF” erscheint bei deaktiviertem Alarm auf
der Anzeige.
Um zum Uhrzeit-Modus zurückzukehren, drücken Sie auf MODE.
ALARM-SNOOZE / STOPP
Um den Alarm 8 Minuten lang auszuschalten, drücken Sie auf .
HINWEIS Bei aktivierter Snooze-Funktion beginnt das Alarmsymbol
zu blinken.
Um den Alarm zu beenden und ihn zur Aktivierung zur selben Zeit des
nächsten Tages zurückzusetzen, drücken Sie eine beliebige Taste, mit
Ausnahme von .
PROJEKTOR / HINTERGRUNDBELEUCHTUNG
Drücken Sie auf , um die Uhrzeit 5 Sekunden lang zu projizieren
(und die Hintergrundbeleuchtung einzuschalten).
Drehen Sie FOKUS, um die Schärfe der projizierten Zeit zu erhöhen.
Um die Zeit ständig zu projizieren, müssen Sie den Netzadapter
verwenden.
TASTENSPERRE
Um die Tasten zu sperren und den Verschluss des Projektors zu
schließen, schieben Sie den Schalter LOCK in Richtung des Pfeils,
wie auf der Geräterückseite dargestellt.
RESET
Um das Gerät auf die Standardeinstellungen zurückzusetzen, führen
Sie einen stumpfen Stift in die RESET-Öffnung ein.
VORSICHTSMASSNAHMEN
Dieses Gerät wurde entworfen, um Ihnen jahrelang zuverlässige
Dienste zu leisten, wenn Sie es mit Sorgfalt handhaben. Hier sind
einige Vorsichtsmaßnahmen:
• Tauchen Sie das Gerät niemals in Wasser. Falls Sie eine Flüs-
sigkeit über das Gerät verschütten, trocknen Sie es sofort mit
einem weichen, faserfreien Tuch.
• Reinigen Sie das Gerät keinesfalls mit scheuernden oder ätzen-
den Mitteln. Diese können die Kunststoffteile zerkratzen und die
elektronische Schaltung zerstören.
• Setzen Sie das Gerät keiner extremen Gewalteinwirkung und
keinen Stößen aus, und halten Sie es von übermäßigem Staub,
Hitze oder Feuchtigkeit fern, da dies zu Funktionsstörungen,
einer kürzeren elektronischen Betriebsdauer, beschädigten Bat-
terien und verformten Einzelteilen führen kann.
• Führen Sie keine Änderungen an den internen Komponenten des
Geräts durch. Dies kann zu einem Verlust der Garantie führen
und eine unnötige Beschädigung des Geräts verursachen. Das
Gerät enthält keine Teile, die vom Benutzer selbst repariert
werden dürfen.
• Verwenden Sie nur neue Batterien, wie in der Bedienungsan-
leitung angegeben. Verwenden Sie keinesfalls neue und alte
Batterien gemeinsam, da alte Batterien auslaufen können.
• Aufgrund der technischen Druckeinschränkungen können sich
die in dieser Anleitung dargestellten Abbildungen vom Original
unterscheiden.
• Der Inhalt dieser Bedienungsanleitung darf nicht ohne Genehmi-
gung des Herstellers vervielfältigt werden.
HINWEIS Die technischen Daten für dieses Produkt und der Inhalt
der Bedienungsanleitung können ohne Benachrichtigung geändert
werden.
TECHNISCHE DATEN
TYP BESCHREIBUNG
Uhrzeit 12- / 24-Stundenformat
Dualalarm Ertönt 2 Minuten lang
Snooze 8 Min.
Batterietyp 2 x AAA (UM-4) 1,5V
Abmessungen 60 x 100 x 20 mm (H x B x T)
Gewicht 175 g (ohne Batterie)
Netzadapter 3.0V
ÜBER OREGON SCIENTIFIC
Besuchen Sie unsere Website (www.oregonscientific.de) und erfahren
Sie mehr über unsere Oregon Scientific-Produkte wie zum Beispiel
Wetterstationen, Projektions-Funkuhren, Produkte für Gesundheit und
Fitness, Digitalkameras, MP3-Player, DECT-Telefone und elektronische
Lernprodukte für Kinder. Auf der Website finden Sie auch Informationen,
wie Sie im Bedarfsfall unseren Kundendienst erreichen und Daten
herunterladen können.
Wir hoffen, dass Sie alle wichtigen Informationen auf unserer Website
finden. Für internationale Anfragen besuchen Sie bitte unsere Website:
www2.oregonscientific.com
EG-KONFORMITÄTSERKLÄRUNG
Hiermit erklärt Oregon Scientific, dass sich dieser/diese/dieses
Reise-Projektionsuhr(Modell: RMB899P) in Übereinstimmung mit den
grundlegenden Anforderungen und den anderen relevanten Vorschriften
der Richtlinie 1999/5/EG befindet". (BMWi)
Eine Kopie der unterschriebenen und mit Datum versehenen
Konformitätserklärung erhalten Sie auf Anfrage über unseren Oregon
Scientific Kundendienst.
IT
G
L O
B
A
L
R
A D
I O
C O
N
T
R
O
L L
E
D
1
3
4
5
2
DE
EINLEITUNG
Herzlichen Glückwunsch zum Erwerb Ihrer Reise-Projektionsuhr
(RMB899P).
HINWEIS Halten Sie bitte diese Anleitung bereit, wenn Sie Ihr neues
Produkt verwenden. Sie enthält praktische Schritt-für-Schritt-An-
weisungen sowie technische Daten und für Sie wichtige Warnhin-
weise.
ÜBERSICHT
VORDERANSICHT
1. UP / DOWN: Wert einer Einstellung erhöhen / verringern; gedrückt
halten, um rasch durch Werte zu blättern
2. Projektor: Zeit an die Zimmerdecke projizieren
3. : Snooze-Funktion einschalten oder Hintergrundbeleuchtung
und Projektor für 5 Sekunden aktivieren
4. MODE: Drücken, um zwischen Anzeigearten der Uhr
umzuschalten; gedrückt halten, um Uhr- / Kalendereinstellungen
zu ändern
5. ALARM: Drücken, um zwischen Alarm 1 und 2 zu wechseln; ge-
drückt halten, um Alarmeinstellungen zu ändern
RÜCKANSICHT
1. Anschluss für Netzadapter
2. Batteriefach
3. LOCK: Schalter verschieben, um Tasten zu sperren oder
zu entsperren
4. FOKUS: Drehen, um projizierte Zeit zu fokussieren
5. RESET: Drücken, um Gerät zurücksetzen
LCD-ANZEIGE
1. Empfangssymbol für Funksignal
2. Symbol für schwache Batterie
3. Anzeige des aktuellen Uhrzeit-Modus
4. Aktuell benutztes Funksignal
5. Uhrzeit
6. Datum / Alarmzeit
7. Anzeige oder Einstellung von Alarm 1 oder 2
ERSTE SCHRITTE
EINRICHTUNG
1. Legen Sie die Batterien vor der ersten Verwendung ein und achten
Sie auf die Übereinstimmung der Polarität (+ und -):
HINWEIS wird angezeigt, wenn die Ladung der Batterien
zu niedrig ist.
2. Sobald die Batterien eingelegt wurden, werden Sie sofort
vom Gerät aufgefordert, das Zeitempfangssignal einzustellen
(die Signaloptionen finden Sie im Abschnitt Zeitsignalempfang).
3. Drücken Sie auf UP oder DOWN, um durch die Signaloptionen zu
blättern.
4. Drücken Sie zur Bestätigung auf MODE.
UHRZEIT-MODI
Drücken Sie auf MODE, um durch die verschiedenen Uhrzeit-Modi
zu blättern:
SYMBOL MODUS
Uhrzeit-Modus: Uhrzeit mit Sekunden und
Kalendar
Zone-Modus: Funkuhr mit Sekunden
und Zeitverschiebung in Stunden
Signalempfangs- Modus: Uhrzeit mit
Sekunden und Funkemfang EIN / AUS
G
L O
B
A
L
R
A D
I O
C O
N
T
R
O
L L
E
D
1
3
4
5
2
PAESI CONFORMI ALLA DIRETTIVA R&TTE
Tutti i Paesi Europei, Svizzera CH
e Norvegia N
KONFORM IN FOLGENDEN LÄNDERN
Alle EG Staaten, die Schweiz CH
und Norwegen N
INTRODUCTION
Congratulations on your purchase of the World Travel Projection Clock
(RMB899P).
NOTE Please keep this manual handy as you use your new product.
It contains practical step-by-step instructions, as well as technical
specifications and warnings you should know about.
OVERVIEW
FRONT VIEW
1. UP / DOWN: Increases / decreases the value of a setting; press
and hold to speed through values
2. Projector: Projects time on the wall or ceiling
3. : Enables the snooze function or activates the backlight and
projector for 5 seconds
4. MODE: Press to toggle between clock displays; press and hold to
change clock / calendar settings
5. ALARM: Press to toggle between alarm 1 and 2; press and hold
to change alarm settings
BACK VIEW
1. AC adapter hole
2. Battery compartment
3. LOCK: Slide switch to lock or unlock the keypad
4. FOCUS: Twist to focus projected time
5. RESET: Press to reset
LCD DISPLAY
1. Radio signal reception icon
2. Low battery icon
3. Shows which clock mode you are in
4. Radio signal currently in use
5. Time
6. Date / alarm time
7. Alarm 1 or 2 is displayed or set
GETTING STARTED
SET UP
1. Insert batteries before first use, matching the polarity (+ and -):
2. Once the batteries have been inserted the unit will immediately ask
you to set the clock reception signal (see Clock Reception section
for signal options).
3. Press UP or DOWN to scroll through the signal options.
4. Press MODE to confirm.
Press MODE to toggle between the clock modes:
G
L O
B
A
L
R
A D
I O
C O
N
T
R
O
L L
E
D
1
3
4
5
2
ICON MODE
Clock Mode: Clock with seconds and calendar
Zone Mode: RF Clock with seconds and hour offset
Signal Reception Mode: Clock with seconds
and RF ON / OFF
NOTE If you have set the time zone offset hour it will be included in
the time displayed in the Clock and Signal Reception Mode.
CLOCK
CLOCK RECEPTION
The clock automatically synchronizes the current time and date when
it is brought within range of the radio signal you have selected:
DISPLAY SIGNAL LOCATION
OFF No signal No signal
EU DCF-77 Central Europe
UK MSF-60 UK
US WWVB-60 US
JP-60 JP-60 Japan – West
JP-40 JP-40 Japan – East
JAPAN JP-60 and JP-40 Japan – West and East
The signals are collected by the unit when it is within 1500 km (932
miles) of a signal.
To change the signal location:
1.
Press and hold MODE when you are in the Signal Reception Mode display.
2. Press UP or DOWN to scroll through the signal options.
3. Press MODE to confirm.
STRONG WEAK NO SIGNAL
The reception icon will blink when it is searching for a signal. If the
radio signal is weak, it can take up to 24 hours to get a valid radio
signal reception. For best reception, place the clock away from metal
objects and electrical appliances and place near a window.
NOTE This product may malfunction when radio interference appears
on the AC power line. The unit will revert to normal operation when
interference stops.
To force a manual search for the signal:
• Press and hold UP.
NOTE When you are in the Signal Reception Mode, “OFF” will
display when the clock radio signal reception is disabled.
ENABLE / DISABLE CLOCK RECEPTION
To enable the clock radio signal reception, press and hold UP. To
disable it, press and hold DOWN.
The signal icon indicates that the clock feature is ON.
No icon means that it is OFF.
CHANGING CLOCK SETTINGS
If you cannot receive clock signals, or wish to manually set the clock,
you must disable the clock radio reception, as shown above.
To change the clock settings:
1. Press MODE to navigate to the Clock or Zone Mode.
2. Press and hold MODE for 2 seconds to enter setting mode.
3. Use UP / DOWN to change the flashing setting.
4. Press MODE to confirm.
5. Repeat steps 3 and 4 to change all the settings.
The setting sequence in the Clock or Zone Mode is:
Time zone offset hour, 12 / 24 hr format, hour, minute, year, date /
month format, month, date and day of the week language.
NOTE The language options are (E) English, (F) French, (D) German,
(I) Italian, and (S) Spanish.
TIME ZONES
If you are in Europe, the UK or Japan you can select + / - 23 hours to
set your clock to a different time zone.
If you are in the US, you can select P (Pacific time +0), M (Mountain
time +1), C (Central time +2), E (Eastern time +3) or + / -23 hours for
other time zones.
ALARM(S)
SETTING THE ALARM(S)
The clock has 2 alarms.
To set an alarm:
1. Press ALARM to toggle between the alarm displays and
selectether the alarm 1 or alarm 2.
2. Press and hold ALARM to enter alarm setting mode. The
alarm setting will blink.
3. Select the hour and minute. Press UP or DOWN to change the
settings.
4. Press ALARM to confirm.
NOTE or appears at the bottom of the display when the
alarm is activated.
ACTIVATING / DEACTIVATING THE ALARM(S)
1. Press ALARM to toggle between alarm 1 and 2.
2. Press UP or DOWN to activate or deactivate the alarm. “OFF”
apears on the screen when the alarm is deactivated.
To return to Clock Mode, press MODE.
SNOOZE / STOP ALARM
To silence the alarm for 8 minutes, press .
NOTE When the snooze function is activated, the alarm icon will flash.
To stop the alarm and reset it to activate at the same time the next
day, press any button except .
PROJECTOR / BACKLIGHT
Press to project the time (and turn on the backlight) for 5 seconds.
Twist FOCUS to improve the clarity of the projected time.
To continuously project the time you must use the AC adapter.
KEYPAD LOCK
To lock the keypad and close the projector shutter, slide the LOCK
switch towards the arrow as shown on the back of the unit.
RESET
To return the unit to the default settings, insert a blunt stylus into the
RESET hole.
PRECAUTIONS
This unit is engineered to give you years of satisfactory service if you
handle it carefully. Here are a few precautions:
• Do not immerse the unit in water. If you spill liquid over it, dry it
immediately with a soft, lint-free cloth.
• Do not clean the unit with abrasive or corrosive materials. This
may scratch the plastic parts and corrode the electronic circuit.
• Do not subject the unit to excessive force, shock, dust, tem-
perature or humidity, which may result in malfunction, shorter
electronic life span, damaged battery and distorted parts.
• Do not tamper with the unit’s internal components. Doing so will
invalidate the warranty on the unit and may cause unnecessary
damage. The unit contains no user-serviceable parts.
• Only use fresh batteries as specified in the user’s instructions.
Do not mix new and old batteries as the old ones may leak.
• Due to printing limitation, the displays shown in this manual may
differ from the actual display.
• The contents of this manual may not be reproduced without the
permission of the manufacturer.
NOTE The technical specifications for this product and the contents
of the user guide are subject to change without notice.
SPECIFICATIONS
TYPE DESCRIPTION
Clock time 12 / 24-hour format
Dual alarm Sounds for 2 minutes
Snooze 8 minutes
Battery type 2 x AAA (UM-4) 1.5V
Unit dimension 60 x 100 x 20 mm (H x W x D)
Unit weight 175 g (without battery)
AC power adapter 3.0V
ABOUT OREGON SCIENTIFIC
Visit our website (www.oregonscientific.com) to learn more about Oregon
Scientific products such as digital cameras; MP3 players; children’s elec-
tronic learning products and games; projection clocks; health and fitness
gear; weather stations; and digital and conference phones. The website
also includes contact information for our Customer Care department in
case you need to reach us, as well as frequently asked questions and
customer downloads.
We hope you will find all the information you need on our website, how-
ever if you’re in the US and would like to contact the Oregon Scientific
Customer Care department directly, please visit:
www2.oregonscientific.com/service/default.asp
OR
Call 1-800-853-8883.
For international inquiries, please visit:
www2.oregonscientific.com/about/international.asp
EN
FCC STATEMENT
This device complies with Part 15 of the FCC Rules. Operation is
subject to the following two conditions: (1) This device may not cause
harmful interference, and (2) This device must accept any interference
received, including interference that may cause undesired operation.
WARNING Changes or modifications not expressly approved by the
party responsible for compliance could void the user’s authority to
operate the equipment.
NOTE This equipment has been tested and found to comply with
the limits for a Class B digital device, pursuant to Part 15 of the FCC
Rules. These limits are designed to provide reasonable protection
against harmful interference in a residential installation.
This equipment generates, uses and can radiate radio frequency en-
ergy and, if not installed and used in accordance with the instructions,
may cause harmful interference to radio communications. However,
there is no guarantee that interference will not occur in a particular
installation. If this equipment does cause harmful interference to
radio or television reception, which can be determined by turning the
equipment off and on, the user is encouraged to try to correct the
interference by one or more of the following measures:
• Reorient or relocate the receiving antenna.
• Increase the separation between the equipment and receiver.
• Connect the equipment into an outlet on a circuit different from
that to which the receiver is connected.
• Consult the dealer or an experienced radio / TV technician for
help.
DECLARATION OF CONFORMITY
The following information is not to be used as contact for support or
sales. Please call our customer service number (listed on our website
at www.oregonscientific.com), or on the warranty card for this product)
for all inquiries instead.
We
Name: Oregon Scientific, Inc.
Address: 19861 SW 95th Ave.,
Tualatin, Oregon 97062 USA
Telephone No.: 1-800-853-8883
declare that the product
Product No.: RMB899P
Product Name: World Travel Projection Clock
Manufacturer: IDT Technology Limited
Address: Block C, 9/F, Kaiser Estate,
Phase 1,41 Man Yue St.,
Hung Hom, Kowloon,
Hong Kong
is in conformity with Part 15 of the FCC Rules. Operation is subject
to the following two conditions: 1) This device may not cause harmful
interference. 2) This device must accept any interference received,
including interference that may cause undesired operation.
EU-DECLARATION OF CONFORMITY
Hereby, Oregon Scientific, declares that the World Travel Projection
Clock (Model RMB899P) is in compliance with the essential require-
ments and other relevant provisions of Directive 1999/5/EC.
A copy of the signed and dated Declaration of Conformity is available
on request via our Oregon Scientific Customer Service.
COUNTRIES RTTE APPROVAL COMPLIED
ALL EU countries, Switzerland CH
and Norway N
CLOCK MODES
RECEPTION SIGNAL
World Travel Projection Clock
Model: RMB899P
USER MANUAL
NOTE shows when batteries are low.
MANUEL DE L’UTILISATEUR
INTRODUCTION
Nous vous remercions d’avoir acheté ce réveil de voyage à projection
(RMB899P).
REMARQUE Veuillez garder ce manuel à portée de main lors de
l’utilisation de ce nouveau produit. Il contient les instructions pra-
tiques, les spécifications techniques et les avertissements à prendre
en compte.
VUE D’ENSEMBLE
FACE AVANT
1. UP/ DOWN : Augmente / Diminue les valeurs d’un réglage ; ap-
puyez sur cette touche et maintenez la enfoncée pour accéder
rapidement aux valeurs.
2. Projecteur : Projette l’heure sur un mur ou sur un plafond.
3. : Active le rappel d’alarme, le rétro éclairage et le projecteur
pendant 5 secondes.
4. MODE : Permet d’alterner entre les divers affichages de l’horloge,
appuyez et maintenez enfoncé pour modifier les réglages de
l’horloge ou du calendrier.
5. ALARME : Permet d’alterner entre l’Alarme 1 et 2 ; appuyez et
maintenez enfoncé pour modifier les réglages de l’alarme.
VUE ARRIERE
1. Adaptateur Secteur
2. Compartiment des Piles
3. VERROUILLAGE : interrupteur coulissant pour verrouiller
ou déverrouiller le clavier
4. MISE AU POINT : Tournez la molette pour mettre au point l’heure
projetée
5. EFFACER : Appuyez pour effacer
AFFICHAGE LCD
1. Icône de réception du signal
2. Icône de batterie faible
3. Indique quel mode d’horloge est sélectionné
4. Signal radio utilisé
5. Heure
6. Date / Heure d’alarme
7. Alarme 1 ou 2 affichée ou réglée
AU COMMENCEMENT
REGLAGE
1. Insérez les piles avant la première utilisation, en respectant les
polarités (+ et -) :
REMARQUE indique si les piles sont faibles.
2. Une fois les piles installées, l’appareil vous demandera immédiate-
ment de régler le signal de réception de l’horloge (voir la section
Réception de l’Horloge pour les options de signaux).
3. Appuyez sur UP ou DOWN pour faire défiler les options
de signaux.
4. Appuyez sur MODE pour confirmer la sélection.
MODES HORLOGE
Appuyez sur MODE pour choisir les différents modes Horloge
disponibles :
ICÔNE MODE
Mode Horloge : Horloge avec secondes et calendrier
Mode Zone : Horloge à radio pilotée avec secondes
et décalage Horaire
Mode Réception de Signal : Horloge avec secondes
et radio pilotage Activée / Désactivée
REMARQUE Si vous réglez le décalage de la zone horaire, il sera
inclus dans l’affichage de l’heure et dans le Mode de Réception du
Signal.
HORLOGE
RECEPTION DE L’HORLOGE
L’horloge sélectionne automatiquement l’heure et la date réelle après
sélection du signal radio :
AFFICHAGE SIGNAL LIEU
OFF Pas de Signal Pas de Signal
Union Européenn DCF-77 Europe Centrale
UK MSF-60 UK
USA WWVB-60 USA
JP-60 JP-60 Japon -Ouest
JP-40 JP-40 Japon – Est
JAPON JP-60 et JP-40 Japon – Ouest et Est
L’appareil reçoit les signaux dans un rayon de 1500 Km (932 miles).
Pour changer le lieu du signal :
1. Appuyez et maintenez enfoncé le bouton MODE dans l’affichage
du Mode Réception de Signal.
2. Appuyez sur UP ou DOWN pour faire défiler les options
de signaux.
3. Appuyer sur MODE pour confirmer la sélection.
SIGNAL DE RECEPTION
FORT FAIBLE PAS DE SIGNAL
L’icône de réception clignotera lorsqu’il cherchera un signal. Si le
signal radio est faible, 24 heures peuvent être nécessaires pour
une réception de signal valide. Pour une meilleur réception, placez
l’appareil loin d’objets métalliques et d’appareils électriques et à
proximité d‘une fenêtre.
REMARQUE Ce produit peut ne pas fonctionner correctement si
des interférences radio apparaissent sur l’alimentation secteur CA.
L’appareil repassera en mode de fonctionnement normal quand ces
interférences disparaîtront.
Pour chercher manuellement un signal
• Appuyez et maintenez enfoncée la touche UP.
REMARQUE Dans le Mode Réception de Signal, “OFF” s’affichera
si la réception de signal radio de l’horloge est désactivée.
ACTIVER/DESACTIVER LA RECEPTION DE L’HORLOGE
Pour activer la réception de signal radio de l’horloge, appuyez et
maintenez enfoncée la touche UP. Pour la désactiver, appuyez et
maintenez enfoncée la touche DOWN.
L’icône du signal vous indique que l’horloge est activée. S’il n’y a
pas d’icône, elle est désactivée.
MODIFIER LES REGLAGES DE L’HORLOGE
Si vous ne recevez pas de signaux ou si vous souhaitez régler
manuellement l’horloge, vous devez désactiver la réception radio de
l’horloge, comme indiqué ci-dessus.
Pour modifier les réglages de l’horloge :
1. Appuyez sur MODE pour entrer dans le Mode Horloge ou Zone.
2. Appuyez sur la touche MODE pendant 2 secondes pour entrer
dans le mode réglage.
3. Utiliser les touches UP / DOWN pour modifier les réglages
du clignotement.
4. Appuyez sur MODE pour confirmer.
5. Répétez les étapes 3 et 4 pour modifier tous les réglages.
La séquence de réglage dans le Mode Horloge ou Zone est :
Le décalage horaire de la zone, Format 12 / 24 heures, heure, minute,
année, format date / mois, date et jour des langues de la semaine.
REMARQUE Les options de langues disponibles sont l’anglais (E),
le français (F), l’allemand (D) l’italien (I) et l’espagnol (S).
FUSEAUX HORAIRES
Si vous êtes en Europe, au Royaume Uni ou au Japon, vous pouvez
sélectionner +/- 23 heures pour régler votre horloge sur un fuseau
horaire différent.
Si vous êtes aux Etats-Unis, vous pouvez sélectionner P (Heure
Pacifique +0), M (Heure des Montagnes +1), C (Heure Centrale +2), E
(Heure Est +3) ou +/- 23 heures pour d’autres fuseaux horaires.
ALARME(S)
REGLAGE DE L’ALARME
L’horloge contient 2 alarmes.
Pour régler une alarme :
1. Appuyez sur la touche ALARM pour alterner entre les différents
affichages et pour sélectionner l’alarme 1 ou l’alarme 2.
2. Appuyez et maintenez enfoncée la touche ALARM pour entrer
dans le mode de réglage de l’alarme. Le réglage de l’alarme
clignotera.
3. Sélectionner les heures et les minutes. Appuyez sur UP ou DOWN
pour modifier les réglages.
4. Appuyez sur ALARM pour confirmer.
REMARQUE ou apparaîtront en bas de l’écran quand
l’alarme est activée.
ACTIVER / DESACTIVER L’ALARME
1. Appuyez sur la touche ALARM pour alterner entre l’alarme 1 et
l’alarme 2.
2. Appuyez sur UP ou DOWN pour activer ou désactiver l’alarme.
L’indication “OFF” s’affiche à l’écran quand l’alarme est désac-
tivée.
Pour revenir au Mode Horloge, appuyez sur MODE.
RAPPEL / ARRET D’ALARME
Pour éteindre l’alarme pendant 8 minutes, appuyez sur .
REMARQUE Si vous activez la fonction rappel d’alarme (snooze),
FR
G
L O
B
A
L
R
A D
I O
C O
N
T
R
O
L L
E
D
1
3
4
5
2
l’icône alarme clignotera. Pour arrêter l’alarme et l’activer pour le lend-
emain, appuyez sur n’importe quelle touche à l’exception de .
PROJECTEUR / RETRO ECLAIRAGE
Appuyez sur pour projeter l’heure (et pour allumer le rétro éclai-
rage) pendant 5 secondes.
Tourner la molette de MISE AU POINT pour améliorer la clarté de
l’heure projetée.
Pour projeter l’heure constamment, vous devez utiliser l’adaptateur
secteur.
VERROUILLAGE DU CLAVIER
Pour verrouiller le clavier et fermer le volet du projecteur, faire
coulisser l’interrupteur VERROUILLAGE en direction de la flèche
comme indiqué sur l’arrière de l’appareil.
EFFACER
Pour revenir aux réglages par défaut, insérer un crayon taillé dans la
fente RESET.
PRECAUTIONS
Cet appareil est conçu pour vous donner entière satisfaction pendant
de nombreuses années, si vous le manipuler avec soin. Voici quelques
précautions à prendre en compte :
• Ne pas immerger l’appareil dans l’eau. Si vous renversez du
liquide, séchez le immédiatement avec un tissu doux sans coton.
• Ne pas nettoyer l’appareil avec des matériaux abrasifs et cor-
rosifs, ce qui pourrait endommager les parties en plastique et
corroder le circuit électrique.
• Ne pas soumettre l’appareil à une force excessive, choc,
poussière, température ou humidité, ce qui pourrait le rendre
défectueux, réduire sa durée de vie, endommager les piles et
tordre certaines parties.
• Ne pas toucher aux composants internes de l’appareil, dans
le cas contraire votre garantie pourrait être annulée et votre
appareil endommagé inutilement. Il est composé de parties non
accessibles à l’utilisateur.
• Veillez toujours utiliser des piles neuves comme indiqué dans les
instructions de l’utilisateur. Ne pas mélanger des piles neuves et
usagées, ces dernières pourront couler.
• En raison des limitations d’impression, les illustrations contenues
dans ce manuel peuvent différer de l’affichage réel.
• Le contenu de ce manuel ne peut être reproduit sans la permis-
sion du fabriquant.
REMARQUE Les spécifications techniques de ce produit et le con-
tenu de ce manuel peut être soumis à des modifications sans préavis.
SPECIFICATIONS
TYPE DESCRIPTION
Heure de l’Horloge Format 12 / 24 heures
Les deux alarmes Sonnerie pendant 2 minutes
Rappel d’alarme 8 minutes
Type de piles 2 x AAA (UM-4) 1.5V
Dimension de l’appareil 60 x 100 x 20 mm (H x L x D)
Poids 175 g (sans les piles)
Adaptateur Secteur CA 3.0V
En consultant notre site internet (www.oregonscientific.fr), vous pourrez
obtenir des informations sur les produits Oregon Scientific: photo nu-
mérique; lecteurs MP3; produits et jeux électroniques éducatifs; réveils;
sport et bien-être; stations météo; téléphonie. Le site indique également
comment joindre notre service après-vente.
Nous espérons que vous trouverez toutes les informations dont vous
avez besoin sur notre site, néanmoins, si vous souhaitez contacter le
service client Oregon Scientific directement, allez sur le site www2.
oregonscientific.com/service/default.asp ou appelez le 1-800-853-8883
aux US. Pour des demandes internationales, rendez vous sur le site:
www2.oregonscientific.com/about/international.asp
Par la présente, Oregon Scientific déclare que ce réveil de voyage à
projection (Modèle RMB899P) est conforme aux exigences essentielles
et aux autres dispositions de la directive 1999/5/CE qui lui sont
applicables
Une copie signée et datée de la déclaration de conformité est disponible
sur demande auprès de notre Service Client.
PAYS CONCERNES RTT&E
Tous les pays de l’UE, Suisse CH
et Norvège N
A PROPOS D'OREGON SCIENTIFIC
DÉCLARTION DE CONFORMTÉ EUROPÉENNE
TM
RMB899P_ML_EU_REV13.indd 1 3/29/06 3:43:23 PM


