Honeywell RCWL330A User manual
- Category
- Door intercom systems
- Type
- User manual
This manual is also suitable for

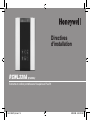
Installation
Instructions
RCWL330A (51459SL)
P4 Premium Portable Plus Wireless Chime and Push
69-2148EFS-01
69-2148EFS_A.indd 1 3/20/2008 9:34:24 AM

Installation Instructions
69-2148EFS—01 ii
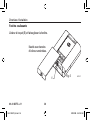
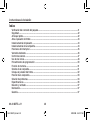
Contents
Checking pack contents .........................................................................................................................1
Safety .......................................................................................................................................................2
Quick start ................................................................................................................................................2
Open the bell push ..................................................................................................................................3
Install the push battery ...........................................................................................................................4
Install the chime battery ..........................................................................................................................4
Switch positions ......................................................................................................................................5
Sliding window.........................................................................................................................................6
Volume control .........................................................................................................................................7
Use of icons .............................................................................................................................................8
Programming procedures .....................................................................................................................10
Recall function .......................................................................................................................................11
Chime sounds ........................................................................................................................................11
Mount bell push .....................................................................................................................................12
Chime position .......................................................................................................................................13
Troubleshooting .....................................................................................................................................14
Specifications ........................................................................................................................................16
Disposal and recycling ..........................................................................................................................17
Declaration .............................................................................................................................................17
Guarantee ..............................................................................................................................................17
69-2148EFS_A.indd 2 3/20/2008 9:34:24 AM

RCWL330A
1 69-2148EFS—01
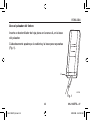
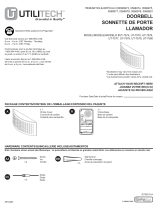
Premium Portable Plus Wirefree Chime with Push
Thank you for choosing this Honeywell product. Please use the following instruc-
tions to ensure correct installation and use. Keep these notes in a safe place for
future reference.
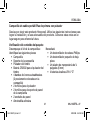
Checking Pack Contents
Unpack your chime kit and identify the
following parts:
• Chime
• Chime bracket
• Bell push
• CR2032 battery for bell push
• 4 self-adhesive icons strips (2 pre-
fitted on chime)
• 2 screws for push
• 2 screws for chime wall bracket
• 2 wall plugs
• Adhesive pad
You will need:
• A Phillips-head screwdriver
• A small flat-bladed screwdriver
• A 1/4-in. (6 mm) masonry drill
• 4 LR14 “C” alkaline batteries
69-2148EFS_A.indd 1 3/20/2008 9:34:24 AM

Installation Instructions
69-2148EFS—01 2
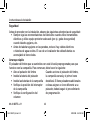
Safety
Before proceeding with the installation, please note the following safety warnings:
• Always follow the manufacturer’s advice when using power tools and wear
suitable protective equipment (e.g. safety goggles) when drilling holes, etc.
• Before drilling holes in walls, check for hidden electricity cables and water pipes.
The use of a cable/pipe locator is advisable if in doubt.
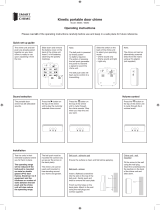
Quick Start
The bell push supplied with this kit is pre-programmed to operate with the chime. You
need to do the following to get started:
• Open the bell push
• Install the push battery
• Install the chime batteries
• Check the chime switch setting
• Check the volume setting
When you operate the bell push, the
chime will sound and the first icon will
flash. If you have additional pushes or
you want to assign a different icon to
your push, you will need to follow the
programming procedure.
69-2148EFS_A.indd 2 3/20/2008 9:34:24 AM

RCWL330A
3 69-2148EFS—01
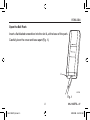
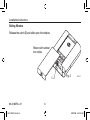
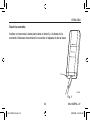
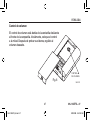
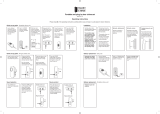
Open the Bell Push
Insert a flat-bladed screwdriver into the slot A, at the base of the push.
Carefully lever the cover and base apart (Fig. 1).
M27269
A
Fig. 1
69-2148EFS_A.indd 3 3/20/2008 9:34:24 AM

Installation Instructions
69-2148EFS—01 4
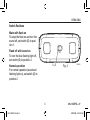
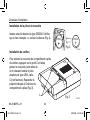
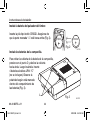
Install the Chime Batteries
To remove the chime battery cover, press at point C
and slide the cover back, then lift off. Insert
4 LR14 “C” alkaline batteries (not
supplied). Observe polarity as
marked inside the battery com-
partment (Fig. 3).
M27270
C
Fig. 3
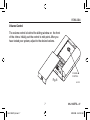
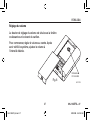
Install the Bell Push Battery
Insert the CR2032 coin cell. Ensure the face
marked “+” is facing up (Fig. 2).
M27153
CR2032
+
CR2
0
32
+
Fig. 2
69-2148EFS_A.indd 4 3/20/2008 9:34:24 AM

RCWL330A
5 69-2148EFS—01
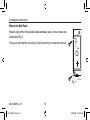
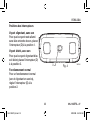
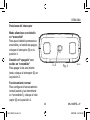
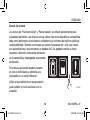
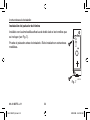
Switch Positions
Mute with flash on
To keep the flash on and turn the
sound off, set switch (D) to posi-
tion 1.
Flash off with sound on
To turn the blue flashing light off,
set switch (D) to position 3.
Normal operation
For normal operation (sound and
flashing light on), set switch (D) to
position 2.
1 2 3
M27286
D
Fig. 4
69-2148EFS_A.indd 5 3/20/2008 9:34:24 AM

Installation Instructions
69-2148EFS—01 6
Sliding Window
Release the catch (E) and slide open the window.
M27271
E
2
3
1
5
6
Fig. 5
Shown with number
icon strips.
69-2148EFS_A.indd 6 3/20/2008 9:34:24 AM

RCWL330A
7 69-2148EFS—01
Volume Control
The volume control is behind the sliding window on the front
of the chime. Initially, set the control to mid-point. After you
have tested your system, adjust to the desired volume.
M27272
VOLUME
CONTROL
2
3
1
5
6
Fig. 6
69-2148EFS_A.indd 7 3/20/2008 9:34:24 AM

Installation Instructions
69-2148EFS—01 8
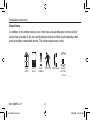
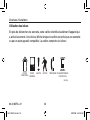
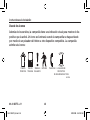
Use of Icons
In addition to the chime sounds, your chime has a visual indication to show which
device has activated it. An icon will illuminate when the chime is activated by a bell
push or another compatible device. The chime supports six icons:
MAIN
DOOR
BACK
DOOR
ALERT
SYMBOL
INTRUDER TELEPHONE PAGER/
KEY FOB
M27289
69-2148EFS_A.indd 8 3/20/2008 9:34:24 AM

RCWL330A
9 69-2148EFS—01
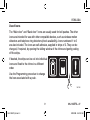
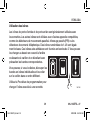
The “Main door” and “Back door” icons are usually used for bell pushes. The other
icons are intended for use with other compatible devices, such as wireless motion
detectors and telephone ring detectors (check availability). Icons numbered 1 to 6
are also included. The icons are self-adhesive, supplied in strips of 3. They can be
changed, if required, by opening the sliding window of the chime and gently peeling
off the strips.
If desired, the strips can be cut into individual
icons and fixed to the chime in a different
order.
Use the Programming procedure to change
the Icon associated with a push.
Use of Icons
M27290
69-2148EFS_A.indd 9 3/20/2008 9:34:24 AM

Installation Instructions
69-2148EFS—01 10
Programming Procedure
Learn procedure
To enable your chime to learn the identity
of your bell push:
• Press the l button and keep it
pressed. Each Icon will light in
turn. When the Icon you want is lit,
release the button.
• While the Icon you have selected is
lit, operate your push. The chime will
sound. The Icon will flash.
Unlearn procedure
If you want to remove a push from the
chime’s memory:
• Press the l button and keep it
pressed. Each Icon will light in turn.
When the Icon associated with the
push to be unlearned is lit, release
the button.
• Press and hold both l & buttons
until a “beep” sound is heard.
69-2148EFS_A.indd 10 3/20/2008 9:34:24 AM

RCWL330A
11 69-2148EFS—01
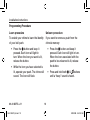
Changing the Tune
Operate the push. While the Icon is flashing, press the button. Press the button
again and the tune will change. Repeat until the tune you want plays.
Recall Function
A short push of the l button will flash the Icon that was last in use.
Chime Sounds
To hear the chime sounds without operating the bell push, press the button. Press
the button again and the tune will change.
69-2148EFS_A.indd 11 3/20/2008 9:34:24 AM

Installation Instructions
69-2148EFS—01 12
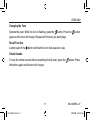
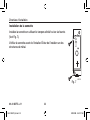
Mount the Bell Push
Mount using either the double-sided adhesive pad, or the screws pro-
vided (see Fig 7).
Test your push before mounting. Avoid mounting to metal structures.
Fig. 7
M27155
TOP
69-2148EFS_A.indd 12 3/20/2008 9:34:25 AM

RCWL330A
13 69-2148EFS—01
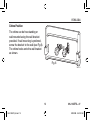
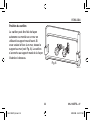
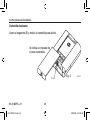
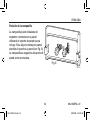
Chime Position
The chime can be free-standing or
wall-mounted using the wall bracket
provided. If wall mounting is preferred,
screw the bracket to the wall (see Fig 8).
The chime hooks onto the wall bracket
as shown.
M27318
Fig. 8
69-2148EFS_A.indd 13 3/20/2008 9:34:25 AM

Installation Instructions
69-2148EFS—01 14
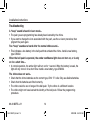
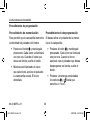
Troubleshooting
A “beep” sound is heard in learn mode…
• The push you are programming has already been learned by the chime.
• If you want to change the icon associated with the push, use the un-learn procedure, then
program the push again.
Two “beep” sounds are heard after the normal chime sound…
• This indicates a low battery in the bell push that activated the chime. Install a new battery,
type CR2032.
When the bell push is operated, the amber confidence light does not turn on, or is only
on for a short time…
• In normal operation, the amber light will turn on for 1 second. When the battery is weak, the
light will only turn on for a short time. Install a new battery, type CR2032.
The chime does not work…
• Check that the chime batteries are the correct type, LR14 “C” cells. Only use alkaline batteries.
• Check that the batteries are fitted correctly.
• The chime could be out of range of the bell push. Try the chime in a different location.
• The chime might not have learned the identity of the bell push. Follow the programming
procedure.
69-2148EFS_A.indd 14 3/20/2008 9:34:25 AM

RCWL330A
15 69-2148EFS—01
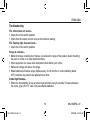
The chime does not sound…
• Check the chime switch position.
• Check that the volume control is not at the minimum setting.
The flashing light does not work…
• Check the chime switch position.
Range is reduced…
• Metal structures, including door frames, can reduce the range of the product. Avoid mounting
the push or chime on or near metal structures.
• Other equipment can cause radio interference that affects your chime.
• Walls and ceilings will reduce the range.
• Weak batteries will reduce range. Replace every 12–18 months. In cold conditions (below
40ºF), batteries may need to be replaced more often.
Amber light flashes…
• When the chime battery is low, an amber light will flash every 5 seconds. Fit new batteries in
the chime, type LR14 “C” cells. Only use alkaline batteries.
Troubleshooting
69-2148EFS_A.indd 15 3/20/2008 9:34:25 AM

Installation Instructions
69-2148EFS—01 16
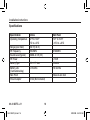
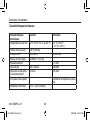
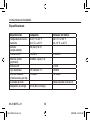
Specification Chime Bell Push
Operating Temperature 32°F to 104°F
0°C to +40°C
14°F to 104°F
-10°C to +40°C
Range (open field) 450 ft (140 m)
RF Frequency 916.8MHz 916.8MHz
Sound Level (typical) 90dBA @ 3 ft (1m)
RF Power <1mW
Battery Type LR14 “C” size CR2032
Battery Life
(5 activations/day)
12 months 18 months
Rain Proof Pass UL rain test
Power Adaptor 6V DC (Not included)
Specifications
69-2148EFS_A.indd 16 3/20/2008 9:34:25 AM

RCWL330A
17 69-2148EFS—01
Disposal & Recycling
Batteries and waste electrical products should not be disposed of with household waste. Please
recycle where these facilities exist. Check with your local authority or retailer for recycling advice.
Declaration
Honeywell hereby declares that this product complies with Part 15 of the FCC rules and
Industrial Canada standards. This device operation is subject to the following two conditions:
(1) This device may not cause harmful interference, and
(2) This device must accept any interference received, including interference that may cause
undesired operation.
Caution:
Changes or modification not expressly approved by the party responsible for regulatory compli-
ance could void the user’s authority to operate the equipment.
Guarantee
Honeywell guarantees this product for 1 year from the date of purchase. Proof
of purchase is required; this does not affect your statutory rights. If you require
further information about your product, call the Honeywell helpline at 1-800-468-
1502.
69-2148EFS_A.indd 17 3/20/2008 9:34:25 AM

Honeywell International Inc.
ACS, Environmental and Combustion Controls
1985 Douglas Drive, Golden Valley, MN 55422
www.honeywell.com
® U.S. Registered Trademark.
© 2008 Honeywell International Inc.
69-2148EFS—01 M.S. 03-08
Printed in U.S.A. on recycled
paper containing at least 10%
post-consumer paper fibers.
69-2148EFS_A.indd 18 3/20/2008 9:34:25 AM
Page is loading ...
Page is loading ...
Page is loading ...
Page is loading ...
Page is loading ...
Page is loading ...
Page is loading ...
Page is loading ...
Page is loading ...
Page is loading ...
Page is loading ...
Page is loading ...
Page is loading ...
Page is loading ...
Page is loading ...
Page is loading ...
Page is loading ...
Page is loading ...
Page is loading ...
Page is loading ...
Page is loading ...
Page is loading ...
Page is loading ...
Page is loading ...
Page is loading ...
Page is loading ...
Page is loading ...
Page is loading ...
Page is loading ...
Page is loading ...
Page is loading ...
Page is loading ...
Page is loading ...
Page is loading ...
Page is loading ...
Page is loading ...
Page is loading ...
Page is loading ...
Page is loading ...
Page is loading ...
-
 1
1
-
 2
2
-
 3
3
-
 4
4
-
 5
5
-
 6
6
-
 7
7
-
 8
8
-
 9
9
-
 10
10
-
 11
11
-
 12
12
-
 13
13
-
 14
14
-
 15
15
-
 16
16
-
 17
17
-
 18
18
-
 19
19
-
 20
20
-
 21
21
-
 22
22
-
 23
23
-
 24
24
-
 25
25
-
 26
26
-
 27
27
-
 28
28
-
 29
29
-
 30
30
-
 31
31
-
 32
32
-
 33
33
-
 34
34
-
 35
35
-
 36
36
-
 37
37
-
 38
38
-
 39
39
-
 40
40
-
 41
41
-
 42
42
-
 43
43
-
 44
44
-
 45
45
-
 46
46
-
 47
47
-
 48
48
-
 49
49
-
 50
50
-
 51
51
-
 52
52
-
 53
53
-
 54
54
-
 55
55
-
 56
56
-
 57
57
-
 58
58
-
 59
59
-
 60
60


Honeywell RCWL330A User manual
- Category
- Door intercom systems
- Type
- User manual
- This manual is also suitable for
Ask a question and I''ll find the answer in the document
Finding information in a document is now easier with AI
in other languages
- français: Honeywell RCWL330A Manuel utilisateur
- español: Honeywell RCWL330A Manual de usuario
Related papers
-
Honeywell RPWL100A User manual
-
Honeywell RCWL200A User manual
-
Honeywell RCWL301A User manual
-
-
-
-
-
-
-
Other documents
-
Advante I8-W1901P Wireless Door Chime User manual
-
Utilitech UT-7353-02 Installation guide
-
 Utilitech UT-7575 User manual
-
 Uni-Com S10131 Operating instructions
-
NuTone LA225WH Installation & Operating Instruction
-
Coopers 9268 Operating instructions
-
Response SC379 User manual
-
Jasco 19303 User manual
-
Byron BY236FE Owner's manual
-
 Uni-Com S10179 Operating instructions


