Operating instructions
Kinetic portable door chime
Model: 66385 / 66392
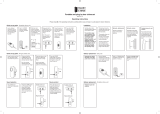
Quick set up guide
Please read all of the operating instructions carefully before use and keep in a safe place for future reference.
The chime unit and bell
push are already paired
together so your door
chime is ready to use
upon unpacking it from
the box.
Slide down and remove
the battery cover on the
back of the chime unit.
Insert 3 x AA batteries,
observing the polarity
markings.
Note;
The bell push is powered
by kinetic power -
no battery required.
The action of pressing
the bell push generates
the power to transmit
a signal to sound the
chime unit.
The bell push LED will
ash red to conrm it is
transmitting.
Sound selection
The portable door
chime has 26 selectable
sounds.
Volume control
Press the button on
the top of the chime unit
to cycle through the 4
volume levels.
Installation
Test the units in their
intended locations before
you x them in place.
The operating range
will be reduced if the
bell push is mounted
on metal or double
glazed uPVC door
frames. Electrical / wi-
equipment and the
thickness or number of
walls between the bell
push and the chime
unit will also reduce
the operating range.
The bell push must be
mounted the correct way
up (as per the arrow on
the back plate).
The chime unit can be
used wall mounted or
free-standing around
your home and garden.
Bell push - adhesive pad
Ensure the surface is clean and at before applying.
Bell push - screws
Insert a athead screwdriver
into the slot on the top of the
bell push. Gently push and
twist to remove the back plate.
Punch out the holes on the
back plate. Attach to the wall
using the wall plugs and
screws supplied.
Slide the switch on the
back of the chime unit
to select your operating
mode:
•
Chime sound only
•
Chime sound and light
•
Light only
Chime unit - wall
mounted
Fit the screw to the wall
using the wall plug.
Insert the screwhead into
the keyhole on the back
of the chime unit and
slide down.
+
AA
AA
AA
+
Note;
The chime unit can be
alternatively powered
direct from the mains
using a 5V adaptor
(not supplied)
5V
Press the button on
the top of the chime
unit to play the currently
selected chime sound.
Press the button on
the top of the chime
unit to cycle through
the chime sounds. Stop
when you hear the one
you want.

Made in China
Smart Chime by Uni-Com (Global) Ltd.
1 & 2 Enterprise Way,
Edenbridge, Kent, TN8 6EW
+44 (0)1732 865238
www.uni-com.co.uk
My door chime is not working?
•
Replace the batteries in the chime unit.
•
The chime unit may not be receiving a signal from the bell push, this can be caused by internal walls or uPVC frames. Move the chime unit closer to the
bell push.
•
The chime unit could be receiving interference from other electrical and wireless devices. The common cause for this is that your chime unit is picking
up outside interference from other wireless transmitters. Do not worry, all Smart Chime kinetic door chimes are programmed with 256 randomly selected
channels to help avoid such a problem:
(1) Ensure the chime unit operating mode is switched to light and sound.
(2) Remove the batteries from the chime unit. Press and hold the button, while continuing to hold the button reinsert the batteries. Release the
button only when the door chime lights and sounds.
(3) Press and hold the button, after the chime unit sounds and light you will hear a double “beep”. While continuing to hold the button press your
bell push. Release the button and wait for another double “beep”.
Your door chime will now be set up on a different channel.
As stated above the channels are randomly selected so you may need to repeat the above process more than once.
Troubleshooting guide
Please do not hesitate to contact our friendly customer service team who will be more than happy to help you with any
problems you are experiencing with your door chime set up
How do I add another chime unit to my existing door chime set up?
All Smart Chime kinetic bell door chimes work together and you can add unlimited chime units to your set up. This will increase the sound area and
means you can have a chime unit in every room in your house if you wish.
(1) Ensure the new chime unit operating mode is switched to light and sound. Press and hold the button, after the chime unit sounds and lights you will
hear a double “beep”. While continuing to hold the button press your bell push. Release the button and wait for another double “beep”.
When you press your bell push the new and existing chime units will sound and light simultaneously.
How do I add another bell push to my existing door chime set up?
A maximum of 4 bell pushes can be paired to the same chime unit.
(1) Ensure the chime unit operating mode is switched to light and sound. Press and hold the button, after the chime unit sounds and lights you will
hear a double “beep”. While continuing to hold the button press your new bell push. Release the button and wait for another double “beep”.
Specication
Frequency: 433.92MHz
R2 device
Hereby, Uni-Com (Global) Ltd declares that the radio equipment type door chime is in compliance with the Directive 2014/53/EU. The full text of the EU Declaration of Conformity is
available to view at www.uni-com.co.uk.
Safety warning
Keep out of reach of children. For indoor use only (operating temp: 0°C to 40°C). Do not drop either unit or subject to excessive blows. The bell push is weather resistant, do not
submerge. Do not mix new and used batteries. Do not mix different types of batteries. Exhausted batteries must be removed immediately. Failure to follow these instructions could
result in re, electric shock, injury or damage to persons, product or property and will invalidate the guarantee.
Batteries
The chime unit uses 3 x AA batteries. They should be removed prior to disposal.
Help the environment by disposing of your products and batteries responsibly.
Guarantee
This product is guaranteed for one year from the date of purchase against faulty parts or workmanship.
It does not cover batteries or physical damage to the units. Proof of purchase required. This does not affect your statutory rights.
/