Sigma BC 1009 STS User manual

Category
Bicycle accessories
Type
User manual
BC 1009
www.sigmasport.com
BIKE COMPUTER TOPLINE
PAGE 4-62
Deutsch
·
English
Français
·
Italiano
Español
·
Nederlands
PAGE 63-97
Português
·
Polski
Magyar
·
Česky
4
2 Die Montage / Assembly
Die Abbildungen zu diesen Montagetexten befinden sich auf dem beiliegenden Faltblatt!
Die Halterung kann entweder mit Kabelbinder (dauerhafte Anbringung) oder mit den
O-Ringen montiert werden.
Lenker oder Vorbau?
Montage am Vorbau: Die im Lieferumfang enthaltene Halterung ist für die Lenkermon-
tage vorgesehen. Für die Vorbaumontage lösen Sie die 4 Schrauben auf der Rückseite,
drehen die Platte um 90° und befestigen Sie wieder. Gelbe Folie entfernen.
Das SIGMA Logo muss immer nach vorne zeigen!
Der Geschwindigkeitssender kann entweder mit Kabelbinder (dauerhafte Anbringung)
oder wahlweise mit den O-Ringen montiert werden.
Um die erforderlichen 12 mm oder weniger zu erreichen, montieren Sie den Sender und
den Magneten näher an der Nabe.
Illustrations belonging to these assembly notes can be found in the enclosed folded
sheet! The bracket can either be fitted with cable ties (permanent attachment) or with
the O-rings.
Handlebars or front end?
Assembly to the front end: The bracket supplied is designed to be fitted to the handle-
bars. To assemble it to the front end, undo the 4 screws on the back, turn the plate by
90° and tighten them back up. Remove yellow film.
D
GB
US
4
5
2 Le montage
Les illustrations relatives aux instructions de montage se trouvent sur le dépliant
joint ! Le support peut être mon au moyen d‘un serre-câbles (mise en place
permanente) ou d‘anneaux toriques.
Guidon ou cadre?
Montage sur le cadre : le support fourni est pvu pour un montage sur le guidon.
Pour monter ce support sur le cadre, desserrer les 4 vis sur sa face arrre, tourner
la plaque à 90° et resserrer les vis. Retirer le film jaune.
Le logo SIGMA doit toujours être devant.
Emetteur de vitesse peuvent être mons au moyen de serre-bles
(montage permanent) ou d’anneaux toriques.
Pour pouvoir atteindre plus facilement les 12 mm, placer l‘aimant
et le capteur plus près du moyeu.
The SIGMA logo must always face forwards.
Speed transmitter can either be installed with cable ties (permanent attachment)
or optionally using the O-rings.
In order to achieve the necessary 12 mm or less install the transmittter
and the magnet closer to the wheel hub.
F
5
3 Inbetriebnahme / Start-up / Mise en service
Aus Stromverbrauchsgnden, wird der BC 1009 STS ohne Batterie
ausgeliefert. Setzen Sie bitte die Batterie ein, indem Sie den Batterie-
fachdeckel mit einer nze öffnen. Nachdem Sie die Batterie eingelegt
haben, schlien Sie den Deckel mit Hilfe einer Münze. Die Anzeige
springt automatisch in den Einstellungsmodus.
For reasons of energy consumption, the BC 1009 STS is supplied
without a battery. Please insert the battery by opening the battery
compartment with a coin. Once you have inserted the battery, close
the cover with the aid of the coin. The display automatically jumps to
setting mode.
Le BC 1009 STS est fourni sans pile afin de limiter la consommation
d‘énergie. Mettre la pile en place en ouvrant le couvercle du compar-
timent à piles au moyen d‘une pièce de monnaie. Aps avoir mis la
pile en place, refermer le couvercle au moyen d‘une pièce de monnaie.
L‘affichage passe automatiquement en mode de réglage.
F
D
GB
US
8
o
p
e
n
-
c
l
o
s
e
o
p
e
n
-
c
l
o
s
e
1009 1009
3.1 Tastenbelegung / Key functions
* Nicht während
der Fahrt
RESET
TAGES KM
FAHRZEIT
DURCH. KMH
MAX. KMH
SET
SPRACHE
KMH/MPH
RADUMFANG
UHRZEIT
GESAMT KM
GESAMTZEIT
KONTRAST
MODE 2
UHRZEIT
GESAMT KM*
GESAMTZEIT*
MODE 1
TAGES KM
FAHRZEIT
DURCH. KMH
MAX. KMH
D
* Not whilst
moving
RESET
TRIP DIST
TRIP TIME
AVG. SPEED
MAX. SPEED
SET
LANGUAGE
KMH/MPH
WHEEL SIZE 1/2
CLOCK
TOTAL ODO
TOTAL TIME
CONTRAST
MODE 2
CLOCK
TOTAL ODO*
TOTAL TIME*
MODE 1
TRIP DIST
TRIP TIME
AVG. SPEED
MAX. SPEED
GB
US
12
1009 1009
3.1 Assegnazione delle funzioni ai tasti / Las funciones de las teclas
* No durante la
carrera.
RESET
KM DIA
TIEMPO PAR
VEL MEDIA
VAL MAXIMA
SET
IDIOMA
KMH/MPH
DIM. RUEDA
HORA
KM TOTAL
TIEMPO TOT
CONTRASTE
MODE 2
HORA
KM TOTAL*
TIEMPO TOT*
MODE 1
KM DIA
TIEMPO PAR
VEL MEDIA
VAL MAXIMA
E
* Non durante
la corsa
RESET
DIST GIORN
TEMPO PERC
VEL MEDIA
VEL MAX
SET
LINGUA
KMH/MPH
MSURARUOTA
OROLOGIO
DIST TOT
TEMPO TOT
CONTRAST
MODE 2
OROLOGIO
DIST TOT*
TEMPO TOT*
MODE 1
DIST GIORN
TEMPO PERC
VEL MEDIA
VEL MAX
I
1009
3.1 Toetsfuncties
* Niet tijdens
de rit
RESET
TRIP KM
TRIP TIJD
GEM.SNELH.
MAX. KMH
SET
TAAL
KMH/MPH
WIELOMTREK
KLOK
TOTAAL KM
TOTAALTIJD
CONTRAST
MODE 2
KLOK
TOTAAL KM*
TOTAALTIJD*
MODE 1
TRIP KM
TRIP TIJD
GEM.SNELH.
MAX. KMH
NL
13
1009
1009
4 Anzeigenwechsel / Display change / Changement d‘affichage
MODE 1/2-Taste drücken, bis die gewünschte Funktion angezeigt wird.
Mit MODE 1- TAGES KM, FAHRZEIT, DURCH-KMH, MAX KMH aktivieren.
Mit MODE 2- UHRZEIT, GESAMT KM*, GESAMTZEIT* aktivieren.
* Nicht hrend der Fahrt
D
Press MODE 1/2 until the desired function is displayed.
MODE 1- TRIP DIST, TRIP TIME, MAX. SPEED, AVG. SPEED
MODE 2- CLOCK, TOTAL ODO*, TOTAL TIME*.
* Not whilst moving
Appuyer sur la touche MODE 1/2 jusqu‘à ce que la fonction souhaie
apparaisse.
MODE 1- KM JOUR, TEMPS PARC, VIT MAX., VIT MOYEN.
MODE 2- HEURE, KM TOTAL*, TEMPSTOTAL.
* Pas pendant la conduite
F
n
MODE 1
MODE 2
!
GB
US
14
16
1009
5 Synchronisierung / Connection / Apareado
BC 1009 STS auf der Halterung einrasten – Die Null der Geschwindig-
keitsanzeige blinkt. Zum Synchronisieren der Geschwindigkeit gibt es
2 Möglichkeiten:
1
Losfahren, i.d.R. hat sich der Empfänger nach 3-4 Radumdrehungen
mit den Sendern synchronisiert.
2
Vorderrad drehen bis die Geschwindigkeitsanzeige nicht mehr blinkt.
Das Entfernen des BC 1009 STS aus der Halterung trennt die Verbindung.
Anzeige ZU VIELE SIGNALE: Abstand zu anderen Sendern vergßern
und eine beliebige Taste drücken. Die Synchronisierung beginnt erneut.
(Falls die Übertragung während der Fahrt ausfallen sollte und nicht mehr funktioniert,
drücken Sie bitte die MODE 1-Taste länger als 3 Sek. um eine manuelle Synchronisierung
zu starten. SYNCH RESET blinkt im Display.)
D
Installation of the BC 1009 STS into the mounting bracket – The zero
of the speed is flashing. To synchronise the speed there are 2 options:
1
Set off, usually the receiver has paired with the transmitter within
3 or 4 wheel turns.
2
Turn front wheel until the KMH display stops flashing. Removing the
BC 1009 STS from the mounting will cut off the connection.
1
2
GB
US
16
17
1009
1009
n
n
n
n
5 Collegamento / El emparejamiento / De pairing
Placer le BC 1009 STS sur son support – Le zéro de la vitesse
clignote. Il existe deux fons de synchroniser la vitesse:
1
Rouler, en général le récepteur s‘est synchronisé avec l‘emetteur
après 3 à 4 rotations de roue.
2
Faire tourner la roue avant jusqu‘à ce que l‘affichage de la vitesse ne
clignote plus. Lorsque l‘on sort le BC 1009 STS de son support, la
connection est arrêtée. TOO MANY SIGNALS s‘affiche: Augmenter
la distance par rapport aux autres vélos et appuyer sur une touche
quelconque. La connection recommence.
(Lorsque la transmission s‘interrompt pendant le trajet et ne fonctionne plus, enfoncer
la touche MODE 1 plus de 3 secondes afin de démarrer la synchronisation manuelle.
SYNCH RESET clignote à l‘écran.)
TOO MANY SIGNALS are shown: Extend the distance of all
transmitters and press any button to continue. Pairing begins again.
(If tranmission fails whilst cycling and no longer works, please press the MODE 1 button
for more than 3 sec. to start manual pairing. SYNCH RESET flashes on the display.)
F
press 1 button shortly
1009
1009
1009
6 Grundeinstellungen / Basic settings / Réglages de base
Öffnen Sie das Einstellungsmenü, indem Sie SET 3 Sekunden gedrückt
halten bis die voreingestellte Sprache in der Anzeige erscheint
(SETTINGS OPEN (EINGABE OPEN) blinkt).
Open the setting menu by pressing the SET button 3 sec. until the
preset LANGUAGE (English) appears on the display (SETTINGS OPEN
flashes).
Maintenir la touche SET enfoncée 3 secondes jusqu‘à ce que
la LANGUE finie (anglais) apparaisse dans l‘affichage
(SETTINGS OPEN (REGLAGES OPEN) clignote).
F
D
SET > 3 sec.
n
GB
US
20
1009
1009
6.1 Eingabe Sprache / Language entry / Reglage langue
kMit MODE 1-Taste zur ENGLISH-Anzeige wechseln.
kSET-Taste kurz dcken, Anzeige blinkt.
kMit RESET/MODE 2-Taste gewünschte Sprache einstellen.
kMit SET-Taste bestätigen. SET OK erscheint im Display.
D
kSwitch to ENGLISH display with MODE 1 button.
kPress the SET button briefly. Display flashes.
kSet the desired language using the RESET/MODE 2 button.
kConfirm by pressing the SET button. SET OK appears
on the display.
kPasser à l‘affichage ENGLISH au moyen de la touche MODE 1.
kAppuyer brièvement sur la touche SET. L‘affichage clignote.
kRégler la langue souhaitée à l‘aide de la touche RESET/MODE 2.
kConfirmer par la touche SET. SET OK appart à l‘écran.
F
n
SET
n
MODE 1
GB
US
22
1009
1009
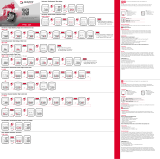
6.2 Eingabe KMH/MPH / KMH/MPH Entry / Reglage KMH/MPH
kChange the display to KMH/MPH using the MODE 1 button.
k Press the SET button briefly.
kKMH appears on the display and flashes.
kSelect MPH or KMH using RESET/MODE 2.
kConfirm by pressing the SET button. SET OK appears on the display.
KMH = km, 24h / MPH = mi, 12h.
kAvec la touche MODE 1, sélectionnez la fonction KMH / MPH.
k Appuyer brièvement sur la touche SET.
kKMH apparaît dans l‘affichage et clignote.
kRégler MPH ou KMH à l‘aide de la touche RESET/MODE 2.
kConfirmer par la touche SET. SET OK appart à l‘écran.
KMH = km, 24h / MPH = mi, 12h.
D
kMit MODE 1-Taste zur KMH-Anzeige wechseln.
k SET-Taste kurz drücken.
kIn der Anzeige erscheint KMH und blinkt.
kMit RESET/MODE 2-Taste MPH oder KMH einstellen.
kMit SET-Taste bestätigen. SET OK erscheint im Display.
KMH = km, 24h / MPH = mi, 12h.
n
MODE 1
F
n
SET
GB
US
24
6.3 Radumfang berrechnen / Measure wheel size / Mesurer la roue
kAus Tabelle
C
Radgröße“ (nächste Seite) den Ihrer Reifengröße
entsprechenden Wert ermitteln.
kDiesen Wert eingeben.
kAlternativ: WS berechnen/ermitteln (Tab.
A
oder Tab.
B
).
D
kDetermine the correct value for your wheel size from Table
C
Wheel Size Chart” (refer to next page).
k Enter this value.
k Alternatively: calculate/determine WS (Tab.
A
or Tab.
B
).
kterminer la valeur correspondant à votre circonrence de roue à partir du
tableau
C
Wheel Size Chart” (voir page suivante).
k Entrer cette valeur.
k Alternative: calculer/déterminer WS (Tab.
A
ou tab.
B
).
F
GB
US
26
6.4 Wheel size chart (Radgröße / Wheel size / Circonference de roue)
mm x 3,14
km/h:
WS = mm x 3,14
mph:
WS = mm x 3,14
1x
= WS (mm)
km/h:
WS = mm
mph:
WS = mm
A
B
28
1009
1009
1009
30
6.5 Eingabe Radumfang / Set wheel size / Reglage de la circonference de la roue
kMit MODE 1-Taste zur RADUMFANG-Anzeige wechseln.
kSET-Taste kurz drücken, die erste Ziffer der Eingabe blinkt.
kMit RESET/MODE 2-Taste Wert einstellen.
kMit MODE 1-Taste zur nächsten Stelle wechseln.
kMit SET-Taste bestätigen. SET OK erscheint im Display.
kChange the display to WHEEL SIZE using the MODE 1 button.
kPress the SET button briefly. The first input figure is flashing.
kSet the value using the MODE 2 button or the RESET button.
kMove to the next figure using the MODE 1 button.
kConfirm by pressing the SET button. SET OK appears on the display.
kAvec la touche MODE 1, sélectionnez la fonction DIM. ROUE.
kAppuyer brvement sur la touche SET. Le premier chiffre
à régler clignote.
kAvec la touche MODE 2 ou RESET, régler le chiffre.
kAvec la touche MODE 1, passer au chiffre suivant.
kConfirmer par la touche SET. SET OK appart à l‘écran.
F
D
n
MODE 1
n
SET
RESET!
_
+
!MODE 2
GB
US
1009
1009
1009
32
6.6 Eingabe Uhrzeit / Time entry / Reglage heure
kMit MODE 1-Taste zur UHRZEIT-Anzeige wechseln.
kSET-Taste kurz dcken. Eingabe blinkt.
kMit RESET/MODE 2-Taste Stunden einstellen.
kMit MODE 1-Taste zur Minuteneingabe wechseln.
kMit RESET/MODE 2-Taste Minuten einstellen.
kMit SET-Taste bestätigen. SET OK erscheint im Display.
D
kChange the display to CLOCK using the MODE 1 button.
kPress the SET button briefly. Display flashes.
k Set the hours with the RESET/MODE 2 button.
k Change to the minute entry by pressing MODE 1.
k Set the minutes with the RESET/ MODE 2 button.
kConfirm by pressing the SET button. SET OK appears on the display.
kAvec la touche MODE 1, sélectionnez la fonction HEURE.
kAppuyer brièvement sur la touche SET. L‘affichage clignote.
kRégler l‘heure à l‘aide de la touche RESET/MODE 2.
kA l‘aide de la touche MODE 1 passer au réglage des minutes.
kRégler l‘heure à l‘aide des minutes RESET/MODE 2.
kRégler les minutes à l‘aide de la touche RESET/MODE 2.
F
n
MODE 1
n
SET
RESET!
_
+
!MODE 2
GB
US
1009
1009
1009
34
6.7 Eingabe Gesamtdaten / Total data entry / Réglage des valeurs totales
D
KM-WHEEL
TIME-WHEEL
Entry as for wheel size. You can transfer the total Km, e.g. when
purchasing this device, from another bike computer here.
Minutes can also be entered on the total time.
KM-VELO
TEMPS VELO
Réglage identique à la circonférence de la roue. Ici, vous pouvez
transférer la distance totale en km, par exemple lors de l‘achat de
cet appareil, à partir d‘un autre compteur. Les minutes peuvent
également être indiquées pour la durée totale.
F
KM RAD
ZEIT RAD
Eingabe wie beim RADUMFANG. Hier können Sie die GESAMT KM
z.B. von Ihrem alten Gerät auf dieses neue Gerät übertragen.
Bei der Gesamtzeit können auch die Minuten eingegeben werden.
n
MODE 1
n
SET
RESET!
_
+
!MODE 2
GB
US
1009
1009
6.8 Eingabe Kontrast / Contrast entry / Reglage contraste
kMit MODE 1-Taste zur KONTRAST-Anzeige wechseln.
kSET-Taste kurz dcken. Anzeige blinkt.
kMit RESET/MODE 2-Taste Wert einstellen (1=schwach, 3 = stark).
kMit SET-Taste bestätigen. SET OK erscheint im Display.
D
k Change the display to CONTRAST using the MODE 1 button.
k Press the SET button briefly. Display flashes.
k Set the value by pressing the RESET/MODE 2 button
(1=weak, 3=strong).
kConfirm by pressing the SET button. SET OK appears on the display.
kAvec la touche MODE 1, sélectionnez la fonction CONTRASTE.
k Appuyer brièvement sur la touche SET. L‘affichage clignote.
k Avec la touche RESET/MODE 2 régler la valeur
(1 = faible, 3 = fort).
kConfirmer par la touche SET. SET OK appart à l‘écran.
F
n
MODE 1
n
SET
GB
US
36
1009
1009
Um die Grundeinstellungen zu verlassen, SET-Taste 3 Sekunden
gedrückt halten (EINGABE CLOSE blinkt).
Press the SET button down for 3 seconds in order to stop entering
settings (SETTINGS CLOSE flashes).
Pour terminer les glages, maintenir la touche SET 3 secondes
appuyée (REGLAGES CLOSE clignote).
F
D
n
SET > 3 sec.
GB
US
6.9 Grundeinstellungen verlassen / Exiting basic settings / Quitter les reglages de base
38
  • Page 1 1
  • Page 2 2
  • Page 3 3
  • Page 4 4
  • Page 5 5
  • Page 6 6
  • Page 7 7
  • Page 8 8
  • Page 9 9
  • Page 10 10
  • Page 11 11
  • Page 12 12
  • Page 13 13
  • Page 14 14
  • Page 15 15
  • Page 16 16
  • Page 17 17
  • Page 18 18
  • Page 19 19
  • Page 20 20
  • Page 21 21
  • Page 22 22
  • Page 23 23
  • Page 24 24
  • Page 25 25
  • Page 26 26
  • Page 27 27
  • Page 28 28
  • Page 29 29
  • Page 30 30
  • Page 31 31
  • Page 32 32
  • Page 33 33
  • Page 34 34
  • Page 35 35
  • Page 36 36
  • Page 37 37
  • Page 38 38
  • Page 39 39
  • Page 40 40
  • Page 41 41
  • Page 42 42
  • Page 43 43
  • Page 44 44
  • Page 45 45
  • Page 46 46
  • Page 47 47
  • Page 48 48
  • Page 49 49
  • Page 50 50
  • Page 51 51
  • Page 52 52
  • Page 53 53
  • Page 54 54
  • Page 55 55
  • Page 56 56
  • Page 57 57
  • Page 58 58
  • Page 59 59
  • Page 60 60
  • Page 61 61
  • Page 62 62
  • Page 63 63
  • Page 64 64
  • Page 65 65
  • Page 66 66
  • Page 67 67
  • Page 68 68

Sigma BC 1009 STS User manual

Category
Bicycle accessories
Type
User manual

Ask a question and I''ll find the answer in the document

Finding information in a document is now easier with AI