Page is loading ...

1
USER GUIDE
Radiation Shield with 24-Hour Fan-Aspirated Radiation
Shield (product number 6838)
The 24-Hour Fan-Aspirated Radiation Shield minimizes the impact of solar radiation on
sensor readings.
The solar- and battery-powered, motor-driven fan draws a constant airflow
through the sensor chamber. At night, when the effects of solar radiation are less, the fan runs
on battery power.
Tools for Setup
In addition to the hardware provided, you will need some or all of the following materials:
• Adjustable wrench or 7/16" wrench
• Drill and 3/16" (5 mm) drill bit (if mounting on a flat, vertical surface)
1/4" Flat Washers
1
/4" Lock Washers
1/4" Hex Nuts
1/4" x 1-1/2
"
Lag Screws
Cable Ties
Mounting
Bracket
Solar Panel
Bracket
Radiation Shield
Assembly
2-1/8" U-Bolts
Fan Power
Cable
Fan Battery
Pull Tab (2)
Note: When shipped, mounting bracket
will be upside down to facilitate packing.

2
Start the fan
The 24-hour fan batteries are shipped with pull tabs that prevent draining the batteries until
ready to use. Pull the tabs. You should hear the fan come on.
If you can’t hear the fan, you can check to make sure that it is running by placing a piece of
tissue paper under the shield.
Install a Sensor
You may use either a temperature probe or a temperature/humidity sensor in your Radiation
shield. (Temperate probe shown in this manual.)
1. Place the Radiation Shield on a table or level work surface.
2. Using an adjustable wrench,
remove the three hex nuts,
lock washers, and flat
washers connecting the
mounting bracket to the solar
panel bracket and radiation
shield.
While removing the hex nuts
and washers, keep the
Radiation Shield on the
surface or support it from the
bottom. When the hex nuts
and washers are removed, it
will drop.
Take care not to lose the
washers and nuts.
3. Lift off the mounting bracket,
and the solar panel bracket
(with the solar panel cable
still connected).
Mounting
Bracket
Solar Panel
Bracket
Nut
Lock Washer
Flat Washer
Solar
Panel
Cable

3
4. Remove the two cap
plates.
5. Remove the white
junction board cover
and unplug the fan
power cable from the
junction board.
6. Lift out the fan and the
fan deflector.
Plates
Screen
Stand-offs
Fan Plate
Solar Panel
Cable
(Plugged into
Junction Board)
Closed Cap Plate
Open Cap Plate
(hole in center)
Solar Panel
Bracket
Junction Board
Fan Unit
Fan Deflector
Sensor Cable
Channel
Fan Unit
Fan Power
Cable
Junction Board
Cover (removed)
Junction Board

4
7. Remove the optional sensor mounting board. Insert the sensor into the radiation
shield. You may mount your sensor to the board and slide it down into the slots on the
inside of the shield.
8. Route the cable up
through the channel and
replace the fan deflector
with the cable channels
correctly aligned with
the sensor cable.
9. Replace the fan and
plug the fan power
cable back into the
junction board. The fan
should start to rotate.
10. Replace the junction
board cover.
11.
Replace the two cap
plates. (Note that the
closed plate goes on
top.)
12. Replace the solar
bracket, being careful to
use the correct holes in
the bracket as shown,
and the mounting
bracket.
13. Align the top of the
screws with the holes in
the mounting base.
14. Replace the nuts, lock
washers and flat
washers.
15. After mounting the
Radiation Shield in its
final location, connect
the sensor cable to the
transmitting station.
Temperature
Probe
Sensor
Mounting
Board
USE THESE HOLES
Lock Washer
Hex Nut
Flat Washer

5
Before You Install the Radiation Shield
Choose a Location
It is important to remember to choose a location that best represents the environment you
would like monitor and/or protect. Consider the following factors as you choose a location:
• In the Northern Hemisphere, the solar panel should face south for maximum sun exposure.
In the Southern Hemisphere, it should face north.
• Do not mount the sensor near any source of cold or heat that might distort temperature
measurements.
• Mount so that the screened opening at the bottom of the shield is not blocked and air can
move up into the shield.
• Mount the sensor over vegetation or soil if possible.
• Do not install over or near sprinklers, which may inflate humidity values, or near sources
of radiated or reflected heat, which may inflate temperature values.
• Make sure the sensor cable can reach the transmitter when the shield is mounted.
• Frost Monitoring: place the sensor at about 5' (1.5m) in a grassy, open field that receives
the coldest temperatures adjacent to the area at risk of frost damage.
Mounting on a Pole
Use a pole having an
outside diameter between
1" and 1-1/4" (25 –
31 mm).
1. Hold the mounting
bracket against the
pole. Put two U-bolts
around the pole and
insert the ends through
the holes in the back of
the mounting bracket.
2. Secure the mounting
bracket using 1/4" flat
washers and 1/4" hex
nuts. Tighten all four
sets of washers and hex
nuts until the mounting
bracket is firmly
mounted on the pole.
3. Connect the sensor
cable to the transmitting station.
4. Use the longer cable tie to secure the coil of unused cable to the pole; use the 8”cable
ties to secure the uncoiled sensor cable to pole to prevent fraying in wind.
1/4" Flat Washer
2-1/8" U-Bo
lts
1/4" Hex Nut
Sensor Cable
Lock Washer

6
Mounting on a Post
1. Using four 1/4" x 1-1/2"
lag screws, attach the
mounting bracket to the
surface in the desired
location. Drill holes using
a 3/16" (5 mm) drill bit.
Use a carpenter’s level
when marking the holes to
ensure that the bracket will
be level.
2. Using an adjustable
wrench or 7/16" wrench,
tighten the lag screws.
3. Connect the sensor cable to
the transmitting
station.Use the longer
cable tie to secure the coil
of unused cable use the
8”cable ties to secure the
uncoiled sensor cable to
prevent fraying in wind.
A Note on Securing Cables
To prevent fraying or cutting of cables, secure them
so they will not whip in the wind. Secure a cable to a
metal pole by wrapping electrical tape around it or
using the supplied cable ties. Make sure cables are
secure by placing clips or ties approximately every 3
– 5' (1 – 1.6 m).
Note: Do not use metal staples or a staple gun to
secure cables. Metal staples—especially when installed with a staple gun—have a tendency to
cut the cables.
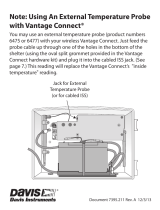
Maintaining Your 24- Hour Fan-Aspirated Radiation
Shield
The cross-section diagram shows how the 24-Hour
Fan-Aspirated Radiation Shield draws outside air up
through the sensor chamber and between the three walls
surrounding the sensor chamber, while the shield stack
prevents radiation heating of the outer wall.
Check the radiation shield for debris or insect nests
several times a year and thoroughly clean as often as
1/4" x 1-1/2" Lag Screws
Sensor Cable
Cable Clip
Cable T
ie
MOTOR
FAN
SENSOR
CHAMBER

7
necessary. A buildup of material inside the shield reduces its effectiveness and may
cause inaccurate temperature and humidity readings.
Clean by disassembling the shield and cleaning the interior surfaces of the shield and
the sensor as necessary to prevent dirt build up. To disassemble, reverse the steps shown
in “Install a Sensor” on page 2.
Notes on dissembling and cleaning your Radiation Shield:
• You will need an adjustable wrench; a soft, damp cloth: and a soft brush (such as a
toothbrush). You will also need a small Phillips head screwdriver if you are also
replacing the fan batteries.
• You will not need to remove the mounting bracket from the pole or post on which it is
mounted. You will be able to remove the entire radiation shield so that you can clean it
and access the sensor, the fan, and the fan batteries.
• Remember to support the radiation shield from the bottom when disassembling. When
you remove the screws, the shield will drop.
• Take note of the cable placement and routing as you disassemble the shield so you can
replace them correctly.
• Pull the temperature/humidity sensor up and out and clean with soft brush or cloth.
• Remove all debris from inside the shield and fan and wipe the interior surfaces with a
damp cloth.
• Remove the screen from the bottom of the radiation shield. Wipe it clean, as well as up
into the interior of the radiation shield. Replace the screen.
• If a new fan and batteries are needed, see “Replacing the Fan Motor and Batteries” on
page 7.
• Check to make sure the fan is running by listening for it, or by holding a piece of
tissue paper under the shield.
• Do not spray down or use water excessively to clean the radiation shield. This can
damage the sensitive sensors or alter the data and readings the ISS is transmitting.
Tip: If you are out in the field where it is very dusty, place the radiation shield on a convenient work place,
such as a table, a piece of cardboard, or a pickup truck tailgate.
CAUTION: DO NOT remove nesting insects or animals by spraying insect killer of any kind
into the radiation shield. Chemicals could easily damage the circuitry inside your
Radiation Shield.
Replacing the Fan Motor and Batteries
To replace the fan motor and batteries in the 24-Hour Fan-Aspirated Radiation Shields, use
product no. 7758B: Standard Motor Kit for Fan-Aspirated Radiation Shield with Batteries.
Troubleshooting
“I am not receiving data from my sensors.”
Make sure the sensor cable is firmly connected. Try reseating the connections.
“My data does not seem to be accurate.”
Make sure the screened opening at the bottom of the radiation shield is not blocked and air
can circulate up the tube. Make sure the fan is running, by listening for it or by placing a
small piece of tissue paper against the screen under the shield.

24-Hr Fan-Aspirated Radiation Shield, 6838 7395.360 Rev. A 3/15/19
©Davis Instruments, 2019. Vantage Pro, Vantage Vue, and EnviroMonitor are trademarks of Davis Instruments,
Hayward, CA. All rights reserved. Information in this document is subject to change without notice. Davis Instruments
Quality Management is ISO 9001 certified.
3465 Diablo Avenue, Hayward, CA 94545-2778 U.S.A.
510-732-9229 • Fax: 510-732-9188
E-mail: [email protected] • www.davisinstruments.com
®
“The fan is not running.”
Make sure the solar panel cable is firmly connected. If you have changed the batteries, make
sure the fan batteries they were inserted in the right orientation (+ to + and - to -).
Contacting Davis Instruments
If you have questions about installing or using your Radiation Shield, please contact Davis
Technical Support. We’re glad to help.
Note: Please do not return items to the factory for repair without prior authorization.
Online: www.davisinstruments.com
See copies of user manuals, product specifications, application
notes, software updates, and more.
E-mail: [email protected]
Telephone: (510) 732-7814
Monday – Friday, 7:00 a.m. – 5:30 p.m. Pacific Time.
Specifications
General
Operating Temperature. . . . . . . . . . . . . . . . -40° to +150° F (-40° to +65° C)
Non-operating Temperature . . . . . . . . . . . . -40° to +158° F (-40° to +70° C)
Shield Dimensions, with bracket . . . . . . . . 8.1” high x 9.5” width x 7.8” deep
(206 mm x 241 mm x 198 mm)
Weight . . . . . . . . . . . . . . . . . . . . . . . . . . . . 6.6 lbs. (3.0 kg)
Aspiration Rate, Solar-powered, full sun
Intake Flow Rate . . . . . . . . . . . . . . . . . . . 190 ft./min. (0.96m/s)
Sensor Chamber Flow Rate . . . . . . . . . . 500 ft./min (2.5 m/s)
Aspiration Rate, Battery only
Intake Flow Rate . . . . . . . . . . . . . . . . . . 80 feet/min (0.4 m/s)
Sensor Chamber Flow Rate . . . . . . . . . . 180 feet/min (0.9 m/s)
Radiation Induced Temperature Error . . . . 0.5°F (0.3°C) [At solar noon, insolation =
1040 W/m
2
] (Ref: RM Young model 43408)
Battery Charge/Operating Temperature . . . 32° to +113°F (0° to +45°C)
Battery Discharge/Storage Temperature . . -4° to +140°F (-20° to +60°C)
Fan Primary Power. . . . . . . . . . . . . . . . . . . Solar panel
Fan Secondary Power . . . . . . . . . . . . . . . . One or two 1.2 v NiMH C-cells
/