Page is loading ...

ASSEMBLY & INSTALLATION INSTRUCTIONS
- 1 -
Recommended Tools & Materials
Roughing-in
Dimensions
Product names listed herein are trademarks of AS America, Inc.
© AS America, Inc. 2011
Hacksaw
Channel Locks
Adjustable Wrench
Tubing Cutter
Basin Wrench
Putty Knife
Tape
Measure
Plumbers’ Putty or
Caulking
Regular Screwdriver
Phillips Screwdriver
Drill
Level
Pipe Wrench
Portsmouth 30" Vanity
Model: 9210.030
To maintain the beauty of the finish, avoid placing the furniture in direct sunlight, as sunlight causes fading. Also avoid
extreme changes in temperature by arranging furniture away from radiators, heat and air vents, and air conditioning
units. Avoid placing furniture directly under windows.
30"
(762mm)
21-1/2"
(546mm)
33-1/2"
(851mm)
27-1/4"
(692mm)
4-3/4"
(120mm)
20"
(508mm)
22"
(559mm)
PORTSMOUTH SINK
8"
(203mm)
FINISHED
FLOOR
FINISHED
FLOOR
FINISHED
WALL
VANITY TOP
9210.130 Laminated 31" Marble Top
No additional top required for Portsmouth
Vanity Top
0615.000 Portsmouth Undermount Sink
7820.400 Portsmouth Vanity Top
- 4" Centers
7820.800 Portsmouth Vanity Top
- 8" Centers
7005.201 Copeland
Center Set Faucet
7005.801 Copeland
Widespread Faucet
RECOMMENDED SINKS RECOMMENDED FAUCETS
770011-100 Rev.C
1-1/4" (32mm)
O.D. WASTE
OPTIONAL: LAMINATED
MARBLE TOP WITH
PORTSMOUTH
UNDERMOUNT SINK
SUPPLIES AS
REQUIRED
Thank you for selecting our products...products which have been the benchmarks of fine quality for over 100 years. To
help insure that the installation process will proceed smoothly, please read these instructions carefully before you begin.
Also, review the recommended tools and materials list; carefully unpack and examine your new plumbing fixture.

- 2 -
VANITY INSTALLATION
Unpack unit carefully, taking care that bottom shelf does not drop and damage front legs (see Figure 2).
Provide suitable reinforcement for anchoring the vanity to the wall. Centerline of reinforcement should be 31" up from
the floor (see Figure 1).
Rough in supply lines and waste per rough-in dimensions.
The molding needs to be notched to seat the vanity flush against the wall.
Move the vanity into place and level with the adjustable glides on the bottom of the feet.
The glides can be adjusted outward up to 1" but it is recommended not to exceed 1/2" if possible.
Drill at least two 3/8" O.D. anchoring holes through the centerline of the rear stringer of the vessel stand, located 1"
down from the top of the table (see Figure 2).
Anchor the vanity to the wall through at least 2 of the anchoring holes in the rear of the vanity (see Figure 2).
Continue with installation appropriate for top and sink options chosen.
C/L of 2 x 6
Reinforcement
Finished
Floor
31"
(787mm)
FIGURE 1
ADJUSTABLE
LEVELLERS
(under each
foot)
ANCHORING HOLES
IN REAR STRINGER
[NOT SHOWN]
3"
(76mm)
REAR STRINGER WITH
ANCHORING HOLES TO
SECURE VANITY TO WALL
FIGURE 2
770011-100 Rev.C
21-1/2"
(546mm)
33-1/2"
(850mm)

770011-100 Rev.C
- 3 -
Turn the marble top upside down and place it on a clean, scratch
resistant surface. Apply a bead of silicone adhesive to the rim of
the sink. Center the sink over the cutout and (secure it to the top
using the mounting kit provided).
NOTE:
Use the 4 brackets supplied with the sink mounting kit
and the 4 screws supplied with the marble top to secure the sink to
the underside of the marble top.
Turn the top right-side up and install the faucet per the manufacturer’s instructions.
Apply a bead of silicone adhesive to the rim of the vanity. Place the marble top
centered left to right on the vanity and with the back edge of the top even with the
rear of the vanity. Clean up any excess silicone.
Connect the trap to the drain assembly hand tight to check alignment. It may be
necessary to cut off part of the tailpiece (area "A") or part horizontal leg of the
trap (area "B").
Connect hot and cold supply lines to the shut off valves. Tighten trap joints for
watertight assembly.
NOTE: Marble top comes pre-cut for the Portsmouth Undercounter sink and 8"
faucet spread. Also it is strongly recommended that the marble top be sealed after
installation and prior to use.
Mount the drain assembly (not included) on the sink. Be certain to apply a bead of
sealing putty on the underside of the drain (Part "A") in order to ensure a watertight seal
between the sink and drain. Remove excess putty after installing the drain on the sink.
MARBLE TOP 9210.130 WITH PORTSMOUTH 0615 UNDERCOUNTER SINK
PORTSMOUTH VANITY SINK 7820.400 AND 7820.800
INSTALLATION onto VANITY
Two people recommended for this installation
A
B
Two people recommended for this installation
A
Mount the drain assembly (not included) on the sink. Be certain to apply
a bead of sealing putty on the underside of the drain (Part "A") in order to ensure
a watertight seal between the sink and drain. Remove excess putty after installing
the drain on the sink.
Apply a bead of silicone adhesive to the rim of the vanity. Place the top centered
left to right on the vanity and with the back edge of the top even with the rear of
the vanity. Apply a bead of silicone along the top back edge of the vanity top
and the wall. Clean up any excess silicone.
Connect the trap to the drain assembly hand tight to check alignment. It may be necessary
to cut off part of the tailpiece (area "B") or part horizontal leg of the trap (area "C").
Connect hot and cold supply lines to the shut off valves.
Tighten trap joints for watertight assembly.
A
B
C

-4-
REPLACEMENT PARTS LIST
9210.030 Portsmouth 30" Vanity
Care and Cleaning of Vanity
Clean the product by using soft, slightly damp cloth. Buff the product by using a soft dry cloth. Avoid using silicone cleaners and waxes.
Clean up excess water and spills immediately. Use a blotting rather than a wiping action. Water left over a long period of time will cause white spots
in the finish.
NOTE: Please note that some chemicals may damage the finish. Take care to avoid the following: iodine, hair dye, after shave lotion, shaving cream,
alcohol, perfume, Lestoil®, Lysol Tub and Tile Cleaner®, Lysol Spray Disinfectant®, Dow Disinfectant®, acetone, paint remover, Formula 409®,
Tile-X®, and Nair®.
Care and Cleaning of the Marble Vanity Top
Marble is porous and easily stained. Wipe off anything spilled on it immediately. It should be washed or cleaned regularly with fresh warm water and
a non-abrasive clean cloth. Also, using a non-abrasive, neutral (pH balanced) cleaner will help remove dirt and grime, but it is recommended to first
try warm water only.
Marble should be sealed regularly with a good quality marble sealer. Marble sealers are available at most retail home supply stores. Follow the
instructions on the sealer container for proper application and frequency of use. The sealer acts as a stain inhibitor and prevents most stains and
soil from being absorbed into the porous surface, but it is NOT a guarantee against staining. All spills should be cleaned immediately. Avoid contact
with all oils and petroleum-based products. Also, avoid contact with all acid or caustic products such as vinegar, citrus or fruit juices, soda, chlorine,
and nail polish remover. If the marble is well sealed, the warm water and non-abrasive cloth should keep it clean.
Child Pull-Out Step
[Shown Closed]
Child Pull-Out Step
Door opens
to access
Storage
Laminated Marble Top
and Portsmouth
Undercounter Sink
Portsmouth
Vanity Sink
770011-100 Rev.C
REPAIR PART NO. DESCRIPTION
THREADER LEVELLER (1 PER PACK) FOR VANITY / STEP
DOOR PULL - PORTSMOUTH 30" VANITY
SHELF CLIPS FOR ADJUSTABLE SHELF
730679-0070A
770007-0070A
770009-0070A
VANITY TOP
9210.130 Laminated 31" Marble Top
No additional top required for Portsmouth
Vanity Top
0615.000 Portsmouth Undermount Sink
7820.400 Portsmouth Vanity Top
- 4" Centers
7820.800 Portsmouth Vanity Top
- 8" Centers
7005.201 Copeland
Center Set Faucet
7005.801 Copeland
Widespread Faucet
RECOMMENDED SINKS RECOMMENDED FAUCETS

- 5 -
AS AMERICA, INC. BATH FURNITURE LIMITED WARRANTY
If inspection of this AS America, Inc. (“American Standard”) plumbing product, within one year after its initial purchase, confirms that it is
defective in materials or workmanship, American Standard will repair or, at its option, exchange the product for a similar model. Variations in
actual wood color and finishes which may result from natural characteristics of the wood, such as grain patterns, mineral streaks and the
like, are not defects and are not covered by this limited warranty.
This limited warranty applies only to the original purchaser and installation of these products. In the event of a claim, proof of purchase will
be required; save your receipt.
This limited limited warranty does not apply to local building code compliance. Since local building codes vary considerably, the purchaser of this
product should check with a local building or plumbing contractor to insure local code compliance before installation.
This limited warranty is void if the product has been moved from its initial place of installation; if it has been subjected to faulty maintenance,
abuse, misuse, accident or other damages; if it was not installed in accordance with American Standard’s instructions; or if it has been
modified in a manner inconsistent with the product as shipped by American Standard.
American Standard’s option to repair or exchange the product under this limited warranty does not cover any labor or other costs of removal
or installation, nor shall American Standard be responsible for any other incidental or consequential damages attributable to a product
defect or to the repair or exchange of a defective product, all of which are expressly excluded from this limited warranty. This limited warranty
does not cover any liability for consequential or incidental damages, all of which are hereby expressly disclaimed, or the extension beyond
the duration of this limited warranty of any implied limited warranties, including those of merchantability or fitness for an intended purpose.
(Some states or provinces do not allow the exclusion or limitation of implied limited warranties, so this exclusion may not apply to you).
This limited warranty gives you specific legal rights. You may have other statutory rights that vary from state to state or province to province,
in which case this limited warranty does not affect such statutory rights.
AS AMERICA, INC. MARBLE/GRANITE VANITY/TABLE TOP LIMITED WARRANTY
If inspection of this AS America, Inc. (“American Standard”) plumbing product, within one year after its initial purchase, confirms that it is
defective in materials or workmanship, American Standard will repair or, at its option, exchange the product for a similar model. Variations in
shading, veining, and texture which may result from natural characteristics of stone and as such are not defects and are not covered by this
limited warranty.
This limited warranty applies only to the original purchaser and installation of these products. In the event of a claim, proof of purchase will
be required; save your receipt.
This limited limited warranty does not apply to local building code compliance. Since local building codes vary considerably, the purchaser
of this product should check with a local building or plumbing contractor to insure local code compliance
before installation.
This limited warranty is void if the product has been moved from its initial place of installation; if it has been subjected to faulty maintenance,
abuse, misuse, accident or other damages; if it was not installed in accordance with American Standard’s instructions; or if it has been
modified in a manner inconsistent with the product as shipped by American Standard.
American Standard’s option to repair or exchange the product under this limited warranty does not cover any labor or other costs of removal
or installation, nor shall American Standard be responsible for any other incidental or consequential damages attributable to a product defect
or to the repair or exchange of a defective product, all of which are expressly excluded from this limited warranty. This limited warranty does
not cover any liability for consequential or incidental damages, all of which are hereby expressly disclaimed, or the extension beyond the
duration of this limited warranty of any implied limited warranties, including those of merchantability or fitness for an intended purpose.
(Some states or provinces do not allow the exclusion or limitation of implied limited warranties, so this exclusion may not apply to you).
This limited warranty gives you specific legal rights. You may have other statutory rights that vary from state to state or province to province,
in which case this limited warranty does not affect such statutory rights.
770011-100 Rev.C
In the United States:
American Standard Brands
P.O. Box 6820
Piscataway, New Jersey 08855
Attention: Director of Consumer Affairs
For residents of the United States, warranty
information may also be obtained by calling
the following toll free number: (800) 442-1902
www.americanstandard.com
In Canada:
AS Canada ULC
5900 Avebury Rd.
Mississauga, Ontario
Canada L5R 3M3
Toll Free: (800) 387-0369
www.americanstandard.ca
In Mexico:
American Standard B&K Mexico
S. de R.L. de C.V.
Via Morelos #330
Col. Santa Clara
Ecatepec 55540 Edo. Mexico
Toll Free: 01-800-839-1200
www.americanstandard.com.mx

730837-100 Rev. B
Recommended Tools & Materials
Roughing-in Dimensions
Adjustable Wrench
Channel Locks
Putty Knife
Level
Basin Wrench Plumbers' Putty Tubing Cutter
Tape MeasurePipe Wrench Silicone Caulk
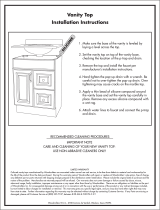
Vanity Installation
CARE AND CLEANING
When cleaning your vanity top, wash it with mild, soapy water, rinse
thoroughly with clear water and dry with a soft cloth. Avoid abrasive
detergents, disinfectants, or cleaning products in aerosol cans.
Two people recommended for this
installation
Mount the drain assembly (not included) on
the sink. Be certain to apply a bead of
sealing putty on the underside of the drain
(Part "A") in order to ensure a watertight seal
between the sink and drain. Remove excess
putty after installing the drain on the sink.
Apply a bead of silicone adhesive to the rim
of the vanity. Place the top centered left to
right on the vanity and with the back edge of
the top even with the rear of the vanity. Apply
a bead of silicone along the top back edge of
the vanity top and the wall. Clean up any
excess silicone.
Connect the trap to the drain assembly hand
tight to check alignment. It may be necessary
to cut off part of the tailpiece (area "B") or part
horizontal leg of the trap (area "C").
Connect hot and cold supply lines to the shut
off valves. Tighten trap joints for watertight
assembly.
A
B
C
ASSEMBLY & INSTALLATION INSTRUCTIONS
Portsmouth
®
Vanity Top
7820.400 & 7820.800
Fits most 30" x 21" Vanity Bases
Thank you for selecting our products...products which have been the benchmarks of fine quality for over 100 years. To help insure that the
installation process will proceed smoothly, please read these instructions carefully before you begin. Also, review the recommended tools and
materials list; carefully unpack and examine your new plumbing fixture.
In the United States:
American Standard Brands
P.O. Box 6820
Piscataway, New Jersey 08855
Attention: Director of Consumer Affairs
For residents of the United States, warranty information may also be
obtained by calling the following toll free number: (800) 442-1902
www.americanstandard.com
In Canada:
AS Canada ULC
5900 Avebury Rd.
Mississauga, Ontario
Canada L5R 3M3
Toll Free: (800) 387-0369
www.americanstandard.ca
In Mexico:
American Standard B&K Mexico
S. de R.L. de C.V.
Via Morelos #330
Col. Santa Clara
Ecatepec 55540 Edo. Mexico
Toll Free: 01-800-839-1200
www.americanstandard.com.mx
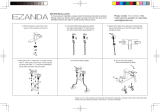
FINISHED
WALL OR
BACKSPLASH
22-7/8"
(581mm)
22"
(559mm)
1-3/4"
DIA.
4"
(102mm)
7820.400
MODEL
8"
(203mm)
7820.800
MODEL
4-1/2"
(114mm)
10-1/8"
(257mm)
13-3/4"
(349mm)
1-3/4"
(44mm)
FINISHED FLOOR
8"
(203mm)
1-1/4" O.D. TAILPIECE
1-1/4"
O.D. WASTE
SUPPLIES
AS REQ'D
11-1/4"
(286mm)
8"
(203mm)
*33-1/2"
(851mm)
31-1/8"
(791mm)
*
*
SUGGESTED
DIMENSIONS
*
AS AMERICA, INC. ONE YEAR LIMITED WARRANTY
If inspection of this AS America, Inc. (“American Standard”) plumbing product, within one year after its initial purchase, confirms that it is defective in materials or workmanship,
American Standard will repair or, at its option, exchange the product for a similar model.
This limited warranty applies only to the original purchaser and installation of these products. In the event of a limited warranty claim, proof of purchase will be required—save
sales receipt.
This limited warranty does not apply to local building code compliance. Since local building codes vary considerably, the purchaser of this product should check with a local
building or plumbing contractor to insure local code compliance
before installation.
This limited warranty is void if the product has been moved from its initial place of installation; if it has been subjected to faulty maintenance, abuse, misuse, accident or other
damages; if it was not installed in accordance with American Standard's instructions; or if it has been modified in a manner inconsistent with the product as shipped by
American Standard.
American Standard's option to repair or exchange the product under this limited warranty does not cover any labor or other costs of removal or installation. IN NO EVENT WILL
AMERICAN STANDARD BE LIABLE FOR THE COST OF REPAIR OR REPLACEMENT OF ANY INSTALLATION MATERIALS, INCLUDING BUT NOT LIMITED TO, TILES,
MARBLE, ETC. American Standard will not be responsible for any other incidental or consequential damages attributable to a product defect or to the repair or exchange of a
defective product, all of which are expressly excluded from this limited warranty. This limited warranty does not cover any liability for consequential or incidental damages, all of
which are hereby expressly disclaimed, or the extension beyond the duration of this limited warranty of any implied limited warranties, including those of merchantability or
fitness for an intended purpose. (Some states or provinces do not allow the exclusion or limitation of implied limited warranties, so this exclusion may not apply to you.)
This limited warranty gives you specific legal rights. You may have other statutory rights that vary from state to state or from province to province, in which case this limited
warranty does not affect such statutory rights.
Product names listed herein are trademarks of AS Americas Inc.
© AS Americas Inc. 2012

M 9 6 5 015 R E V. 1.7
Certified to comply with ANSI A112.18.1
Adjustable Wrench Screwdriver Channel Locks
Recommended tools
Tubing Cutter
1
2
1
3
4
6
12
5
SLOT
Turn off hot and cold water
supplies before beginning.
CAUTION
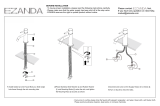
Insert SPOUT (1) and CABLE CONNECTOR (12) through center hole, making sure
the SEAL WASHER (3) is properly seated in the SPOUT ESCUTCHEON (2).
Assemble RUBBER WASHER (4), BRASS WASHER (5) and LOCKNUT (6) onto SPOUT
SHANK (7) from under side of sink . Make sure SPOUT (1) is centered in the mounting
hole and the slot in the BRASS WASHER (5) faces toward the rear of the sink.
Tighten LOCKNUT (6) firmly. Fig. A.
1
1A
INSTALL SPOUT
INSTALL VALVE BODY
1
8
11
7
Fig. A.
MOUNTING
SURFACE
Hand tighten LOCKNUT (11) to secure VALVE BODY (8).
Repeat above steps for opposite VALVE BODY (8A).
Install LOCKNUT (11) onto VALVE BODY (8).
From under side of mounting surface, install VALVE BODY (8) through valve
mounting holes. Threads of VALVE BODY (8) should extent at least 5/16
of a inch above mounting surface top. Fig. B. Thread ADAPTER (10)
onto VALVE BODY (8) until snug against internal stop. If necessary, adjust
LOCKNUT (11).
8
11
Place RUBBER RING (9) into ADAPTER (10).
5/16'' MIN.
8A
Fig. B.
7420.801
7420.821
Series
7415.801
7415.821
Series
Installation
Instructions
PORTSMOUTH™
Spread Lavatory Faucet
with Speed Connect™ Drain
10
9
10
9
Congratulations on purchasing your
American Standard faucet with
Speed Connect drain, a feature found
onlyon American Standard faucets.
*Your new American Standard faucet is designed to work only with the Speed Connect drain.
Heplful tips for removing your current drain can be found in the Troubleshooting section of these instructions.
To ensure that your installation proceeds smoothly-please read these instructions carefully
before you begin.
7420
7415
Speed Connect Drain*
• Fewer parts, installs in less time
• Never needs adjustment
• Guaranteed to seal properly the first time, every time.

2
6
POP-UP KNOB (1) must be fully down. Fig. B.
FLANGE GASKET AND POP-UP KNOB
Fig. A.
Fig. B.
Check DRAIN FLANGE in SINK to ensure that
WHITE FOAM GASKET (3) is fully compressed
and not visible. Fig. A.
Thread FLANGE (1) counter-clockwise and remove
FLANGE (1) and FOAM GASKET (2) from drain
body.
Fig. A.
Thread LOCKNUT (3) clock-wise to bottom of
drain body. Push GASKET (4) down against
LOCKNUT (3).
Fig. B.
POP-UP DRAIN
Tighten TAILPIECE (4) on DRAIN BODY before
installing DRAIN BODY.
Fig. B.
2
4
3
TIGHTEN LOCKNUT
1
REMOVE FLANGE
Remove CLEAR PLASTIC COVER (1).
Remove CARDBOARD SPACER (2) from under
DRAIN POP-UP (3).
2
2
3
3
1
1
Tighten LOCKNUT (1) firmly with Adjustable
Wrench or Channel Locks.
INSTALL DRAIN FROM
BELOW FIXTURE
5
From under side of SINK
install DRAIN BODY (1) up
through drain outlet.
Note: No plumber’s putty
or caulk is required.
The CABLE ATTACHMENT
POINT (2) must face towards
the rear of the SINK.
Install FOAM GASKET (3) and
FLANGE (4) onto drain body
from above SINK and tighten
FLANGE (4) firmly.
4
Fig. A. Fig. B.
Fig. A. Fig. B.
2
DRAIN
OUTLET
1
3
4
REAR OF SINK
DRAIN
BODY
4
WHITE FOAM
GASKET
NOT VISIBLE
DRAIN
FLANGE
1
DOWN
M 9 6 5 015 R E V. 1.7

Connect HOT water supply to inlet of left SHANK and COLD
water supply to right SHANK using sealant, appropriate
connectors, and COUPLING NUTS.
Connect 1-1/4” O.D. tailpiece on POP-UP DRAIN to
waste outlet.
Thread TEE BODY (4) to SPOUT SHANK (5).
Thread HOSE CONNECTOR (6, 6A) to VALVE CONNECTIONS (7, 7A).
9
Connect water supply to VALVE BODIES (1,1A) with 1/2" IPS FLEXIBLE
SUPPLIES (2) or 3/8" O.D. BULL-NOSE RISERS (3). Use
adjustable wrench to tighten connections. Do not over tighten.
Be careful not to kink copper supply when bending. Use tubing
cutter to cut to proper length.
MAKE WATER SUPPLY AND WASTE CONNECTIONS
NOTE: FLEXIBLE SUPPLIES OR BULL-NOSE RISERS NOT INCLUDED
AND MUST BE PURCHASED SEPARATELY.
HOT
COLD
FERRULE
COMPRESSION
NUT
COUPLING
NUT
FLEXIBLE
SUPPLIES
1
1A
3/8 O.D.
BULL-NOSE
RISERS
1/2" PIPE THREAD
3/8 COMPRESSION
CONNECTION
2
3
4
5
2
7
6
6A
7A
Operate LIFT KNOB (1) to verify that STOPPER (2) opens and
closes.
Note: If STOPPER (2) does not open and close properly then refer
to the “troubleshooting section” of these instructions.
CHECK OPERATION OF POP-UP
8
3
Thread CABLE CONNECTOR (1) clockwise
onto DRAIN BODY CONNECTION (2) and
hand tighten. Fig. A.
Your new POP-UP DRAIN installation is
now complete. Fig. B.
Note: Tailpeice on pop-up drain is 1-1/4” O.D.
Fig. B.
Fig. A.
ATTACH CABLE CONNECTOR
7
2
1
Fig. B.
1-1/4” O.D.
WASTE
OUTLET
1
M 9 6 5 015 R E V. 1.7

10
INSTALL HANDLES
CHECK DRAIN CONNECTIONS
11
12
13
14
TEST INSTALLED FITTING
With HANDLES (1) in OFF position, turn on WATER
SUPPLIES (2) and check all connections for leaks.
Remove AERATOR (3).
Operate both HANDLES (1) to flush water
lines thoroughly.
Replace AERATOR (3).
1
HOT
COLD
2
2
5
Operate POP-UP KNOB (5) and fill Sink with water. Check
that DRAIN STOPPER (4) makes a good seal and retains
water in Sink. If STOPPER (4) does not seal properly, please
refer to “Troubleshooting Guide” in these instructions.
Release POP-UP KNOB (5) down and check all drain
connections and "P" trap for leaks. Tighten
if necessary.
4
4
“P” TRAP
WASTE
OUTLET
DO: SIMPLY RINSE THE PRODUCT
CLEAN WITH CLEAR WATER.DRY
WITH A SOFT COTTON FLANNEL
CLOTH.
DO NOT: DO NOT CLEAN THE
PRODUCT WITH SOAPS, ACID,
POLISH, ABRASIVES, HARSH
CLEANERS, OR A CLOTH WITH
A COARSE SURFACE.
CARE INSTRUCTIONS:
1
2
4
5
3
BOTTOM
SPLINE
END UP
Push ADAPTER (1) on VALVE STEM (2), so that the hole of the
ADAPTER (1) with the spline is facing up. Fig. A. Tighten
STEM SCREW (3) to secure ADAPTER (1).
Find correct position of LEVER HANDLE ASSEMBLY (4) by adjusting
male teeth on ADAPTER (1) to female teeth in HANDLE (4).
Thread LEVER HANDLE ASSEMBLY (4) onto DECK ADAPTER (5)
until snug against mounting surface.
THREAD ON
TO DECK
ADAPTER
Fig. A.
3
1
SERVICE (all models)
2
90˚
To change direction of handle rotation,
proceed as follows:
Turn valve to OFF position. Unthread HANDLE
BASE (1) from DECK ADAPTER (2).
Pull HANDLE ASSEMBLY off VALVE STEM (3).
Remove SPRING CLIP (4). Lift STOP WASHER (5),
turn 90˚ and replace. Replace SPRING CLIP (4).
Find correct position of HANDLE ASSEMBLY by adjusting
male teeth on VALVE STEM (3) to female teeth in HANDLE.
Thread HANDLE ASSEMBLY onto DECK ADAPTER (2)
until snug against mounting surface.
If spout drips, operate handles several times from
OFF to ON position. Do not force - handles turn
only 90˚.
1
4
3
5
UNTHREAD
HANDLE
ASSEMBLY
M 9 6 5 015 R E V. 1.7

Fig. F.
5
Speed Connect™ Drain
Troubleshooting Guide
Disconnect the Cable from the Drain by threading the Cable Connector (1) counter-clockwise. Fig. A.
Look at the area on the Drain Body where the Cable was attached and locate the component labeled
as “Cam” and “Cam Cap” in the illustration. Fig. B.
Use fingers or small screwdriver under either side of the Cam Cap to pry it out from the Drain. Fig. D.
Remove the Cam by pulling it straight out while wiggling gently to loosen the Rubber Seal. Fig. E.
The Stopper can now be removed by lifting it out of the Drain. Fig. F.
CAM
CAM CAP
CABLE ADJUSTMENT PROCEDURE
If sink does not hold water even though Stopper is in the “down” position:
• Follow CABLE ADJUSTMENT PROCEDURE.
If Stopper does not raise up fully or sink drains too slowly:
• Follow CABLE ADJUSTMENT PROCEDURE.
If you need to remove the Stopper:
• Follow STOPPER REMOVAL PROCEDURE.
If you would like the ability to remove your Stopper simply by lifting it out of the drain:
• Follow STOPPER INSTALLATION PROCEDURE for “Unlocked” mode.
Fig. B.Fig. A.
REMOVE
CAM
Fig. E.
Disconnect the Cable from the Drain by threading the Cable Connector (1) counter-clockwise. Fig. A.
Look at the area on the Drain Body where the Cable was attached and locate the component labeled as
“Cam” in the illustration. Fig. B.
Use a small screwdriver to rotate the Cam in the clockwise direction as far as it will go. At this point the
Stopper should be in the UP position. Fig. B, C.
Push DOWN on the Lift-Knob to make sure it is fully down. Fig. C.
Re-attach the Cable to the Drain Body Connection (2) by threading the Cable Connector (1) clockwise onto the
Drain Body Connection (2) and hand-tighten. Fig. A.
STOPPER REMOVAL PROCEDURE
2
1
RE-ATTACH
DISCONNECT
Fig. D.
REMOVE
CAM CAP
LIFT-KNOB
STOPPER
Fig. C.
DOWN
M 9 6 5 015 R E V. 1.7

LOOP TOWARD
REAR OF SINK
LOOP TOWARD
FRONT OF SINK
Fig. G.
180˚
LOGO
LOGO
DRAIN
Fig. H.
STOPPER INSTALLATION PROCEDURE
Locked Mode:
Look at the Plastic Loop at the bottom of the Stopper and notice
that the Loop is on one side of the Stopper. Fig. G.
To install the stopper in “Locked” mode, insert the Stopper into
the Drain so that the Plastic Loop is facing toward the rear of the
Sink and the American Standard logo is facing front. Rotate
Stopper slightly if necessary so that the Stopper slides all the
way down.Fig. G.
Re-install the Cam into the Drain, rotating the Cam if necessary
to make sure it is fully inserted. Fig. J.
Re-install the Cam Cap, making sure the guide teeth are facing
outward. If the Cam Cap does not “snap” into place, then rotate
the Cam to make sure it is fully inserted. Fig. K.
Re-attach Cable. See “CABLE ADJUSTMENT PROCEDURE” in
Troubling Shooting Guide to complete installation. Stopper will be
in “Locked” mode and not be removable.
Unlocked Mode:
Look at the Plastic Loop at the bottom of the Stopper and notice
that the Loop is on one side of the Stopper. Fig. H.
To install the stopper in “Unlocked” mode, insert the Stopper into
the Drain so that the Plastic Loop is facing toward the front of the
Sink and the American Standard logo is facing rear. Rotate Stopper
slightly if necessary so that the Stopper slides all the way down.
Fig. H.
Re-install the Cam into the Drain, rotating the Cam if necessary
to make sure it is fully inserted. Fig. J.
Re-install the Cam Cap, making sure the guide teeth are facing
outward. If the Cam Cap does not “snap” into place, then rotate
the Cam to make sure it is fully inserted. Fig. K.
Re-attach Cable. See “CABLE ADJUSTMENT PROCEDURE” in
“Troublingshooting Guide” to complete installation. Stopper will be
in “Unlocked” mode and removable.
The Stopper can be installed two ways, “Locked” Mode (Stopper cannot be
removed) or “Unlock” Mode (Stopper is removable).
Locked Mode
(Vandal Proof)
Unlocked Mode
DRAIN
6
Fig. J. Fig. K.
INSTALL
CAM CAP
CAM
INSTALL CAM
M 9 6 5 015 R E V. 1.7

7
M962552-0070A
CAM ASSEMBLY
M952430-0070A
CABLE ASSEMBLY
M952425-YYY0A
DRAIN ASSEMBLY
M962457-YYY0A
FLANGE
ASSEMBLY
M962458-0070A
DRAIN MOUNTING KIT
A919661-0020A
TAILPIECE
M922872-0070A
CAM SEAT INSERT
M913207-0070A
TAILPIECE INSERT
M919660-0020A
6” TAILPIECE
(NOT INCLUDED
WITH FAUCET)
M962544-YYY0A
STOPPER
ASSEMBLY
For toll-free information and answers to your questions, call:
1-800-442-1902
Weekdays 8:00 a.m. to 6:00 p.m. EST
IN CANADA 1-800-387-0369 (TORONTO 1-905-306-1093)
Weekdays 8:00 a.m. to 7:00 p.m. EST
IN MEXICO 01-800-839-1200
Product names listed herein are trademarks of American Standard Inc.
© AS America, Inc. 2010
HOT LINE FOR HELP
M953006-0070A
TEE & HOSE KIT
M922881-YYY0A
AERATOR
M962590-YYY0A
SPOUT KIT
M961733-0070A
SPOUT MTG. KIT
918555-0070A
HANDLE SCREW
918049-0070A
ADAPTER
994053-0070A
CARTRIDGE
M911741-0070A
SEAL
MODEL NUMBER
M962592-0070A
DECK ADAPTER KIT
M962937-YYY0A
HANDLE
M962946-YYY0A
CROSS HANDLE
024220-0070A
SUPPLY NUT
M950211-YYY0A
LIFT ROD & KNOB
A906652-0070A
ATTACHMENT NUT
PORTSMOUTH™
Spread Lavatory Faucet
with Speed Connect™ Drain
7420.801
7420.821
Series
002
068
224
295
Replace the "YYY" with
appropriate finish code
CHROME
BLACKENED BRONZE
OIL RUBBED BRONZE
SATIN NICKEL
M 9 6 5 015 R E V. 1.7

8
M962947-YYY0A
HANDLE
M962946-YYY0A
CROSS HANDLE
918555-0070A
HANDLE SCREW
918049-0070A
ADAPTER
994053-0070A
CARTRIDGE
M962455-YYY0A
LIFT ROD & KNOB
M962552-0070A
CAM ASSEMBLY
M952430-0070A
CABLE ASSEMBLY
M952425-YYY0A
DRAIN ASSEMBLY
M962457-YYY0A
FLANGE
ASSEMBLY
M962458-0070A
DRAIN MOUNTING KIT
A919661-0020A
TAILPIECE
M922872-0070A
CAM SEAT INSERT
M913207-0070A
TAILPIECE INSERT
M919660-0020A
6” TAILPIECE
(NOT INCLUDED
WITH FAUCET)
M962544-YYY0A
STOPPER
ASSEMBLY
For toll-free information and answers to your questions, call:
1-800-442-1902
Weekdays 8:00 a.m. to 6:00 p.m. EST
IN CANADA 1-800-387-0369 (TORONTO 1-905-306-1093)
Weekdays 8:00 a.m. to 7:00 p.m. EST
IN MEXICO 01-800-839-1200
Product names listed herein are trademarks of American Standard Inc.
© AS America, Inc. 2010
HOT LINE FOR HELP
M953006-0070A
TEE & HOSE KIT
M922881-YYY0A
AERATOR
M962052-YYY0A
SPOUT KIT
M961733-0070A
SPOUT MTG. KIT
M962453-YYY0A
SEAL & ESCUTCHEON
MODEL NUMBER
M962592-0070A
DECK ADAPTER KIT
024220-0070A
SUPPLY NUT
PORTSMOUTH™
Spread Lavatory Faucet
with Speed Connect™ Drain
7415.801
7415.821
Series
002
068
224
295
Replace the "YYY" with
appropriate finish code
CHROME
BLACKENED BRONZE
OIL RUBBED BRONZE
SATIN NICKEL
M 9 6 5 015 R E V. 1.7
A906652-0070A
ATTACHMENT NUT
/