Page is loading ...

8
2
WIRELESS REMOTE CONTROL
LED LIGHT BAR OWNER’S MANUAL
Model # BRRC124IR
FIG. 1 FIG. 2
1
4
5
6
7
3
FIG. 3
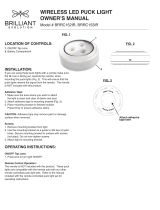
LOCATION OF CONTROLS:
1. ON/OFF Tap Lens
2. Light Battery Compartment
3. Remote Control
4. Power Buttons
5. Dimmer
6. Preset Dimmer
7. Timer
8. Remote Battery Compartment
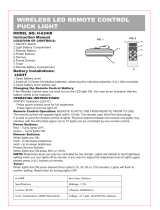
INSTALLATION:
When mounting the LED Light Bar make sure
the icon is facing out, towards the remote (Fig. 3).
This will ensure that the LED Light Bar receives the
signal from the remote.
Adhesive Tape:
1. Make sure the area where you want to attach
the light is clean and clear of debris and dust.
2. Attach adhesive tape to mounting bracket (Fig. 4).
3. Place mounting bracket in desired location.
Press firmly to ensure adhesive sticks.
CAUTION: Adhesive tape may remove paint or damage surface when removed.
Screws:
1. Remove mounting bracket from light.
2. Use the mounting bracket as a guide to drill two (2) pilot holes.
Secure mounting bracket to surface with screws (included). Do not over tighten screws.
3. Attach light to mounting bracket.
OPERATING INSTRUCTIONS:
ON/OFF Tap Lens:
1. Press lens to turn light ON/OFF.
Remote Control Operation: REMOVE PLASTIC TAB FROM REMOTE PRIOR TO USE
The remote control will operate the LED Light Bar within 15 feet. The remote uses Infra Red technology. It is best to point the remote
control at the LED Light Bar. Physical objects between the remote and the LED Light Bar may interfere with the Infra Red signal. Up to 10
LED Light Bars can be controlled by one remote control.
Power Buttons:
Red – Turns LED Light Bar OFF.
Green – Turns LED Light Bar ON.
Dimmer Buttons:
When the LED Light Bar is ON:
Hold - to decrease brightness.
Hold + to increase brightness.
Preset Dimmer Buttons:
When the LED Light Bar is ON press 50% or 100%.
NOTE: Brightness level can only be controlled by the remote. Lights will default to last brightness setting.
Timer:
When the LED Light Bar is ON press desired timer option (15, 30, 60 or 120 minutes). Lights will flash to confirm setting. Reset timer by
turning LED Light Bar OFF.
Attach adhesive tape here
FIG. 4

WARNING:
To reduce the risk of electrical shock, do not put the unit in water or other liquid. To clean, use a soft dry cloth. Do not place or store
appliance where it can fall or be pulled into a tub or sink.
BATTERY PRECAUTIONS:
1. Use only the size and type of batteries specified.
2. Always purchase the correct size and grade of battery most suitable for the intended use.
3. Be sure to follow the correct polarity when installing the batteries as indicated in the battery compartment.
Reversed batteries may cause damage to the device.
4. Do not mix alkaline, standard (Carbon-Zinc), or rechargeable (Nickel Cadmium) batteries.
5. Replace all batteries of a set at the same time. Do not mix old and new batteries.
6. Clean the battery contacts and also those of the device prior to battery installation.
7. Do not dispose of batteries in fire.
8. Remove batteries if consumed or if product is to be left unused for an extended period of time.
INDOOR USE ONLY
ONE-YEAR LIMITED WARRANTY:
This product is warranted to the original purchaser that the product will be free from defects in materials and workmanship for a period of
one year from the date of purchase. Additional details are available at www.brilliantevolution.com.
© 2017 London Johnson, Inc. All Rights Reserved.
www.brilliantevolution.com
Made in China
BATTERIES:
If the LEDs appear to be dim the batteries need to be replaced.
REPLACING THE BATTERIES IN THE LED LIGHT BAR:
1. Remove battery compartment cover.
2. Remove old batteries (if replacing batteries).
3. Insert three (3) new AA batteries (not included)
4. Make sure to follow the battery polarity guide
when installing new batteries (Fig. 5).
5. Replace battery compartment cover.
REPLACING THE BATTERIES IN THE REMOTE CONTROL:
The remote control comes with a CR2025 battery pre-installed. Remove the plastic tab
from the remote prior to use.
This product contains a button battery. If swallowed, it could cause severe injury
or death in just 2 hours. Seek medical attention immediately.
1. Loosen the screw on the bottom of the remote control.
2. Slide out battery compartment.
3. Remove old battery (if replacing battery).
4. Insert one (1) new CR2025 battery.
5. Make sure to follow the battery polarity guide.
6. Replace battery compartment.
7. Tighten screw.
PRODUCT INFORMATION CHART:
Light Output (Lumens)
Correlated Color Temperature (CCT)
Run Time
Batteries (not included)
Number of LEDs
LED Beam Angle
75
3000 (Warm White)
72 hours
AA x 3
4
120º
Dimensions: 9-3/4” wide / 2-3/4” deep / 1-3/8” high
FIG. 5
/