Page is loading ...

LPL 107 4WRCAC Owner's Manual
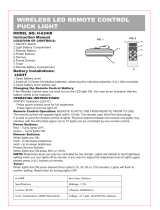
location of Controls
1.
ON/OFF Switch With Selectable Dimmer
2.
Multi-Directional Light Heads
3.
Mounting Bracket*
4.
Battery Compartments*
5.
AC Power Indicator Light
6.
Direct AC Power Port (Marked "DC SV")
7.
AC Link Port (Marked "DC SV")
8.
Link Connector
9.
AC Adaptor - Input Voltage: 100-240V-50/60Hz 1.0A MAX
Output Voltage: SV DC 1.SA
10.
Remote Control
11.
Remote Control Signal Transmitter
12.
Battery Compartment**
13.
ON/OFF Switch With Selectable Dimmer
14.
EZ-Mount Bracket
*On back of unit
** Behind EZ-Mount
Bracket
Installation
Note:
Hook and loop tape may be cut to desired size for easier removal. Remove the mounting bracket if you are using
the hook and loop tape. To do so, hold the light with mounting bracket facing up and the power button facing you. Slide
the mounting bracket to the left and pull up to remove it.
1.
Check the location of where you want to place the Track Light. Make sure it is clean and there is no debris or dust
2.
Two sets of hook and loop tape are included. Place the two pieces of hook and loop tape together so the hook and loop sides adhere to each other. Repeat this step
for the second set of hook and loop tape.
3.
Remove the plastic covering on one sticky side of the tape. Repeat this step for the second set of hook and loop tape.
4.
Place one set of the hook and loop tape in the left and right rectangular recessed areas on the base of the Track Light
5.
Remove the plastic covering on the other sticky side of the tape. Repeat this step for the second set of hook and loop tape.
6.
Place the Track Light in the desired location. Press firmly for five (5) seconds so the tape adheres to the surface.
CAUTION:
Be cautious of what surface the hook and loop adhesive is attached fo, as it may remove paint or damage surface.
Screws and Detachable Bracket (included)
1. Remove both pieces of hook and loop tape by pulling the tape away from the base of the light.
2. Remove the mounting bracket so that it can be used as a template for the screw holes.
To do so, hold the light with mounting bracket facing up and the power button
facing you. Slide the mounting bracket to the left and pull up to remove it.
3. Drill two (2) pilot holes in the location where you want to mount the Track Light. Use the detachable bracket as a guide for the pilot holes.
4. Place screws (included) in pre-drilled holes. Do not over tighten.
5. Clip the Track Light to the detachable bracket by aligning and inserting the posts on the bracket into the keyhole slot openings on the backside of the Track
Light. Slide the light to the left to lock it into position.
6. To remove the Track Light from the detachable bracket, simply slide the light to the right and pull down.
Mounting the Remote Control Hook and Loop Tape (included):
For best operation, mount the remote control within 20 feet of the LED picture light
1.
Check the location of where you want to place the Remote. Make sure it is clean and free of debris and dust
NOTE:
Polishing or cleaning chemicals on surface may reduce the strength of the adhesive.
2.
Remove the paper covering on one side of the hook and loop tape.
3.
Place the hook and loop tape in the recessed area in the center on the back of the Mounting Bracket, sticky side
down.
4. Remove the paper covering from the other side of the hook and loop tape. This is the side you will mount to your
desired surface.
5. Place the Mounting Bracket in the desired location. Press firmly and evenly for five (5) seconds so that the hook and
loop tape adheres to the surface.
CAUTION:
Be cautious of what surface the hook and loop adhesive is attached to, as it may remove paint, plaster
or damage surface when removed.
Screws (included):
You can secure the EZ-Mount Bracket to almost any surface using 2 screws.
To
do so, remove the Remote from the Bracket by sliding it up and out of
Use the Bracket printed paper mounting template for pilot hole positions.
1.
Drill two (2) pilot holes in the location where you want to mount the Remote
Control making sure you are within 20 feet (6 meters) of the LED light
2.
Place screws (included) in pre-drilled holes. Tighten slightly until secure, but do
not tighten all the way.
Slide the EZ-Mount Bracket keyhole slots over screw heads and into position.
3.
Tighten screws to secure the Bracket to the wall. Take care to not over tighten.
4.
Place the Remote Control in the mounting bracket
Operating Directions
Light Positioning
Each of the four light heads may be positioned independently. They can be rotated 330' left or right as well as pivoted up and down for
the desired light positions.
NOTE: Each light head can only be turned 330' left or right (Fig 1 ). To prevent damage to the unit, do NOT overturn the light heads.
Doing so may damage the unit and will void the warranty.
WIRELESS REMOTE CONTROLLED
UNDER CABINET LIGHT
Fig 1
1
2
3
4
5
6
7
8
9
10
11
12
13
14

YOU CAN OPERATE AND CONTROL THE LIGHT TWO WAYS:
Manual Operation Using ON/OFF Switch With Selectable Dimmer On Light
1.
Press once for full brightness.
2.
Press and hold for desired brightness.
3.
Press a third time to turn the light OFF.
Remote Operation Using the Wireless Remote Control
Where you mount the Remote Control in relation to the Track Light will determine how best to control the lights using the Remote Control. The Remote uses Infra Red
technology. This is the same type of technology used in most TV remote controls. As such, physically removing the remote from its Mounting Bracket and pointing it at the
Track
Light may be necessary. For best operation, use the Remote Control within 20 feet of the Track Light.
1.
Press the Remote Control ON/OFF Switch With Selectable Dimmer once to turn the light ON.
2.
Press and hold for desired brightness.
3.
Press the ON/OFF Switch With Selectable Dimmer a third time to turn the light OFF.
NOTE:
It is recommended to mount the Track Light with the Remote Control Signal Receiver facing out toward the Remote Control.
Positioning the Remote Control
For
best operation, we recommend mounting the Remote Control with the Signal Graphic pointing upwards.
AC Power Operation (120V)
Light can be powered by AC Adaptor included with this unit from 120V direct household current. The AC Power Indicator Light will illuminate red when the unit is operating
from direct AC power. Only use the AC adaptor provided with this unit to power the unit. Using a different AC adaptor may damage the unit and will void the warranty.
Powering More than One Light Using Only One AC Adaptor
These lights are designed with a unique Link Connect circuit that allows you to power two lights using only one AC adaptor (in the event you purchase more than one of
our AC powered lights). The Link Connect cord (included) has an input plug on either end. Follow the below listed instructions for linking two units.
Step
1: Plug AC adaptor into Direct AC Power Port marked "DC SV" on one light unit (we will call this Unit 1).
Step
2: Plug input plug from Link Connect cord to opposite port marked "DC SV" on Light Unit
1.
Step
3: Plug the other input plug end from link Connect cord to either port marked "DC SV" on light Unit 2.
NOTE:
You can only connect and power two units from one AC adaptor supplied. Attempting to link more than two units may damage the lights and/or the AC adaptor
and will void the warranty.
Battery Power Operation
Light can also be powered by 6 AAA batteries (not included). As this light contains four high output LEDs, run time from batteries will
be limited. Battery operation is primarily
intended during power outages. It is suggested to use the AC adaptor and direct AC power whenever possible.
Inserting/Replacin
g the
Batteries
If the LEDs appear to be dim this is an indication that your batteries need to be replaced.
1.
Remove the mounting bracket at the back side of the Track Light. To do so, hold the light
with mounting bracket facing up and the power button facing you. Slide the mounting
bracket to the left and pull up to remove it.
2.
Slide the battery compartment covers in towards the center of the unit to open the
battery compartments.
3.
Remove old batteries, if replacing batteries. Insert six new AAA batteries.
4.
Make sure to follow battery polarity guide when installing new batteries
5.
Replace battery compartment housing.
Changing the Remote Control Batteries
If the Remote Control does not work to turn the LED lights ON, this may be an indication that the battery needs to be replaced.
Replacing the Batteries:
1.
Remove the Remote from the EZ-Mount Bracket by pulling it up and out of the bracket.
2.
Using a small phillips head screwdriver, remove the screw on the back of the Remote. As the screw is very small, take care not
to lose after removing. Remove battery compartment cover.
3.
Remove the old battery (if replacing).
4.
Insert new CR2032 battery. Be sure to match the battery polarity guide when installing new battery.
5.
Replace the battery compartment cover and screw (making sure not to overtighten).
This product contains a Button battery. If swallowed, it could cause severe injury or death in just 2 hours,
Seek medical attention immediately,
Battery Precautions:
1.
Use only the size and type of batteries specified.
2.
Always purchase the correct size and grade of battery most suitable for the intended use.
3.
Be sure to follow the correct polarity when installing the batteries as indicated in the battery compartment. Reversed batteries may cause damage to the device.
4.
Do not mix alkaline, standard (Carbon-Zinc), or rechargeable (Nickel Cadmium) batteries.
5.
Replace all batteries of a set at the same time. Do not mix old and new batteries.
6.
Clean the battery contacts and also those of the device prior to battery installation.
7.
Do not dispose of batteries in fire.
8.
Remove batteries if consumed or if product is to be left unused for an extended period of time.
FCC Statement
This device complies with Part 15 of the FCC Rules. Operation is subject to the following two conditions: (1) This
de
vice may not cause harmful interference, and (2) this
device must accept any interference received, including interference that may cause undesired operation.
NOTE: This equipn:ient has been tested and found to comply with the limits for a Class B digital Oevice, pursuant to Part 15 of the FCC Rules. These limits are designed to
provide reasonable protection against harmful interference in a residential installation. This equipment generates, uses and can radiate radio frequency energy and, if not
installed and used in accordance with the instructions, m ay cause harmful interference to radio communications.
However, there is no guarantee that interference will not occur in a particular installation. If this equipment does cause harmfu
l interference to radio or television reception,
which can be
determint1d by turning the equipment Off and on, the user is encouraged to try to correct the interference by one or more of the following measures:
•
Reorient or relocate the receiving antenna.
•
Increase the separation between the equipment and receiver.
•
Connect the equipment into an outlet on a circuit different from that which the receiver is connected.
•
Consult the dealer or an experienced radio/TV technician for help.
WARNING:
Modifications to this product not approved by the party responsible for compliance could void t
he user's authority to operate th
e
product.
Customer Service
Answers to the most commonly asked questions can be found at www.lancerandloader.com
Limited 2 Year Warranty
If you recently purchased the item the quickest option is to return the product to the retailer where the item was purchased. Return policies vary by retailer. If returning
the item to the retailer i s not possible visit www.lancerandloader.com for warranty details and directions on how to have the product repaired or replaced.
050212
© 2012 Lancer & Loader Group LLC. All rights reserved. Custom manufactured in China for lancer and loader Group LLC, New York, NY 10016.
/