Install the Bulldog Valve Robot, Continued.
M
or
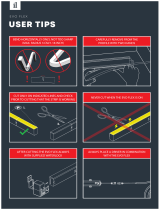
3. Place the upper bracket and lower bracket on the valve, as shown, and loosely tighten
the screws.
4. Position the bracket so that it is aligned with the pivot point of the ball valve, by
visualizing a line between the tab slot and the pivot point, as shown.
5. Remove the screw from the tab slot, then attach the Valve Robot to the bracket.
6. Keeping the center axis of the Valve Robot’s motor shaft aligned with the ball valve
shaft, as indicated by the red dashed line, reinsert and tighten the tab slot screw.
8. Remove the nuts and collars from the two handle supporting bolts, as shown.
9. Place the bolts in the slot on the rocker arm, with one on each side of the valve handle,
as shown.
10. Put the collars back on the bolts. Holding them in place with one hand, insert the
bottom supporting bracket over the end of each bolt, as shown. Insert and loosely
tighten a nut on each bolt. Now, position each bolt/collar so that it is snug against the
valve lever handle, with one on each side of the handle. Using a Phillips screwdriver,
tighten the screw on each bolt/collar assembly, holding the nut in place, as needed.
Confirm that each collar is snug against the handle.
If it is not possible to align the parts as shown, or if the bracket can not be secured to
the ball valve, consider rotating the ball valve handle 180°. After removing the Bulldog,
this can be done by removing the ball valve handle, and then reinstalling it on the other
side. Reinstall the Bulldog (on the other side of the ball valve) and check if alignment is
better in this position.
7. Securely tighten the two screws on the bracket. Gently tug on the Bulldog, and tighten
the screws until the Bulldog is firmly held in place by the bracket and tab screw.
Contact Us
P
We are here for you, if you ever need any
assistance installing, setting up or using
a YoLink app or product!
Need help? For fastest service, please
Or call us at 831-292-4831 (US phone
support hours: Monday - Friday, 9AM to
5PM Pacific)
You can also find additional support and
ways to contact us at:
www.yosmart.com/support-and-service
Or scan the QR code:
Finally, if you have any feedback or
suggestions for us, please email us at
Thank you for trusting YoLink!
Eric Vanzo
Customer Experience Manager
Support
Home Page
15375 Barranca Parkway
Ste. J-107 | Irvine, California 92618
© 2023 YOSMART, INC IRVINE,
CALIFORNIA
Scan the appropriate QR code to watch a short installation video. Visit the Valve
Controller 2 product support page for additional videos and product support resources.
EVO Motorized Valve:EVO Valve Operator:
Power Up, Final Connections & Testing
O
1. The Valve Controller will appear offline until it is turned on and it wirelessly connects
to a YoLink hub. Turn on the Valve Controller by pressing the SET button until you see
the LED blink (red, then green, indicates the Valve Controller 2 has connected to the
cloud).
2. In the app, verify the Valve Controller is indicated as online.
3. Connect the valve controller’s valve control cable to the control cable of the Motorized
Valve or Valve Operator.
4. Connect the valve controller’s valve status cable to the valve status cable of the
Motorized Valve or Valve Operator.
5. If using the power adapter, and before plugging in the power adapter to the AC power
outlet, connect the valve controller’s 12VDC input cable to the power adapter cable. Plug
in the power adapter at the wall outlet.
6. Test the Valve Controller 2 and valve by pressing the SET button on the controller, and
by watching the closing or opening action of the Valve. The valve should open and close
completely (verify no water is flowing through the valve while closed). Also, listen for an
even sound of the motor operating. If the motor appears to be straining, indicated by an
uneven and/or increasing operation sound, this can indicate a problem with the
motorized valve or the valve operator, or a mechanical issue with the existing ball valve
(if applicable). Return to the appropriate installation section and confirm each step was
performed per the instructions. If unable to resolve the matter, please contact our
customer support department. See the contact information at the end of this guide.
7. Test the operation of the Valve Controller 2 from the app. From the Rooms or Favorite
screen, locate your Valve Controller 2, tap the image, then tap Close to turn off the water,
and tap Open to turn it on.
Refer to the full installation and user guide to complete the setup of your Valve
Controller 2.
2. Connect the valve shaft adapter to the shaft of the ball valve. You will first need to
loosen the two screws on the adapter’s plate. Fit the adapter over the ball valve’s shaft.
The flat part of the adapter’s plate will join to one flat side of the ball valve’s shaft, and
the flat, inner, side of the adapter should join the other flat side of the ball valve’s shaft,
as shown in the figure below. (It should not be necessary to remove the plate.) Tighten
the screws, thereby clamping the adapter securely to the shaft of the ball valve.
3. The EVO is shipped with a pair of brackets, in two sizes. To check for the appropriate
size, lower the EVO Valve Operator over the valve shaft adapter, as shown in Figure 1,
below.
Rotate the EVO Valve Operator as needed, to align the square protrusion at the top of the
adapter with the matching square socket at the underside of the EVO Valve Operator. If
needed, swing the brackets out of the way, if they are too large and prevent the EVO
Valve Operator from being seated on top of the adapter.
If placed correctly, the square socket of the EVO Valve Operator will fit over the top of the
valve shaft adapter, locking in place. Move the brackets back in place, as shown. The
brackets may be secured to the ball valve, or to the pipe. If it is not possible to have a
bracket on each end of the EVO Valve Operator as shown, two brackets can be installed
on the same side. In this case, space them as far apart as possible, to provide maximum
stability. The brackets are too big if you can not place them over the pipe, at a right angle
to the pipe, as shown.
The brackets provide stability for the EVO Valve operator while in operation, and they can
be installed in one of numerous configurations as shown below. Ideally, one bracket will
be installed on each side of the valve, and as far apart as possible, but if your application
does not permit this, both brackets can be installed on one side. Select the short or long
bracket that fits best. If a bracket is too big to fit at the location, use the small bracket.
5. Your application will require a pair of large or small adjustable clamps, to secure the
brackets to the pipe (or valve). Choose the smallest appropriate size and thread the
adjustable clamp through both sides of the bracket and around the pipe/valve as shown
in Figure 2 above.
6. Tighten the screw on both adjustable clamps, firmly securing the EVO Valve Operator
to the pipe or valve.
7. Gently tug on the EVO Valve Operator, ensuring there is no looseness or movement of
the EVO Valve Operator away from the ball valve.
8. Mechanically test the EVO Valve Operator prior to connection to the valve controller.
To move the handle on the EVO Valve Operator, you must first depress the clutch pin (the
pin is on the underside of the EVO Valve Operator). Extend the handle, as needed, and
turn it to the closed position. Verify water is completely turned off, by checking from a
faucet.
Top view, before attachment of adapter Side view, after attachment of adapter
VALVE ADAPTER
PLATE BALL VALVE
VALVE ADAPTER
Install the EVO Motorized Valve or Motorized Valve
L
Make a mental note of the orientation of the ball valve handle. If the space is confined, not allowing
the rotation of the handle if in another position, the EVO should be installed with the handle in the
same orientation.
1. Before you can install the EVO Valve Operator on the ball valve, you must first remove
the existing handle. Depending on the ball valve, you will need either an adjustable or
socket wrench, or a screwdriver. Using the appropriate tool, remove the existing handle
and nut, as shown below. If there was a washer on the ball valve, leave it in place.
Install the EVO Valve Operator
NInstall the EVO Valve Operator, Continued.
N
6. Wrap each adapter’s threaded end with thread seal tape, per the tape manufacturer’s
instructions, as shown below.
7. Install the EVO Motorized Valve on the adapter fittings, ensuring a secure connection
at each fitting, as shown below.
8. At the water valve or point of disconnection, turn the water on again.
9. Verify there are no leaks and no visible water on the motorized valve.
Proceed to section L, Power Up, Final Connections & Testing
3. Cut the water pipe through the mark using a pipe cutting tool, then remove the cut
section of pipe, as shown below.
4. Sand both ends of cut pipe, removing any burrs or rough edges. Use care handling the
cut edges, which may be sharp! Wipe off the cut section of pipe with a clean cloth.
5. Install your adapter fittings in the pipe ends, per the manufacturer instructions.
Pivot Point
Tab Slot
Install the Bulldog Valve Robot
M
1. Select the appropriate bracket for your application. The appropriate bracket fit over
the ball valve, and will allow for clamping securely to it when the screws are tightened.
If the bracket does not fits over the ball valve or seems to be too loose, use the other
bracket.
2. Loosen the two screws, to separate the bracket into two pieces, as shown. Figure 1 Figure 2