Page is loading ...

RC-1000 and RC-2000
Programmable Communicating Thermostat
User’s Guide

Contents
About your thermostat ................................................................................................................................. 1
Features:......................................................................................................................................................................1
Getting to know your thermostat’s controls............................................................................................... 2
Getting to know your thermostat’s display (Advanced Display) .............................................................. 4
Filter Reminder ...........................................................................................................................................................4
Getting to know your thermostat’s display (Simplified Display).............................................................. 6
Changing the desired temperature settings ................................................................................................ 7
Changing the thermostat mode.................................................................................................................... 8
About the fan and hold settings ................................................................................................................... 9
About the hold settings ............................................................................................................................... 10
Setting the time and date............................................................................................................................ 11
Modifying the program schedule............................................................................................................... 12
Changing the desired humidity setting (RC-2000)................................................................................... 16
Display the runtime graph of air conditioning and heating usage.......................................................... 17
Document Number 65A17-1, March 2008
Copyright ® 2008 Home Automation, Inc.

About your thermostat
1
About your thermostat
Thank you for purchasing your new Omnistat2 electronic communicating thermostat. Your thermostat will provide you with
comfort, convenience, and energy savings for years to come.
The Omnistat2 is a precision digital thermostat. It has the capability of being controlled both locally and remotely. It offers stand
alone operation, programmability, and communications with automation systems, utility control systems, and personal computers.
Please take a few moments to become familiar with all of the features of your new thermostat by reviewing this guide. A complete
Omnistat2 Owner’s Manual can be downloaded from our web site at www.homeauto.com
.
Features:
x Digitally precise temperature control
x 7 day programmable
x Multicolor backlight, user defined color
x Proximity/motion detector, screen lights up when approached
x Vacation mode
x Easy to navigate menus
x Communicates with automation systems, utility control systems, and personal computers
x Displays outdoor temperature
x Graphical display of HVAC usage, by week
x Filter reminder
x Large graphical display
x Learns the patterns of your house and uses smart control to apply maximum comfort with efficiency
x Automatic heat/cool changeover
x Fan cycle mode
x Humidity sensing
1
x Humidifier control
1
x Dehumidifier control
1
1
Only available on the RC-2000

Getting to know your thermostat’s controls
2
Getting to know your thermostat’s controls
To take advantage of all the benefits and features offered by your new thermostat, we recommend that you start by becoming
familiar with its controls.
Scroll Wheel
Turn to adjust the temperature,
navigate menus, and change
values and settings.
Press for the Main Menu, and to
make or confirm a setting.
Task Buttons
Press to select the task that is displayed
above the respective button.
Proximity/Motion Sensor
The display lights up when
approached, making it easy to
ad
j
ust in the dark of ni
g
ht.
Large Graphical Display
Customizable multicolor backlit display
shows everything necessary to operate
your system and monitor temperature
and humidity.

Getting to know your thermostat’s controls
3
Adjusting the color of the thermostat display:
To adjust the color of the thermostat display press and hold [HOLD] while turning the Scroll Wheel:
Press and hold [HOLD].
While pressing [HOLD], turn the Scroll Wheel to
adjust the color.
When complete, release [HOLD].
The following icons are used throughout this guide:
Turn the Scroll Wheel to the right or to the left.
Press the Scroll Wheel.
Press the Task Button on the left.
Press the Task Button in the middle.
Press the Task Button on the right.
Adjusting the contrast of the thermostat display:
To adjust the contrast of the thermostat display press and hold [FAN]
while turning the Scroll Wheel:
Press and hold [FAN].
While pressing [FAN], turn the Scroll
Wheel to adjust the contrast.
When complete, release [FAN].

Getting to know your thermostat’s display (Advanced Display)
4
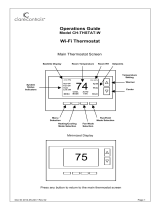
Getting to know your thermostat’s display (Advanced Display)
The following graphics will be displayed on the Home Page when using the Advanced Display:
Filter Reminder
Your thermostat logs the amount of time your heating and cooling system has been running and gives you a reminder when it's time to replace your
filter. “Change Filter” will be displayed on the Message Bar when it is time to change your filter.
Press the Scroll Wheel twice to clear the change filter reminder. Don't forget to change your filter!
Message Bar (6)
Period Indicator (10)
Cool Setting
(2)
Heat Setting
(
3
)
Thermostat Mode
(4)
Relative Humidity (9)
(RC-2000)
Fan Setting (8) Hold Setting (7)
Current Indoor
Temperature
(1)
Status Indicators (5)

Getting to know your thermostat’s display (Advanced Display)
5
(1) Temperature: Displays the current indoor temperature.
(2) Cool Setting:
Displays the desired cool setting.
(3) Heat Setting:
Displays the desired heat setting.
(4) Thermostat Mode: Displays the current system mode: Off, Heat, Cool, Auto, or EM Heat (Emergency Heat for heat pump systems)
(5) Status Indicators:
Cool 1
st
stage of air conditioning system is running
Heat 1
st
stage of heating system is running
Cool 1
st
and 2
nd
stage of air conditioning system is running
Heat 1
st
and 2
nd
stage of heating system is running
Note: The Status Indicators may flash to indicate a start up delay for equipment protection. After a few minutes, the compressor will start
and the Status Indicators will stop flashing.
(6) Message Bar:
The message bar displays messages that you enable. If more than one message type is enabled, the message bar will display
the first message for 4 seconds, and then the next message is displayed. On the advanced display, the available message types are as follows:
Date and Time Outdoor Status (outdoor temperature and/or outdoor humidity) Filter Reminder (time to change the filter)
Energy Status Energy Messages
(7) Hold Setting: Displays the current hold setting: Off, On, or Vacation
(8) Fan Setting:
Displays the current fan mode: Auto, On, or Cycle
(9) Relative Humidity:
Displays the current relative humidity (RC-2000 only).
(10) Period Indicator:
Morn, Day, Eve, or Night is displayed when scheduled temperature changes are made by the thermostat programs.

Getting to know your thermostat’s display (Simplified Display)
6
Getting to know your thermostat’s display (Simplified Display)
The following graphics will be displayed on the Home Page when using the Simplified Display:
(1) Temperature:
Displays the current indoor temperature.
(2) Thermostat Mode:
Displays the current mode: Heat or Cool. If the thermostat is in Off mode, this area is blank.
(3) Temperature Setting:
Displays the desired temperature setting for the current thermostat mode (the mode that is displayed directly above
this setting). If the thermostat is in Off mode, this area is blank.
(4) Status Indicators:
Cool 1
st
stage of air conditioning system is running
Heat 1
st
stage of heating system is running
Cool 1
st
and 2
nd
stage of air conditioning system is running
Heat 1
st
and 2
nd
stage of heating system is running
(5) Time: The current time of day is displayed.
Current Indoor
Temperature
(1)
Temperature Setting
for Current Mode
(3)
Thermostat Mode (2)
Status Indicators (4)
Time
(
5
)

Changing the desired temperature settings
7
Changing the desired temperature settings
To change the desired temperature setting, simply turn the Scroll Wheel. With the first turn of the Scroll Wheel, the
Temperature Settings Page is displayed:
Turn the Scroll Wheel to adjust the temperature setting for the current mode.
To adjust the temperature setting for the opposite mode, press [Heat] or [Cool].
Press the Scroll Wheel or [Ok] when complete.
Press [Heat] to adjust the
Heat Setting
Turn the Scroll Wheel to
adjust the Cool Setting
Press [Cool] to adjust the
Cool Setting
Turn the Scroll Wheel to
adjust the Heat Setting
On the Temperature Settings Page,
you will initially be adjusting the
temperature setting for the current
thermostat mode.

Changing the thermostat mode
8
To change the thermostat mode, press [MODE]. When first pressed, the Mode Setting Page is displayed:
Changing the thermostat mode
¾ In Off mode, the heating and air conditioning systems are both off and do not respond to changes in the temperature
settings.
¾ In Heat mode, the heating system responds to maintain your desired heating temperature setting.
¾ In Cool mode, the air conditioning system responds to maintain your desired cooling temperature setting.
¾ In Auto mode, your thermostat will automatically switch between heat and cool to maintain your desired heating and
cooling temperature settings.
¾ In Emergency Heat mode (for heat pumps with auxiliary heat) the thermostat will turn off the heat pump and use the
auxiliary heating to maintain the heating temperature setting. This mode should only be used if the heat pump is
malfunctioning, because the auxiliary heat costs more to operate than the heat pump.
Turn the Scroll Wheel to scroll through the list of modes.
Press the Scroll Wheel or [Select] to select the highlighted mode.
Press [Cancel] to discard changes and return to the Home Page.
MODE

About the fan and hold settings
9
To change the fan setting, press [FAN]. When first pressed, the Fan Setting Page is displayed:
About the fan and hold settings
¾ In Fan Auto mode, the fan runs only when the system calls for heating or cooling.
¾ In Fan On mode, the fan runs continuously.
¾ In Fan Cycle mode, the fan is cycled on and off every 10 minutes to circulate the air
To change the hold setting, press [HOLD]. When first pressed, the Hold Setting Page is displayed:
Turn the Scroll Wheel to scroll through the list of fan settings.
Press the Scroll Wheel or [Select] to select the highlighted setting.
Press [Cancel] to discard changes and return to the Home Page.
Turn the Scroll Wheel to scroll through the list of hold settings.
Press the Scroll Wheel or [Select] to select the highlighted setting.
Press [Cancel] to discard changes and return to the Home Page.
FAN
HOLD

About the hold settings
10
About the hold settings
In Hold mode, the thermostat will not change the desired temperature settings by program schedule or remote system.
¾ In Hold Off mode, the thermostat responds to program schedule and remote system temperature setting changes.
¾ In Hold On mode, the thermostat ignores program schedule and remote system temperature setting changes.
¾ In Hold Vacation mode, the thermostat ignores program schedule and remote system temperature setting changes for the
duration of your scheduled time away.
When Hold Vacation is selected, you are prompted for heat and cool settings and the number of days that it will hold those settings.
Turn the Scroll Wheel to adjust the desired Cool Settings that the
thermostat will maintain while you are on vacation.
Press the Scroll Wheel or [Next] to highlight the heat setting.
Turn the Scroll Wheel to adjust the desired Heat Settings that the
thermostat will maintain while you are on vacation.
Press the Scroll Wheel or [Next] to highlight the days setting.
Turn the Scroll Wheel to select the number of days (in half day
increments) that the desired temperature settings will remain before
Hold is turned off and the thermostat returns to normal operation.
When temperature settings and number of days have been set, press
[Ok] to active the Hold settings.
Press [Cancel] to discard changes and return to the Home Page.

Setting the time and date
11
Setting the time and date
To set or change the current time and date, press and hold [MODE] for 5 seconds:
Turn the Scroll Wheel to adjust each item for the time and date.
After each item is set, press the Scroll Wheel or [Next] to adjust the next item.
After the time and date has been set, press [Ok] to save it to memory.
Press [Cancel] to discard changes.
Press and hold for
5 seconds.
1) Set the current hour
2) Set the current minutes
3) Set AM or PM
4) Set the month
5) Set the day
6) Set the year

Modifying the program schedule
12
Modifying the program schedule
Your new thermostat has been preprogrammed with energy saving settings according to the ENERGY STAR
®
program. You may
modify the times and temperature settings to maximize energy savings and comfort based on your lifestyle.
Your thermostat may be programmed to adjust the heating and cooling temperature settings up to 4 times per day, with different
times and temperature settings for every day of the week (Monday – Sunday). You may also modify the schedule for a day, and
then copy that schedule to other days. This is especially beneficial if you have the same schedule on weekdays. You can modify a
single day’s schedule and then copy it to the remaining weekdays.
To modify the existing program schedule, press the Scroll Wheel once to display the Main Menu.
Select Program by pressing the Scroll Wheel to
view or change the time schedule for each day of
the week
Main Menu
Turn the Scroll Wheel to highlight the day of week
Press the Scroll Wheel or [Select] to view the time
schedule for the highlighted day.

Modifying the program schedule
13
¾ The time is increased and decreased in 15 minute increments.
¾ To disable a period, set it and the next period to the same time.
The 4 time periods for each day of the week are as follows:
MORNING
This is the time in which you typically awaken in the morning, along the desired temperature settings that will
remain until you leave your home for the day.
DAY
This is the time in which you leave your home for the day, along with the desired temperature settings that will
remain until you return home in the evening.
EVENING
This is the time in which you return home in the evening, along with the desired temperature settings that will
remain until you go to bed at night.
NIGHT
This is the time in which you go to bed at night, along with the desired temperature settings that will remain
until you awake the next morning.
When the desired time is displayed for the selected period, press the Scroll Wheel to highlight the Heat
temperature setting for the selected period on the respective day.
Turn the Scroll Wheel to adjust the time for the selected period on
the respective day. This is the time in which the selected period
starts and the previous period ends.
The time schedules above are preprogrammed
into your thermostat for every day of the week.

Modifying the program schedule
14
Turn the Scroll Wheel to adjust the desired Heat Settings that the
thermostat will maintain for the selected period on the respective day.
When the desired Heat Setting is displayed for the selected period,
press the Scroll Wheel to highlight the Cool temperature setting.
Turn the Scroll Wheel to adjust the desired Cool Settings.
Turn the Scroll Wheel to adjust the desired Cool Settings that the
thermostat will maintain for the selected period on the respective day.
When the desired Cool Setting is displayed for the selected period,
press the Scroll Wheel to highlight the time for the next period on the
respective day.
Make any desired modifications for the selected period.
When the schedule for each period of the respective day is complete,
press [Ok] to save the changes.
When the schedule for each period of the respective day is complete,
press [Copy] to save the changes and copy the schedule to other days in
the week.
Press [Cancel] to discard changes.

Modifying the program schedule
15
Turn the Scroll Wheel to highlight the desired day(s).
Press the Scroll Wheel to check the box next to the day(s) in which
the current schedule will be used.
When the desired days have been selected, press [Ok] to save the
schedule tor each of the checked days.
Press [Cancel] to discard changes.
Notes:
¾ At any time, you can undo changes made to the current schedule on the respective day by pressing [Cancel].
o Select a day from the list of days and modify the program schedule for that day, OR
o Press [Back] twice, to return to the Home Page
¾ When all of the modifications are complete, you can save the schedule for the respective day by pressing [Ok].
o Select a different day from the list of days and modify the program schedule for that day, OR
o Press [Back] twice, to return to the Home Page
¾ When all of the modifications are complete, you can save and copy the schedule for the respective day to any of the other days
in a week by pressing [Copy].
Copying a time schedule to other days
You may copy the program schedule from any given day, and copy it to any other day(s) in a week. After the
schedule for the respective day has been completed, press [Copy].

Changing the desired humidity settings (RC-2000)
16
Changing the desired humidity setting (RC-2000)
To change the desired temperature setting, press the Scroll Wheel once to display the Main Menu.
Main Menu
Turn the Scroll Wheel to highlight Humidity.
Press the Scroll Wheel or [Select] to view the
humidity settings.
Turn the Scroll Wheel to adjust the desired
humidity and dehumidify setting.
Press the Scroll Wheel or [Next] to switch
between the humidity and dehumidify setpoints.
When humidity settings have been set, press [Ok]
and then [Back] to return to the Home Page.
Press [Cancel] two times, to discard changes and
return to the Home Page.

Display the runtime graph of air conditioning and heating usage
17
Display the runtime graph of air conditioning and heating usage
To view a System Runtime graph of air conditioning and heating usage over the past 4 weeks, press the Scroll
Wheel once to display the Main Menu.
System Runtime Bar Graph 0-3:
This area displays the bar values and hours that the air conditioning and/or heating
system operated in the current week (Week 0) and in the three previous weeks (Weeks 1-3), respectively.
Main Menu
Turn the Scroll Wheel to highlight Runtime Graph.
Press the Scroll Wheel or [Select] to view the
runtime graph of air conditioning and heating
usage over the past 4 weeks.
Press the Scroll Wheel to return to the Main
Menu.
Press [Back] to return to the Home Page.

Changing the desired humidity settings (RC-2000)
This thermostat has been tested and found to comply with the requirements of the European Union for Electromagnetic
Interference, Electromagnetic Immunity and Safety under the applicable EMI and Low Voltage Directives and Standards.
As an EPA ENERGY STAR
®
Partner, Home Automation, Inc. has determined that this thermostat meets the ENERGY
STAR guidelines for energy efficiency.
This thermostat has been tested and found to comply with the limits for a Class B digital device, pursuant to part 15 of the
FCC Rules.
This product generates and can radiate radio frequency energy. Due to its low power design, it is unlikely to interfere with
radio and TV communications. If it is suspected of doing so, the user is encouraged to try to correct the problem by
reorienting the receiver's antenna, moving the receiver away from the product, or consulting an experienced radio/TV
technician for help.
HAI New Orleans, LA USA
FCC
/