Epson 4:3 Height-Adjustable Cart Solution User guide
- Category
- Projector accessories
- Type
- User guide
This manual is also suitable for

Epson_CART - Version 2012_A - May 8 2012 - Copernicus Educational Products Inc.
Please Recycle
Epson_CART_2012_A
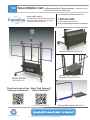
This Assembly Guide provides instructions
to build the Epson Mobile Cart for Epson
Ultra Short Throw Projectors.
For assistance, please contact us:
1-800-267-8494
Email [email protected]
Have your packing slip ready for reference
PLEASE KEEP THIS GUIDE WITH THE PRODUCT
Base Frame
(CEPCART1 or 2)
Optional (CEPCART3)Lock Box
Epson Mobile Cart for Epson Ultra Short Throw Projectors - Assembly Guide
Epson
CART
Optional (CEPCART5)Side Laptop
Optional
Keyboard Tray
Rear Laptop &
(CEPCART4)
470/475W/475Wi/480/480i/485W/485Wi
Check out some of our
other great products!
Need Tech Support?
Have a Question?
Email our Tech Support Service

Epson_CART - Version 2012_A - May 8 2012 - Copernicus Educational Products Inc.
For assistance, please contact us:
1-800-267-8494
Email [email protected]
Have your packing slip ready for reference
Table of Contents
Tips for Assembly................................................................................................3
Frequently Asked Questions...............................................................................4
Part Lists.............................................................................................................5
Assemble the Base Frame (CEPCART1 or 2)...................................................10
Assemble the Optional Rear Laptop Arm (CEPCART4).....................................19
Assemble the Optional Keyboard Tray (CEPCART4).........................................25
Assemble the Optional Side Laptop Arm (CEPCART5)......................................27, 28, 44
Installing Stop Bolt..............................................................................................38
Assemble the Optional Lock Box (CEPCART3)..................................................40
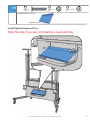
Setting up the Projector for Use..........................................................................47
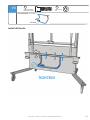
Routing Cables on the Unit.................................................................................48
Tips for Use.........................................................................................................49,50
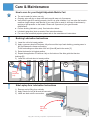
Care & Maintenance............................................................................................51
To validate your three year frame warranty, submit the ON-LINE form at www.copernicused.com
Enter a drawing to win a Copernicus Product for your classroom at the same time!
Validate Your Warranty
3
Warranty
Year
Frame
Epson Mobile Cart for Epson Ultra Short Throw Projectors - Assembly Guide
Epson
CART
470/475W/475Wi/480/480i/485W/485Wi
Epson_CART_2012_A
This Assembly Guide provides instructions
to build the Epson Mobile Cart for Epson
Ultra Short Throw Projectors.
2

Epson_CART - Version 2012_A - May 8 2012 - Copernicus Educational Products Inc.
This symbol denotes a 2- or 3- Person Task. For safety, please ensure that there are the
suggested number of people working on steps displaying this symbol.
Watch for this symbol throughout the Assembly Guide. Wherever you see it, pay close
attention. The symbol denotes a step needing extra attention to ensure it is done
correctly.
The star symbol highlights an advisory note.
!
Watch for These Helpful Symbols
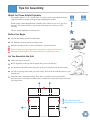
Before You Begin
As You Assemble the Unit
Lay out and identify all of the included parts.
The hardware has been packed according to step.
Read the assembly guide over once to familiarize yourself with them.
Please note that in its unassembled state, this product contains parts that can be
hazardous to small children. This product should be assembled by an adult.
2-Person Task
!
3-Person Task
Tips for Assembly
Hole indents should
always be to the outside
!
Follow the steps in sequence.
Before beginning each step, find the part(s) that you need for that step.
Pay attention to the labels on the parts; they are there to help direct you at certain stages.
The title of each step states what you will be doing. Review the text and the pictures as you
build the unit.
Some holes have indented the tubing. These holes are marked with a red dot sticker.
Anywhere there is an indent or red dot sticker, it should face towards the outside of the unit.
See image below:

Epson_CART - Version 2012_A - May 8 2012 - Copernicus Educational Products Inc.
For parts and other issues regarding the frame:
- The height adjust system is not working.
missing
- The gas cylinders are not working properly.
- I lost the key to my lock box.
Please call Copernicus Customer Service,
1-800-267-8494. Monday - Friday 8:00am - 4:30 pm EST.
My interactive board isn’t working, who should I call?
Please call the reseller that you bought the product from first (reseller information
can be found on your packing slip).
My projector isn’t working, who should I call?
Please call the reseller that you bought the product from first (reseller information
can be found on your packing slip), OR please call Epson Customer Service at:
United States 562-276-4394 or Canada 905-709-3839.
where we will be happy to help.
Customer Service - FAQ’s
?
?
?
Need Tech Support?
Have a Question?
Email our Tech
Support Service
Dear Educator,
Thank you for purchasing one of our products.
I hope the assembly of your Epson Mobile Cart went well.
If you have any questions, or concerns, or ideas for how we can improve, please call us at 1-800-267-8494,
where someone will be happy to help.
Enjoy using your new product, and happy teaching,
Quality schools are the
result of quality teachers
going above and beyond
the call of duty.
VICKI CARUANA
A liberal education is at
the heart of a civil society,
and at the heart of a
liberal education is the act
of teaching.
A. BARTLETT GIAMATTI
My idea of education is
to unsettle the minds of
the young and inflame
their intellects.
ROBERT MAYNARD
HUTCHINS
Develop a passion for
learning. If you do, you
will never cease to grow.
ANTHONY J. D’ANGELO
Jim Phillips
President

Epson_CART - Version 2012_A - May 8 2012 - Copernicus Educational Products Inc.
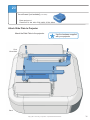
Frame slide
(1)
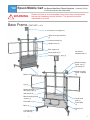
Base Frame (CEPCART1 or 2)
Base (1)
Handle insert (4)
Lift handle (1)
4” swivel total
lock caster (4)
Top clamp (2)
Front cover
(1)
Board mounting frame
- bottom (1)
Bottom cover (1)
Center slide
pole (1)
Board mounting
frame - supports
(2)
Projector arm support (1)
Support stretcher - grey (1)
Protective handle (2)
Upper frame pre-assembly
(1)
Slide handle (1)
Back support (2)
Support stretcher
with spring clips (1)
Leg (2)
Short stretcher (2)
Board mounting
frame - top (1)
Please note that in its unassembled state, this product contains parts
that can be hazardous to small children. This product should be
assembled by an adult.
!
WARNING
Epson Mobile Cart for Epson Ultra Short Throw Projectors - Assembly Guide
Epson
CART
Not Shown:
Adapter Plate (1)
470/475W/475Wi/480/480i/485W/485Wi
5

Epson_CART - Version 2012_A - May 8 2012 - Copernicus Educational Products Inc.
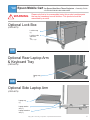
Optional Lock Box
(CEPCART3)
Optional Side Laptop Arm
(CEPCART5)
Optional Rear Laptop Arm
& Keyboard Tray
(CEPCART4)
OR
OR
Lock box side
with door
(2)
1 left, 1 right
Lock box top
(1)
Laptop extension
arm (1)
Laptop rotation
arm (1)
Laptop tray
(1)
Laptop tray
(1)
Please note that in its unassembled state, this product contains parts
that can be hazardous to small children. This product should be
assembled by an adult.
!
WARNING
Epson Mobile Cart for Epson Ultra Short Throw Projectors - Assembly Guide
Epson
CART
470/475W/475Wi/480/480i/485W/485Wi
6

Epson_CART - Version 2012_A - May 8 2012 - Copernicus Educational Products Inc.
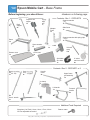
Short stretcher
2x
Contents - Box 1 - CEPCART0
Leg
2x
Before beginning, you should have:
Back
support
2x
Center
slide
pole
1x
Protective
handle
2x
Support stretcher with spring clips
- chrome
1x
Support stretcher
- grey
1x
Slide frame
1x
Slide handle
1x
Front cover
1x
Bottom cover
1x
Projector arm
support
1x
Base
1x
Board mounting
frame - top
1x
Board mounting
frame - bottom
1x
4” swivel
total lock caster
4x
Handle
insert
4x
Lift handle
1x
Upper frame
pre-assembly
1x
Wrenches (2 of Each): 10mm, 13mm, 17mm, 19mm
OR Two adjustable wrenches
Rubber mallet
Hardware on following page.
Split black
wire loom
1x
Velcro®
strap
12x
Top clamp
2x
Contents - Box 2 - CEPCART1 or 2
Additional Tools Required
Board mounting
frame - support
2x
Epson Mobile Cart - Base Frame
Epson
CART
Adapter
Plate
1x
7

Epson_CART - Version 2012_A - May 8 2012 - Copernicus Educational Products Inc.
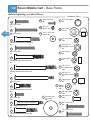
M6 x 90mm bolt
2x
Before beginning, you should have:
In Box 1
Hardware - Box 1
front
side
M6 x 30mm bolt
1x
A
M6 x 50mm bolt
11x
B
Partially threaded M10 x 55mm bolt
2x
C
Partially threaded M8 x 65mm bolt
1x
E
Partially threaded M8 x 95mm bolt
1x
F
G
Partially threaded M8 x 35mm bolt
8x
H
M6 x 19mm Bolt
10x
I
M13 lock washer
4x
L
M13 acorn
nut 4x
M
M8 lock nut
with plastic insert
18x
R
M6 lock washer
12x
N
M10 lock nut
with plastic insert
4x
O
M6 keps nut
3x
P
M6 barrel nut
12x
W
M8 lock washer
12x
V
Small spacer
1x
Q
M8 flat
washer
16x
U
M6 lock nut
with plastic insert
3x
S
front
side
Large spacer
4x
T
M6 x 45mm bolt
1x
D
M8 x 50mm Shoulder Bolt
1x
used only in special instances
J
Partially threaded M8 x 50mm bolt
4x
K
M8 extra large
flat washer
4x
Y
M6 x 40mm bolt
2x
X
BB
M6 x 35mm bolt
2x
Epson Mobile Cart - Base Frame
Epson
CART
M4 x 16mm bolt
6x
DD
EE
M4 lock
washer 6x
FF
9/16” x 11/64” flat
washer 6x

Epson_CART - Version 2012_A - May 8 2012 - Copernicus Educational Products Inc.
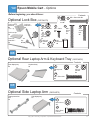
Lock box
key
2x sets
Lock box side
with door
2x
1 left, 1 right
Before beginning, you should have:
Optional Lock Box (CEPCART3)
Optional Side Laptop Arm (CEPCART5)
Optional Rear Laptop Arm & Keyboard Tray (CEPCART4)
OR
OR
Laptop extension
arm
1x
Contents
Rear laptop tray
1x
Contents
Lock box top
1x
Lock box
stretcher 1
1x
Lock box
stretcher 2
1x
M6 keps nut
2x
P
M6 x 35mm bolt
2x
BB
M6 lock
washer
2x
N
M8 lock nut
2x
R
M8 x 40mm
bolt 2x
CC
M6 lock washer
4x
N
M6 keps nut
7x
P
M6 x
50mm
bolt
7x
M5 x 13mm
bolt
4x
Z B
Keyboard tray
1x
Side laptop tray
1x
M6 x
35mm
bolt
2x
BB
Contents
AA
M5 keps
nut 4x
9
M8 lock
washer
4x
V
M6
barrel nut
4x
W
M6 x 40mm bolt 2x
X
Epson Mobile Cart - Options
Epson
CART

Epson_CART - Version 2012_A - May 8 2012 - Copernicus Educational Products Inc.
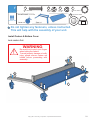
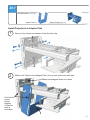
Install Casters & Bottom Cover
Caster x 4
You will need: (not to scale)
Do not tighten any fasteners, unless instructed.
This will help with the assembly of your unit.
1
Actual Size:
M
L
M
L
M
L
M
L
A
N
P
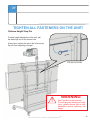
Lock casters first.
Base x 1 Bottom cover x 1
2-Person Task
M13 lock washer
4x
L
M13 acorn nut 4x
M
M6 x 30mm bolt
1x
A
M6 lock
washer 1x
N
M6 keps
nut 1x
P
!
WARNING
Be careful not to pinch your fingers
when locking the casters.
To avoid property damage or bodily
injury please ensure casters are
locked before proceeding with
assembly.
10

Epson_CART - Version 2012_A - May 8 2012 - Copernicus Educational Products Inc.
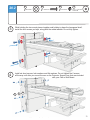
Partially
threaded M8 x 50mm bolt 2x
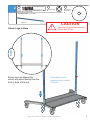
Leg x 2
You will need: (not to scale)
2
K
Attach Legs to Base
!
Ensure legs are aligned the
correct way when looking from the
front or back of the unit.
CAUTION
Maximum recommended weight on
bottom shelf - 50 lbs.
!
Hole indents should
always be to the outside
of the unit.
K
M8 lock washer
2x
V
M8 extra large
flat washer
2x
Y
K
V
Y
K
V
Y
11

Epson_CART - Version 2012_A - May 8 2012 - Copernicus Educational Products Inc.
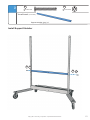
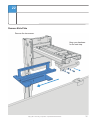
3
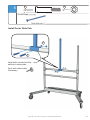
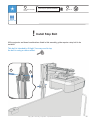
Install Support Stretcher
Support stretcher (grey) x 1
M6 x 50mm bolt
2x
B
M6 lock washer
2x
N
You will need: (not to scale)
Actual Size:
B
N
B
N
12

Epson_CART - Version 2012_A - May 8 2012 - Copernicus Educational Products Inc.
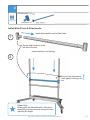
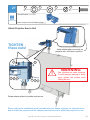
Slide frame x 1
You will need: (not to scale)
4
Install Slide Frame & Slide Handle
Slide handle x 1
1
2
Insert slide handle in end of slide frame.
Insert assembly over the legs.
Ensure both sides have a
black plastic bushing in the
top.
!
2-Person Task
Ensure slide handle is on the
left side of the unit.
Please Note:
Sliding parts are lubricated with a Petroleum
based jelly to ensure smooth movement when
adjusting the height.
13

Epson_CART - Version 2012_A - May 8 2012 - Copernicus Educational Products Inc.
You will need: (not to scale)
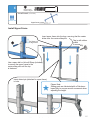
5
Actual Size:
Partially threaded
M10 x 55mm bolt
2x
C
M10 lock nut
2x
O
Install Center Slide Pole
Center slide pole x 1
Install bolt in circular hole first,
and then in oblong hole.
Tap in with rubber mallet
if necessary.
C
O
14

Epson_CART - Version 2012_A - May 8 2012 - Copernicus Educational Products Inc.
You will need: (not to scale)
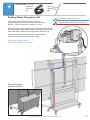
6
Install Upper Frame
Upper frame pre-assembly x 1
Use a spare bolt or Velcro® Strap (included)
to secure the upper frame to the
center slide pole until the top
is fastened.
Insert upper frame into the legs, ensuring that the center
slides over the center slide pole.
2-Person Task
Pull frame up
to align holes
Insert detent pin (attached to upper frame)
in hole.
Tap in with rubber
mallet
if necessary.
Bolt from Extra
hardware bag 1x
Please Note:
Sliding parts are lubricated with a Petroleum
based jelly to ensure smooth movement when
adjusting the height.
15

Epson_CART - Version 2012_A - May 8 2012 - Copernicus Educational Products Inc.
You will need: (not to scale)
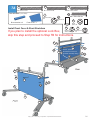
7A
Install Front Cover & Short Stretchers
Short stretcher x 2 Front cover x 1
Front
If you plan to install the optional Lock Box,
skip this step and proceed to Step 7B for instructions.
M6 x 50mm bolt 3x
B
M6 lock
washer 2x
N
M6 keps nut
2x
P
M6 x 45mm bolt 3x
D
Small
spacer 1x
Q
front
side
X
D
V
X
N
B
N
B
B
W
Rear
P
Q
P
Item Q - spacer
sits between front cover
and base assembly tubing
B
N
W
V
W
X
V
W
V
W
V
M6 x 40mm bolt 2x
X
M8 lock washer
4x
V
M6 barrel nut
4x
W
V
W
M6 x 35mm bolt 2x
BB
BB
BB
BB
16

Epson_CART - Version 2012_A - May 8 2012 - Copernicus Educational Products Inc.
Item Q - spacer
sits between front cover
and base assembly tubing
P
Q
You will need: (not to scale)
7B
Actual Size:
Install Front Cover & Short Stretchers
Short stretcher x 2 Front cover x 1
M6 x 50mm
bolt 2x
B
If you plan to install the optional Lock Box
Front
Rear
M6 lock
washer 2x
N
M6 keps
nut 1x
P
M6 x 45mm
bolt 1x
D
Small
spacer 1x
Q
front
side
N
B
N
B
D
17

Epson_CART - Version 2012_A - May 8 2012 - Copernicus Educational Products Inc.
You will need: (not to scale)
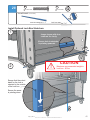
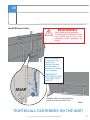
8
Install Back Supports & Secure Short Stretchers
Back supports x 2
M6 x 50mm bolt
4x
B
M6 lock
washer 4x
N
B
K
N
V
Hole indents should
always be to the outside
of the unit.
Y
Partially
threaded M8 x 50mm bolt 2x
K
K
M8 lock
washer 2x
V
M8 extra large
flat washer
2x
Y
B
N
B
N
18

Epson_CART - Version 2012_A - May 8 2012 - Copernicus Educational Products Inc.
You will need: (not to scale)
9
Actual Size:
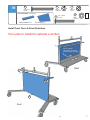
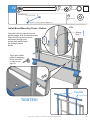
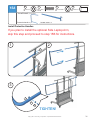
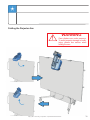
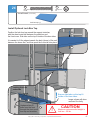
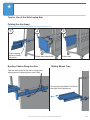
Install Rear Support Stretcher
Support stretcher with spring clips (chrome) x 1
If you plan to install the optional Rear Laptop Arm
OR
1
2
Laptop tray can be installed on
either the left or right hand side.
You will need: (not to scale)Option
Laptop tray x 1
M6 x 50mm
bolt 2x
B
M6 lock washer
2x
N
B
N
N
B
B
N
N
B
CAUTION
Maximum recommended weight
on rear laptop arm - 20 lbs.
!
Slide laptop tray assembly
onto support stretcher
until the spring clips pop
through the laptop tray
assembly.
Ensure spring clip
is turned towards the
inside of the unit.
2-Person Task
19

Epson_CART - Version 2012_A - May 8 2012 - Copernicus Educational Products Inc.
You will need: (not to scale)
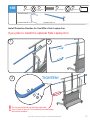
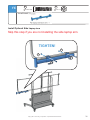
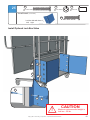
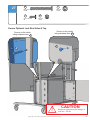
10
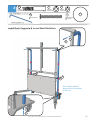
Board mounting frame - support x 2
M8 lock
nut 4x
R
Install Board Mounting Frame - Top & Projector Arm Support
1
Board mounting frame - top x 1
Actual Size:
R
R
LEAVE VERY LOOSE
Ensure tabs are all on one side.
20
Page is loading ...
Page is loading ...
Page is loading ...
Page is loading ...
Page is loading ...
Page is loading ...
Page is loading ...
Page is loading ...
Page is loading ...
Page is loading ...
Page is loading ...
Page is loading ...
Page is loading ...
Page is loading ...
Page is loading ...
Page is loading ...
Page is loading ...
Page is loading ...
Page is loading ...
Page is loading ...
Page is loading ...
Page is loading ...
Page is loading ...
Page is loading ...
Page is loading ...
Page is loading ...
Page is loading ...
Page is loading ...
Page is loading ...
Page is loading ...
Page is loading ...
-
 1
1
-
 2
2
-
 3
3
-
 4
4
-
 5
5
-
 6
6
-
 7
7
-
 8
8
-
 9
9
-
 10
10
-
 11
11
-
 12
12
-
 13
13
-
 14
14
-
 15
15
-
 16
16
-
 17
17
-
 18
18
-
 19
19
-
 20
20
-
 21
21
-
 22
22
-
 23
23
-
 24
24
-
 25
25
-
 26
26
-
 27
27
-
 28
28
-
 29
29
-
 30
30
-
 31
31
-
 32
32
-
 33
33
-
 34
34
-
 35
35
-
 36
36
-
 37
37
-
 38
38
-
 39
39
-
 40
40
-
 41
41
-
 42
42
-
 43
43
-
 44
44
-
 45
45
-
 46
46
-
 47
47
-
 48
48
-
 49
49
-
 50
50
-
 51
51


Epson 4:3 Height-Adjustable Cart Solution User guide
- Category
- Projector accessories
- Type
- User guide
- This manual is also suitable for
Ask a question and I''ll find the answer in the document
Finding information in a document is now easier with AI
Related papers
-
Epson LS500B User guide
-
-
Epson V12H706020 Datasheet
-
-
Epson BrightLink 455Wi Datasheet
-
Epson V11H452520T Datasheet
-
Epson PowerLite 475W Installation guide
-
Epson BrightLink 697Ui Installation guide
-
Sharp EB-475W Owner's manual
-
Other documents
-
ROOMS TO GO 41434337 Assembly Instructions
-
Crosley Furniture CO600148-BK Operating instructions
-
HUANUO Keyboard Tray Under Desk Installation guide
-
Home Styles 5554-3385C Operating instructions
-
-
POLYWOOD PWS117-1-11NT Operating instructions
-
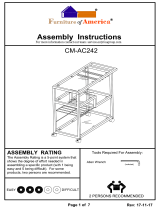 Furniture of America IDF-AC242 Installation guide
-
POLYWOOD PWS118-1-11TE Operating instructions
-
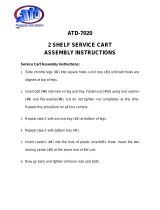 ATD Tools ATD-7020 Assembly Instructions
-

