Page is loading ...

Contents Page:
Part 2: Installation instructions class 806
1. Items of the sewing unit delivered
. . . . . . . . . . . . . . . . . . . . . . . . . . . . . . . . . 3
2. Installing the sewing unit
2.1 Transport safety devices . . . . . . . . . . . . . . . . . . . . . . . . . . . . . . . . . . . . . . . 4
2.2 Balancing the sewing unit . . . . . . . . . . . . . . . . . . . . . . . . . . . . . . . . . . . . . . . 5
2.3 Assembling the reel stand . . . . . . . . . . . . . . . . . . . . . . . . . . . . . . . . . . . . . . . 5
2.4 Assembling the stacker plate . . . . . . . . . . . . . . . . . . . . . . . . . . . . . . . . . . . . . 5
2.5 Assembling the DAC control unit . . . . . . . . . . . . . . . . . . . . . . . . . . . . . . . . . . . 5
3. Covers
3.1 Removing the covers above the table . . . . . . . . . . . . . . . . . . . . . . . . . . . . . . . . 7
3.2 Removing the covers below the table . . . . . . . . . . . . . . . . . . . . . . . . . . . . . . . . 7
3.3 Fitting the covers above the table . . . . . . . . . . . . . . . . . . . . . . . . . . . . . . . . . . 9
3.4 Fitting the covers below the table . . . . . . . . . . . . . . . . . . . . . . . . . . . . . . . . . . 9
4. Electrical connection
4.1 Checking the nominal voltage . . . . . . . . . . . . . . . . . . . . . . . . . . . . . . . . . . . . 10
4.2 Checking the step-motor setting . . . . . . . . . . . . . . . . . . . . . . . . . . . . . . . . . . . 10
5. Pneumatic connection
. . . . . . . . . . . . . . . . . . . . . . . . . . . . . . . . . . . . . . . . 11
6. Refilling the oil
6.1 Head no. 806-121 . . . . . . . . . . . . . . . . . . . . . . . . . . . . . . . . . . . . . . . . . . . 12
6.2 Head no. 806-111 . . . . . . . . . . . . . . . . . . . . . . . . . . . . . . . . . . . . . . . . . . . 13
6.3 Regulating the lubrication of the shuttle . . . . . . . . . . . . . . . . . . . . . . . . . . . . . . . 13
6.4 Lubricating wicks and felts . . . . . . . . . . . . . . . . . . . . . . . . . . . . . . . . . . . . . . 14
7. Initial operation
7.1 Checking the machine adjustment . . . . . . . . . . . . . . . . . . . . . . . . . . . . . . . . . . 15
7.2 Selecting the machine class . . . . . . . . . . . . . . . . . . . . . . . . . . . . . . . . . . . . . 15
7.3 Residual thread monitor (only 806-121) . . . . . . . . . . . . . . . . . . . . . . . . . . . . . . . 15
7.4 Transfer plate . . . . . . . . . . . . . . . . . . . . . . . . . . . . . . . . . . . . . . . . . . . . . . 16
7.4.1 Setting reference point . . . . . . . . . . . . . . . . . . . . . . . . . . . . . . . . . . . . . . . . 16
7.4.2 Position balancing . . . . . . . . . . . . . . . . . . . . . . . . . . . . . . . . . . . . . . . . . . . 17
7.4.3 Carrying out the position balancing . . . . . . . . . . . . . . . . . . . . . . . . . . . . . . . . . 18
7.5 Test run . . . . . . . . . . . . . . . . . . . . . . . . . . . . . . . . . . . . . . . . . . . . . . . . . 20
Home

1. Items of the sewing unit delivered
The items delivered depend on your order. Before installing the unit
please check whether all parts required have been received.
–
Basic equipment provided with sewing head no. 271 for light
sewing material or sewing head no. 467 for medium to heavy
sewing material depending on the subclass.
–
Additional equipment
–
Supplementary hardware
3

2. Installing the sewing unit
CAUTION
The sewing unit may only be installed by skilled personnel.
2.1 Transport safety devices
The following units are secured by means of transport safety devices:
–
Sewing head
–
Stacker
–
Transfer carriage
–
Folding device
Removing the transport safety devices
–
Remove the covers above the table according to section 3.1.
–
Loosen the screws 2 of the transport safety device on the sewing
head.
–
Remove the transport safety device 3.
–
Remove the holding straps on the stacker.
–
Tilt the stacker forward.
–
Remove the holding straps on the transfer carriage.
–
Remove the holding straps on the cylinder 1 of the folding device.
–
Remove the wooden block on the cylinder 1.
–
Mount the covers above the table according to section 3.3.
1
2
3
4

2.2 Balancing the sewing unit
The four feet 6 serve to centre the sewing unit. Make sure that the
weight is evenly distributed on the four feet.
–
Place a level on the stand.
–
Loosen the locknut 7.
–
Alter the height by turning the foot 6.
–
Tighten the locknut 7.
2.3 Assembling the reel stand
–
Insert the reel stand 1 in the bore hole of the reel-stand carrier 3.
–
Clamp the reel stand with the clamping lever 2 so that the thread
guide runs in parallel to the head of the sewing machine.
2.4 Assembling the stacker plate
–
Clamp the stacker plates for the pocket cuts on the supporting
barÿ4 using two fixing screws.
–
Align the stacker plates for the sewing material.
2.5 Assembling the DAC control unit
–
Put the DAC control unit into the bore hole 5 of the folding station
cover.
–
Fix the DAC control unit using the fixing screw.
–
Insert the plug into the back of the DAC control unit.
1
2
3
4 5
6 7
5


3. Covers
3.1 Removing the covers above the table
Make absolutely sure to remove the covers above the table in the
order described below.
Cover 6 sewing head
–
Loosen the clamping on the reel stand.
–
Pull the reel stand up and out.
–
Move the cover to the right and lift it off.
Cover 5 carriage
–
Remove the cover by lifting it off.
Cover 1 folding station
–
Loosen the fixture of the control.
–
Pull the control up and remove it.
–
Pull the cover up and remove it.
At the same time pay attention to the control-panel guide.
3.2 Removing the covers below the table
Cover 10 on the left at the back and cover 11 on the right at the
back
–
Pull the covers up and remove them towards the front.
Covers 4 on the left at the front and Cover 7 on the right at the
front
–
Pull the covers up and remove them towards the front.
Cover 2 left-hand side
–
Dismantle the stacker plates.
–
Pull the covers up and remove them towards the front.
Cover 9 right-hand side
–
Pull the covers up and remove them towards the front.
Cover 8 Stacker
–
Swing the stacker plate towards the machine.
–
Loosen all 7 fixing screws.
–
Pull the cover off towards the front.
7


3.3 Fitting the covers above the table
Make absolutely sure to assemble the covers in the order described
below.
Cover 1 folding station
–
Put the cover in place from above.
At the same time pay attention to the control-panel guide.
–
Put the control in place from above.
–
Fix the control using the fixing screws.
Cover 5 carriage
–
Put on the cover from above so that it is nested in the
folding-station cover.
Cover 6 sewing head
–
Put the cover into the guide of the carriage cover from the right.
–
Insert the reel stand from above.
–
Tighten the fixture on the reel stand.
–
Secure the cover with the lock.
3.4 Fitting the covers below the table
Cover 10 on the left at the back and cover 11 on the right at the
back
–
Put the cover into the guiding hooks below.
–
Pull the cover up and insert it into the guiding hooks above.
The cover is locked by the springs on the lower guiding hooks.
Cover 4 on the left at the front and cover 7 on the right at the front
–
Pull the covers up and remove them towards the front.
–
Secure the cover 7 with the lock.
Cover 2 left-hand side
–
Put the cover into the guiding hooks below.
–
Pull the cover up and insert it into the guiding hooks above.
The cover is locked by the springs on the lower guiding hooks.
–
Assemble the stacker plates.
Cover 9 right-hand side
–
Put the cover into the guiding hooks below.
–
Pull the cover up and insert it into the guiding hooks above.
The cover is locked by the springs on the lower guiding hooks.
–
Secure the cover with the 2 locks.
Cover 8 Stacker
–
Swing the stacker forward.
–
Put on the cover from above.
–
Tighten all 7 fixing screws.
–
Swing the stacker back.
9

4. Electrical connection
CAUTION
All work on the electrical equipment of the sewing unit may only be
carried out by skilled electricians or persons specifically trained to do
the job.
The plug must be disconnected from the mains.
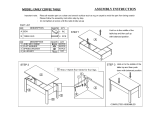
4.1 Checking the nominal voltage
Make sure the nominal voltage as indicated on the name plate and the
line voltage are the same.
4.2 Checking the step-motor setting
CAUTION
Before initial operation the step-motor settings must be checked.
Wrong step-motor settings can cause damage to the sewing unit.
–
Remove the cover 1 on the left at the back. (see section 3.2)
–
The parameter switches 04 must all be in the "OFF" position.
–
The power select switch 05 must be in the "F" position.
–
Assemble the cover 1 on the left at the back (see section 3.4).
ON ON
F F
Ready Ready
Fault Fault
Temp Temp
OverVolt OverVolt
Low Volt Low Volt
04
05
04
1
10

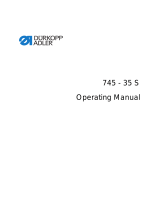
5. Pneumatic connection
CAUTION
The following instructions must be observed if the pneumatic control is
to function properly.
The compressed-air ductwork system must be designed for a minimum
operating pressure of 5 bar to be maintained even at the moment of
peak air consumption.
The pneumatic system of the sewing unit must be supplied with
waterless compressed air.
The line pressure must be between 8 and 10 bar.
Connecting the compressed-air conditioner
–
Connect the hose 4 to the compressed-air ductwork system by
means of a type R 1/4" hose coupling.
–
Open the shut-off valve 3.
Adjusting the operating pressure
The operating pressure is 6 bar. It can be read off the pressure
gaugeÿ2.
–
Increase pressure = lift rotating handle 1 and turn clockwise.
Reduce pressure = lift rotating handle 1 and turn anti-clockwise.
1
2
3
4
11

6. Refilling the oil
The oil reservoir should be filled only with
ESSO SP-NK 10
or an
equivalent oil of the following specification:
–
viscosity at 40°C : 10 mm2/s
–
flashpoint: 150 °C
ESSO SP-NK 10
can be obtained from DÜRKOPP ADLER AG sales
outlets.
Caution: danger of injury
Oil can cause skin rashes.
Avoid protracted contact with the skin.
Wash thoroughly after contact.
IMPORTANT
The handling and disposal of mineral oils are governed by legal
provisions.
Take used oil to an authorised acceptance point.
Protect the environment.
Take care not to spill any oil.
6.1 Head subclass 806-121
–
Check the oil level at container 1.
The oil level must be between the MIN and MAX marks.
–
If the oil level in container 1 has reached the MIN mark, the oil
level in container 2 should also be checked.
If the oil level there is above the MAX mark, do not add any oil.
Complete a further 20 or so sewing cycles and check the oil level
again.
–
Add oil through the oil-filler neck of container 1.
–
Remove spilt oil from the oil sump.
1
2
12

6.2 Head subclass 806-111
–
Check the oil level in the sight glass 2.
The oil level must be between the middle and the upper rim of the
sight-glass eye.
–
Fill in the oil through the filler neck 1.
–
Remove spilt oil from the oil sump.
6.3 Regulating the lubrication of the shuttle
CAUTION
To ensure sufficient lubrication during the running-in period of the
sewing machine, the oil supply is pre-set at a relatively high level by
the factory.
This setting must be checked and corrected after the running-in period.
1
2
13


7. Initial operation
NOTE !
Prior to the initial operation of the 806 it is absolutely necessary to
check the machine adjustments. Check particularly the positions of the
transfer carriage
7.1 Checking the machine adjustments
–
Turn on main switch.
The control will be initialised.
The display will present briefly the DÜRKOPP ADLER Logo.
–
During
the display of the logo press the key "
F2
".
–
Press the key "I".
Following the basic setting travel, the display will present the
adjustment menu of the 806.
–
The positions of the transfer carriage existing at the moment of
delivery are shown on the sticker beside the typeplate.
7.2 Selecting the machine class
Setting and controlling
The programming of the 806 is ensured in the way that all classes of
the 806 are provided with the same software.
–
For indicating the machine class, one of the following symbols is
activated :
806-111 (with machine head 467)
806-121 (with machine head 271)
806-121 (with machine head 396)
–
The activated symbol must correspond to the existing machine
class.
Correction
–
The symbol shows that the existing machine class complies.
7.3 Remnant thread monitor (only 806-121)
By means of the function "Remnant thread monitor available " it is
possible to set the sub-class 806-121 to show whether the remnant
thread monitor is available. The symbol can only be selected when the
sub-class 806-121 has been set accordingly.
Note
This function is not used for connecting or disconnecting the remnant
thread monitor.
15

7.4 Transfer plate
7.4.1 Setting the reference point
Rule and control
–
Activate the function "
Reference travel
".
The transfer carriage performs a reference travel.
The display must show for X and Y a value between 6 and 15.
Correction
–
By means of a key, set the switch 1 for releasing the
electromagnetic switch 1 so that the X-value ranges between 9
and 11.
–
By means of a key, set the switch 2 for releasing the
electromagnetic switch so that the Y-value ranges between 9
and 11.
–
Activate the function "
Reference travel
".
The display must show for X and Y a value between 9 and 11.
NOTE !
Following a reference travel it is always necessary to carry out a
position balancing (see chapter 7.5). It is also necessary to check the
positions of the transfer carriage.
1
2
16

7.4.2 Position balancing
Note:
The sticker on the machine shows the coordinates of the positions
existing at the moment of machine delivery. The symbols on the sticker
correspond to those presented in the display when balancing the
positions.
By means of the functions "
Position balancing
", the balancing of the
important positions of the transfer carriage will be carried out in the
following sequence :
–
Read-in the position balancing for coding
–
Position balancing for the upper sewing position
–
Position control for the lower sewing position
–
Position balancing for the beading station
After having carried out the position balancing, you can release by the
keys F1 - F4 following functions:
Lifting/lowering the transfer plate
This permits to lower and to lift the transfer plate when the sewing
head stands in its upper position.
Lifting/lowering the sewing head
This permits to lower and to lift the sewing head when transfer plate is
in its lowered position.
NOTE !
The needle bar should not stand above the transfer plate mechanism
when the sewing head is in its lowered position.
Step value 2
Set the step here to the value 2 (0,2 mm). The transfer plate will be
displaced by this value each time you press the arrow key..
Step value 10
Set the step here to the value 10 (1 mm). The transfer plate will be
displaced by this value each time you press the arrow key.
X =
Y =
X =
Y =
X =
Y =
17

7.4.3 Carrying out the position balancing
Preparing the transfer plate
–
By means of the reflecting foil, having a diameter of about 5 mm,
cover the number 1 of the coding field.
–
Insert this transfer plate.
Read-in the position balancing for coding
–
Select the function "
Position balancing
".
–
Do not lower the transfer plate.
–
Displace the transfer plate by the arrow keys until the Symbol
"
Coding OK
" (Pos. 3) is no longer shown crossed.
The actual coordinates will be displayed.
If no position is found, check the following:
- The transfer plate must be in horizontal position.
The light barrier must be clean.
–
Press the
RETURN
.
Position balancing for the sewing position
–
The transfer carriage will move towards the upper sewing position.
–
Introduce 2 mm pin into needle bar.
–
Lower the transfer plate by the function "
Lifting/lowering the
transfer plate
".
–
Lower the sewing head by the function "
Lifting/lowereing the
sewing head
".
Use the arrow keys of the control unit for moving the 2 mm pin
across the upper bore hole of the transfer plate.
The actual coordinates will be displayed.
–
Turn the handwheel and check whether the 2 mm pin dips into the
bore hole in the transfer plate.
–
By means of the functions "
Lifting/lowering the sewing head
"
and "
Lifting/lowering the transfer plate
"Lift the sewing head and
the transfer plate and lower again.
Note:
By displacing the transfer plate in lowered state, the transfer plate
can be slightly displaced within its guides. Therefore, it is
necessary to check and, if required to correct the position once
again.
–
Press the
RETURN
key.
The sewing head will be lifted.
The transfer plate will be lifted.
1
2
3
18

Position balancing for the upper sewing position
–
The transfer carriage will move towards the lower sewing position.
–
By means of the function "
Lifting/lowering the transfer plate
"
lower the transfer plate.
–
Lower the sewing head by means of the function "
Lifting/lowering
the sewing head
".
–
It is possible to change the position of the transfer plate by the
arrow keys, but the position will not be memorised.
If the position is not correct, , loosen the 4 screws 1 on both sides
of the transfer lever and align the transfer plate so that the needle
dips into the lower bore hole.
NOTE !
After a new alignment of the transfer plate, it is necessary to
balance the positions.
–
Press the
RETURN
key.
The sewing head will be lifted.
The transfer plate will be lifted.
Position balancing for the beading station
–
The middle slide will advance.
The middle slide will be lowered.
The transfer carriage will move towards the beading station.
–
Lower the transfer plate by the function "
Lifting/lowering the
transfer plate
".
–
By means of the arrow keys of the control unit align the transfer
plate so that the middle slide protrudes into the seam contour of
the transfer plate to the same extent at all sides..
The actual coordinates will be displayed.
–
Lift and lower again the transfer plate by the function
"
Lifting/lowering the transfer plate
".
–
Check the adjusted position and correct it, if required.
–
Press the
RETURN
key.
The transfer plate will be lifted.
The middle slide will return.
Checking the positions
–
Press the key "F1".
The position balancing will be repeated.
–
Check the position adjustment of the transfer plate.
–
After checking the positions, press the key "F4".
This is the end of the position checking.
1
19

7.5 Test run
Following the installation, conduct proceed to a test run.
–
Thread the needle. (see chapter 6 of the Operating Instructions)
–
Insert the full threads reel. (see chapter 6 of the Operating
Instructions)
–
Switch on the machine as described under chapter 2.1 of the
Operating Instructions.
–
Switch on the function "
Beading control
" by the arrow keys.
–
Operate the machine as described under chapter 2.2.1 of the
Operating Instructions.
–
Control the applied pocket.
20
/