
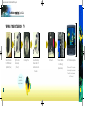
CONTENTS
1.Checklist of the items that you bought
2.Checklist of extra accessories
3.Camera button usa ge
4. F ollow the ar rows:
Land Pictures Sea Pictures View your Pictures
Pioneer Research
97 Foster Road • Suite 5
Moorestown,NJ 08057 USA
www.pioneer-research.com
www.sealife-cameras.com
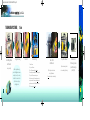
Quick Guide
IMPOR TANT!
1. Read warnings and warranty in instruction
manual before using this digital camera.
2. Find important updates on our website
www.sealife-cameras.com
3. Tr ouble shooting guide is located in
instruction manual.
4.Always follow safe diving practices
Pioneer Quick Guide 11/13/01 10:04 PM Page A

(With driver : Install driver only
for Windows 98, 2000, ME,XP
and Mac 8.5 and higher)
2
ReefMaster DIGITAL Quick Guide
MGI Photo Suite CD imaging
software and camera driver
Instruction Manual
MUSTREAD!
Warranty Registration
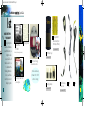
CHECK THE ITEMS
YOU BOUGHT
Going through this
checklist will familiarize
you with the items you
bought as well as
accessories.This will
make it easier for you
to understand the
following instructions.
Also, you will make
sure that you are not
missing any parts.
1s t
This is the Quick Guide booklet
you are using now.
3
NI-MH Battery Charger
4 Rechargeable Ni-MH
Batteries,Size AA (Nickel
Metal Hydride, 1600 mAh)
3 Foreign Plug Adapters
AC/DC/Transformer
Power Cable
PC-USB
Cable
TV/Video
Cable
✎
✔
✔
✎
Only included with DC 200
Only included with DC 200
Only included with DC 200
Only included with DC 200
Includes important warnings and warranty
Pioneer Quick Guide 11/13/01 10:04 PM Page 2

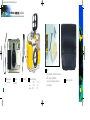
4
ReefMaster DIGITAL Quick Guide
Inner Camera
Item # SL101
Strap for Housing Underwater Camera Housing
Model: DC 200 DC 100
Item #: SL111DX SLSL111
Depth rated: 200 ft. 130 ft.
Care Kit
1. O-Ring Cleaning Brush - O-Rings must be absolutely clean
2.Anti-Fog Desiccant - For humid climate.
(Do not open bag until inserting into camera housing.)
3. Lens Cleaning Cloth
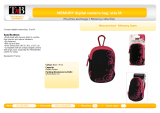
Camera Case for Inner Camera
1.
2.
3.
Strap for Inner Camera
Do not use inside housing
5
Pioneer Quick Guide 11/13/01 10:04 PM Page 4

CHECK THE
OPTIONAL
ACCESSORIES
YOU BOUGHT
Note:All accessories
are usable with
SeaLife ReefMaster
Film Cameras
unless otherwise
mentioned.
2 n d
7
6
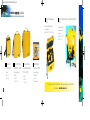
ReefMaster DIGITAL Quick Guide
Extra Rechargeable
Ni-MH Batteries,
Size AA (Nickel Metal
Hydride, 1600 mAh)
# SL190
With proper power management,the batteries will last for one or
two dives. Turn the power off when not taking pictures and limit
the use of the LCD monitor. Recharging will take about 2.5 hours.
For more information,see the manual.
SeaLife Compact Flash
Memory Cards for
CF-compatible Digital
Cameras
32 MB CF Card - # SL180 (64 Hi-Res Pictures)
128 MB CF Card - # SL 182 (256 Hi-Res Pictures)
* The built in memory is 8 MB and holds up to
17 Hi-Res Pictures
SeaLife Anti-Fog
Desiccant Capsules
# SL911
Insert in Underwater housing to prevent
fogging. Should be replaced daily in high
humidity. 10 per pack.
SeaLife Anti-Fog Desiccant
1oz/28g bag
# M101
Insert into airtight SeaLife hard case for
storage of batteries or any electronics.
Can be re-generated.3 bags per pack.
10 packs per box.
* Indicating silca turns from blue to pink when expired.
SeaLife External Flash(es)
with Mounting Brackets
# SL960
The External Flash is the key to great photos.
The External Flash also reduces backscatter.
2 External flashes prevent shadows and will
allow a more even illumination.
* Soft Case included.
SeaLife Soft Case
(included with External Flash)
Pioneer Quick Guide 11/13/01 10:05 PM Page 6

8
ReefMaster DIGITAL Quick Guide
9
Buoyancy Control Weight BCW - # SL966
To be inserted in Flash head.
Note:One BCW makes the ReefMaster Digital w/External Flash
negatively buoyant.
Flash Diffuser Dial
# SL968
3 settings to control over-flashing on
close reflective objects. Snaps onto
External Flash.
SeaLife 20 mm
Wide Angle Lens
# SL970
Increases frame angle
by approx.50%.
Example:5 foot
Reef Shark fits in frame
at 5 foot distance.
Macro Set - # SL959
Includes 8x and 16x Macro Lenses/UW Filters
and Macro Wand Distance Tool
Macro Wand Distance Tool
Extendible and foldable. Attaches to tripod mount or flash mount.
* All Macro Lenses include Safety Lan yar d
SeaLife Macro lenses are also Underwater filters, which intensify red
and yellow colors slightly to compensate for underwater blue effect.
The lens automatically compensates the flash intensity to prevent over-flashing.
3x Macro Lens/UW Filter
Distance:12”-36”(30cm-90cm)
8x Macro Lens/UW Filter
Distance:10”-13”(25cm-33cm)
Use with Macro Wand Distance Tool
16x Macro Lens/UW Filter
Distance:7”-10”(17cm - 25cm)
Use with Macro Wand Distance Tool
Macro lens easily
snaps on housing
when underwater
Pioneer Quick Guide 11/13/01 10:05 PM Page 8

11
10
ReefMaster DIGITAL Quick Guide
Hard Case for Underwater Camera
# SL930
Unbreakable. Air and Water tight with foam
insert and pressure valve.
Inside Size:9.25 x 7.25 x 4“ - 23 x 18 x 10 cm
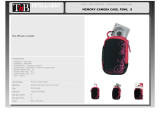
Soft Case for UW
Camera - # SL945
Inside Size:
6 x 6 x 3.5“
15 x 15 x 9 cm
Soft Case for UW Camera
and External Flash - # SL946
Soft Case for UW Camera
and 2 External Flash Units and
Macro Set - # SL947
(included with External Flash)
Inside Size:
11 x 9.5x 4“
27 x 23 x 12 cm
Inside Size:
15 x 14 x 5.5“
37 x 35 x 14 cm
SeaLife Weather-Proof
Camera Pouch - # SL948
Transparent LCD screens,
Glass Lens Port and
button control.
(Not for use in water.)
Hard Case for Underwater Camera, 2 External Flash Units and Macro Set
# SL934
To order accessories or for more information about SeaLife accessories visit your local scuba retailer or
visit our website at www.sealife-cameras.com
Unbreakable.Air and Water
tight with foam insert and
pressure valve.
Inside Size:17 x 11.5 x 5.5“
42 x 28 x 13 cm
Pioneer Quick Guide 11/13/01 10:05 PM Page 10

CAMERA
BUTTONS
Learn the
various buttons
and features
to operate your
Inner Camera
and Underwater
Housing.
3 rd
13
12
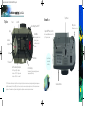
ReefMaster DIGITAL Quick Guide
Self Timer Indicator LightViewfinder
Flash
Connections:
To PC- USB
To TV - Video
DC-In from
110/220V
transformer
Standard Focus
2 feet (60cm) - ∞
Close-Up
12-24”(30-60cm)
Lens
Clean with soft cotton
cloth and lens cleaner
Viewfinder
Strap Holder
Menu Buttons:
Up/Back
(also self-timer)
Down/Forward
Ok/Set
LCD Monitor ON/OFF
In replay mode: press for image data, press again for index of pictures
Indicator Lights:
Green: Power On,
Red Blinking: Processing
Red Blinking with Beep: Error
Green: CF Card Inserted
Rear Vie w
Pioneer Quick Guide 11/13/01 10:05 PM Page 12

15
14
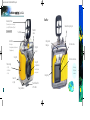
ReefMaster DIGITAL Quick Guide
Select Flash
Record
Record & Replay Menu ON/OFF
Shutter Button
Delete images within 3 seconds
after taking pictures in
Sea Mode when prompted
by monitor.
LCD Status Display
Indicates number of pictures remaining, battery power level,
image quality and flash setting.
Select Resolution and Quality Level:
Hi:1.3 Megapixel (Mp),Lo:.3 Megapixel
Compression - 8:1,12:1,20:1 in high resolution
Compression - 4:1,8:1,16:1 in lo resolution.*
PC Download
Power Button
Delete
Land & Sea
set up menu
Replay
* Note:“Pixels”are the dots that make up the picture.The more dots, the larger the picture (more dots also create slower processing and downloading speeds and require more
space).There is a maximum of 1.3 million pixels (MP) per picture.To save space, the pictures can be compressed by combining similar color pixels.The compression ratio lowers
the quality level.It is recommended to use high resolution and high quality. For more information on resolution and compression see the manual.
Battery Cover
Push down and over to open
Tripod Mount
Compact Flash
®
Memory Card Slot
Built-in memory:8 MB,usable without CF Card
for 17 high-resolution pictures.
Compact Flash
®
is
a trademark of
Sandisk Corp.
Bottom Vie w
Top Vie w
Camera Serial Number
Pioneer Quick Guide 11/13/01 10:05 PM Page 14

17
16
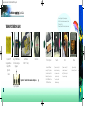
ReefMaster DIGITAL Quick Guide
Removable Sportsfinder
If the center appears as a circle, it is aiming at
a point 4 feet/120cm from the lens. (Optional)
Power Button
Built-in flash
window
Docking Port
for snap-on lenses
Macro 3x,8x,16x and
wide angle lenses.
Connector for
carry strap
Closing Latch
Optical glass
lens port
Mount for External Flash
or Macro Wand
Rubber Armoring
• Slip Proof
• Shock Protection
• Visibility
Shutter Button
• Record images
• Delete images when prompted by monitor
(during image review)
Anti-fog desiccant
holding areas
Underwater Housing Closing Lid
LCD monitor window
Closing Lid hinge
LCD monitor window frame
*
*
Also Docking
Port for optional
sunshade
Rear Vie w
Only included with DC 200
Housing Serial Number
Pioneer Quick Guide 11/13/01 10:05 PM Page 16

18
ReefMaster DIGITAL Quick Guide
TAKING PICTURES ON LAND
19
Only use Ni-MH
rechargeable batteries.
Capacity:1600 or
higher mAh
Size:AA
Charge 110/220V Batteries
for 2 1/2 hours until green
light appears
Insert Batteries
Watch + / - Polarity
Set to Record
CFCard - Optional
Camera has 8 MB internal
memory for 17 high resolution
pictures. Insert Compact Flash
Memory Card for more pictures.
CF Card:32 MBholds 64 hi-res.
128 MB holds 256 hi-res.
Power On
If camera is not used for 3
minutes, the camera will go
into power save mode to
preserve the battery.
To reactivate, push the
shutter button again.
Shoot
If camera is not used for 5
minutes, the camera will
shut off. To reactivate, push
the power button again.
Preview
Quickview will display
picture taken for 3 seconds.
In case of message “out of memory”you may:
1.Set Dial to delete mode and erase unwanted pictures
2.Use larger CF Card
3.Download pictures to PC and erase pictures in camera
Foreign Plug Adapters
Important: Read instruction manual on battery usa ge!
Pioneer Quick Guide 11/13/01 10:06 PM Page 18

TAKING SEA PICTURES
Set to Land and Sea Power On
See Menu:
“Land/Sea/Ext. Flash”
Press:OK button
Select SEA using
56
buttons
Press OK to set*
For Underwater Images
Use CF Card with at least
32 MB,or better at 128 MB
for 61 or 256 hi-res pictures
(CFcard not included)
21
20
ReefMaster DIGITAL Quick Guide
Set to Record
* The menu is self explanator y, once you understand the basic principle:
Use
56
buttons to scroll through the menus and options
Use OK button to select or set an item
Opening the Housing
CONTINUED…
If the housing is difficult to open,
for example after flying in an airplane,
push the strap holder with your thumb to
one side and the recess in the lid to the
other side as shown.
Insert Camera in Dry, Air Conditioned Room*
* Trapping warm,humid air inside housing may cause fogging.
Batteries must be fresh and fully charged.
Wipe one drop of Anti-Fog Lotion in on inside
of housing lens.
Pioneer Quick Guide 11/13/01 10:06 PM Page 20

TAKING SEA PICTURES, Cont.
Close Latch Test before Diving Dry with a clean towel
Keep camera housing in shade to
avoid over-heating inside of housing.
Remove Camera
from housing only when
you and the housing are
perfectly dry
22
23
ReefMaster DIGITAL Quick Guide
Closing the Housing
When closing the housing,
press the lid tightly down to ensure
a waterproof sea, before closing
the latch.Do not close the latch
if the lid is not completely
and tightly closed.
Clean O-Rings w/Brush
Insert Desiccant
Do not grease O-Ring
1. Power ON camera.
2.See object in LCD monitor.
3.Shoot - Hold camera steady;press shutter button
4.You may delete a picture within 3 seconds when prompted.
5.Turn power OFF camera to save battery power.
Note:If camera is not used for 3 minutes, the camera will go
into power save mode. To reactivate, push the shutter button
again.If camera is not used for 15 minutes, power will shut
OFF. To re-activate, press power button.
Soak or Wash
with fresh water
After diving rinse or soak camera in
housing with fresh water.
Never let sea water dry on camera housing.
Pioneer Quick Guide 11/13/01 10:06 PM Page 22

Push
5
or
6
buttons
to scroll through
pictures in memor y
Turn Power On
VIEWING YOUR PICTURES ON TV
25
24
ReefMaster DIGITAL Quick Guide
Plug Power Cable
into camera jack
(DC/6 volt)
Set to Replay Mode Connect Video Cable to
Video-In at back of TV
set and the other end to
the camera
Connect Power Cable
to 110/220 volt outlet
(Save Battery Power)
Set TV to Video and view pictures.
(While connected to a TV set you can also
set the mode setting dial on your camera to
“Record Mode” to take pictures and use
the TV as a monitor)
Make sure plugs
are pushed all the
way into the camera
Pioneer Quick Guide 11/13/01 10:06 PM Page 24

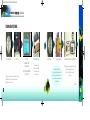
VIEWING YOUR PICTURES ON COMPUTER
27
26
ReefMaster DIGITAL Quick Guide
View, Save, Edit, e-mail
and Print your images.
Use only the best
photo glossy paper.
Double-click
“Removable Disk” (x:)
Double-click “Pics”
(on some operating systems this
takes up to 4 minutes)
Download:
Double-click
“My Computer”
Removable disk (x:)
will appear.
Install Driver and
MGI Photo Suite
Imaging Software*
(follow on-screen instructions)
Set to PC mode Turn Power On Only NOW connect
PC Cable to Camera
Connect PC Cable to
USB Port of Computer.
Make sure computer
is turned ON
Important - Follow the sequence 1-2-3-4 as indicated!
1. 2. 3. 4.
*You may want to use your
favorite editing software.
Install driver only for Windows 98,
2000,ME,XP and Mac 8.5
or higher.
NOTE:
Follow your
operating
system’ s
guidelines for
removing
USB device .
Pioneer Quick Guide 11/13/01 10:07 PM Page 26
-
 1
1
-
 2
2
-
 3
3
-
 4
4
-
 5
5
-
 6
6
-
 7
7
-
 8
8
-
 9
9
-
 10
10
-
 11
11
-
 12
12
-
 13
13
-
 14
14


Ask a question and I''ll find the answer in the document
Finding information in a document is now easier with AI
Related papers
-
Sealife Reefmaster DC100 & DC200 User manual
-
Sealife Reefmaster DC250 User manual
-
-
-
Sealife DC300 & DC310 User manual
-
-
-
-
-
Sealife DC 600 User manual
Other documents
-
 T'nB DCCM20PK Datasheet
-
DeLonghi CVN6PL Datasheet
-
Olympus V6300570E000 Datasheet
-
 T'nB DCCM10PK Datasheet
-
Pioneer DC500 User manual
-
-
Vista POWER WAND Programming & Operating Instructions
-
Canon PowerShot S400 User manual
-
 Xircom 925-609-7550 User manual
-
 Winmate DD-M101 User manual


