Page is loading ...

Guide to Underwater Photography for
ReefMaster and SportDiver Cameras
Film & Digital
Film & Digital
Great Pictures Made Easy
Guide to Underwater Photography for
ReefMaster and SportDiver Cameras
Great Pictures Made Easy
by
Item #SL240
Item #SL240

1
Contents: PAGE
I. Summary: Trouble Free Operation and Key to Good Results ... 3
II. Differences between Film and Digital Cameras ............................. 4
III. Tips for Great Pictures.......................................................................... 10
IV. Quick Tips for Camera Operation .................................................... 19
V. How Easy It Is – Illustrated Instructions ........................................ 25
VI. Accessories............................................................................................... 43
VII. Trouble Shooting Guide ......................................................................... 50
VIII. Service and Warranty............................................................................. 56
Warning: Before operating these cameras you must read and understand this
manual. For updates to this manual visit www.sealife-cameras.com.
Send your suggestions regarding this manual to:
Pioneer Research
Attn: Sealife Manuals
97 Foster Rd, Moorestown, NJ 08057
info@pioneer-research.com

2
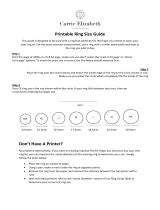
0´ 1´ 2´ 3´ 4´ 5´ 6´ 7´ 8´ 9´ 10´ 11´ 12´
ft
0m 1.20 2.10 3.00 m
Distance:
Rate Your Pictures
––
Test Your Skills
Too Far.
All blue
sharp pictures.
Mostly blue.
O.K. for background.
Film: Best distance
without MACRO.
For richer color
use external flash.
Out of focus. Too close without
close-up lens. Best color with
close-up lens
Overflashing on
close white
reflective subject
“Marine Snow”
Diver stirs up sand.
Causes backscatter.
14˝-16˝
with
MACRO 8X
close-up lens.
2´-4´ with
MACRO 3X
lens.
Proper shooting distance chart for all Sealife cameras

3
I. Summary: Troublefree Operation and the Key to Good Results
a. Key to trouble free operation:
Good care and extreme cleanliness of O-rings and sealing areas. Absolutely dry conditions
when opening the camera. Load camera into housing in dry cool air, best in air conditioned room.
Insert SeaLife anti-fog desiccant. Apply a drop of anti-fog lotion on inside of housing lens. Test
camera before use (before inserting film). Follow proper film loading procedures. Use fresh AA
batteries for 8 rolls of film and only SeaLife NiMH batteries freshly and fully charged for two
subsequent dives with ditigal cameras. Do not replay your pictures between dives using up bat-
tery power. Use either type battery in the external flash(es) for about 100 shots. Use only
approved memory flash cards, best SeaLife CF cards, 32 MB or better 128 MB. See Trouble
Shooting Guide on page 50.
b. Key to good pictures:
Crystal clear water! For film cameras: shooting distance u/w 4 ft. to 5 ft. / 1.2 to 1.5 m. Better 2
to 4 feet and 3x macro lens. (Recommended also for digital cameras to improve colors). For dig-
ital cameras: shooting distance u/w 2 ft. to 5 ft./ 0.6 m to 1.5 m. FLASH READY light on. Be calm
and patient and move very slowly. Hold camera steady. External flash(es) always get you the
best pictures, especially below 30 feet/10 m or in darker light. Shoot the same scene several
times with different distances.
Maximum depth ratings: ReefMaster Film: 164 ft. / 50 m. SportDiver Film: 120 ft / 36 m.
ReefMaster DC200 Digital 200 ft / 60 m, DC100 100 ft. / 30 m.
Film: ISO 200. Use ISO 100 print or slide film in extremely bright conditions, on beaches or snor-
keling. Processing: Tell your photo lab that you’re developing underwater pictures and to
increase red and yellow as needed to balance the picture color. Request sample prints.

4
II. The Difference Between Film and Digital Cameras
In this guide you will learn the basics of underwater photography as well as how to enjoy
your camera, easy and trouble free. You will be able to compare our digital and film cam-
eras side by side. Much applies to both types of cameras, but the differences are pointed
out and highlighted. If you have a film camera you will easily understand digital photogra-
phy and perhaps appreciate your film camera even more; and if you have just bought a dig-
ital camera, it will be much easier for you to learn digital photography by comparing it with
film cameras in every step. It will be well worth your time to read the whole text for both
camera types. You will find some repetition: We start with a very brief summary of the key
facts, then you read a Quick Guide, and then a more explicit version with picture examples.
The fundamental advantages of either system are well known: Digital does not need film,
so with a large enough memory card, you can click away; a whole vacation without buying
film. You can instantly see your picture, and - unique to SeaLife - you can instantly delete
a picture, so you come home with only good pictures; you can show them on the TV set in
the hotel lobby during cocktail hour, or email pictures from your laptop instead of sending
postcards; and finally, you can edit and archive your pictures and create fascinating vaca-
tion stories.
Well, in today’s digital world, you can do most of this with film too. The biggest advantage
of film is that you are used to it, and less things can go wrong. Great pictures can not be
made easier, if you have the patience to go to a photo lab. They can give you even a CD
with your digitized film pictures.
But besides these general differences, SeaLife research has developed unique special

5
differences. Each camera type has a very unique exposure program, developed for
underwater, but also usable on land. This beats any land camera trying to also take under-
water pictures. SeaLife film cameras have a fixed exposure system. The advantage is that
it is faster, easier to use, and produces great pictures in most underwater light conditions:
Short exposure time, large aperture, fixed focus lens, flash is always on underwater.
Designed so you cannot go wrong.
SeaLife Digital Cameras, however, have a computerized exposure system that evaluates
the picture and then chooses the best combination of aperture, exposure time, “film” speed
(sensitivity), flash or no flash. SeaLife is the first camera company that has specifically
researched and developed an automatic underwater exposure system. This sounds great,
but since it gives you more options, you need to understand it to get great results. Before
you begin, you set the camera to one of 3 modes: Land, Sea, or External Flash. Sea mode
will try to get the best picture without external flash. If it is dark, sea mode will work with a
long exposure time of 1/42 second, and a large aperture of 2.8. This means you have to
hold the camera very steady, when using sea mode. You see your picture and are asked
“Delete?” By pressing the shutter button within 3 seconds again, the picture is gone. Note,
that the picture you see was taken 1/4 of a second before the actual picture. The camera
puts out a “pre-flash”, which tests the light condition, reprograms the exposure, shows you
the pre-picture and then takes the real picture. This is different in the External Flash Mode:
There is no pre-flash, the camera evaluates only the existing light, fires the internal and
external flash, processes the actual picture you took (message: “processing”), and then
shows you the actual picture with the question “Delete?”. The external flash allows a short-
er exposure time, since there is more light, (besides of capturing richer colors).

6
Light and good visibility are the key to underwater photography, therefore an external flash
will always improve your pictures, film or digital. Don’t let the greater number of
buttons of the digital camera confuse you. Most you do not need. Underwater you only
need two: The shutter button and the power button.
Power is a major difference: You can take 8 rolls of film with 2 Alkaline batteries, and they
will stay fresh in the camera for at least 6 months. But the digital cameras are so power-
hungry that you have to recharge your batteries every night, you cannot even use regular
batteries. Most power is consumed by the monitor, which you can turn off on land, but
underwater it is too important to be turned off. Fully charged SeaLife batteries will get you
through two dives, if you manage the power wisely. That’s why we have built in the auto-
matic power save mode and the power on/off button.
Some people say, digital photography is more difficult. But the truth is that you have to famil-
iarize yourself with any new camera. The good thing is, that you can experiment and take
dozens or hundreds of pictures without limitation of film. So, the most important method to
take great pictures has remained the same: Just do it, try everything and you will become
a master in no time, and have fun.

Film or digital? Take a great land shot.
A is film, B,C,and D are digital.
External Flash Mode (B) and Sea Mode (D).
7
B
D

8
Sports Finder
Color
Coded
Frame
Counter
Viewfinder
Color
Coded
Frame
Counter
Opening
Latch
Shutter
Release
Flash
Main O-Ring
(Don’t remove or grease.
Keep Clean)
Opening
Latch
Power Switch and
Lens Cover
2AA
Batteries
Flash
Override
(ReefMaster
RC only)
Viewfinder
Window
Flash
Window
Applies to SeaLife ReefMaster
®
RC, CL and Sport Diver
Film Rewind

9
Applies to all ReefMaster
®
Digital Cameras
Removable Sportsfinder
I
f the center appears as a circle,
it is aiming at a point 4 feet/120cm
from the lens.
Built-in Flash
Window
Docking Port
for Snap-on
Lenses
Macro 3x, 8x, 16x and
wide angle lenses.
Connector for
Carry Srap
Optical
Glass
Lens Port
Mount for External
Flash(es) or Macro Wand
Shutter Button
Record images and Delete
Images when Prompted
Soft Rubber Grips
Closing
Latch
SeaLife Cameras consist of 2
parts: The waterproof “Housing”
and the compact “Inner Camera”.
This modular design gives you
great versatility underwater and on
land. It also makes cleaning easy
and allows inexpensive service.

10
III. Tips for Great Pictures
1. Just do it!
One of the best ways to learn about underwater photography is to just do it and learn from
your best shots and from mistakes. Even the best photographers have taken countless bad
pictures… that’s the way they became better and better. Here is the trick: Just shoot any-
thing in front of your lens in a variety of conditions, distances, colors, objects etc. Then look
at every picture and take a note of what’s good or bad about the shot. We evaluated sev-
eral thousand pictures and found that even amateurs can take great pictures by simply
avoiding a few common mistakes. (For the most common errors see the picture examples
on pages 13 - 16.) You will be surprised that among your snapshots you will find some
award-winning pictures. Put the good ones in an album. But keep one bad shot of each typ-
ical error. After a while you will achieve good control and even perfection. Digital SeaLife
cameras allow you to take several shots of the same subject and to delete the bad pictures
instantly.
The best pictures are taken with a close-up lens which also acts as an underwater filter..
The SeaLife MACRO 3X Close-Up Lens has a distance range from 2ft. - 4 ft/60 - 120 cm.
In lower water visibility, the SeaLife Close-Up Lens is a must. The key to good pictures is
to get close. The reason is that water absorbs more light than air. In air you could see up
to 30 miles, in water your eyes can see 100 ft. at most, but a cameras can see less than
half of that and much less red and yellow than your eyes.
2. Capture the Magic
What do you want to capture on film? What attracts you to underwater photography? What
scenes are so breathtaking that people say “this is so unbelievable, I wish I had a camera
to show this to my friends”?

You will encounter strange creatures, see incredible effects of light and colors, explore
wrecks, corals and plants that appear as if they were from a different planet, while you float
effortlessly through space without gravity.
And after years of adventures with your SeaLife camera you will look at your albums, per-
haps even at an impressive gallery of framed enlargements. And it may be only then that
you discover the real treasure that you found with your camera: You have learned to use
your eyes to see and experience the underwater world, one of the greatest miracles on
earth.
As the manufacturers of SeaLife we believe that an easy-to-use underwater camera will
help millions of divers and non-divers to experience and see a part of our world which is
essential to our survival.
And we hope that you will enrich and enlighten your life by capturing valuable impressions
in the underwater world with your SeaLife Camera.
3. The Great Hunt
While you hunt for a big strange fish or a good shot of your buddy with a stingray, always
include the underwater magic
in your pictures.
Get a mystic blue background, an interesting little red fish and yellow coral in the fore-
ground. These color contrasts will add depth to your pictures.
Capture rising air bubbles against the reflections of the surface water. This will indicate
motion.
Use the walls of a canyon as a frame for your object, look for contrasting colors, bizarre
shapes, towering kelp forests, subtle shades of water colors, sand and rock, wild structures,
or dark shades of a wreck penetrated by spears of sun rays.

The primary target for most people is, of course, a good picture of yourself and your friends
surrounded by tropical fish. This is actually the easiest part.
A diver should be only 5ft./1 50 cm. away for a good picture. Portrait shots of diver and fish
are best taken at 2ft. to 4 ft. with the snap-on MACRO 3X close up lens. Use the MACRO
8X lens for extreme close-up of 14” to 16” / 36 cm to 41 cm. For larger objects such as
group shots or sharks use the SeaLife wide angle lens at distances of 3 - 5 ft.
/ 90-150 cm.
You may chum for fish with bits of food, but pick something that does not fall apart and
cloud up the water (for example, bread dissolves and clouds up the water). Check with a
local dive master to select chum that does not endanger the fish.
Be very calm and patient, and let that curious fish get closer and closer. There are two ways
of using current to your advantage: 1. Drift motionless along with your camera in ready
position. 2. Stay in a camera-ready waiting position, approach your subject facing the cur-
rent.
Always take notes of your pictures and mark your films or create a digital dive log with
pictures on your computer. It is very exciting to document every fish in your area in an album.
Once you have some expertise you might start to take slides and put a presentation togeth-
er, possibly combined with music and video for dive clubs, schools and friends. Scan your
best film pictures and use them just like digital images.
4. Great Effects
Everything about seeing and taking pictures is about light. Pay attention to light and
shade, colors and contrasts, don’t just get mesmerized by that big fish.
continued on page 17

Good & Bad Pictures
a) Stay within the ideal distance
Distance 4 to 5 ft., regular lens2 ft., too close for film camera
Distance 3 ft. / 90 cm with MACRO 3X close-up lensDistance 6 ft. / 1.80 m, regular lens, shallow, sunny
Distance 8 ft., too far
13

14
Back scatter of the internal
flash from sand.
Low visibility Perfect visibility
Avoid floating particles stirred
up by currents, waves or
divers.
Low visibility is caused by
small particles, like algae.
Use the MACRO 3X lens at a
distance of 2.5 ft/75 cm or the
Macro Set from 8 to 16” / 20
to 41 cm.
Visibility better than 50
ft./15m (horizontally) gives
you the best pictures. Shoot
at the ideal range, 4 to
5 ft./1.2 to 1.5 m. or even
closer with a macro lens.
Good & Bad Pictures
b) Crystal Clear Water
No matter what equipment you use, good underwater pictures require crystal clear water.
(It is important to remember that the human eye can see more detail than any camera.)

15
Good & Bad Pictures
c) External Flash: The purpose of a U/W flash is to bring out colors at the ideal shooting
range, not to illuminate objects at longer distances. Also, with the digital camera the external
flash affords a shorter exposure time, resulting in sharper pictures.
The MACRO lens/uw filter
corrects color and moderates
the flash (2 ft. / 60cm)
Overflash on close object.
(regular lens, ext.flash,)
also aimed too high)
Distance 4 ft., In dark cave.
(regular lens, double ext.flash)

16
Good & Bad Pictures
d) Composition: Look for good color contrast between object (fish), surrounding (coral) and
background (water). Look for exciting shapes.
Here the photo lab added yellow and red.
Digital images can be edited on your comput-
er
Below 30 ft/10 m most yellow and red is absorbed
by the water, leaving only blue.
Interesting Coral Shapes
(with regular lens)
Great shot, but poor contrast Good contrast
(with MACRO 3X close-up lens)
e) Color correction: UW filter, macro lens, special processing, or editing are ways to increase
yellow and red. Request to see sample prints at your photo lab.

17
Your best colors and effects will be where the sun still penetrates the water: Dive or snorkel
at a vertical sun from 10 am to 2 pm in a depth not greater than 25 ft. / 8 m.
Each depth and light condition has its own attraction. Experiment and capture different
effects at different depths and scenes. In crystal clear tropical waters you will get great
turquoise water colors to a depth of 20 ft. / 7 m, then an intense blue, and a wonderful deep
blue beyond 40 ft. / 12 m. In the SeaLife ReefMaster RC film camera the built-in “Coral
Flash” will intensify red and yellow colors of close objects (4 ft. to 6 ft. / 1.2 m to 1.8 m) and
leave the blue background untouched. Color corrected macro lenses will intensify the warm
colors (red and yellow) even more and moderate the flash.
Look for rich color contrasts. You may use the Sealife External Flash to add color and bright-
ness. To really illuminate coral or any area further than 5 ft., you cannot just increase the
power of your flash, but you must position one or two external flashes sideways of your lens
and direct it at an angle of 20 to 30 degrees at the object. If the water is not as clear as you
may wish, choose closer objects. Use 1 flash for high contrast, and two for even illumination
and rich colors. The MACRO 3X Close-Up lens can be used for distances of 2 ft. to 4 ft. /
60 cm to 1.2 m, the MACRO 8X lens for 14” to 16”/35cm to 40cm.
Just a black silhouette against the bright water surface can make a dramatic shot.
A “halo” effect can be created by the sun or a light source behind a person or a sea creature.
In bright conditions on land or in snorkeling use ISO 100 print film or ISO 64 for slides. A sec-
ondary strobe can be used to reduce “marine snow”, caused by the flash hitting microscopi-
cally small particles like algae or plankton. The primary flash of the camera must be covered
with a flash reflector which reflects the light towards the external flash sensor and not directly
towards the target. SeaLife Macro Lenses also help to reduce marine snow.

18
For pictures partially above and under water, coat the lens with a touch of detergent to let
drops run off. This can take many trials until the water surface is exactly on the center of
the lens.
5. Inspiring Books
Visit the website www.sealife-cameras.com and see pictures, links, and the latest SeaLife
publications on underwater photography. Every dive or photo dealer with an underwater
camera department will have some worthwhile books on underwater photography. An illus-
trated reference book should be your constant companion as well as this manual. Keep it
inside your SeaLife Dry Box. The best book, however, is the one you yourself compose.
6. An U/W photo course can be very enjoyable.
Ask your dive instructor. Your dive store also offers a variety of trips with “Underwater Photo
Safaris” to the world’s most beautiful reefs in good company and with a knowledgeable
guide.

19
IV. Quick Tips
1. Quick Setup of camera
A) All camera models:
Keep everything clean and dry. One drop of water inside the housing can cause the
front lens to fog underwater.
Use SeaLife Anti-Fog Desiccant and a drop of anti fog lotion inside on the housing
port. Load the camera in dry, cool air, best in an air conditioned room.
B) Film camera models:
Use 200 speed 24 exposure film and 2 fresh AA Alkaline Batteries. Replace batteries
if “Flash Ready” light takes more than 15 seconds to recycle.
• Turn camera power ON (below lens of inner camera.)
• Before loading film, push shutter button once to test camera advance.
• Insert film roll. Make sure roll is properly seated onto rewind shaft.
• Pull film tab over and into take-up spool and press shutter button until film
engages. Film should lay flat across film plane and sprocket teeth.
• Close film door. If the film door is obstructed by film roll, remove and re-insert roll
until film door closes without any obstruction.
With camera power on, insert loaded camera into housing. Keep camera and inside
of housing dry.
C) Digital Cameras:
Insert freshly and fully charged SeaLife NiMH batteries.
Lithium AA batteries may also be used. They’re expensive but last twice as long.
Set camera to Sea Mode, External Flash Mode or Land Mode.
Camera power shuts off automatically after about 2 minutes.
/