Acclaim Lighting FLEX PENDANT CHANNEL User guide
- Type
- User guide
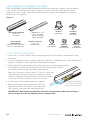
Acclaim Lighting FLEX PENDANT CHANNEL is a versatile lighting solution that offers multiple mounting options for customizable installations. With its ability to be mounted from fixed steel rods, stainless wire, or against a flat surface, it provides great flexibility for various applications. The channel features conductive end caps or fasteners for easy power transfer via supportive wires or rods. It supports clear, opal, and frosted lens options, allowing you to tailor the lighting effect to your preference.
Acclaim Lighting FLEX PENDANT CHANNEL is a versatile lighting solution that offers multiple mounting options for customizable installations. With its ability to be mounted from fixed steel rods, stainless wire, or against a flat surface, it provides great flexibility for various applications. The channel features conductive end caps or fasteners for easy power transfer via supportive wires or rods. It supports clear, opal, and frosted lens options, allowing you to tailor the lighting effect to your preference.


-
 1
1
-
 2
2
-
 3
3
-
 4
4


Acclaim Lighting FLEX PENDANT CHANNEL User guide
- Type
- User guide
Acclaim Lighting FLEX PENDANT CHANNEL is a versatile lighting solution that offers multiple mounting options for customizable installations. With its ability to be mounted from fixed steel rods, stainless wire, or against a flat surface, it provides great flexibility for various applications. The channel features conductive end caps or fasteners for easy power transfer via supportive wires or rods. It supports clear, opal, and frosted lens options, allowing you to tailor the lighting effect to your preference.
Ask a question and I''ll find the answer in the document
Finding information in a document is now easier with AI
Related papers
-
Acclaim Lighting FLEX 45 DEGREE CHANNEL User guide
-
-
-
-
-
-
-
-
-
Other documents
-
Schluter Systems KB12SN305711A1 User guide
-
Schluter KL1BL19EB110 User manual
-
Schluter SES1D6EB User manual
-
Schluter Systems KSK1830PVC User manual
-
Schluter Systems KSLT1930/965S User manual
-
Woodstock W1744H Owner's manual
-
Excel Two Bag Catcher User manual
-
-
 Digital Watchdog Snapit DWC-HV421D User manual
-
Eneo MEB-62F0036P0A User manual
