Xerox C230 Reference guide

Category
Print & Scan
Type
Reference guide

Xerox C230, your new go-to printer, is designed to elevate your printing experience with its diverse capabilities. Effortlessly print from your Apple device using AirPrint®, or tap into the mobile printing revolution with Mopria™ Print Service and Wi-Fi Direct®, connecting directly to the printer without an access point. Unleash your creativity and print documents, emails, and images from the comfort of your mobile device.

Xerox C230, your new go-to printer, is designed to elevate your printing experience with its diverse capabilities. Effortlessly print from your Apple device using AirPrint®, or tap into the mobile printing revolution with Mopria™ Print Service and Wi-Fi Direct®, connecting directly to the printer without an access point. Unleash your creativity and print documents, emails, and images from the comfort of your mobile device.

Xerox®C230 Color Printer Quick
Reference Guide
Print
PPrriinnttiinngg ffrroomm aa CCoommppuutteerr
Note: For labels, card stock, and envelopes, set the paper size
and type in the printer before printing the document.
1. From the document that you are trying to print, open the Print
dialog.
2. If necessary, adjust the settings.
3. Print the document.
PPrriinnttiinngg FFrroomm aa MMoobbiillee DDeevviiccee
PPrriinnttiinngg ffrroomm aa MMoobbiillee DDeevviiccee uussiinngg MMoopprriiaaPPrriinntt
SSeerrvviiccee
Note: This feature is available only in some printer models.
Mopria Print Service is a mobile printing solution for mobile devices
running on AndroidTM version 10.0 or later. It allows you to print
directly to any Mopria-certified printer.
Note: Make sure that you download the Mopria Print Service
application from the Google PlayTM store and enable it in the
mobile device.
1. From your Android mobile device, launch a compatible
application or select a document from your file manager.
2. Tap >Print.
3. Select a printer, and then adjust the settings, if necessary.
4. Tap .
PPrriinnttiinngg ffrroomm aa MMoobbiillee DDeevviiccee uussiinngg AAiirrPPrriinntt®®
Note: This feature is available only in some printer models.
The AirPrint software feature is a mobile printing solution that allows
you to print directly from Apple devices to an AirPrint-certified printer.
Make sure that the Apple device and the printer are connected to
the same network. If the network has multiple wireless hubs, then
make sure that both devices are connected to the same subnet.
This application is supported only in some Apple devices.
1. From your mobile device, select a document from your file
manager or launch a compatible application.
2. Tap >Print.
3. Select a printer, and then adjust the settings, if necessary.
4. Print the document.
PPrriinnttiinngg ffrroomm aa MMoobbiillee DDeevviiccee uussiinngg WWii--FFii DDiirreecctt®®
Note: This feature is available only in some printer models.
Wi-Fi Direct is a printing service that lets you print to any Wi-Fi Direct-
ready printer.
Note: Make sure that the mobile device is connected to the
printer wireless network. For more information, see
Connecting a Mobile Device to the Printer.
1. From your mobile device, launch a compatible application or
select a document from your file manager.
2. Depending on your mobile device, do one of the following:
• Tap >Print.
• Tap >Print.
• Tap >Print.
3. Select a printer, and then adjust the settings, if necessary.
4. Print the document.
Maintain the Printer
RReeppllaacciinngg aa PPrriinntt CCaarrttrriiddggee
Note: If the tray is extended, then remove it before replacing
a cartridge.
1. Open the front door, then firmly push it down.
2. Pull out the print cartridge tray.
1
3. Remove the used print cartridge.
4. Unpack the new print cartridge.
Warning—Potential Damage: Do not expose the underside
of the print cartridge to direct light. Extended exposure to
light may cause print quality problems.
Warning—Potential Damage: Do not touch the underside
of the print cartridge. Doing so may affect the quality of
future print jobs.
5. Insert the new print cartridge.
6. Insert the print cartridge tray, and then close the door.
RReeppllaacciinngg tthhee WWaassttee TToonneerr BBoottttllee
1. Remove the used waste toner bottle.
Note: To avoid spilling the toner, place the bottle in an
upright position.
2. Unpack the new waste toner bottle.
3. Insert the new waste toner bottle.
LLooaaddiinngg tthhee TTrraayy
CAUTION—TIPPING HAZARD: To reduce the risk of
equipment instability, keep the tray closed until needed.
1. Remove the tray.
Note: To avoid paper jams, do not remove the tray while the
printer is busy.
2. Flex, fan, then align the paper edges before loading.
2
3. Load the paper stack with the printable side face-up.
Load letterhead face-up with the header toward the back of
the tray for one-sided printing.
Load letterhead face-down with the header toward the front
of the tray for two-sided printing.
Do not slide paper into the tray.
4. To avoid paper jams, make sure that the stack height is below the
maximum paper fill indicator.
5. Adjust the guides to match the size of the paper that you are
loading.
6. Insert the tray.
7. If necessary, set the paper size and paper type from the control
panel to match the paper loaded.
LLooaaddiinngg tthhee MMaannuuaall FFeeeeddeerr
1. Adjust the guide to match the size of the paper that you are
loading.
2. Load a sheet of paper with the printable side face-up.
Load letterhead with the printable side faceup and the top
edge entering the printer first for one-sided printing.
3
Load letterhead with the printable side face-down and the top
edge entering the printer last for two-sided printing.
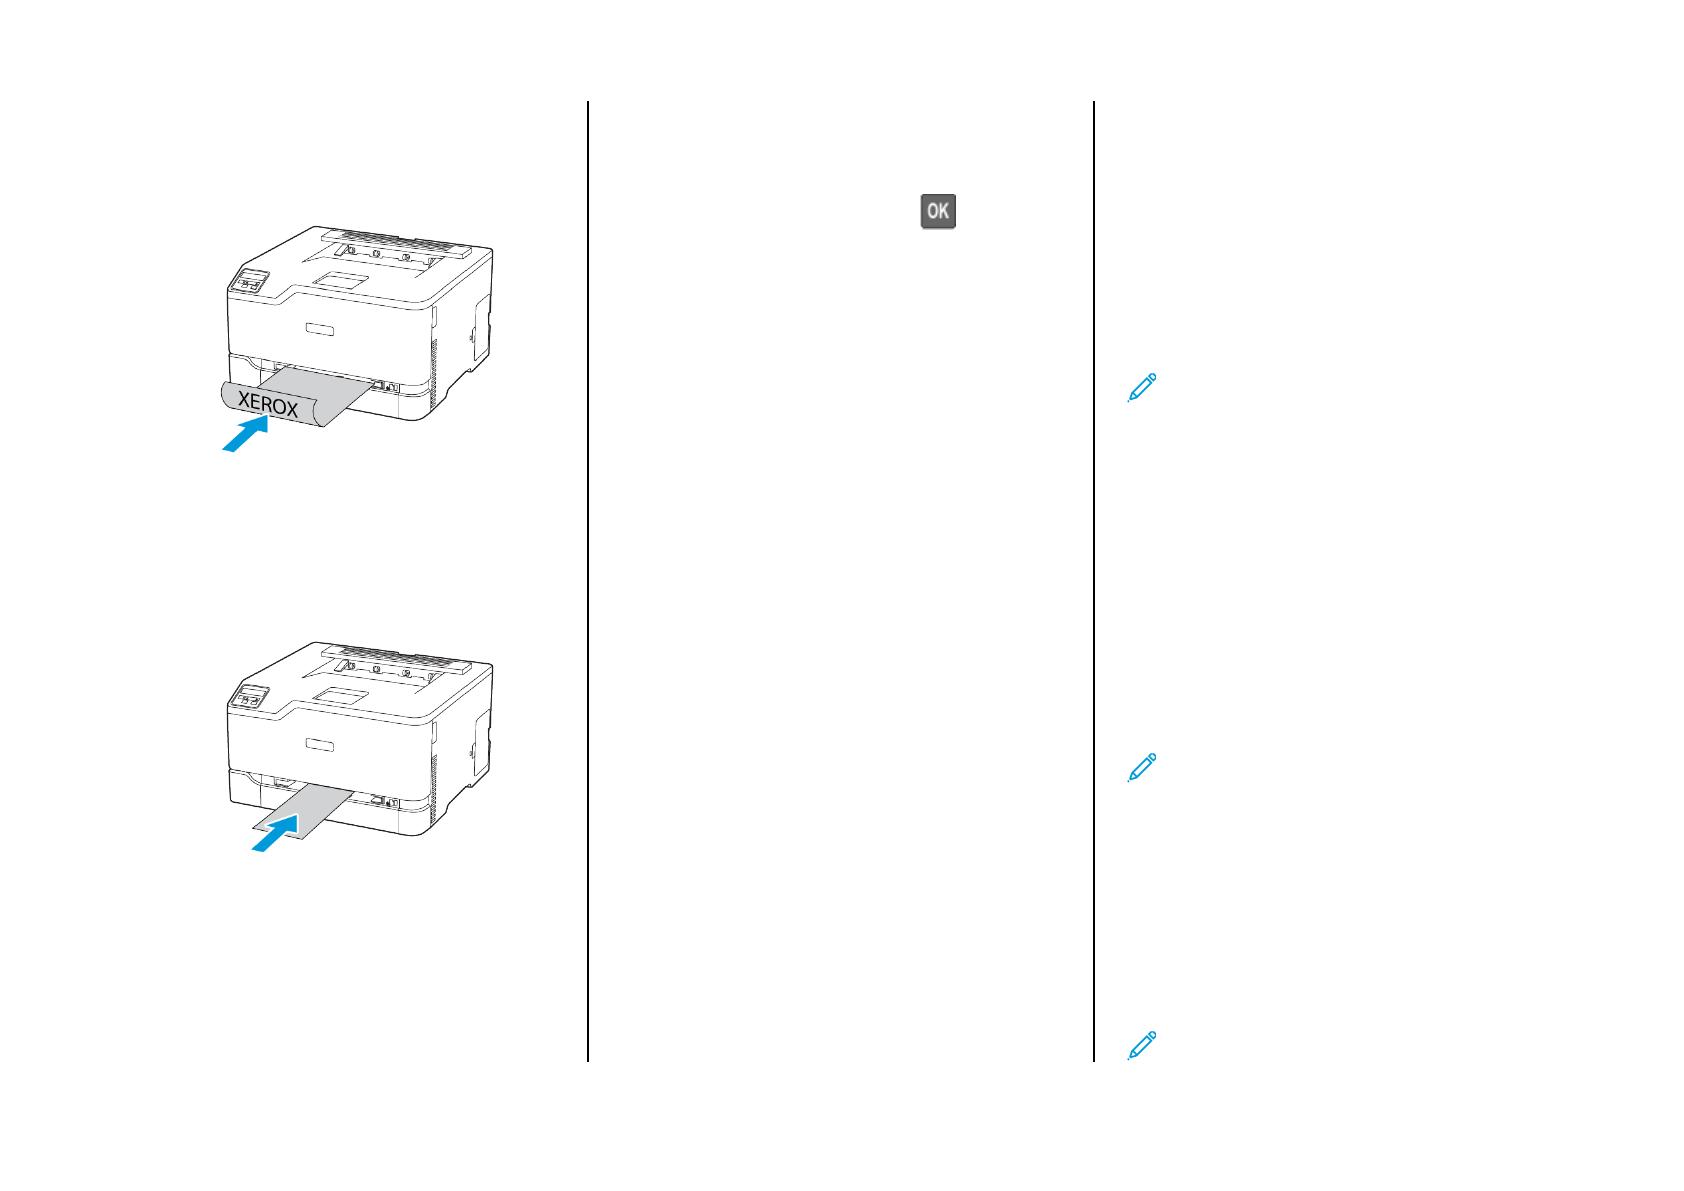
Load envelope with the flap side down and against the right
side of the paper guide.
3. Feed the paper until its leading edge gets pulled in.
To avoid paper jams, do not force paper into the manual
feeder.
Before loading another sheet, wait for a message to appear
on the display.
SSeettttiinngg tthhee PPaappeerr SSiizzee aanndd TTyyppee
1. From the control panel, navigate to Settings > PaperTray >
Configuration > Paper Size/Type, then select a paper source.
For non-touch-screen printer models, press to navigate
through the settings.
2. Set the paper size and type.
UUppddaattiinngg FFiirrmmwwaarree
Some applications require a minimum device firmware level to
operate correctly.
For more information on updating the device firmware, contact your
representative.
1. Open a web browser, and then type the printer IP address in the
address field.
View the printer IP address on the printer home screen. The IP
address appears as four sets of numbers separated by periods,
such as 123.123.123.123.
If you are using a proxy server, then temporarily disable it to
load the web page correctly.
2. Click Settings > Device > Update Firmware.
3. Do either of the following:
Click Check for updates > I agree, start update.
Upload the flash file.
1. Browse to the flash file.
2. Click Upload > Start.
CCoonnffiigguurriinngg WWii--FFii DDiirreecctt
Wi-Fi Direct is a Wi-Fi-based peer-to-peer technology that allows
wireless devices to connect directly to a Wi-Fi Direct-enabled printer
without using an access point (wireless router).
1. From the control panel, navigate to Settings > Network/Ports >
Wi-Fi Direct.
For non-touch-screen printer models, to navigate through the
settings, press OK.
2. Configure the settings.
Enable Wi-Fi Direct: Enables the printer to broadcast its own
Wi-Fi Direct network.
Wi-Fi Direct Name: Assigns a name for the Wi-Fi Direct
network.
Wi-Fi Direct Password: Assigns the password for negotiating
the wireless security when using the peer-to-peer connection.
Show Password on Setup Page: Shows the password on the
Network Setup Page.
Auto-Accept Push Button Requests: Lets the printer accept
connection requests automatically.
Note: Accepting push-button requests automatically is not
secured.
By default, the Wi-Fi Direct network password is not visible on
the printer display. To show the password, enable the
password peek icon. From the control panel, navigate to
Settings > Security > Miscellaneous > Enable Password/PIN
Reveal.
To know the password of the Wi-Fi Direct network without
showing it on the printer display, from the control panel
navigate to Settings > Reports > Network > Network Setup
Page.
CCoonnnneeccttiinngg aa MMoobbiillee DDeevviiccee ttoo tthhee PPrriinntteerr
Before connecting your mobile device, make sure that Wi-Fi Direct has
been configured. For more information, see Configuring Wi-Fi Direct.
CCoonnnneeccttiinngg UUssiinngg WWii--FFii DDiirreecctt
Note: These instructions apply only to Android mobile
devices.
1. From the mobile device, go to the settings menu.
2. Enable Wi-Fi, and then tap Wi-Fi Direct.
3. Select the printer Wi-Fi Direct name.
4. Confirm the connection on the printer control panel.
CCoonnnneeccttiinngg UUssiinngg WWii--FFii
1. From the mobile device, go to the settings menu.
2. Tap Wi-Fi, and then select the printer Wi-Fi Direct name.
Note: The string DIRECT-xy, where x and y are two random
characters, is added before the Wi-Fi Direct name.
4
3. Enter the Wi-Fi Direct password.
CCoonnnneeccttiinngg tthhee PPrriinntteerr ttoo aa WWii--FFii NNeettwwoorrkk
Note: This feature is available only in some printer models.
Before you begin, make sure that:
Active Adapter is set to Auto. From the control panel, navigate to
Settings > Network/Ports > Network Overview > Active Adapter.
For non-touch-screen printer models, to navigate through the
settings, press OK.
The Ethernet cable is not connected to the printer.
UUssiinngg tthhee WWiirreelleessss SSeettuupp WWiizzaarrdd iinn tthhee PPrriinntteerr
These instructions apply only to some printer models.
Before using the wizard, make sure that the printer firmware is
updated.
1. From the home screen, touch the Wi-Fi icon, then touch Set up
now.
2. Select a Wi-Fi network, and then type the network password.
3. Touch Done.
UUssiinngg tthhee PPrriinntteerr CCoonnttrrooll PPaanneell
1. From the control panel, navigate to Settings >Network/Ports >
Wireless >Setup On Printer Panel.
For non-touch-screen printer models, to navigate through the
settings, press OK.
2. Select a Wi-Fi network, and then type the network password.
For Wi-Fi-network-ready printer models, a prompt to set up the
Wi-Fi network appears during initial setup.
Clearing Jams
AAvvooiiddiinngg JJaammss
LLooaadd PPaappeerr PPrrooppeerrllyy
Make sure that the paper lies flat in the tray.
Correct loading of paper Incorrect loading of paper
Do not load or remove a tray while the printer is printing.
Do not load too much paper. Make sure that the stack height is
below the maximum paper fill indicator.
Do not slide paper into the tray. Load paper as shown in the
illustration.
Make sure that the paper guides are positioned correctly and are
not pressing tightly against the paper or envelopes.
Push the tray firmly into the printer after loading paper.
UUssee RReeccoommmmeennddeedd PPaappeerr
Use only recommended paper or specialty media.
Do not load paper that is wrinkled, creased, damp, bent, or curled.
Flex, fan, and align the paper edges before loading.
Do not use paper that has been cut or trimmed by hand.
Do not mix paper sizes, weights, or types in the same tray.
Make sure that the paper size and type are set correctly on the
computer or printer control panel.
Store paper according to manufacturer recommendations.
IIddeennttiiffyyiinngg JJaamm LLooccaattiioonnss
When Jam Assist is set to On, the printer might attempt to flush
blank pages or pages with partial prints after a jammed page has
been cleared. Check your printed output for blank pages.
When Jam Recovery is set to On or Auto, the printer reprints
jammed pages.
5
1. Standard output tray
2. Manual feeder
3. Standard tray
4. Door B
PPaappeerr JJaamm iinn tthhee SSttaannddaarrdd TTrraayy
1. Open door B.
CAUTION—HOT SURFACE: The inside of the printer might
be hot. To reduce the risk of injury from a hot component,
allow the surface to cool before touching it.
2. Remove the jammed paper.
Note: Make sure that all paper fragments are removed.
3. Close the door.
4. Remove the tray and the manual feeder.
5. Remove the jammed paper.
Note: Make sure that all paper fragments are removed.
6. Insert the manual feeder and the tray.
6
PPaappeerr JJaamm iinn tthhee OOppttiioonnaall TTrraayy
1. Open door B.
CAUTION—HOT SURFACE: The inside of the printer might
be hot. To reduce the risk of injury from a hot component,
allow the surface to cool before touching it.
2. Remove the jammed paper.
Note: Make sure that all paper fragments are removed.
3. Close the door.
4. Open door E.
5. Remove the jammed paper.
Note: Make sure that all paper fragments are removed.
6. Close the door.
7. Remove the optional tray.
8. Remove the jammed paper.
Note: Make sure that all paper fragments are removed.
9. Insert the tray.
PPaappeerr JJaamm iinn tthhee SSttaannddaarrdd OOuuttppuutt TTrraayy
Remove the jammed paper.
Note: Make sure that all paper fragments are removed.
7
PPaappeerr JJaamm iinn tthhee MMaannuuaall FFeeeeddeerr
1. Remove the tray and the manual feeder.
2. Remove the jammed paper.
Note: Make sure that all paper fragments are removed.
3. Insert the manual feeder and the tray.
PPaappeerr JJaamm iinn DDoooorr BB
1. Open door B.
CAUTION—HOT SURFACE: The inside of the printer might
be hot. To reduce the risk of injury from a hot component,
allow the surface to cool before touching it.
2. Remove the jammed paper from any of the following areas:
Note: Make sure that all paper fragments are removed.
Fuser area
Below the fuser area
8
Duplex unit 3. Close the door.
9
© 2021 Xerox Corporation. All rights reserved. Xerox®is a trademark of Xerox Corporation in the United States and other countries.
Apple®, iPad®, iPhone®, iPod®, iPod touch®, AirPrint®and the AirPrint Logo®are trademarks or registered trademarks of Apple Inc. in the U.S. and other countries. Google Cloud Printweb printing service,
Gmailwebmail service, and Androidmobile technology platform are trademarks of Google, Inc. Microsoft®, Windows Vista®, Windows®, Windows Server®, and OneDrive®are registered trademarks of
Microsoft Corporation in the United States and other countries. Mopria is a trademark of the Mopria Alliance. Wi-Fi CERTIFIED Wi-Fi Direct®is a trademark of the Wi-Fi Alliance. All other trademarks are the
property of their respective owners. 702P08609
BR32747
607E39340
10
  • Page 1 1
  • Page 2 2
  • Page 3 3
  • Page 4 4
  • Page 5 5
  • Page 6 6
  • Page 7 7
  • Page 8 8
  • Page 9 9
  • Page 10 10

Xerox C230 Reference guide

Category
Print & Scan
Type
Reference guide

Xerox C230, your new go-to printer, is designed to elevate your printing experience with its diverse capabilities. Effortlessly print from your Apple device using AirPrint®, or tap into the mobile printing revolution with Mopria™ Print Service and Wi-Fi Direct®, connecting directly to the printer without an access point. Unleash your creativity and print documents, emails, and images from the comfort of your mobile device.

Ask a question and I''ll find the answer in the document

Finding information in a document is now easier with AI