Page is loading ...

COGNEX
®
DataMan
®
8050
Quick Reference Guide

ii DataMan 8050 Quick Reference Guide DataMan 8050 Quick Reference Guide iii
Getting Started
About DataMan 8050 • DataMan 8050 Accessories •
Physical Layout of the Reader and the Base Station
Page 4
1
DataMan 8000 Software
Overview of Setting Up the Reader • Install DataMan
8000 Software • Start the Setup Tool • Use the Setup
Tool Menu Bar
Page 12
2
Connection Options
Connecting Through Ethernet • Troubleshooting an
Ethernet Connection • Connecting Through RS-232 •
Connecting through USB
3
Using DataMan 8050 Wireless
Readers
Connecting to a Wireless DataMan 8050 • Pairing Strategy
• Base Station Routing Capabilities • Ad-hoc Mode •
Infrastructure Mode • Buffering Data • Summary of
Wireless Indicators • Charging • Changing Batteries
4
Industrial Protocols,
Compliance Information,
Warnings and Notices
Industrial Protocols • DataMan 8050 Reader and Base
Station Specications • Agency Compliance Statements
6
Reading Codes with the
DataMan 8050
Trigger Types • DataMan 8050 Imager Specications •
Map of Field of View and Reading Distances
5
Page 18
Page 22
Page 42
Page 44

4 DataMan 8050 Quick Reference Guide DataMan 8050 Quick Reference Guide 5
About DataMan 8050
The DataMan 8050 readers offer the industry’s most advanced technology
for reading 1D and 2D codes regardless of size, quality, printing method or
surface, and belong to the only industrial handheld ID reader family that offers
Industrial Ethernet communication.
DataMan 8050 is available with patented 1DMax+ with Hotbars, class-leading
2-D algorithms and future-proof modular communication slide-ins.
The DataMan 8050 readers use bright eld illumination
and and class leading algorithms in two models: 8050
and 8050X. The DataMan 8050 is designed for high-speed
reading of challenging label-based barcodes and the 8050X
reads more challenging barcodes, including direct part mark
barcodes.
The DataMan 8050 readers are available with the following communication
options:
• USB
• RS-232
• Bluetooth
• WiFi
An intelligent base station is also
provided when the DataMan 8050
reader uses the wireless (Bluetooth
or WiFi) communication module. The
base station acts as a router between
the reader and your computer or
network.
Infrastructure Mode does not use the
base station for communication (see
page 30-31).
The DataMan 8000 series base stations are available with the following
communication options:
Base Station
Communication
Wireless Protocol
Ethernet with
Industrial
Protocols
USB
RS-232
Bluetooth WiFi
DMA-CBASE-01
√
DMA-IBASE-BT-01
√ √ √
DMA-IBASE-BT-02
√ √ √ √
DMA-IBASE-01
√ √ √ √
*NOTE: Henceforward, the term ‘wireless’ refers in this document to the WiFi or to
the Bluetooth communication module of the reader.

Serial/USB slide-in
DMCM-SERIALM-00
Ethernet slide-in
DMCM-ENETM-00
Bluetooth slide-in
DMCM-BTM-00
Intelligent Base
Station
DMA-IBASE-01
Charging Base Station
DMA-CBASE-01
Intelligent Bluetooth
Base Station
DMA-IBASE-BT-02
POE Adapter
CPS-AC-POE1A-xx
Power Supply for
base station
DMA-24VPWR-xx
Power Supply for
reader
DM100-PWR-00
POE Adapter
CPS-24V-POE1
POE Adapter
CPS-24V-POE4
Stand
DM-STAND-00
RS-232 coiled cable
for reader, 2.5 m
DM8000-RS232-02
RS-232 coiled cable
for reader, 5 m
DM8000-RS232-05
USB cable, 2.5 m
DM8500-USB-00
USB coiled cable, 2.5 m
DM8500-USBC-02
DataMan 8050 Reader Cables
RS-232 industrial cable
for reader, 2.5 m
DM8000-RS232IND-02
Wall Mount
DMA-WALL-8000-00
Battery for the wireless
reader
DMA-HHBATTERY-01
Multi-Battery Charger
DMA-MBC-xx
Wall Mount for Base
Station
DMA-IBASE-WALL-00
Intelligent Bluetooth
Base Station
DMA-IBASE-BT-01
Wireless slide-in
DMCM-WLESSM-00
6 DataMan 8050 Quick Reference Guide DataMan 8050 Quick Reference Guide 7
DataMan 8050 Accessories

Ethernet cable, 5 m
DM8000-ECABLE-05
Ethernet cable, 30 m
DM8000-ECABLE-30
DataMan Base Station Cables
• USB cable for base station: Use any standard USB-A to USB-B 2.0
cable up to 3 meters
• Ethernet cable for base station: Use any standard CAT5/5e, SF/FTP
or S/FTP cable
• DMA-USB-00: Straight 10ft USB cable
Ethernet cable, 2.5 m
DM8000-ECABLE-02
Ethernet Coiled cable, 5m
DM8000-ECABLEC-05*
RJ25 (RJ12) to DSUB9
cable for base station,
5 m
DMA-RS232RJ-05
*Note: Collimated cable length including DM8000-ECABLE-X should not exceed
50 m.
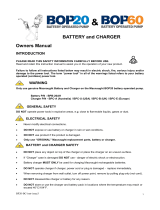
Trigger
(press and
hold to read)
Communication
module insertion
point
LED aimer guide
1. Lanyard hook
2. Indicator light
3. Communication module
insertion point
1
2
3
8 DataMan 8050 Quick Reference Guide DataMan 8050 Quick Reference Guide 9
Physical Layout of the Reader
DataMan 8050 Accessories (Continued)

Connection point with
the reader:
• pairing reader and
base station
• non-wireless
communication
• charging
RS-232
USB
power plug (24V,
max. 13W)
spare battery charger
status indicator
base station
status indicators
spare battery charger
DMA-IBASE-01
Ethernet (with
optional Class 3 PoE
power)
Physical Layout of the Base Station
DMA-IBASE-BT-XX
base station
status indicators
Connection point with
the reader:
• pairing reader and
base station
• non-wireless
communication
• charging
Base station status indicators:
• Power: RED = base powered / BLINK = wrong reader in base
• Communication: BLUE = Wireless link / BLINK = Wireless communication
• Cradle connections: GREEN = reader properly inserted / BLINK = cradle USB
interface communication
USB
power plug
(24V, max.
15W)
Ethernet
alternative
power supply
connector
(24V, max.
15W, polarity
marked on
the plastic
part near the
connector)
RS-232
NOTE:
• DMA-IBASE-BT-01 does not support Ethernet
• DMA-IBASE-BT-02 does support Ethernet
10 DataMan 8050 Quick Reference Guide DataMan 8050 Quick Reference Guide 11

Ethernet RS-232 USB
12 DataMan 8050 Quick Reference Guide DataMan 8050 Quick Reference Guide 13
To be able to connect to your reader or base station on your computer, you
must perform the following steps:
1. Install the Setup Tool on your computer.
2. Select the connection type: Ethernet, Serial, or USB; and connect the
appropriate cabling.
3. Power on your device(s).
Overview of Setting Up the Reader
RS-232/USB
connection
Install DataMan 8000 Software
1. Check the DataMan Release Notes for a full list of system
requirements.
2. Download the DataMan Setup Tool from http://www.cognex.com/
support/dataman and follow the on-screen steps.
3. Connect the DataMan 8050 to your PC.
4. Launch Setup Tool and click Refresh. The reader or the base station
appears under COM ports or Network devices.
5. Select a COM port or a Network device and click Connect.
Ethernet connection
“DM8xx0” with the last 6
characters of MAC address,
printed on the back of the
reader or the base station

WARNING
Disconnect DataMan from power before inserting/removing
communication modules.
Use the DM8000-RS232-02 cable (2.5 meters) or the DM8000-RS232-05 cable
(5 meters). For power supply, use the DataMan 8000 Power Supply (DM100-
PWR-000).
1
Observe the following electrical requirements:
WARNING
For proper RS-232
operation, do not apply
any voltage to pin 9.
Power on the RS-232 cable can be supplied by either the DC Power Plug
or Pin 1 of the D-SUB. DO NOT use both in parallel.
14 DataMan 8050 Quick Reference Guide DataMan 8050 Quick Reference Guide 15
Connecting a DataMan 8050 Through RS-232
2. With a 2.5 mm
Allen Wrench,
tighten the screws
so that the slide-in
is rmly locked.
3. Insert the plug and slide
the cable lock up to the
reader and twist the cable
lock in place.
1. Connect the
serial slide-
in (DMCM-
SERIALM-00) to
your DataMan
8050.
location of the
two screws
5 GND
9 Reserved
4 N/C
8 RTS
3 RxD
7 CTS
2 TxD
6 N/C
1 VCC PWR
VCC
GND
1. 6VDC power supply (DM100-PWR-000), a 5.5mm x 2.1mm DC Power
Plug
2. VCC = +4.75V up to +6.0V for 2.5 m cable
VCC = +5.5V up to +6.0V for 5.0 m cable

16 DataMan 8050 Quick Reference Guide DataMan 8050 Quick Reference Guide 17
Connecting a DataMan 8050 Through USB
WARNING
Disconnect DataMan from power before inserting/removing
communication modules.
2. With a 2.5 mm
Allen Wrench,
tighten the screws
so that the slide-in
is rmly locked.
3. Insert the plug and slide the
cable lock up to the reader and
twist the cable lock in place.
1. Connect the
serial slide-
in (DMCM-
SERIALM-00)
to your
DataMan 8050.
location of the
two screws
Use the DM8500-USB-00 cable (2.5 meters) or the DM8500-USBC-02
cable (2.5 meters).
NOTE: DataMan 8050 does not require an external power supply.
Using Your Device Through USB
If you connect your reader with the coiled USB cable, you must use
your device in USB 1.1 mode. With a straight USB cable, you can use
your device in both modes.
Change the USB Connection in the Serial tab of the Communication
Settings pane in Setup Tool, or scan the appropriate code from the
DataMan Conguration Codes document.
You can also switch the USB mode (CDC or HID) of both the reader and
the base station with a pair of RP codes. Perform the following steps:
1. Disconnect from Setup Tool if
you are connected.
2. Scan the “USB Keyboard” code
from the DataMan Conguration
Codes document.
3. Start scanning codes with your
corded reader.
1. Disconnect from Setup Tool if
you are connected.
2. Scan the “Enable USB
Keyboard for the base
station” code from the
DataMan Conguration Codes
document.
3. Start scanning codes with your
wireless reader.
Bluetooth

18 DataMan 8050 Quick Reference Guide DataMan 8050 Quick Reference Guide 19
Connecting to a Wireless DataMan 8050 Through a Base Station
2. With a 2.5 mm
Allen Wrench,
tighten the
screws so that
the slide-in is
rmly locked.
1. Connect the
wireless slide-in
(DMCM-BTM-00)
to your DataMan
8050.
3. Insert the battery.
WARNING
Remove battery from your DataMan before inserting/removing
the communication module.
location of the
two screws
4. Insert the plug and twist it in place.
5. Power up the DMA-IBASE-BT-XX base station using a 24V power
supply (DMA-24VPWR-XX). In the case of a DMA-IBASE-01 base
station, use either a 24V power supply, or a Class 3 Power Over
Ethernet adapter.
6. Connect your base station to your PC using either serial, USB or
Ethernet communication.
Ethernet
connection
RS-232
connection
USB connection
Power
DMA-IBASE-BT-XX
Ethernet
connection
RS-232
connection
USB connection
Power
DMA-IBASE-01

20 DataMan 8050 Quick Reference Guide DataMan 8050 Quick Reference Guide 21
Wireless Connections (Continued)
Observe the following electrical requirements when connecting the base
station through RS-232:
WARNING
For proper RS-232
operation, do not apply
any voltage to pin 9.
Power to base station can be supplied by either the DC power plug or by wiring
in 24V. DO NOT use both in parallel.
The DC power plug is a 24VDC power supply (DMA-24VPWR-xx), 3.5mm x
1.3mm.
5 GND
9 Reserved
4 N/C
8 RTS
3 RxD
7 CTS
2 TxD
6 N/C
1 N/C
VCC
GND
NOTE: Be careful to use the appropriate connector for RS-232. (See page 19.)
7. When the base station is powered up, scan the Pair scan code and
place your reader into the base station. The base station’s status
indicator becomes green. When the wireless reader is removed from
the base, a wireless connection is established. The status indicator
of both the base station and the reader become blue and you can
hear a beep. Blue lights indicate that the reader and the base have
successfully paired and are communicating.
8. Connect to your base station or to the wireless reader. You have the
following connection options:
Base
Station
Connection
Type
Connect to Reader in the Setup Tool Connection
Channels
RS-232 Wireless reader appears: COM port
(Base Station does not appear)
terminal program
Setup Tool
USB Base Station appears: COM port 1
Wireless reader appears: COM port 2
terminal program
Setup Tool
Ethernet Base station appears: Network device 1
Wireless reader appears: Network device 2
terminal program
Setup Tool

22 DataMan 8050 Quick Reference Guide DataMan 8050 Quick Reference Guide 23
9. Lift your reader up from the base station and start reading codes.
NOTES
• When the reader is on the base station, communication is established by
means of cradle contacts. Wireless communication is disabled.
• Congure wireless communication settings by connecting to the base
station. In order for the changed settings to be synchronized between the
DataMan 8050 wireless reader and the base station, place your reader in the
base station after your changes are saved. To assign a static IP address to
the base station or the reader when communicating via Ethernet, connect to
the base station in Setup Tool. The base station, however, auto-assigns the
IP address to the reader when they become paired.
• When you connect with the base station to a terminal program, your
wireless reader sends decode results to the terminal, but you cannot send
commands to the reader.
• If you want to unpair your reader from the base station, you can either click
Unassign in the Bluetooth or Wireless tab of the Communication Settings
pane of Setup Tool (when you are connected either with the reader or the
base station), or scan the “Unassign Reader” reader conguration code.
• If you place the wrong reader (that is, a reader that is not associated with
the base station) into the base station, the base station status indicator
ashes red and a series of short beeps can be heard.
Wireless Connections (Continued) Pairing Strategy (DMA-IBASE-BT-XX)
In order to pair the base station and the reader in a single step without
considering former pairing states and without using Setup Tool, scan the Pair
code from the scan code sticker on the base station.
The reader then blinks green/blue
until it gets paired with the base
station (or until the end of the 20
second timeout period). When the
reader is put on the base station,
the base station drops its pairing
with its old reader and pairs with the
new reader.
IMPORTANT!
Scanning the Pair code puts the base station and the reader put on it into
force pairing mode.
This means that the reader and the base it is put on get paired regardless of
any assignments they both had previously. This force pairing mode is valid
for 20 seconds after reading the Pair code.

24 DataMan 8050 Quick Reference Guide DataMan 8050 Quick Reference Guide 25
Pairing Strategy (Continued)
When the reader is put onto another
(unpaired) base station without any
previous actions, the base station
signals this event with beeping and red
ashing of its indicators.
The base station that is paired
with a certain reader signals a bad
reader alert (beeps and ashing
red indicators) also when another,
unassigned reader is put into it.
The base station’s indicators turn
green to indicate successful pairing.
Base Station Routing Capabilities
The base station is visible as connected through either RS-232, USB or
Ethernet, but it routes data through the wireless interface to the reader.
RS-232/
USB
reader
base station
PC
NETWORK
Ethernet
Bluetooth

26 DataMan 8050 Quick Reference Guide DataMan 8050 Quick Reference Guide 27
Ad-hoc Mode
It is possible to connect to the reader wirelessly with the computer in ad-hoc
mode (using a reader-created Wi connection). Reset the reader to factory
defaults (this congures the device to ad-hoc mode), and after the device
appears under Wi connections, connect to it with Setup Tool and then use the
Wireless tab under Communication Settings to congure authentication and
encryption (which are not congured by default). For more information, see the
Communications and Programming Guide.
NOTE:
• The base station is only used for charging the reader in this setup. If an intelligent
base station is used, the reader has to be unassigned in Setup Tool (connected to
the base station) under Communication Settings > Wireless tab if the reader
has already been placed in the base station.
• Also note that placing the reader in the intelligent base station automatically re-
assigns it to the base station unless the base station is unplugged from the network
rst.
Infrastructure Mode
It is possible to connect to the reader in infrastructure mode using Wi
connection. You need to reset the reader to factory defaults, connect
to the device in ad-hoc mode, and then use the Wireless tab under
Communication Settings to activate and congure infrastructure
mode.
Infrastructure mode requires a router as an access point. Encryption
and authentication are available as seen in the table below. See the
Communications and Programming Guide for detailed information.
NOTE:
• The base station is only used for charging the reader in this setup. If an
intelligent base station is used, the reader has to be unassigned in Setup Tool
(connected to the base station) under Communication Settings > Wireless
tab if the reader has already been placed in the base station.
• Also note that placing the reader in the intelligent base station automatically
re-assigns it to the base station unless it is unplugged from the network rst.
Authentication mode Encryption Requirements
Open System WEP-40, WEP-104 passphrase
WPA-PSK, WPA2-PSK TKIP, AES, TKIP/AES passphrase
EAP-TLS TKIP, AES, TKIP/AES • Client’s certificate
• CA’s certificate
• Client’s private key
• Client’s username
PEAP-MSCHAPV2 TKIP, AES, TKIP/AES • CA’s certificate
• Client’s username
• Client’s password

28 DataMan 8050 Quick Reference Guide DataMan 8050 Quick Reference Guide 29
Wireless Reader: Buffering Data
When you are within the wireless range of the base station, your wireless
reader sends decoded data to your PC through the base station, just as if you
used a tethered reader. You can also see the decoded images in Setup Tool, if it
is running and is connected to the reader.
When you leave the wireless range, however, you lose connection to your PC,
but you can still keep reading codes. The decoded data is saved in the buffer of
the reader.
This buffered data appears on your PC again when you come back within the
wireless range, but ONLY IF you were connected to a terminal program when
you left the wireless range.
Buffered read results on the reader are not displayed in Setup Tool; they are
only transmitted over an existing keyboard emulation, RS-232 Serial or TCP/IP
Telnet connection. NOTE that the images acquired by the reader when it is out
of the wireless range are never saved, and cannot be retrieved.
Open a connection with the reader in a terminal program so that you gain the
buffered data when wireless connection is established again.
See the following table for connection options according to communication
type:
Base Station Con-
nection Type
How to Connect
RS-232 Connect to the COM port of the base station.
USB Connect to the COM port of the wireless reader.
Base Station Con-
nection Type
How to Connect
Ethernet Connect to the terminal program using the IP address of
the reader. To nd out the IP address, go to the Connect
to Reader pane in Setup Tool and hover your mouse
over the reader. The IP address appears.
USB Keyboard Open the text editor or your program of choice to use
keyboard emulation. When you return to the wireless
range, keyboard emulation continues, starting with the
buffered data.
While you are still within the wireless range, the reader occasionally
blinks blue to indicate that the wireless connection is established.
When the reader leaves the
wireless range, the base station’s
signal becomes red.
Blinking blue status indicator:
wireless connection is alive.

30 DataMan 8050 Quick Reference Guide DataMan 8050 Quick Reference Guide 31
status indicator beeps twice:
your reader is ofine while
decoding symbols
status indicator blinks
magenta: your reader is
ofine
when the buffer is full, the
reader beeps and the status
indicator becomes white
When the buffer is full, no more codes are read. The reader does not discard
the oldest read.
When the reader is ofine, good reads are indicated with 2 short beeps and the
selected good read status indicator color (green by deafult).
When you leave the wireless range, you can still keep reading codes. The
reader going ofine is indicated by a long beep and the status indicator ashes
magenta.
Wireless Reader: Buffering Data (Continued)
Condition Status Indicator:
Reader
Status Indicator: Base
Station
Sounds
Reader in
wireless
range of base
station
When the reader is
awake, blinking blue
indicates wireless
connection with base.
When the reader is
ofine, no indicator.
Pull the trigger to wake
it up and it will blink
blue.
Good read: green,
single beep (default)
No read: red, no beep
(default)
Reader out of the base
station and reader is
awake: steady blue.
Reader out of the base
station and reader is
ofine: steady red.
Paired reader in the base
station: ashing green.
Base station is receiving
data or images from
reader: steady blue.
Good read: 1 beep
(default)
No read: no beep
(default)
Reader out
of wireless
range of base
station
Ofine: When the
reader wakes up out
of the wireless range,
there is no indicator.
Good read: green
(default)
No read: red (default)
Reader ofine: steady
red.
Long beep when
you leave the
wireless range.
Good read: 2 beeps
No read: no beep
Reader out
of wireless
range, buffer
is full
Good read: green and
then white.
No read: red (default)
Reader ofine: steady
red
Good read: long
beep
No read: no beep
Summary of Wireless Buffering Indicators

32 DataMan 8050 Quick Reference Guide DataMan 8050 Quick Reference Guide 33
Wireless Reader: Charging
Blinking red status
indicator indicates low
battery or thermal
shutdown mode.
When you are reading codes with your wireless reader, blinking red status
indicators will indicate a low battery. As the battery discharges, the blink
frequency increases.
You can also check the status of the battery in Setup Tool.
Place the reader on the base station for charging. Make sure that the
pins at the end of the handle make contact with the pins in the base
station.
Paired Reader Charging
Paired Reader Fully Charged
1
2

34 DataMan 8050 Quick Reference Guide DataMan 8050 Quick Reference Guide 35
Condition Status Indicator: Reader Status Indicator: Base Station
Battery low
ashing red indicators • steady blue, indicating
connection
• ashing blue, indicating
data transfer
Reader is charging in
the base station
steady red indicators • steady green, indicating
connection
• ashing green, indicating
data transfer
Reader is fully charged
in the base station
steady green
indicators
• steady green, indicating
connection
• ashing green, indicating
data transfer
Refer to the following table for a summary of indicators regarding charging.
Wireless Reader: Charging (Continued)
To change batteries, perform the following steps:
Wireless Reader: Changing Batteries
1. Twist the reader’s end cap, and take it off.
2. Hold the reader in an upright position and the battery will slide out
of the handle. NOTE that you may need to shake the reader slightly.
CAUTION
The battery used in these devices may
present a risk of re or chemical burn
if mistreated. Do not disassemble,
heat above 60ºC (140ºF), or incin-
erate. Replace battery with Cognex
DMA-HHBATTERY-01 only. The use of
another battery may present a risk of
re or explosion.

36 DataMan 8050 Quick Reference Guide DataMan 8050 Quick Reference Guide 37
Wireless Reader: Changing Batteries (Continued)
Make sure that the
triangle aligns with
the circle when the
cover is locked.
4. Put the end cap back on and twist it.
3. Put the replacement battery into the slot. The battery has a small triangle on
one side. Make sure that you insert the battery in a way that the triangle end
goes into the slot rst.
5. If using DMA-CBASE-01, place the battery in the spare battery
charger in the direction of the small triangle of the battery.
When you are charging the auxilliary battery, the base station’s spare
battery status indicator displays either charging in progress (red) or fully
charged (green).
6. Dispose of used battery promptly. Keep it away from children. Do not
disassemble and do not burn it. Use the appropriate separate take-back
systems for battery disposal.

38 DataMan 8050 Quick Reference Guide DataMan 8050 Quick Reference Guide 39
Trigger Types
The DataMan 8050 trigger mode determines when the reader attempts to read
a code. Use Setup Tool or the appropriate reader conguration codes to change
trigger types.
The following trigger types are supported:
• Presentation: The LED aimer is always on.
• Manual (default): Begins acquiring images when you press the trigger
button on the reader, and continues acquiring images until a symbol is found
and decoded or you release the button.
DataMan 8050 Imager Specications
Specication DataMan 8050 Imager
Image Sensor 1/3 inch CMOS
Image Sensor
Properties
6.0 µm square pixels
Image Resolution
(Pixels)
752 x 480
Map of Field of View and Reading Distances
1D
2D
100mm
in
0
0
3
200
300
6
9
12
198 mm (7.8 in)
58 mm (2.28 in)
(0.86-1.7 in)
10 mil 7-120 mm (0.27-4.7 in)
20 mil
7-180 mm (0.27-7.1 in)
13 mil
25-185 mm (0.98-7.3 in)
7 mil 7-125 mm (0.27-4.9 in)
5 mil 22-44 mm
0
mm
in
100
100
200
200
6
6
3
3
20 mil
40-254 mm (1.6-10 in)
NOTE that due to tolerances, ranges can vary by +/- 5 mm for small
codes to +/- a couple of centimeters for large codes.
/