
LiteTouch Quick Start Guide
Power
1. Connect the supplied power cord firmly into the AC Input located on the back side of your LiteTouch panel. If
facing front of panel the AC input is located on the right hand side.
2. Connect the other end of the power cord to a 120v AC outlet.
3. Toggle power switch to ON. It is located beside the AC input.
4. Press the Power button located on the front of the bezel. (LED will turn green when powered on.)
Connecting your PC to LiteTouch (HDMI)
1. Connect your HDMI cable to your PC and to one of the five HDMI ports located on LiteTouch. We recommend
using input HDMI 1 for your first device. If facing the front of the panel HDMI 1 is located on the back of the
panel on the bottom left.
Connecting your PC to LiteTouch (VGA)
1. Connect your VGA cable to your PC and to the VGA input located on LiteTouch. If facing the front of the
panel the VGA input is located on the back of the panel on the bottom left.
2. If using a VGA cable with audio you must plug the stereo 1/8” cable into the PC audio jack located directly
beside the VGA input on your LiteTouch.
3. The stereo 1/8” cable must also be plugged into the headphone jack on your PC.
4. For touch control on the VGA input you must use Touch-USB4. More info on this can be found below.
Touch Control for your PC
1. Using the supplied USB – A/B cable connect the USB-A side to your PC and the USB-B side to the TOUCH-USB
port number corresponding to the HDMI/VGA input being used on your LiteTouch. The USB ports are
located on the back of the panel on the left hand side.
* Note – There is a HDMI and Touch USB input on the front bezel of your LiteTouch. These work together
and provide a quick way to connect a device without reaching behind your LiteTouch. To use this input
switch to the unnumbered HDMI input on your source menu.
-If using a Windows PC a restart may be required before touch control is operational. Your PC may
automatically find and install a new USB device.
-If using a MAC a touch driver is required. Please contact your LiteTouch representative for the driver.
-If using a Chrome device make sure your OS is up to date. A restart may also be required before touch
control is operational.
Accessory Bag
Your LiteTouch remote will require two AAA batteries.
Volume controls are located on the remote and panel (left and right arrows). The volume can also be controlled
by touch once you press the volume control buttons. Touch the volume control display on the screen and slide
to the desired level.

The magnetic styluses provided are not required for annotation or control but can be used as an alternative to
using your finger.
A small USB dongle is provided for wireless connectivity for the built in Android computer on your LiteTouch.
The dongle should be inserted into USB 2.0 or 3.0 inputs on the back of the panel on the left hand side (Do not
insert this into the PRO PC USB input). See our website at www.LTNTechnologies.com for more information
about the built-in Android Computer.
Annotation
Each LiteTouch panel comes with one license of LitePen annotation and recording software. If you haven’t
received this please contact your LiteTouch representative. There is a guide for using this software on our
website – www.LTNTechnologies.com
Controls
Use the power button or the remote control to turn your LiteTouch on and off. If you have a LiteTouch PRO this
will also boot and shut down the onboard computer without the need to shut down/startup the Windows 10 PC
manually.
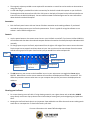
To change inputs on your LiteTouch, swipe inward from the right or left edge of the screen to access the menu.
Tap the input icon to expand it and then select an input. You can also use the source button from the remote
control to bring up a list of inputs. Scroll to the input you would like to select and press OK.
The 3D button on your remote or the Snowflake icon on in your swipe menu can toggle the Freeze option
ON/OFF. When freeze is on the screen contents will continue to be displayed until freeze is turned off. This
allows the presenter to access other items on your computer that you may not want to be displayed to the
audience.
Cleaning your LiteTouch
For screen cleaning use a soft cloth. If using cleaning materials, use a glass cleaner such as Windex. DO NOT
spray directly onto screen. Spray cleanser onto cloth and wipe screen gently and avoid getting any liquids into
bezel.
Keeping the LiteTouch bezel clean is very important. Dust and debris can affect the touch sensors making touch
seem slow or nonresponsive. To clean bezel use dry soft cloth.
-For more information visit: www.LTNTechnologies.com
Input
HDMI 1-4
located on back
HDMI located
on front
PRO PC
Component
RCA Composite
VGA
Freeze
-
 1
1
-
 2
2


LiteTouch 75 PRO Quick start guide
- Type
- Quick start guide
Ask a question and I''ll find the answer in the document
Finding information in a document is now easier with AI
Other documents
-
Infocus IN3114 User manual
-
Infocus IN3100(Series) User manual
-
Infocus IN2100 User manual
-
-
Crestron CNWM User manual
-
Nikon LiteTouch Zoom 80QD User manual
-
Infocus IN3108 Datasheet
-
Cooper Lighting H4 User manual
-
Savant SKL-4000-00 Reference guide
-