Page is loading ...
Page is loading ...

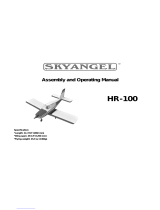
ASW 15 ARF, ASW 15 RTF
3
Specification
Top wingspan: approx. 2050 mm
Overall length: approx. 1020 mm
Total surface area: approx. 32 dm
2
All-up weight: approx. 750 g
Total surface area loading: approx. 24 g / dm
2
Dear customer,
Congratulations on your choice of a factory-assembled
model aircraft from the robbe Modellsport range. Many
thanks for placing your trust in us.
The ASW 15 is available in two versions: the ARF model is
fitted with servos, motor and speed controller, while the RTF
model also comes complete with radio control system, flight
battery and charger.
Note: the recommended accessories for the kit version are
not identical to the components supplied in the ARF and
RTF versions. Please note the recommendations in the
instructions.
Very little work is required to prepare the model ready for fly-
ing. You can make it as easy as possible to operate your
new model safely by taking the trouble to read right through
these instructions attentively, together with the separate
information sheets, before you fly it for the first time.
All directions, such as “right-hand”, are as seen from the
tail of the model, looking forward.
Suitable adhesives (for repairs)
Use robbe Speed Type 2 cyano-acrylate glue (“cyano”) with
the associated activator (“kicker”) for all repairs to this
model.
robbe Speed Type 2 No. 5063
Activator spray No. 5017
Painting, decals
It is not necessary to paint the model.
When applying the decals you can emulate the arrangement
shown in the kit box illustration.
Essential accessories for the ASW 15 RTF,
Order No. 3195RTF
Order No.
AA-size dry cell (non-rechargeable) 8008
8 cells for transmitter
Alternative batteries for rechargeable operation
1.2 V NC cell 8004 or 8005
8 cells for transmitter
Unicharger 6 8500 or
Lader 6 8365
Transmitter charge lead F 1415
Be sure to read the instructions supplied with the battery
charger and the NC cells before recharging them.
Essential accessories for the ASW 15 ARF,
Order No. 3195ARF
Any robbe-Futaba radio control system with at least four
channels
Order No.
Y-lead for the aileron servos F 1423
or
Two servo extension leads F 1419
LiPo battery, 2S 1P, 950 mAh 4827
or
LiPo battery, 3S 1P, 950 mAh 4828
CT-2 connectors for flight battery 4077
Heat-shrink sleeve 5150
Battery charger, e.g. Lipomat 6-800 8478
Essential accessories for flying either version as a pure
glider
1 Switch harness F 1407
1 Receiver battery, e.g. 4KR 1100 4146
Replacement parts Order No.
ASW 15 tail set 31950003
Folding propeller and spinner 31950004
ASW 15 wing set 31950005
ASW 15 fuselage 31950006
ASW 15 decal sheet 31950007
ASW 15 canopy 31950008
Aluminium hub, 3.0 mm 31950011
Glider nose and spacer 31950010
Notes on the building instructions
These building and operating instructions describe both
versions of the ASW 15 model aircraft.
If you have purchased the ARF version, all you have to do is
install the receiver. You can simply skip the description of
the radio control system and the battery charger, which are
intended for the RTF version.
In this case please read the instructions supplied with the
radio control system, the flight pack and the battery char-
ger.
If you have the RTF version, you can skip the following
stage in which the receiver is installed.
The section of the instructions starting with Fig. 13 apply
equally to both versions of the model.
Depending on the version of the model you have purcha-
sed, the servos described and shown in the instructions
may not be the same as those included with your model or
recommended for it.
Preparatory work on the ASW 15 ARF
Fig. 1
Unwind the flexible wire aerial attached to the receiver.
Note: if your radio control system features a six-channel
receiver and mixer functions, the aileron servos can be
connected to two separate channels. In this case you will
need to use two servo extension leads, F 1419, instead of
the Y-lead.
Fig. 2
Apply a strip of Velcro tape to the receiver, and stick the
matching piece in the fuselage.
Pierce a 2 mm Ø hole in the fuselage.
Run the wire aerial through the hole in the fuselage bottom
and out of the fuselage.
Do not deploy the aerial inside the fuselage tail boom.
Assembly and operating instructions
No. 3195ARF
No. 3195RTF

ASW 15 ARF, ASW 15 RTF
4
Fig. 3
Connect the servos, the speed controller and the Y-lead to
the receiver. Read the instructions supplied with the RC
system to ensure that you connect the servos to the correct
receiver sockets.
Install the receiver in the fuselage, running the aerial
towards the tail.
Fig. 4
Deploy the aerial along the fuselage and tape it to the tail
end.
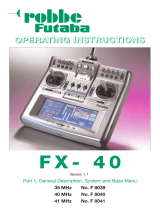
Figs. 5 and 6, the transmitter controls
- A: Operating display
- B: Stick for functions 1 and 2
- C: Trim for function 1
- D: Trim for function 2
- E: On / Off switch
- F: Transmitter crystal holder
- G: Stick for functions 3 and 4
- H: Trim for function 3
- I: Trim for function 4
- J: Battery compartment and cover
- K: Reverse, function 1
- L: Reverse, function 2
- M: Reverse, function 3
- N: Reverse, function 4
Note: Reverse functions (servo reverse switches): the direc-
tions of servo rotation and the throttle stick are factory-set
to suit this model, so please do not operate the reverse
switches.
The stick mode
Function 1: Aileron
Function 2: Throttle (non self-neutralising)
Function 3: Elevator
Function 4: Rudder
Fig. 7, inserting the dry / rechargeable cells in the trans-
mitter
Open the battery compartment by pressing lightly on the
cover and sliding it down and off.
Fit the dry or rechargeable cells, taking care to maintain cor-
rect polarity.
Close the battery compartment again.
Switch the transmitter on. If the needle of the operating dis-
play is in the silver area, the transmitter is ready for use.
Needle in red area: cease operations, fit new dry cells or
recharge the NC cells.
Note regarding dry cells: do not attempt to recharge dry
cells, do not open them, do not dispose of them by thro-
wing them into a fire. Remove exhausted cells from the
transmitter, as escaping electrolyte would ruin the transmit-
ter. Dispose of old batteries by taking them to your local
battery collection point.
Fig. 8, charging the transmitter battery
Caution: always connect the charge lead to the charger fist,
before plugging it into the transmitter.
Figs. 9 and 10, changing the crystals
The transmitter and receiver can be operated on different
spot frequencies within the frequency band. This is accom-
plished by fitting different pairs of crystals - see crystal
table. To avoid “channel clashes” (crashes caused by two
transmitters on the same frequency), the crystals in the
transmitter and receiver may have to be changed. The fre-
quency channel of the transmitter and receiver must be
identical. Transmitter crystals are printed with the letters FM
Tx + frequency and channel number; receiver crystals with
FM Rx + frequency and channel number. Use genuine
robbe crystals exclusively; see the main robbe catalogue
for Order Nos.
Withdraw the crystal holder from the transmitter, remove the
crystal “F” and fit the new one.
Withdraw the receiver from the fuselage, taking care not to
damage the flexible wire aerial. Remove the crystal “Q” and
fit the new one.
Place the receiver in the fuselage again.
Crystals are not polarised; they can be fitted either way
round.
Figs. 11 and 12, charging the flight battery
Connect the charger to the mains PSU or a 12 V power
source; the LED will now flash (glow) red. A change of
colour to green indicates that charging can commence.
Connect the flight battery. The LED changes to red to indi-
cate that charging is in progress.
Towards the end of the charge period the LED alternates
between red and green.
When the LED changes back to green, the charge process
is complete.
When the charge period is over, disconnect the battery from
the charger, and unplug the charger from the mains socket.
Safety notes:
Do not place the charger and the battery on an inflammable
surface when they are operating, and never leave a battery
on charge unsupervised. Protect the unit from damp.
Do not subject the battery or charger to direct sunshine, and
do not cover the charger.
Do not charge batteries which are hot to the touch; allow
the pack to cool down to ambient temperature first.
The charger supplied should only be used to recharge the
battery included in the model set.
Fig. 13, pushrod connectors
Mount the swivel pushrod connectors on the control surfa-
ce horns, noting the correct positions: inner hole on the rud-
der horn, outer hole on the elevator horn.
Figs. 14 and 15, tail panels
Place the fin on the tailplane.
Fig. 16, installing the tail panels
Place the tail assembly on the fuselage, slipping the pus-
hrods through the swivel pushrod connectors at the same
time.
Fit the M4 x 30 plastic screw and tighten it gently to secure
the tail assembly. Don’t over-tighten it!
Fig. 17, the control surfaces
Check from the transmitter that the servos are at centre.
Set the rudder and elevators to centre, then tighten the scr-
ews in the swivel pushrod connectors.
Figs. 18 and 19
Fit the wing panels together as shown.
Note: the canopy features a magnetic closure, and can be
removed simply by lifting it off.
Place the prepared wing on the fuselage, running the aileron
servo leads forward into the radio bay.
Fix the wing to the fuselage using the M4 x 30 plastic screw.
Assembly and operating instructions
No. 3195ARF
No. 3195RTF

ASW 15 ARF, ASW 15 RTF
5
Fig. 20, connecting the aileron servos and battery
Connect the aileron servos to the receiver using the Y-lead.
Place the battery in the radio bay for balancing, but do not
connect it at this stage.
Fig. 21, the canopy
Place the canopy on the fuselage again.
Fig. 22, balancing
The Centre of Gravity (CG) should be in the range 50 to 60
mm back from the wing root leading edge. Mark this point
on both sides of the fuselage.
Support the model at the marked points and allow it to hang
freely. The CG is correct when the model balances level,
with the nose inclined slightly down.
Adjust the position of the flight battery if necessary.
Mark the battery position in the fuselage, so that you can be
confident of replacing it in the same place after removing it.
Pack pieces of scrap foam round the battery, so that it can-
not shift in flight and alter the model’s balance.
The ASW 15 as a pure glider
Figs. 23 and 24
If you wish to fly the model as a glider, i.e. without the power
system, the propeller and spinner can simply be removed
and replaced with the glider nosecone.
Undo the screws holding the spinner in place, undo the pro-
peller nut and remove the propeller.
Undo the screws holding the motor in place, and remove
the motor, speed controller and flight battery.
Disconnect the speed controller from the receiver.
Fig. 25
Connect the receiver battery to the receiver using the switch
harness.
Fig. 26
Install the receiver battery and slide it forward into the nose.
The switch can be attached to the fuselage using Velcro
tape.
Figs. 27 and 28
Place the glider nosecone on the model and fit the retaining
screws to secure it.
The model must now be re-balanced - see Fig. 22.
Figs. 29 - 32, checking the working systems
Charge the flight battery.
Switch the transmitter on, and move the throttle stick (fun-
ction 2) to the “Motor stopped” position.
Place the fully charged flight battery in the fuselage and
connect it to the speed controller. Wait until you hear a
series of beeps.
Check the neutral position of the control surfaces: adjust
the swivel pushrod connectors if necessary.
Place the model on the floor and stand behind it.
Check the direction of rotation of the servos:
Move the aileron stick to the right (a), and the right-hand
aileron should rise (a), the left-hand aileron fall (b).
Pull the elevator stick back towards you (c), and the trailing
edge of the elevator should rise (c).
Move the rudder stick to the right (e), and the rudder should
also deflect to the right (e).
If any function works the wrong way round, correct it using
the servo reverse facility for that channel on your transmit-
ter.
Motor run
Hold the model in such a way that the propeller is free to
rotate. Do not stand in front of the propeller, or in line with
its rotational plane.
Note that the propeller blades will open up suddenly when
the motor starts.
Open the throttle (stick forward): the motor should now
start running.
Move the throttle stick back to the “Motor stopped” position.
Disconnect the battery from the speed controller first, and
only then switch the transmitter off.
Note: whenever you are working on the model, making
adjustments etc., keep well clear of the rotational plane of
the propeller - injury hazard.
The model is now ready for flying, as soon as you have
recharged the flight battery.
Test-flying, flying notes
- Please read the sections entitled “Routine pre-flight
checks” and “Flying the model” in the Safety Notes
before attempting to fly the model for the first time.
- For your first few flights please wait for a day with no
more than a gentle breeze.
- A good flying site consists of a large, flat, open grassy
field, devoid of trees, fences, high-tension overhead
cables etc.
- Repeat the check of the working systems.
- The model is designed for hand-launching; ask an expe-
rienced friend to do the honours for you. He should be
capable of giving the model a reasonably strong, flat
launch.
- The model must be launched straight into any wind.
- With the motor running at full-throttle, give the aeroplane
a firm launch, directly into any breeze, with the fuselage
and wings level.
- Keep the “ASW 15” flying straight and level at first; don’t
turn the model while it is still close to the ground.
- Adjust the control surface trims if necessary, so that the
model flies straight with a reasonable rate of climb “hands
off”.
- Check the model’s response to control commands; you
may need to increase or reduce the control surface travels
after the first landing.
- Check the aeroplane’s stalling speed at a safe height.
- Keep the model’s speed well above the stall for the lan-
ding approach.
- If you needed to adjust the trims during the test-flight,
correct the pushrod length after the landing and return the
transmitter trims to centre, so that full trim travel is avai-
lable to both sides of centre for subsequent flights.
robbe Modellsport GmbH & Co. KG
We reserve the right to alter technical specifications.
Assembly and operating instructions
No. 3195ARF
No. 3195RTF
Page is loading ...
Page is loading ...
Page is loading ...
Page is loading ...
Page is loading ...
Page is loading ...
Page is loading ...
Page is loading ...
Page is loading ...

15
This symbol means that you must dispose
of electrical and electronic equipment sepa-
rately from the general household waste
when it reaches the end of its useful life.
Take your charger to your local waste
collection point or recycling centre. This applies to all coun-
tries of the European Union, and to other European coun-
tries with a separate waste collection system.
Ce symbole signifie que les petits appareils
électriques et électroniques irréparables ou
en fin de cycle d’exploitation doivent être
mis au rebut non pas avec les ordures
ménagères mais dans les déchetteries spé-
cialisées. Portez-les dans les collecteurs
communaux appropriés ou un centre de recyclage spécia-
lisé. Cette remarque s’applique aux pays de la
Communauté européenne et aux autres pays européens
pourvus d’un système de collecte spécifique.
Questo simbolo indica che le apparecchia-
ture elettriche ed elettroniche di piccole
dimensioni devono essere smaltite sepa-
ratamente dai rifiuti domestici al termine del
loro utilizzo.
Smaltite l’apparecchio presso gli appositi
punti di raccolta comunali oppure presso i centri di riciclo.
Tale disposizione è in vigore per tutti i paesi dell’Unione
Europea e per gli altri paesi europei con centri di raccolta
separati.
Este símbolo significa, que los aparatos
eléctricos y electrónicos tienen que ser des-
echados de forma separada de la basura
doméstica al final de su uso.
Desechar el aparato en un sitio de recogida
local o en un centro de reciclaje. Esto vale para todos los
países de la Comunidad Europea, así como para otros paí-
ses europeos con sistemas de recogida separados.

robbe Modellsport GmbH & Co. KG
Metzloserstr. 36
Telefon: 06644 / 87-0
D36355 Grebenhain
robbe-Form AEAH
Errors and omissions excepted. Modifications reserved.
Copyright robbe-Modellsport 2007
Copying and re-printing, in whole or in part, only with prior written
approval of robbe-Modellsport GmbH & Co. KG
Sous réserve de d’erreur et de modification technique.
Copyright robbe-Modellsport 2007
Copie et reproduction, même d’extraits, interdites sans autorisation
écrite expresse de la Société robbe-Modellsport GmbH & Co. KG
La información facilitada no responsabiliza al fabricante respecto a modificaciones
técnicas y/o errores. Copyright robbe-Modellsport 2007
Queda prohibida la reproducción total o parcial de este documento, excepto con
autorización por escrito de robbe-Modellsport GmbH & Co. KG.
Alcune parti possono subire variazioni senza preavviso. Con riserva di modifiche tec-
niche o eventuali errori. Copyright robbe-Modellsport 2007.
La copia e la ristampa , anche parziali, sono consentite
solamente sotto autorizzazione della robbe-Modellsport GmbH & Co.KG
/