Page is loading ...

Eaton
®
Power Xpert
®
Gateway Minislot PXGMS UPS Card
User's Guide

Class B EMC Statements
FCC Part 15
This equipment has been tested and found to comply with the limits for a Class B digital device, pursuant to
part 15 of the FCC Rules. These limits are designed to provide reasonable protection against harmful
interference when the equipment is operated in a commercial environment. This equipment generates, uses,
and can radiate radio frequency energy and, if not installed and used in accordance with the instruction manual,
may cause harmful interference to radio communications. Operation of this equipment in a residential area is
likely to cause harmful interference in which case the user will be required to correct the interference at his
own expense.
Requesting a Declaration of Conformity
Units that are labeled with a CE mark comply with the following harmonized standards and EU directives:
l
Harmonized Standards: EN 62040-2:2006
EN 55022:2010 Class B, EN 55024:2010 FCC Part 15 Sub-part B Class B
l
EU Directive: 2004/108/EC, Council Directive relating to electromagnetic compatibility
The EC Declaration of Conformity is available upon request for products with a CE mark. For copies of the EC
Declaration of Conformity, contact:
Eaton Power Quality Oy
Koskelontie 13
FIN-02920 Espoo
Finland
Phone: +358-9-452 661
Fax: +358-9-452 665 68
Eaton, Power Xpert Architecture, and Power Xpert are registered trademarks and PowerChain Management is
a trademark of
Eaton Corporation or its subsidiaries and affiliates. Microsoft, Windows, Internet Explorer, and
Excel are registered trademarks of Microsoft Corporation in the United States and other counties. Freescale is
a trademark of Freescale Semiconductor, Inc. Google
Chrome is a trademark of Google Inc. IBM is a
registered trademark of International Business Machines Corporation. Linux is a registered trademark of Linus
Torvalds. Micrel is a registered trademark of Micrel, Inc. Modbus is a registered trademark of Schneider
Automation. Mozilla and Firefox are registered trademarks of the Mozilla Foundation. OpenView is a trademark
of Hewlett-Packard Company. Phillips is a registered trademark of Phillips Screw Company. All other
trademarks are property of their respective companies.
©Copyright 2012 Eaton Corporation, Raleigh, NC, USA. All rights reserved. No part of this document may be
reproduced in any way without the express written approval of
Eaton Corporation.

Eaton Power Xpert Gateway Minislot PXGMS UPS Card User’s Guide P-164000207—Rev 1 www.eaton.com/powerquality i
Table of Contents
1 INTRODUCTION
Eaton Power Xpert Architecture . . . . . . . . . . . . . . . . . . . . . . . . . . . . . . . . . . . . . 1
2 GETTING STARTED
Installation Checklist . . . . . . . . . . . . . . . . . . . . . . . . . . . . . . . . . . . . . . . . . . . . . . 2
Install the Card . . . . . . . . . . . . . . . . . . . . . . . . . . . . . . . . . . . . . . . . . . . . . . . . . . 3
Connect the Card to the Computer. . . . . . . . . . . . . . . . . . . . . . . . . . . . . . . . . . . 4
Install the USB Driver Software (Windows XP). . . . . . . . . . . . . . . . . . . . . . . . . . 6
Install the USB Driver Software (Windows 7). . . . . . . . . . . . . . . . . . . . . . . . . . . 11
Verify IP Address Assignment . . . . . . . . . . . . . . . . . . . . . . . . . . . . . . . . . . . . . . 14
Manually Assign an IP Address. . . . . . . . . . . . . . . . . . . . . . . . . . . . . . . . . . . . . . 15
IPv6 Address Assignments. . . . . . . . . . . . . . . . . . . . . . . . . . . . . . . . . . . . . . . . . 16
Disable Internet Explorer Compatibility Mode . . . . . . . . . . . . . . . . . . . . . . . . . . 17
Network Configuration . . . . . . . . . . . . . . . . . . . . . . . . . . . . . . . . . . . . . . . . . . . . 19
Important Security Information . . . . . . . . . . . . . . . . . . . . . . . . . . . . . . . . . . . . . . 20
3 CONFIGURING THE CARD
Navigating the Home Page . . . . . . . . . . . . . . . . . . . . . . . . . . . . . . . . . . . . . . . . . 22
Identifying Monitored Equipment . . . . . . . . . . . . . . . . . . . . . . . . . . . . . . . . . . . . 24
Device Data Page Operations . . . . . . . . . . . . . . . . . . . . . . . . . . . . . . . . . . . 25
Configuring Tasks Essential to Initial Configuration . . . . . . . . . . . . . . . . . . . . . . 27
Changing the Passwords . . . . . . . . . . . . . . . . . . . . . . . . . . . . . . . . . . . . . . . . . . 27
Setting the Date and Time . . . . . . . . . . . . . . . . . . . . . . . . . . . . . . . . . . . . . . . . . 28
Configuring SNMP Options. . . . . . . . . . . . . . . . . . . . . . . . . . . . . . . . . . . . . . . . . 29
Community Strings and Trap Recipients . . . . . . . . . . . . . . . . . . . . . . . . . . . 29
Changing SNMP Access . . . . . . . . . . . . . . . . . . . . . . . . . . . . . . . . . . . . . . . 30
System Location and System Contact. . . . . . . . . . . . . . . . . . . . . . . . . . . . . 30
Management from an SNMP NMS . . . . . . . . . . . . . . . . . . . . . . . . . . . . . . . 31
Configuring Modbus TCP/IP Options . . . . . . . . . . . . . . . . . . . . . . . . . . . . . . . . . 31
Configuring BACnet/IP . . . . . . . . . . . . . . . . . . . . . . . . . . . . . . . . . . . . . . . . . . . . 32
Editing BACnet IP Settings . . . . . . . . . . . . . . . . . . . . . . . . . . . . . . . . . . . . . 32
Configuring BACnet/IP Options . . . . . . . . . . . . . . . . . . . . . . . . . . . . . . . . . . 33
Download BACnet/IP EPICS File . . . . . . . . . . . . . . . . . . . . . . . . . . . . . . . . . 33
Configuring HTTP and HTTPS . . . . . . . . . . . . . . . . . . . . . . . . . . . . . . . . . . . . . . . 34
Configuring Automatic Shutdown of UPS-Protected Computers . . . . . . . . . . . . 34
Configuring Shutdowns for a UPS . . . . . . . . . . . . . . . . . . . . . . . . . . . . . . . . 34
Shutdown Clients . . . . . . . . . . . . . . . . . . . . . . . . . . . . . . . . . . . . . . . . . . . . 35
Managing UPS Power. . . . . . . . . . . . . . . . . . . . . . . . . . . . . . . . . . . . . . . . . . . . . 35
Turning the UPS Load On and Off . . . . . . . . . . . . . . . . . . . . . . . . . . . . . . . . 35
Scheduling a UPS Shutdown and Restart . . . . . . . . . . . . . . . . . . . . . . . . . . 36
Configuring E-Mail Notification . . . . . . . . . . . . . . . . . . . . . . . . . . . . . . . . . . . . . . 36
Configuring EMP Settings. . . . . . . . . . . . . . . . . . . . . . . . . . . . . . . . . . . . . . . . . . 38
Saving and Restoring Configuration Settings . . . . . . . . . . . . . . . . . . . . . . . . . . . 39
Creating a Backup . . . . . . . . . . . . . . . . . . . . . . . . . . . . . . . . . . . . . . . . . . . . 39
Restoring a Backup . . . . . . . . . . . . . . . . . . . . . . . . . . . . . . . . . . . . . . . . . . . 39
4 OPERATION AND MAINTENANCE
Indicator Descriptions . . . . . . . . . . . . . . . . . . . . . . . . . . . . . . . . . . . . . . . . . . . . . 40
DIP Switch Description . . . . . . . . . . . . . . . . . . . . . . . . . . . . . . . . . . . . . . . . . . . . 41
Alarm Notices . . . . . . . . . . . . . . . . . . . . . . . . . . . . . . . . . . . . . . . . . . . . . . . . . . . 42
Generating Log Files . . . . . . . . . . . . . . . . . . . . . . . . . . . . . . . . . . . . . . . . . . . . . . 43

Table of Contents
Eaton Power Xpert Gateway Minislot PXGMS UPS Card User’s Guide P-164000207—Rev 1 www.eaton.com/powerquality ii
Data Log . . . . . . . . . . . . . . . . . . . . . . . . . . . . . . . . . . . . . . . . . . . . . . . . . . . 43
Interval Log . . . . . . . . . . . . . . . . . . . . . . . . . . . . . . . . . . . . . . . . . . . . . . . . . 44
Event Log. . . . . . . . . . . . . . . . . . . . . . . . . . . . . . . . . . . . . . . . . . . . . . . . . . . 44
System Log . . . . . . . . . . . . . . . . . . . . . . . . . . . . . . . . . . . . . . . . . . . . . . . . . 44
UPS History Log . . . . . . . . . . . . . . . . . . . . . . . . . . . . . . . . . . . . . . . . . . . . . 44
UPS Battery Test Log . . . . . . . . . . . . . . . . . . . . . . . . . . . . . . . . . . . . . . . . . 45
Erasing a Log . . . . . . . . . . . . . . . . . . . . . . . . . . . . . . . . . . . . . . . . . . . . . . . . 45
Upgrading the Card's Firmware . . . . . . . . . . . . . . . . . . . . . . . . . . . . . . . . . . . . . 45
5 ROOT CERTIFICATE AUTHORITY INSTALLATION
Installing Root CA with Windows Internet Explorer 7 and Internet Explorer 8. . 46
Installing Root CA with Mozilla Firefox . . . . . . . . . . . . . . . . . . . . . . . . . . . . . . . . 51
Installing Root CA with Google Chrome . . . . . . . . . . . . . . . . . . . . . . . . . . . . . . . 53
6 MIB FILES
Selecting a UPS MIB File . . . . . . . . . . . . . . . . . . . . . . . . . . . . . . . . . . . . . . . . . . 59
Powerware UPS MIB . . . . . . . . . . . . . . . . . . . . . . . . . . . . . . . . . . . . . . . . . . . . . 60
RFC 1628 UPS MIB . . . . . . . . . . . . . . . . . . . . . . . . . . . . . . . . . . . . . . . . . . . . . . 60
Eaton EMP MIB . . . . . . . . . . . . . . . . . . . . . . . . . . . . . . . . . . . . . . . . . . . . . . . . . 61
Eaton Alarms+Traps MIB . . . . . . . . . . . . . . . . . . . . . . . . . . . . . . . . . . . . . . . . . . 61
Eaton OID Assignments . . . . . . . . . . . . . . . . . . . . . . . . . . . . . . . . . . . . . . . . . . . 61
Entity MIB Files. . . . . . . . . . . . . . . . . . . . . . . . . . . . . . . . . . . . . . . . . . . . . . . . . . 61
Selecting the UPS Trap Type . . . . . . . . . . . . . . . . . . . . . . . . . . . . . . . . . . . . . . . 61
7 MODBUS REMOTE TERMINAL UNIT (RTU) CONFIGURATION
Wiring the PXGMS UPS Card RS-485 Port . . . . . . . . . . . . . . . . . . . . . . . . . . . . . 62
Configure Modbus Serial Port and Mappings . . . . . . . . . . . . . . . . . . . . . . . . . . . 63
Access to RTU Registers . . . . . . . . . . . . . . . . . . . . . . . . . . . . . . . . . . . . . . . . . . 64
8 MODBUS REGISTERS FOR TCP AND RTU
Obtaining the Modbus Register Map . . . . . . . . . . . . . . . . . . . . . . . . . . . . . . . . . 65
Returning Modbus TCP Error Codes. . . . . . . . . . . . . . . . . . . . . . . . . . . . . . . . . . 65
Returning Modbus Serial Error Codes. . . . . . . . . . . . . . . . . . . . . . . . . . . . . . . . . 66
Modbus Register Addressing . . . . . . . . . . . . . . . . . . . . . . . . . . . . . . . . . . . . . . . 66
Modbus Function Codes . . . . . . . . . . . . . . . . . . . . . . . . . . . . . . . . . . . . . . . 66
Data Formats . . . . . . . . . . . . . . . . . . . . . . . . . . . . . . . . . . . . . . . . . . . . . . . . 67
Data Addressing . . . . . . . . . . . . . . . . . . . . . . . . . . . . . . . . . . . . . . . . . . . . . 67
UPS Modbus TCP Unit ID Numbers . . . . . . . . . . . . . . . . . . . . . . . . . . . . . . . . . . 68
UPS Registers and Alarms . . . . . . . . . . . . . . . . . . . . . . . . . . . . . . . . . . . . . . . . . 68
UPS Registers (FC 04) . . . . . . . . . . . . . . . . . . . . . . . . . . . . . . . . . . . . . . . . . 68
UPS Alarms (FC 02) . . . . . . . . . . . . . . . . . . . . . . . . . . . . . . . . . . . . . . . . . . . 69
EMP (FC 04) . . . . . . . . . . . . . . . . . . . . . . . . . . . . . . . . . . . . . . . . . . . . . . . . . . . . 70
Time or Date (FC 04). . . . . . . . . . . . . . . . . . . . . . . . . . . . . . . . . . . . . . . . . . . . . . 70
9 SPECIFICATIONS
10 SERVICE AND SUPPORT
Two-Year Limited Warranty (US and Canada) . . . . . . . . . . . . . . . . . . . . . . . . . . . . . . . . . . . . . . . . . . 73

Eaton Power Xpert Gateway Minislot PXGMS UPS Card User’s Guide P-164000207—Rev 1 www.eaton.com/powerquality 1
Chapter 1 Introduction
The Eaton
®
Power Xpert
®
Gateway Minislot (PXGMS) UPS Card provides Web-enabled, real-time monitoring
of
Eaton 93PM and Eaton 93PR (future release) uninterruptible power systems (UPSs) through standard Web
pages, Power Xpert software,
Intelligent Power Manager (IPM), Intelligent Power Protector (IPP), or third-party
software. An integral part of the
Eaton Power Xpert Architecture
®
, which provides end-to-end PowerChain
Management
™
solutions, the PXGMS UPS Card provides a central point to connect UPSs to the Ethernet
network.
Network managers can view critical downstream device information, such as status, power, energy, and
power quality data with an easy-to-use interface.
The PXGMS UPS Card has the following features:
l
Web-enabled UPSs – view data from any location with a Web browser.
l
Real-time power monitoring – view critical device data and make informed network management decisions.
l
Integrated communications with Eaton’s Power Xpert software – monitor power devices in real time through
Power Xpert software.
l
Simple Network Management Protocol (SNMP) support – integrate and manage your UPS with third party
network management software.
l
Power quality data using Modbus
®
Transmission Control Protocol (TCP) – use this open communication
protocol to communicate with standard building management systems.
l
Modbus Remote Terminal Unit (RTU) – uses a two-wire serial communication protocol to communicate with
the Building Management System.
l
BACnet/IP communication – provides device interface with Building Automated Systems (BASs)
l
Easy installation – install the PXGMS UPS Card while the UPS is online, maintaining the highest system
availability.
l
Field upgradable – use the Web interface to easily upgrade the card's firmware in the field.
Eaton Power Xpert Architecture
Eaton Power Xpert Architecture provides the framework to unify the entire power system. It connects power
systems with communication and management systems to provide a holistic approach to the entire power
system. This strategic system-level focus is integral to PowerChain Management solutions. It provides
increased reliability, cost efficiencies, enhanced safety and risk mitigation, and allows for the more effective
use of capital. Eaton Power Xpert Architecture is comprised of both software and hardware components
including meters, gateways, time servers, and connectivity devices.

Eaton Power Xpert Gateway Minislot PXGMS UPS Card User’s Guide P-164000207—Rev 1 www.eaton.com/powerquality 2
Chapter 2 Getting Started
This section explains:
l
Checklist items needed for installation
l
Installing the card
l
Connecting the card to the computer
l
Installing the USB Driver Software (Windows XP and Windows 7)
l
Verifying or assigning the IP address
l
Assigning IPv6 address
l
Configuring the network settings
l
Security information
Installation Checklist
1. Verify that the following items are available:
o Power Xpert Gateway Minislot (PXGMS) UPS Card package contents
o Phillips
®
screwdriver
o Available USB port on a computer running Microsoft
®
Windows
®
o Web browser (Microsoft Internet Explorer
®
version 8.0 and higher, Mozilla
®
Firefox
®
, or
Google Chrome™ are recommended)
2. If you are going to use Dynamic Host Configuration Protocol (DHCP), provide your local network
administrator with the card's MAC address. The MAC address is located on a label on the bottom of the
card.
o MAC Address _____________________________________________
3. If you are not going to use DHCP to provide any of the settings listed below, contact your local network
administrator for the settings. Select DHCP or enter the values for manual configuration in the table
below:
NOTE If you have completed all sections in the Power Xpert Gateway Minislot (PXGMS)
UPS Card
Quick Start Instructions, proceed to “Configuring the Card” on page 21.
Item
Either Provided
by
DHCP* Or Manual Configuration
IPv4
o
Card IP Address: _______________________
Netmask: _______________________
Gateway: _______________________
DNS – Name Servers
o
Name Server #1: _______________________
Name Server #2: _______________________
Name Server #3: _______________________
DNS – Domain
o
Domain: _______________________
* The network administrator normally sets up the DHCP server to provide a static IP address each time
the card makes a DHCP request.
Getting Started
Eaton Power Xpert Gateway Minislot PXGMS UPS Card User’s Guide P-164000207—Rev 1 www.eaton.com/powerquality 3
4. If you need e-mail functionality, obtain the SMTP mail server's IP address or host name. If using the SMTP
host name, verify that you also have the Name Server IP address (see Step 3).
o SMTP (mail server) IP Address
or Host Name _____________________________________________
Install the Card
To install the PXGMS UPS Card:
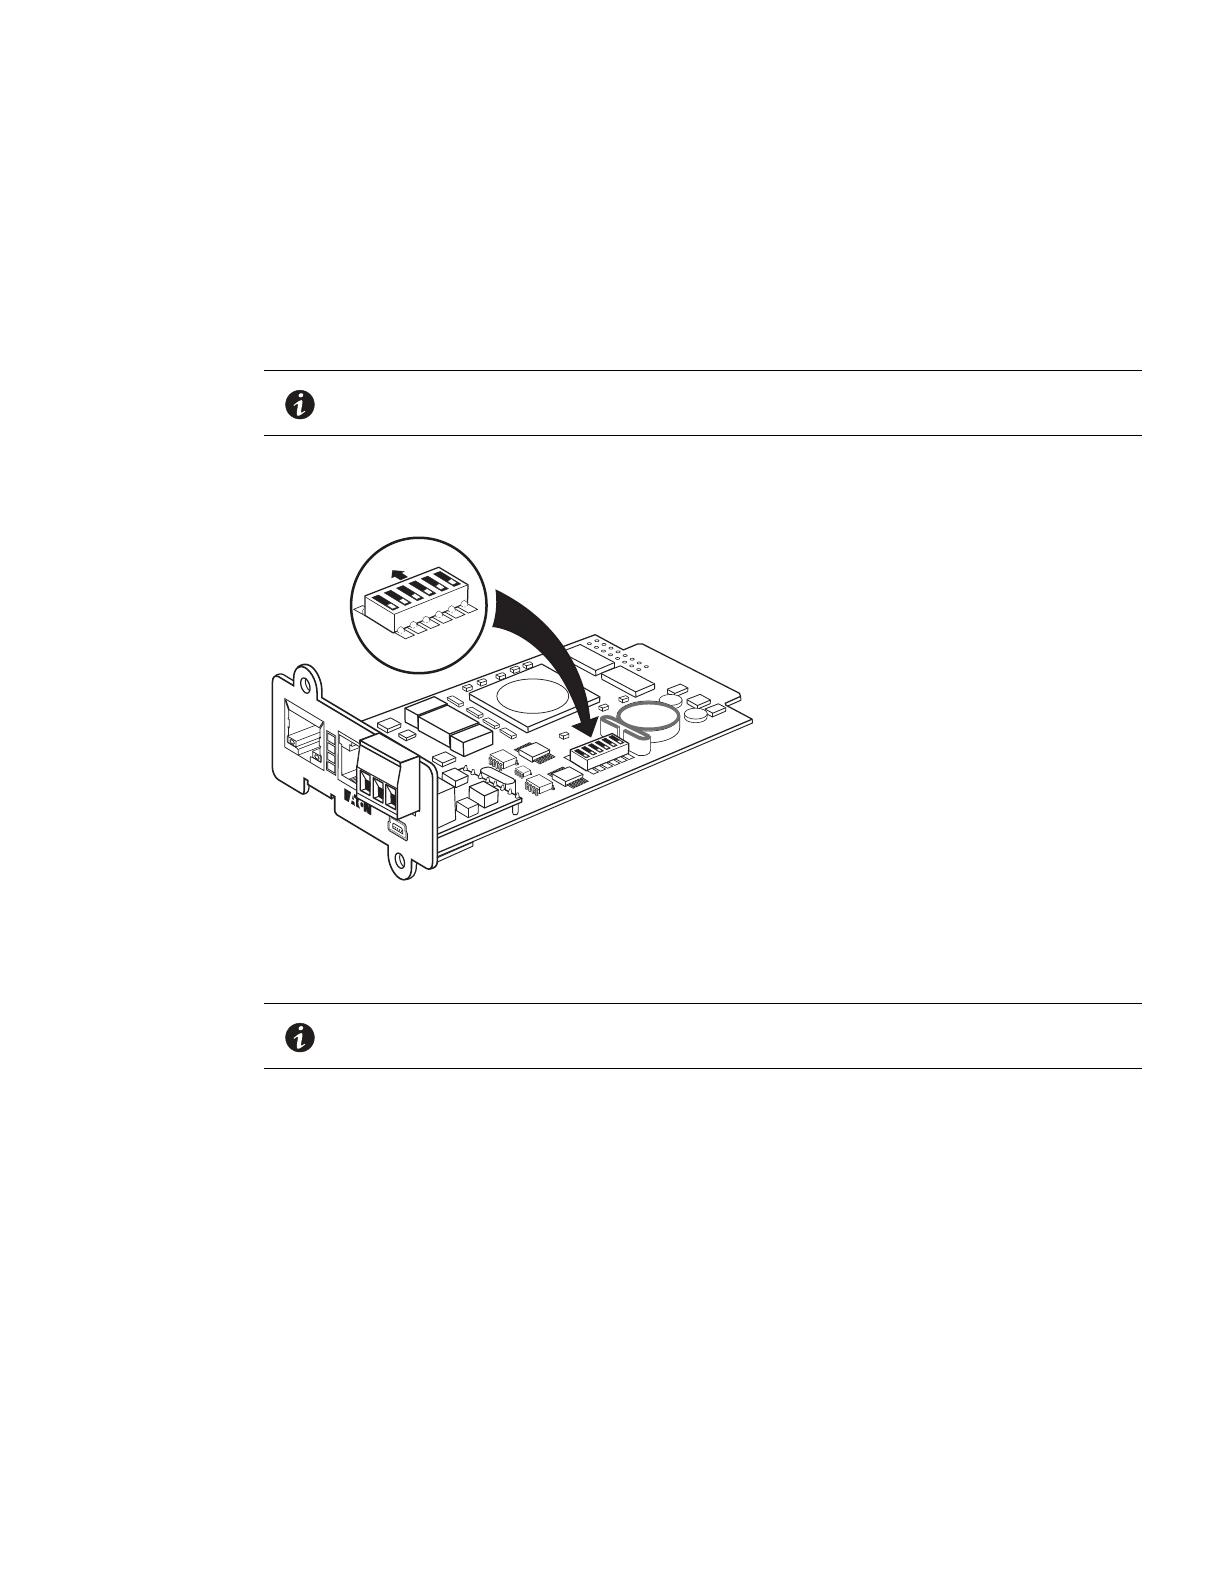
1. Verify that all six DIP switches on the card are in the OFF position (see Figure 1).
Figure 1. Verify DIP Switches are OFF
2. Remove the blank Minislot cover from the UPS. Retain the screws.
3. If not already done, record the MAC address for future reference (see Step 2 on page 2).
NOTE The hot-swappable PXGMS UPS Card can be installed without turning off the UPS
or disconnecting the load.
NOTE If there is another card already installed with an attached communication cable,
disconnect the cable and then remove the card.
Ident
Power
Act
100
PXGMS UPS
Restart
TX
RX
Setup
CMN
Status
DHCP
EMP
Ethernet 10/100
+
-
2
1
3
4
5
6
ON
OFF

Getting Started
Eaton Power Xpert Gateway Minislot PXGMS UPS Card User’s Guide P-164000207—Rev 1 www.eaton.com/powerquality 4
4. To prevent electrostatic discharge (ESD), place one hand on a metal surface, such as the UPS rear panel.
5. Slide the card into the open slot and secure with the screws removed in Step 2 (see Figure 2).
Figure 2. Secure the PXGMS Card
6. Connect an active Ethernet cable (not supplied) to the Ethernet 10/100 connector on the PXGMS UPS
Card
(see Figure 3).
Figure 3. Install the Ethernet Cable
Connect the Card to the Computer
To connect the card to the computer:
1. G o t o www.eaton.com/pxgms and click the Power Xpert Gateway Minislot UPS Card link beside the
PXGMS UPS Card photograph.
2. On the Features tab, click the Download Configuration File link to download the powerxpert.inf file.
Note the location of the downloaded file on your computer so you can use it later.
Ident
Power
Act
100
PXGMS UPS
Restart
TX
RX
Setup
CMN
Status
DHCP
EMP
Ethernet 10/100
+
-
Ident
Power
Act
100
PXGMS UPS
Restart
TX
RX
Setup
CMN
Status
DHCP
EMP
Ethernet 10/100
+
-

Getting Started
Eaton Power Xpert Gateway Minislot PXGMS UPS Card User’s Guide P-164000207—Rev 1 www.eaton.com/powerquality 5
3. Plug the USB cable into the Setup port on the card (see Figure 4).
Figure 4. Install the USB Cable
4. Plug the other end of the USB cable into the USB port on the computer.
5. The Windows operating system detects new hardware (see Figure 5).
Figure 5. Found New Hardware Wizard – Welcome Window
6. The steps for installing the USB driver software are determined by the type of operating system running
on your computer:
l
For Windows XP, continue to “Install the USB Driver Software (Windows XP)” on page 6.
l
For Windows 7, continue to “Install the USB Driver Software (Windows 7)” on page 11 .
NOTE If a message displays indicating that the device driver software was not successfully
installed, click Ignore.
Ident
Power
Act
100
PXGMS UPS
Restart
TX
RX
Setup
CMN
Status
DHCP
EMP
Ethernet 10/100
+
-

Getting Started
Eaton Power Xpert Gateway Minislot PXGMS UPS Card User’s Guide P-164000207—Rev 1 www.eaton.com/powerquality 6
Install the USB Driver Software (Windows XP)
To install the USB driver software on a computer running Windows XP:
1. On the Welcome window, select No, not this time and click Next (see Figure 6).
Figure 6. Found New Hardware Wizard – Welcome Window
2. Select Install from a list or specific location (Advanced) and click Next (see Figure 7).
Figure 7. Found New Hardware Wizard – Install Software Window

Getting Started
Eaton Power Xpert Gateway Minislot PXGMS UPS Card User’s Guide P-164000207—Rev 1 www.eaton.com/powerquality 7
3. Select Don’t search. I will choose the driver to install and click Next (see Figure 8).
Figure 8. Found New Hardware Wizard – Installation Options Window
4. Select Network adapters and click Next (see Figure 9).
Figure 9. Found New Hardware Wizard – Hardware Type Window

Getting Started
Eaton Power Xpert Gateway Minislot PXGMS UPS Card User’s Guide P-164000207—Rev 1 www.eaton.com/powerquality 8
5. Select Have Disk... and click Next (see Figure 10).
Figure 10. Found New Hardware Wizard – Select Network Adapter Window
6. Click Browse (see Figure 11 ).
Figure 11. Install From Disk Window
NOTE Disregard the instruction to insert the manufacturer’s installation disk. You will not
install from a disk. The driver will be installed from the powerxpert.inf file you
downloaded in
Step 2 on page 4.
Getting Started
Eaton Power Xpert Gateway Minislot PXGMS UPS Card User’s Guide P-164000207—Rev 1 www.eaton.com/powerquality 9
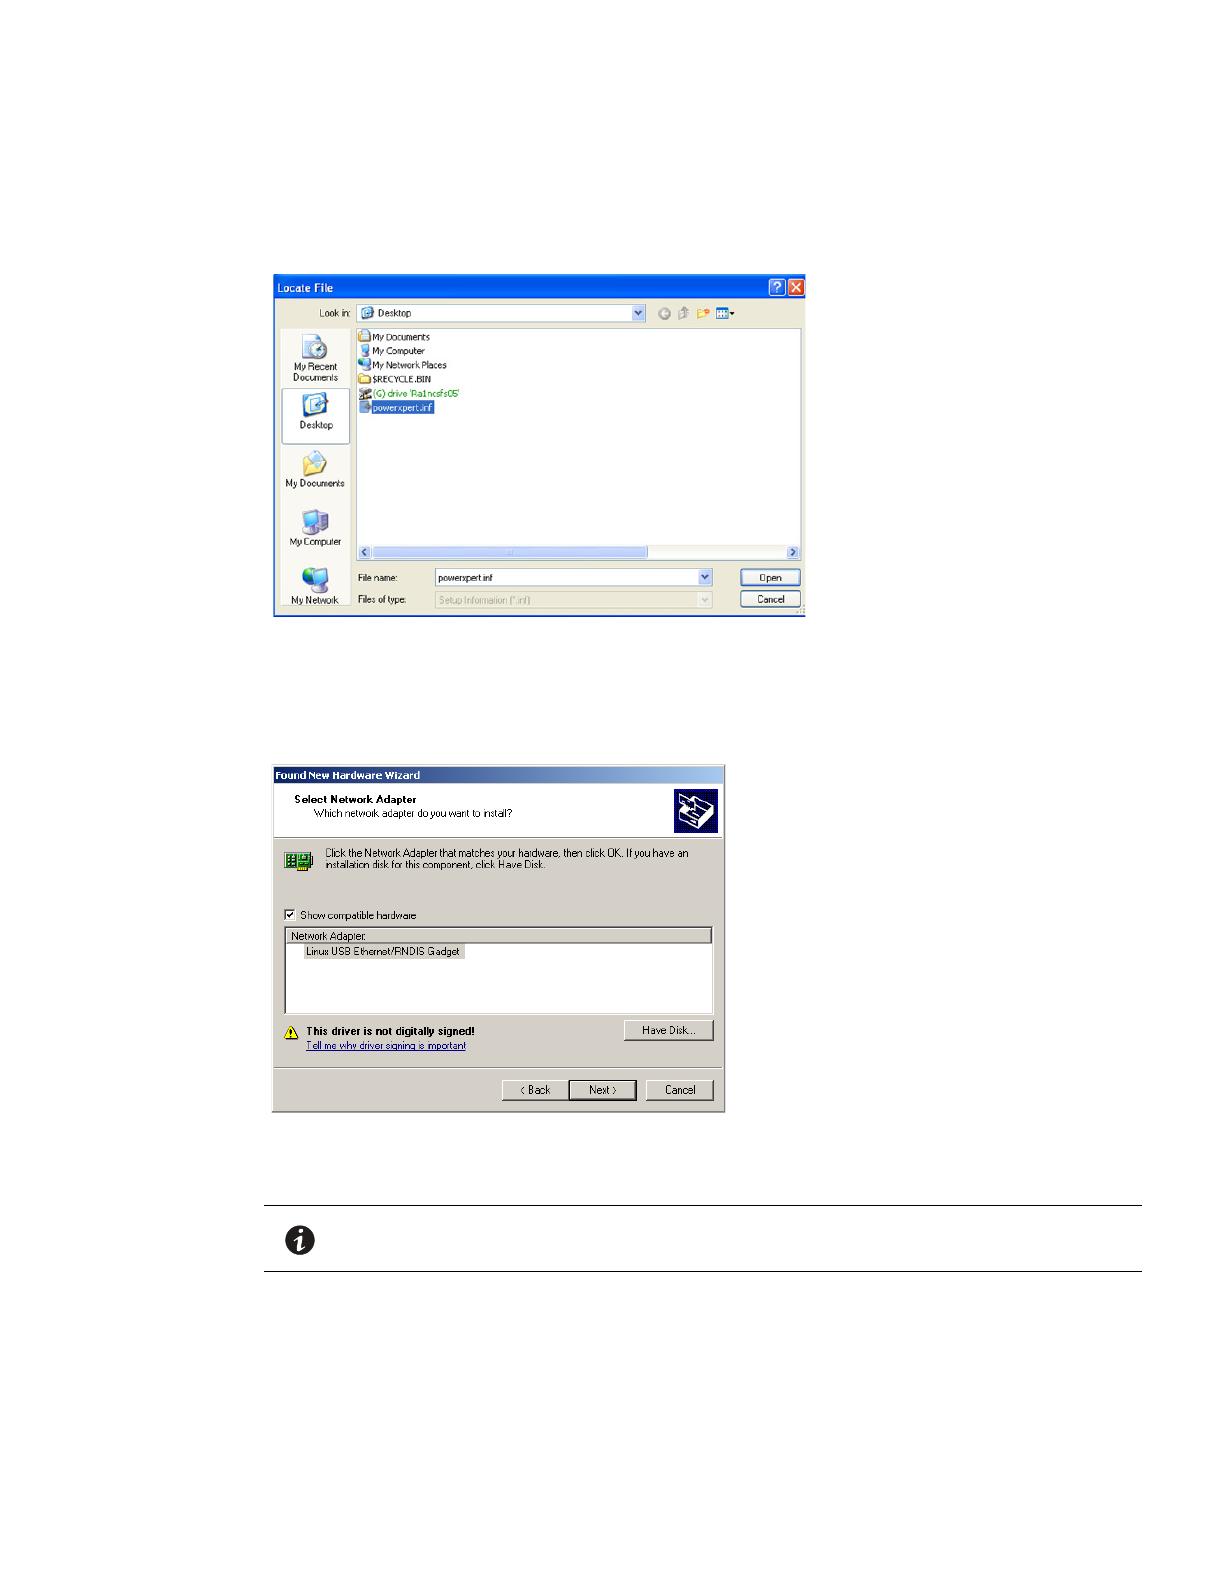
7. In the Locate File window, navigate to the powerxpert.inf file you downloaded in Step 2 on page 4
(see
Figure 12).
8. Select the file and click Open.
Figure 12. Locate File Window
9. In the Install from Disk window, the path to the powerxpert.inf file displays in the Copy manufacturer’s
file from box. Click OK.
10. Select the most recent Linux USB Ethernet/RNDIS Gadget and click Next (see Figure 13).
Figure 13. Found New Hardware Wizard – Select Network Adapter Window
NOTE If the caution message shown in Figure 14 displays, click Continue Anyway.

Getting Started
Eaton Power Xpert Gateway Minislot PXGMS UPS Card User’s Guide P-164000207—Rev 1 www.eaton.com/powerquality 10
Figure 14. Caution Message
11. The wizard installs the software for the USB driver. Click Finish to close the wizard (see Figure 15).
Figure 15. Found New Hardware Wizard – Finished Installing the Software Window
12. Open the Network Connections window from the Windows Control Panel to verify that the installation
was successful.
If “Linux USB Ethernet/RNDIS Gadget” is listed in the Device Name column, the USB driver has been
successfully installed (see
Figure 16).
Figure 16. Network Connections Window
NOTE By default, the PXGMS UPS Card requests an IP address through DHCP when the
card is connected to a network.

Getting Started
Eaton Power Xpert Gateway Minislot PXGMS UPS Card User’s Guide P-164000207—Rev 1 www.eaton.com/powerquality 11
13. Either verify the assigned IP address or manually enter a fixed IP address:
l
To verify the IP address assigned through DHCP, continue to “Verify IP Address Assignment” on
page 14.
l
To manually enter a fixed IP address for the card’s network connection, continue to “Manually Assign an
IP Address” on page 15.
Install the USB Driver Software (Windows 7)
To install the USB driver software on a computer running Windows 7:
1. Open the Control Panel and select Hardware and Sound (see Figure 17).
2. Under Devices and Printers, select Device Manager to open the Device Manager window.
Figure 17. Control Panel Window – Hardware and Sound
3. Expand Other devices and select RNDIS/Ethernet Gadget (see Figure 18).
4. Right-click Update Driver Software.
Figure 18. Device Manager Window
Getting Started
Eaton Power Xpert Gateway Minislot PXGMS UPS Card User’s Guide P-164000207—Rev 1 www.eaton.com/powerquality 12
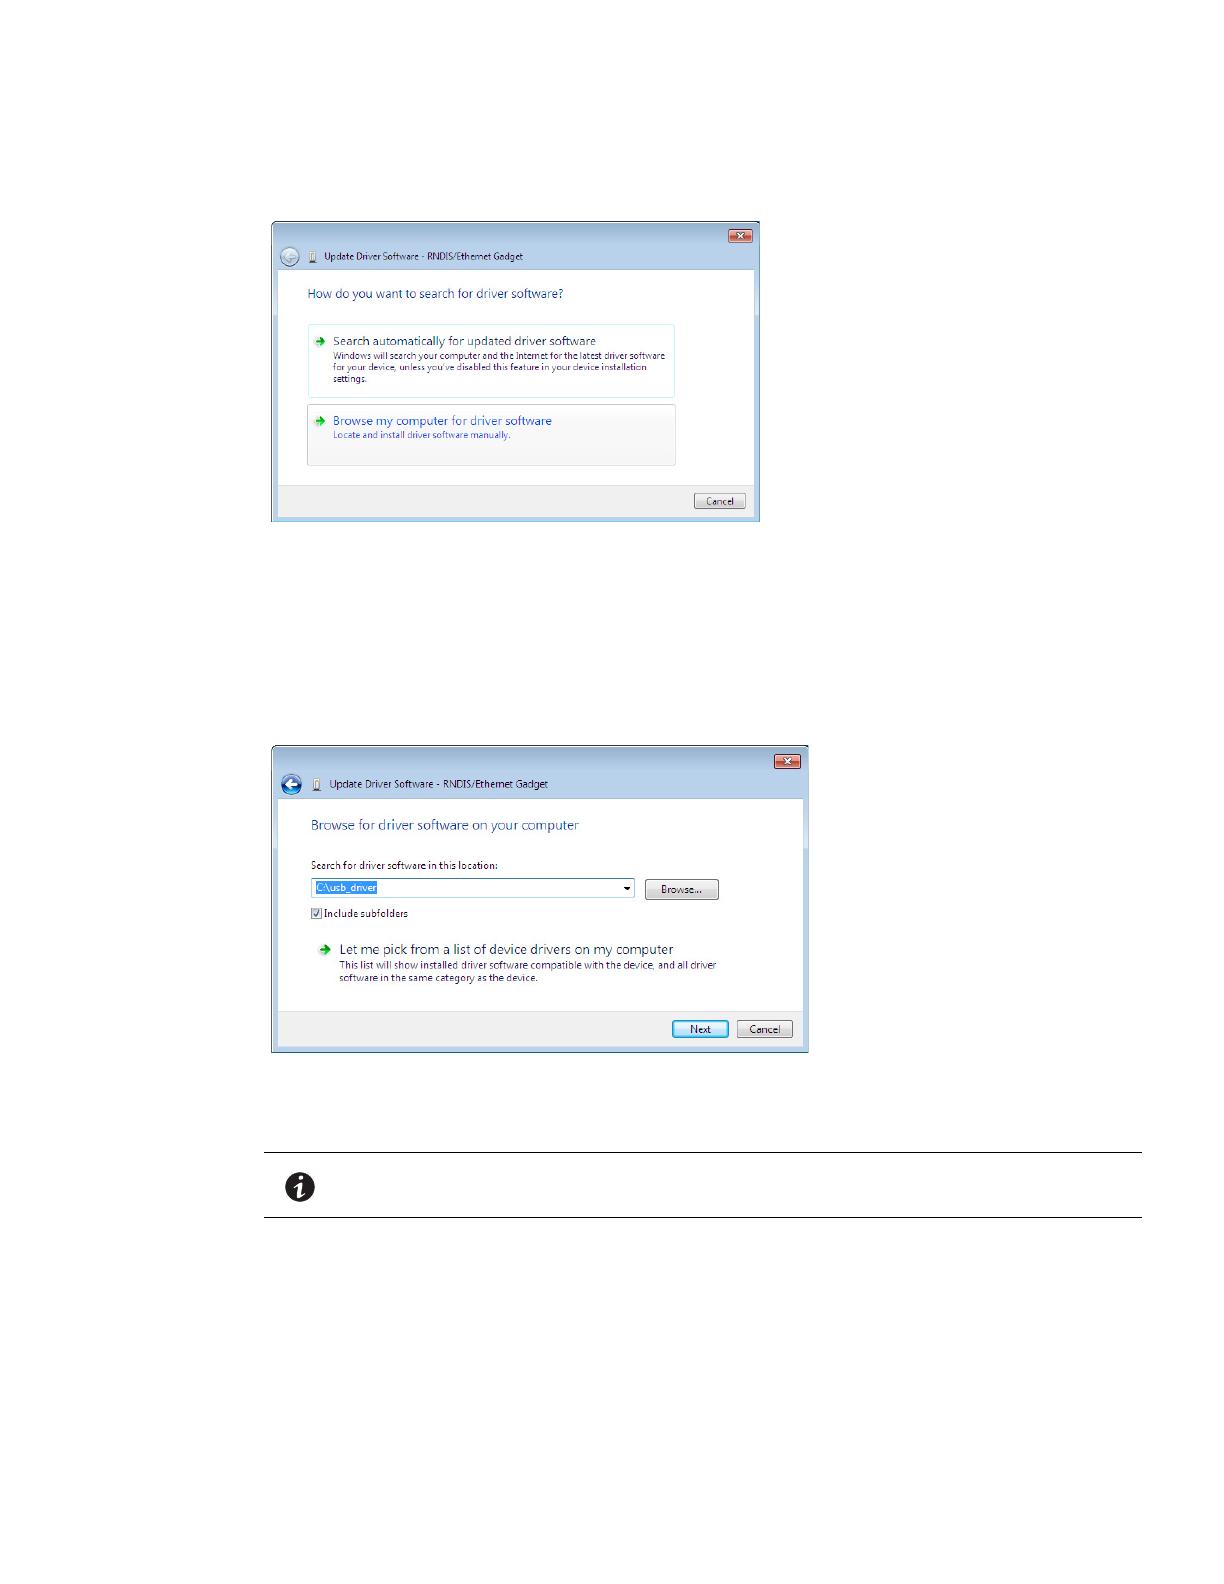
5. Select Browse my computer for driver software (see Figure 19).
Figure 19. Update Driver Software Window – Search Method
6. Click Browse (see Figure 20).
7. In the Locate File window, navigate to the powerxpert.inf file you downloaded in Step 2 on page 4.
8. Select the file and click Open.
9. The path to the powerxpert.inf file displays in the Search for driver software in this location box. Click
Next (see
Figure 20).
Figure 20. Update Driver Software Window – Browse for Driver Software
NOTE If the message “Windows can't verify the publisher of this driver software”
displays, select Install this driver software anyway (see
Figure 21).

Getting Started
Eaton Power Xpert Gateway Minislot PXGMS UPS Card User’s Guide P-164000207—Rev 1 www.eaton.com/powerquality 13
Figure 21. Windows Security Message
10. When the driver software is updated successfully, the message “Windows has successfully updated your
driver software” displays (see
Figure 22).
Figure 22. Update Driver Software Window – Update Successful
11. To verify the device is installed:
a. Go to Control Panel > Hardware and Sound > Devices and Printers > Device Manager.
b. Expand Network adapters.
c. Verify that Linux USB Ethernet/RNDIS Gadget is listed under Network adapters (see Figure 23).
Figure 23. Device Manager Window – Verify Device Installation
Getting Started
Eaton Power Xpert Gateway Minislot PXGMS UPS Card User’s Guide P-164000207—Rev 1 www.eaton.com/powerquality 14
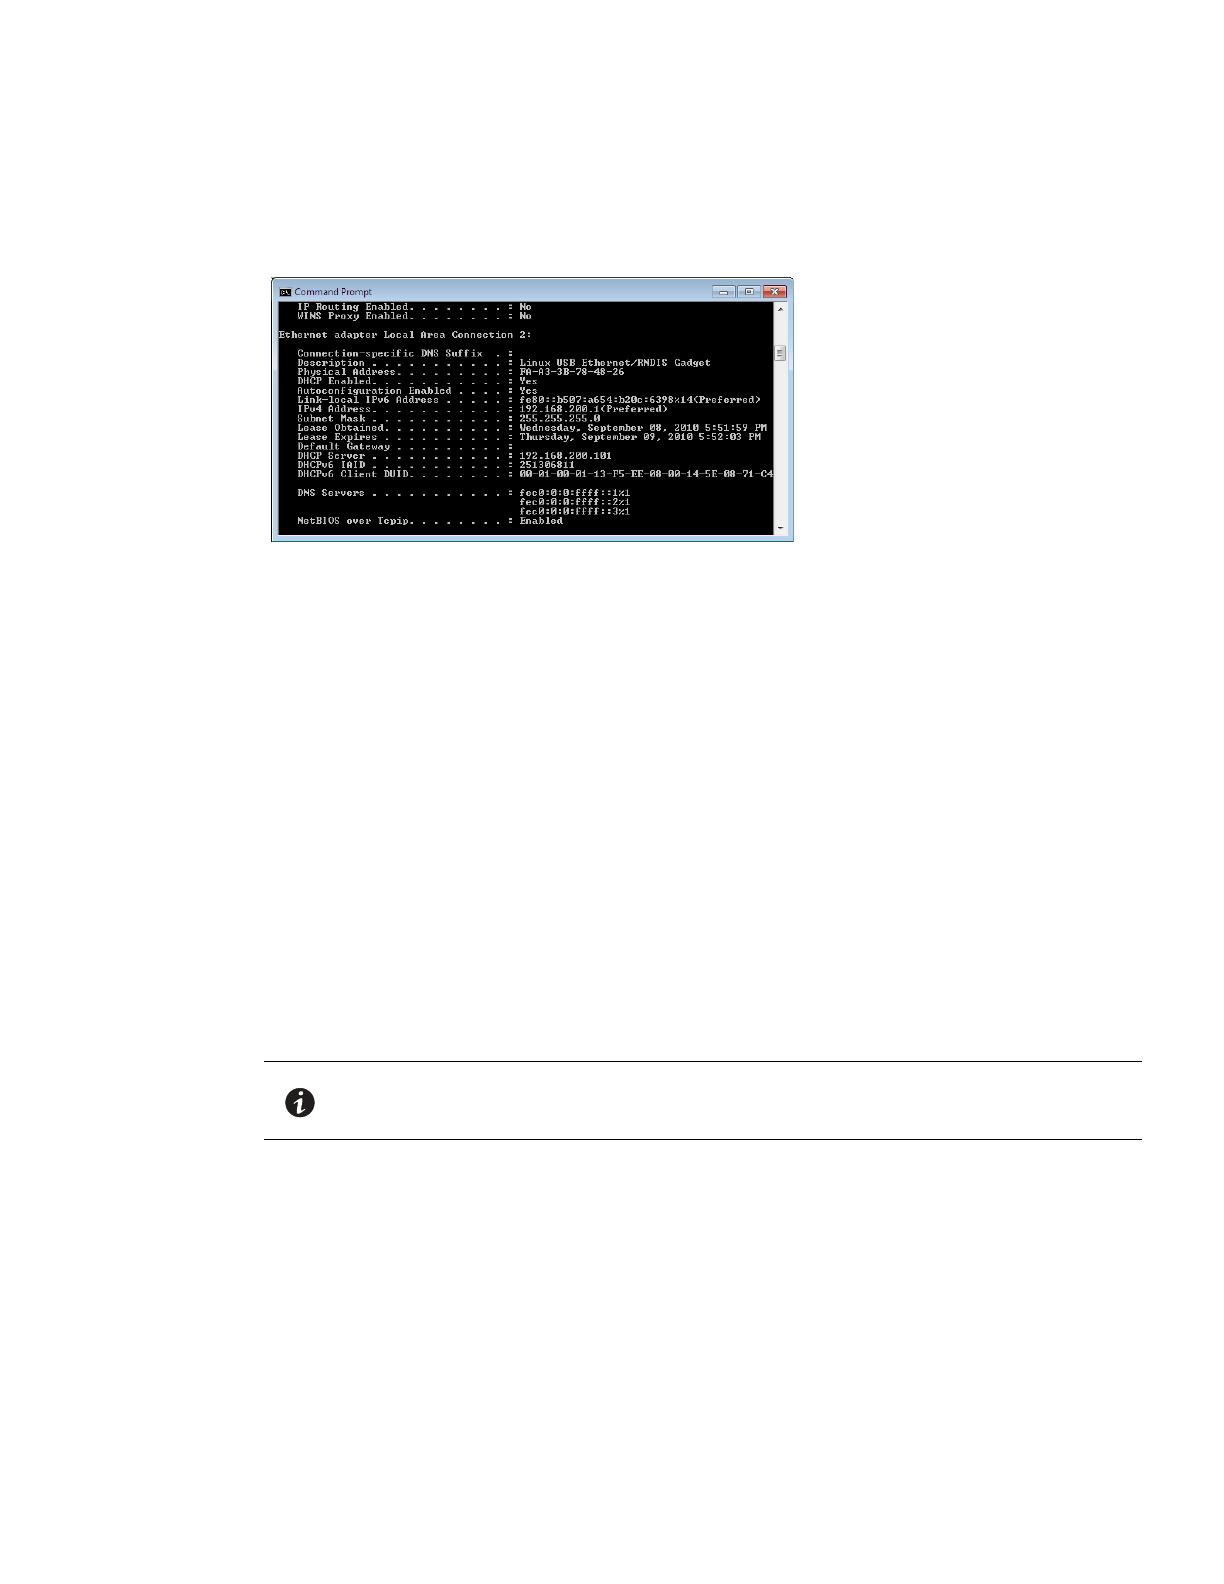
12. From the Start menu, go to All Programs > Accessories > Command Prompt to open a Command
Prompt window.
13. Enter ipconfig /all. The adapter IP addressing information displays (see Figure 24).
Figure 24. Command Prompt Window – Adapter IP Address Information
14. Verify that the assigned IPv4 address is in the 192.168.200.x range, where “x” is typically “1.”
15. Either verify the assigned IP address or manually enter a fixed IP address:
l
To verify the IP address assigned through DHCP, continue to “Verify IP Address Assignment” on
page 14.
l
To manually enter a fixed IP address for the card’s network connection, continue to “Manually Assign an
IP Address” on page 15.
Verify IP Address Assignment
To verify the IP address assignment:
1. Connect to the card over the USB cable:
a. Open your Web browser.
b. Enter: http://192.168.200.101
You are prompted to log on.
2. Log on as administrator. The default username and default password are “admin.” The PXGMS UPS Card
Web page displays.
NOTE If you receive a browser incompatibility warning, the Internet Explorer browser is
running in compatibility mode. To disable compatibility mode, go to
“Disable
Internet Explorer Compatibility Mode” on page 17.
Getting Started
Eaton Power Xpert Gateway Minislot PXGMS UPS Card User’s Guide P-164000207—Rev 1 www.eaton.com/powerquality 15
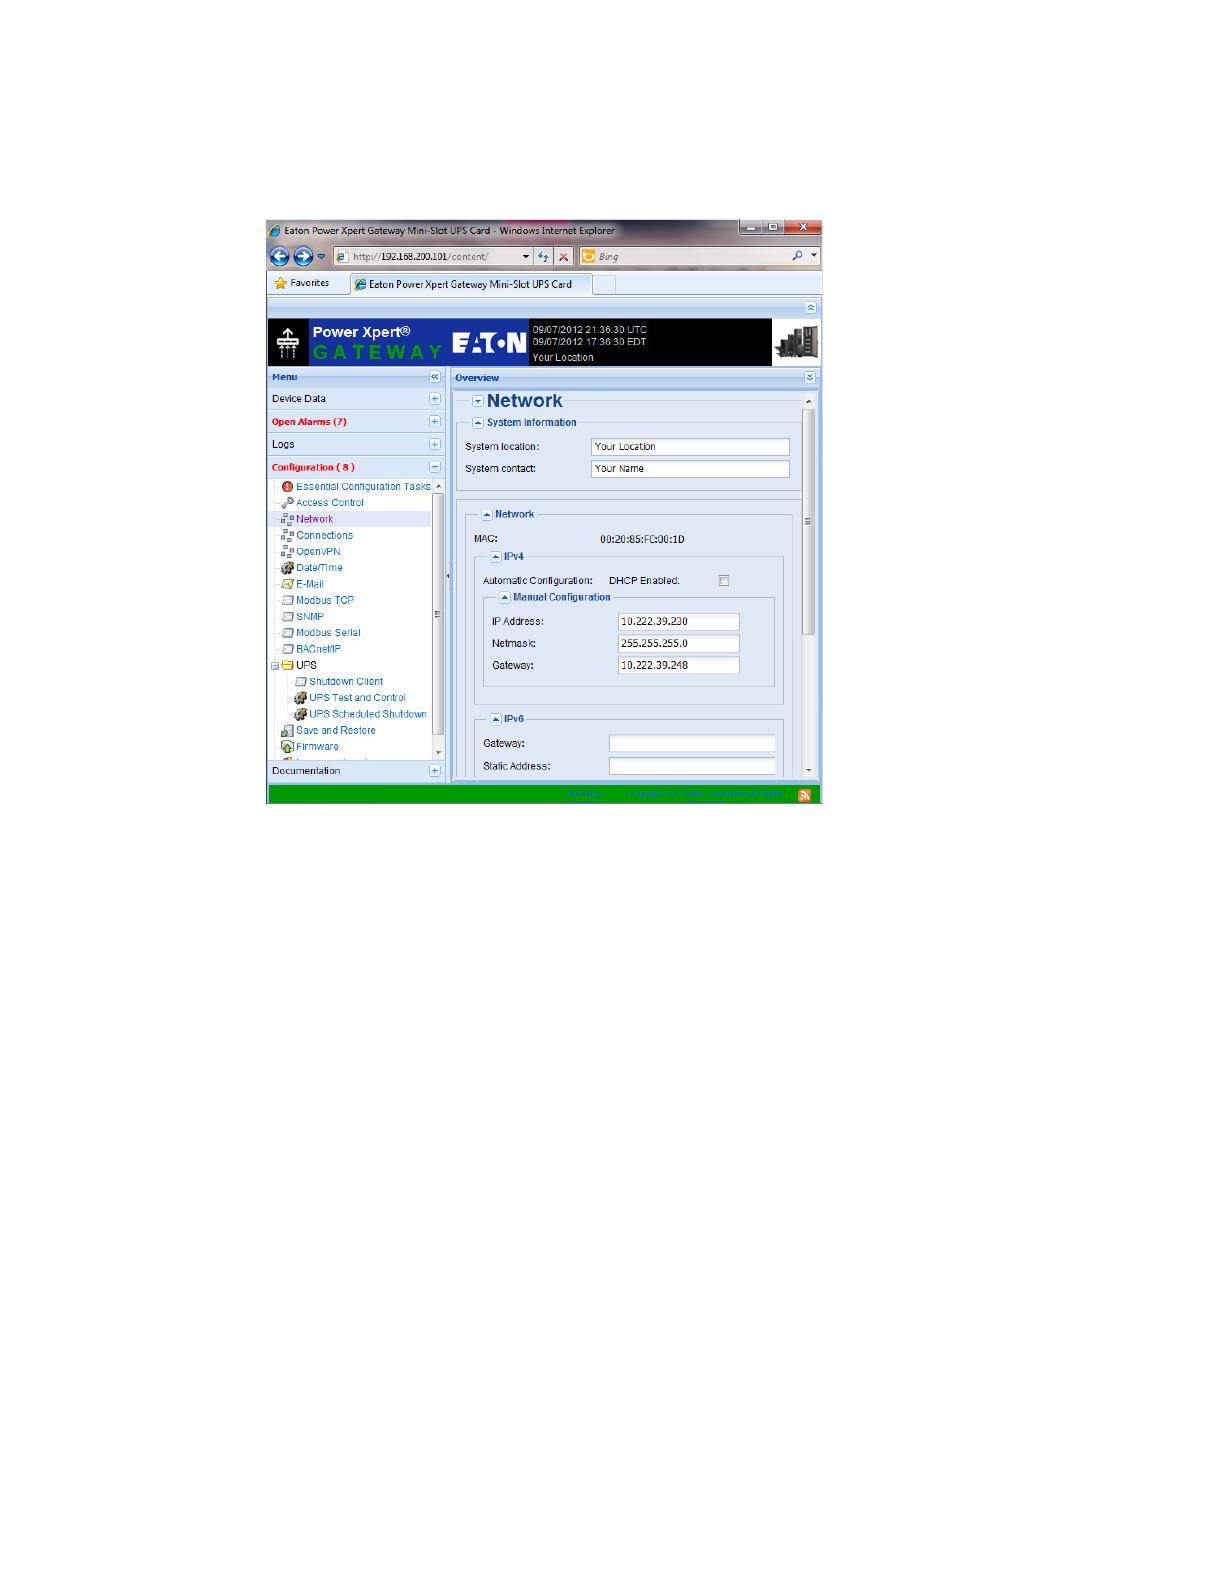
3. Select Network from the Configuration menu. The Network page displays (see Figure 25).
Figure 25. PXGMS Card Network Page
4. Verify that the network settings match those on the Installation Checklist on page 2.
5. Verify network communication:
a. Clear the DHCP Enabled check box. The text that was dimmed in the Manual Configuration section is
now available.
b. Copy the IP address.
c. Open a second browser and paste the IP address in the Address bar and click Go. If the assigned IP
address is working, you are prompted to log on.
d. Log on as administrator. The default username and default password are “admin.” The PXGMS UPS
Card
Web page displays.
Manually Assign an IP Address
To manually enter a fixed IP address for the card:
1. Connect to the card over the USB cable:
a. Open your Web browser.
b. Enter: http://192.168.200.101
You are prompted to log on.
2. Log on as administrator. The default username and default password are “admin.” The PXGMS UPS Card
Web page displays.

Getting Started
Eaton Power Xpert Gateway Minislot PXGMS UPS Card User’s Guide P-164000207—Rev 1 www.eaton.com/powerquality 16
3. Select Network from the Configuration menu. The Network page displays (see Figure 25 on Page 15).
4. Clear the DHCP Enabled check box to enable manual configuration.
5. Enter the IP, Netmask, and Gateway addresses in the Manual Configuration section and click Apply.
6. Click OK to confirm.
7. If you are using a host name, or host names, for controlling access to the card, type the server IP address
in the Name Server box. Up to three IP addresses can be entered.
8. Click Apply.
9. Click OK to confirm.
10. Verify network communication:
a. Copy the IP address you entered in Step 5.
b. Open a second browser and paste the IP address in the Address bar and click Go. If the assigned IP
address is working, you are prompted to log on.
c. Log on as administrator. The default username and default password are “admin.” If the PXGMS UPS
Card
Web page displays, the fixed IP Address is correct.
IPv6 Address Assignments
There are four sets of IPv6 addresses that can be assigned to the card:
l
Gateway. Manually assigned IPv6 Gateway address.
l
Link-Local Address. The Link-Local Address is a permanent address assigned to the card.
l
Automatic Address. This address only displays if the card is connected to a network router that supports
stateless address autoconfiguration.
l
Static Address. Manually assigned fixed IPv6 address.
NOTE If you receive a browser incompatibility warning, the Internet Explorer browser is
running in compatibility mode. To disable compatibility mode, go to
“Disable
Internet Explorer Compatibility Mode” on page 17.
NOTE Only the Gateway and Static addresses are user-configurable. The Link-Local and
Automatic addresses are automatically populated.
NOTE Dynamic Host Configuration Protocol for IPv6 (DHCPv6) is not supported.
/