Page is loading ...

J
INSTALLATION, OPERATION
AND MAINTENANCE
INSTRUCTIONS FOR
HAMILTON MODEL lOHF
SAFETY PRECAUTIONS
OTHER MATERIALS NEEDED
6" Galvanized Duct Elbow and Round Pipe (or Metal flex duct)
Electrical Tape / Wire Nuts
Safety Goggles
Tin Snips
Electric or Hand Drill
1/8" drill bit Screwdriver
Pliers
Pencil
Hammer
Small Adjustable Wrench
Center Punch
Knife
Straight Edge Ruler
Level
TOOLS NEEDED
1) This Humidifier is intended for use on forced air circulation warm
air furnaces, as well as multi-fuel furnaces where the temperatures do
not exceed 200 degrees Fahrenheit. Excessive temperatures will
damage your Humidifier and possibly cause an overflow condition
and water damage to your home.
2) Do not install a Humidifier where surrounding temperatures may be
32°F or colder. Freezing water will damage your Humidifier and
burst the supply pipe, resulting in home damage.
3) The installation, wiring and plumbing of the humidifier must comply
with local codes, ordinances and regulations.
) 4)
Do not cut or drill into any air conditioning or electrical accessories
during installation.
5) Make sure all water connections are properly installed or water
damage could occur.
6) Do not allow the Drain Tubing or Water Supply Tubing to touch any
heated surface or sharp edges. Make certain the Drain Tubing is
placed in a drain so there is no resistance to the flow of the
discharged water.
7) Below are the recommended settings for your humidity control.
Setting your humidistat higher than the listed setting could cause
condensation that would damage your home. If excessive moisture
appears on windows or walls, reduce humidity setting enough to
eliminate condensation. If the situation continues, turn off water
valve until condensation is gone.
READ ENTIRE INSTRUCTIONS
CAREFULLY BEFORE INSTALLING
1) Reference the back page for the names and descriptions of
each part and component mentioned in the instructions.
2) The Humidifier can be installed on either the arm air supply
plenum or the cold air return plenum.
When the humidifier is activated, the solenoid valve opens and
allows the water supply into the Distribution Tray at the top of
the humidifier. The water is then evenly channeled onto the
evaporative pad inside the cabinet, where the heated air passes
through and becomes humidified. This moist air is then
distributed throughout your home by the air circulation of your
central heating system. Any unevaporated water from the pad,
then flows through the drain tube into a floor drain. This self -
cleaning design washes away any minerals left behind and
reduces the maintenance on the unit itself.
NOTES:
GENERAL INFORMATION
The lOHF Flow- Thru Humidifier is designed to humidify the
heated air that your furnace produces based on your selected
humidity level for your home. When your furnace blower
comes "on", the humidifier is activated and remains "on" until
your furnace blower turns "off”, or your home reaches its
desired humidity level.
3) The installation instructions are for the 10 HP Humidifier,
which comes fully assembled, with the outlet to the RIGHT.
Conversion so the outlet is to the LEFT, can simply be made
by inverting the Humidifier, and reversing the positions of the
a) Solenoid Valve connection, b) Distribution Tray, c) the
Drain Pan and d) Evaporator Pad (so black mark is at top).
4) The initial adjustment period for the desired humidity level
in your home can take up to 3 weeks since furniture, drapes,
carpeting, houseplants, woodwork etc., will absorb the newly
produced moisture as well.
Hamilton Home Products, Inc.
P.O. Box12039, Columbus, Ohio 43212
www.HamiltonHomeProducts.com
1-800-879-0123
IMPORTANT
A FLOOR DRAIN IS REQUIRED for proper
installation and operation of this model.
8) Hamilton assumes no responsibility under warranty if user does
not follow stated precautions.
Outside Temp
-20°F
-10°F
0°F
Rec. Setting
15
20
25
Rec. Setting
30
35
40
Outside Temp
+10°F
+20°F
Above 20°F

J
SELECTING THE LOCA TION
I) By holding the humidifier against the vertical surface of the
warm OR cold air plenum, determine the best location for the
unit. Be sure to allow adequate clearance to attach the water
supply tubing, the drain tubing, and clearance for the
humidifier by-pass tubing. (If mounting Humidifier on cold
air return, allow 6" above top of unit for mounting of
humidistat) Securely tape the mounting template provided to
the plenum selected. Make sure template is horizontal and
LEVEL. Allow at least 3 inches clearance from bottom line
on template to any part of furnace jacket or other obstruction.
2) Center punch 4 side mounting holes on template, and drill with
1/8" or smaller drill bit.
WARNING: MAKE SURE YOU ARE NOT CUTTING OR
DRlLLING INTO ANY AIR CONDITIONING OR
ELECTRICAL ACCESSORIES.
3) Cut the plenum opening, using tin snips, by cutting along the
solid line in the center section of the template, as indicated.
4) Bypass Hole Location. Extend centerline from template on
warm air plenum to cold air plenum or vice versa and mark
appropriately. This mark will be used in Step4 of the next
section. Slight variances from horizontal will not affect
performance of the humidifier.
5) Remove template.
INSTALLING THE HUMIDIFIER
1) Start 4 sheet metal screws in side holes. Hang the humidifier
on the 4 screws and tighten. USE CARE NOT TO OVER
TIGHTEN SCREWS AND CRACK FRAME.
2) LEVEL the Humidifier, using the built-in bubble level inside
the Distribution Tray. Adjust, level, re-tighten screws, if
necessary. CAUTION: THE HUMIDlFIER MUST BE
LEVEL FROM SIDE TO SIDE AND FRONT TO BACK
TO INSURE WATER EVENLY FLOWS THROUGH THE
EVAPORATOR PAD
3) Secure top and bottom of humidifier housing by marking and
drilling the 4 holes to the plenum. Attach using sheet metal
screws. Check the level and adjust if necessary.
) Using starting collar provided, as template, scribe a circle on
opposite plenum using centerline marked earlier. Cut the opening
and insert tabbed end of collar through hole. Bend tabs over to
secure mounting collar.
5) Mount a 6" elbow (not provided) to starting collar and
determine length of 6" round pipe (not provided) needed to fit
between elbow and humidifier. Mount pipe to elbow and
humidifier by-pass opening. NOTE: 6" diameter metal flex
duct can be used in place of the 6" elbow and pipe.
6) Drill two (2) 1/8" holes through pipe and mounting ring on
humidifier and secure with two (2) 1/4" long sheet metal
screws. NOTE: Check damper operation to be sure that
screws do not interfere with rotation.
7) Secure pipe at elbow connection and plenum connection (or
metal flex duct if used instead), with sheet metal screws.
WATER CONNECTION
1) Supply Tube: Place looped end of Supply Tube into the hole
in the top of the Distribution Tray and assemble the straight
end to the brass fitting at top of solenoid Valve using copper
ferrule and compression nut, and tighten down. Note: Make
sure that the looped end of Supply Tube is directed into the
hole in the cover of the Distribution Tray.
2) Tighten down Distribution Tray cover with plastic
thumbscrew provided.
3) Saddle Valve: Select nearest cold water pipe. Install self-
piercing saddle valve on cold water pipe following the
instructions provided on Saddle Valve package.
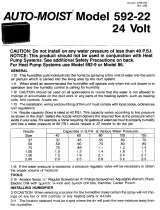
4) Plastic Water Supply Tubing Connection: Assemble the
plastic water supply tubing, brass tube insert, plastic ferule
and compression nut as shown. (See diagram below) Then,
insert this assembled end of tubing directly into saddle valve
and tighten down the brass compression nut.
5) Assemble the other end of the plastic water supply tubing
(again as shown above) and insert directly into the brass
fitting at the bottom of the Solenoid Valve. Tighten down
brass compression nut.
6) Turn water on and check for leaks. Stop leaks by further
tightening fittings. Check that all fittings are secured.
DRAIN CONNECTION
1) Connect drain hose to the fitting on bottom of drain pan, with
clamp provided.
2) Run hose to suitable drain such as a floor drain, making sure
that the tubing runs continuously downward with no
restrictions. Be sure drain hose is not kinked at any point as
water could back up and overflow out of the Drain Pan.
HUMIDIFIER LOCATION

J
ELECTRICAL CONNECTIONS
Note: Please read this section completely before
attempting the 120V wiring.
IMPORTANT INFORMATION: Many newer furnaces have I
Control Boards with ports for the connection of a Humidifier,
simplifying installation. Check wiring diagram for your
furnace to see if it has a control board if the and if the
Humidifier ports are 120v or 24v.
Control Board w/ 1120v Ports: Follow Steps in “LINE"
Wiring, except make the wire Connections to the Humidifier
ports on the Control Board instead of the Blower Motor.
Control Board w/ 24v Ports: Go to directions for “LOAD”
wiring, only. The Humidifier Transformer is not needed. Skip
"LINE" Wiring section below.
No Control Board: Follow instructions below as written.
1) Locate the Humidifier Transformer. You will note that one
side reads "LINE", which is for the 120V wiring, and the
other side reads "LOAD", which is for the 24V Wiring.
2) Select the best location to mount the transformer on the
furnace so I) the black wire (hot) on the Line side can be
connected to the proper furnace blower motor wire, and 2)
the white wire (common) can be connected to any furnace
common wire. Mount the transformer.
3) From the wiring diagram for your furnace, locate the wire
that is HOT, during the HEAT mode of operation. (In
most cases, there will be 3 color-coded wires that control the
speeds of high, medium or low).
4) Make the wiring connections as described in Step I. Wire nut
and wrap each connection with electrical tape to complete the
I2OV wiring.
B) "LOAD" WIRING (24V) Refer to previous diagram
Humidistat, Solenoid, and Transformer Connections
1) Humidistat: To complete the 24V wiring, the duct Humidistat
must first be mounted. The Humidistat must be located on the
return (cold) air plenum AND upstream of the Humidifier or
by-pass on a flat vertical surface of the return air plenum or
duct. It should not be closer than 6" to the Humidifier or by-
pass. Do not install the Humidistat on the Supply {HOT)
air plenum. Follow installation instructions found in
Humidistat package.
2) Connect a piece of the Low Voltage wire provided, from the
LOAD side of transformer (or 24V Humidifier port on
Control Board if applicable) to either Solenoid Valve wire.
Connect another piece of wire from the other Solenoid Valve
wire to the Humidistat. (Refer back to wiring diagram)
3) Lastly, connect a piece of the Low Voltage wire from the
LOAD side of the transformer (or 24V common port on the
Control Board if applicable) directly to the Humidistat.
OPERATING THE HUMIDIFIER
1) When furnace blower is "OFF", solenoid should be closed.
2) With the furnace blower turned "ON", the solenoid valve
should be open, if Humidistat setting is ON (i.e. 20,30 etc). 3)
Flow of water should fall directly into Distribution Tray.
4) The orifice in the solenoid valve will limit the flow of water to
the Distribution Tray to approximately 3 1/2 gallons per hour,
at a line pressure of 60 PSI.
5) Let Humidifier run long enough to be sure that the unit drains
properly into floor drain without overflow. Overflow
conditions are usually caused by water not flowing freely out
of the drain tube. Verify downward slope and no trap or kink
in the drain tubing. Make sure again that all connections are
secure and there are no leaks.
7) Damper is suggested to be on "HIGH" when Humidifier is
used during the winter months, with the Humidistat set at the
recommended settings. Should water blow off of evaporator
pad, gradually close damper until the condition is corrected.
Set Damper to "LOW" position during the summer months and
Humidistat set to 'OFF". WARNING: Do NOT set Humidity
Control too high. Use recommended settings shown on
Humidistat nameplate.
MAINTENANCE INSTRUCTIONS
1) Shut off power and water supplying this equipment.
2) Remove bottom Drain Pan and slide Evaporator Pad down and
out.
3) Wipe any loose sediment from the water tray (make certain no
particles are allowed to plug the drain hole).
4) Slide new Evaporator Pad up and in through the bottom and re-
connect the Drain Pan to the Humidifier housing
5) Evaporator pad should be replaced at least once a year.
CAUTION: Before wiring, turn off all power that supplies the
components. All wiring should comply with local, state and national
codes.
A) "LINE" WIRING (120v)
Furnace Connections
Using the Humidifier Transformer provided, follow the basic
12Ov wiring directions and the diagram below. The Humidifier
Transformer will be wired to the Furnace Blower Motor.

J
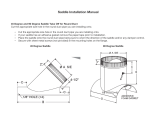
REPLACEMENT PARTS FOR 10-HF
A
H-7503
B
H-7501
C
EPO36
D
H-7500
E
H-7514
F
H-7502
G
H-3094
H
H-7515
I
H-7506
Optional H-7505
J
H-7510
K
H-7509
Optional H-7516
L
H-7507
M
H-7508
Not Shown H-7511
Not Shown H-7520
Not Shown H-7519
Not Shown H-2030/161
Not Shown H-850-24
Not Shown AT20-120
CHANNEL PAD (2 REQ.)
COVER/ DISTRIBUTION TRAY
DISTRIBUTION TRAY
REPLACEMENT PAD
HOUSING
SELECTOR/ DAMPER
DRAIN PAN
CLAMP TUBE
DRAIN TUBE
SOLENOID VALVE 24V
SOLENOID VALVE 115V
1/4" SUPPLY TUBING x 10'
ORIFICE (40-120 PSI)
ORIFICE (20-40 PSI)
INLET FITTING
STRAINER INLET (000-1319-051)
LOCK DOWN SCREW COVER
PARTS BAG
1/4" COMPRESSION NUT
HUMIDISTAT
TRANSFORMER
CONGRATULATIONS
We, the employees at Hamilton thank you for your
recent purchase of a Hamilton Humidifier. With a little
care, it will provide you with years of comfort. If you
have any questions about installing, servicing, or
obtaining parts for your Hamilton Humidifier, call us
at: 1-800-879-0123
Visit us at: www.HamiltonHomeProducts.com
MODEL 10HF Humidifier
Limited One-Year Product Warranty
This limited one-year warranty covers this Hamilton Humidifier as
designated on the return portion of the warranty registration card,
excluding wiring, plumbing, and installation.
Hamilton Home Products, Inc. warrants that all new Hamilton
Humidifiers are free from defects in material and workmanship
under normal, non- commercial use and service. Hamilton will
remedy any such defects as they appear within 12 months from the
date of original installation as evidenced by receipt of the warranty
registration card, subject to the terms and conditions of this limited
one-year warranty stated below:
1) This limited one-year warranty is granted by Hamilton Home
Products, Inc. PO Box 12039, Columbus, Ohio 43212
2) This warranty shall extend only to any non-commercial owner who
has purchased this residential product other than purpose of resale.
3) The completion and return of the warranty registration card is a
condition precedent to warranty coverage and performance.
Warranty is not valid unless this card is completed and mailed to the
factory within 15 days of equipment installation.
4) All components are covered by this limited warranty except
expendable items. This warranty only applies if the unit is properly
installed and operating according to the manufacturer’s instructions
provided with this product.
5) If within the warranty period any Hamilton product requires service,
Hamilton will not pay shipping charges or, or labor charges to
remove or replace such defective parts or components. If the part or
component is found by inspection to contain such defective material
or workmanship, it will be either repaired or exchanged, free of
charge, at Hamilton’s option, and returned freight collect.
6) In order to obtain the benefits of this limited one-year warranty, the
owner must notify the seller of any defects within 30 days of
discovery. If after reasonable time you have not received a
satisfactory response, notify in writing, Hamilton Home Products,
Inc. PO Box 12309, Columbus, Ohio 43212. HAMILTON WILL
RECEIVE, FREIGHT PREPAID, ONLY REMOVABLE PARTS
OR COMPONENTS OF SUCH DEFECTIVE PRODUCTS.
7) This limited one-year warranty does not apply to any part or
component that is damaged in transit or handling; has been subject
to abuse, neglect or accident; has not been installed, operated and
serviced according to Hamilton’s instructions; has been operated
beyond factory rated capacity; altered in any such way that its
performance is affected. There is no warranty due to neglect,
alteration, or ordinary wear and tear. Hamilton’s liability is limited
to replacement of defective parts or components and does not
include payment of the cost of labor charges to remove or replace
such defective components or parts.
8) Hamilton will not be responsible for loss of use of any product: loss
of time, inconvenience, or any other indirect, incidental, or
consequential damages with respect to person or property, whether
caused directly or indirectly by the product, a result of breach of
contract, neglect or otherwise. Some states do not allow the
exclusion or limitation of incidental or consequential damages,
so the limitation of exclusion in the preceding sentence may not
apply to you.
9) THIS WARRANTY GIVS YOU SPECIFIC RIGHTS, AND YOU
MAY ALSO HAVE OTHER RIGHTS, WHICH VERY, FROM
STATE TO STATE.
10) Any warranty work will be performed within a reasonable time,
usually within 120 days after notice of defect and delivery to
Hamilton’s factory, subject to delays beyond the manufacturer’s
control.
11) Any warranty by Hamilton of merchantability, fitness for use or any
other warranty (expressed, implied, or statutory), representation or
guarantee other than what is set forth herein shall expire at the
expiration date of this limited one-year warranty. Some states do
not allow limitation on how long an implied warranty lasts, so
the limitation in the preceding sentence may not apply to you.
12) Hamilton reserves the right to make changes in the design and
material of its products without incurring any obligation to
incorporate such changes in the units completed on the effective
date of such change.
Hamilton Home Products, Inc.
PO Box 12039, Columbus, Ohio 43212
1-800-879-0123 / www.hamiltonhomeproducts.com

MODEL 10HF Humidifier
Limited One-Year Product Warranty
This limited one-year warranty covers this Hamilton Humidifier as designated on the return portion
of the warranty registration card, excluding wiring, plumbing, and installation.
Hamilton Home Products, Inc. warrants that all new Hamilton Humidifiers are free from defects in
material and workmanship under normal, non- commercial use and service. Hamilton will remedy
any such defects as they appear within 12 months from the date of original installation as evidenced
by receipt of the warranty registration card, subject to the terms and conditions of this limited one-
year warranty stated below:
1) This limited one-year warranty is granted by Hamilton Home Products, Inc. PO Box 12039, Columbus, Ohio
43212
2) This warranty shall extend only to any non-commercial owner who has purchased this residential product other
than purpose of resale.
3) The completion and return of the warranty registration card is a condition precedent to warranty coverage and
performance. Warranty is not valid unless this card is completed and mailed to the factory within 15 days of
equipment installation.
4) All components are covered by this limited warranty except expendable items. This warranty only applies if the
unit is properly installed and operating according to the manufacturer’s instructions provided with this product.
5) If within the warranty period any Hamilton product requires service, Hamilton will not pay shipping charges or, or
labor charges to remove or replace such defective parts or components. If the part or component is found by
inspection to contain such defective material or workmanship, it will be either repaired or exchanged, free of
charge, at Hamilton’s option, and returned freight collect.
6) In order to obtain the benefits of this limited one-year warranty, the owner must notify the seller of any defects
within 30 days of discovery. If after reasonable time you have not received a satisfactory response, notify in
writing, Hamilton Home Products, Inc. PO Box 12309, Columbus, Ohio 43212. HAMILTON WILL RECEIVE,
FREIGHT PREPAID, ONLY REMOVABLE PARTS OR COMPONENTS OF SUCH DEFECTIVE
PRODUCTS.
7) This limited one-year warranty does not apply to any part or component that is damaged in transit or handling; has
been subject to abuse, neglect or accident; has not been installed, operated and serviced according to Hamilton’s
instructions; has been operated beyond factory rated capacity; altered in any such way that its performance is
affected. There is no warranty due to neglect, alteration, or ordinary wear and tear. Hamilton’s liability is limited
to replacement of defective parts or components and does not include payment of the cost of labor charges to
remove or replace such defective components or parts.
8) Hamilton will not be responsible for loss of use of any product: loss of time, inconvenience, or any other indirect,
incidental, or consequential damages with respect to person or property, whether caused directly or indirectly by
the product, a result of breach of contract, neglect or otherwise. Some states do not allow the exclusion or
limitation of incidental or consequential damages, so the limitation of exclusion in the preceding sentence
may not apply to you.
9) THIS WARRANTY GIVS YOU SPECIFIC RIGHTS, AND YOU MAY ALSO HAVE OTHER RIGHTS,
WHICH VERY, FROM STATE TO STATE.
10) Any warranty work will be performed within a reasonable time, usually within 120 days after notice of defect and
delivery to Hamilton’s factory, subject to delays beyond the manufacturer’s control.
11) Any warranty by Hamilton of merchantability, fitness for use or any other warranty (expressed, implied, or
statutory), representation or guarantee other than what is set forth herein shall expire at the expiration date of this
limited one-year warranty. Some states do not allow limitation on how long an implied warranty lasts, so the
limitation in the preceding sentence may not apply to you.
12) Hamilton reserves the right to make changes in the design and material of its products without incurring any
obligation to incorporate such changes in the units completed on the effective date of such change.
Hamilton Home Products, Inc.
PO Box 12039, Columbus, Ohio 43212
1-800-879-0123 / www.hamiltonhomeproducts.com
/