Page is loading ...

CM200
Flow-Thru Humidier
READ AND SAVE THESE INSTRUCTIONS
UNIT NOT FOR COMMERCIAL USE

Model CM200
2 www.trioniaq.com
1. Preparing the unit.
This unit is reversible. Although not mandatory, use on the hot air duct
will improve performance. Find the best location and determine how the
humidier will be installed. Select the top. Install and fasten the water
diffuser, the long plastic piece, with two screws #6 x 1/2” inside of the
top part of the humidier. Install the solenoid valve (mounted on a metal
bracket) outside of the top of the humidier. While supporting the water
diffuser with one hand, insert the plastic tube protruding from the valve
into the hole in the middle of the top part of the humidier making sure
that the plastic tubing is rmly seated in the hole of the water diffuser.
Fasten the valve assembly to the unit with screws # 6 x 1/2”, using the two mounting
pins towards the rear. Finally, install the plastic pad retainer by snapping it in the hole
located in the middle of the humidier frame.
2. Cutting the opening.
Draw a level line at four inches minimum above the furnace housing for clearance of
the drain tube. Attach the template to the duct. Punch and drill the four corners for the
opening and the four fastening holes with a 3/32” drill. Remove the template and
complete the opening outline. Cut the opening in the plenum. Take care not to drill
into air conditioning coils.
3. Installing the unit.
Install the unit in the opening. Use the four screws (#8 x 3/4”) to attach the humidier
body to the duct. The ribs around the humidier back opening must t into the
rectangular opening in the duct. Check that the humidier body is level from side to
side. Then fasten the unit completely.
4. Installing the collar and the ex duct.
Install the 6” duct collar in a convenient location on the opposite duct with
four screws (#8 x 3/8”). Using the gear clamp provided, t the exible duct
onto the collar and tighten gear clamp. Slide the damper assembly into
the side opening of the humidier until it snaps. Make sure to position the
damper knob in front of the unit. Measure the required ex duct length to
the duct collar so it does not sag. Cut the excess portion. Slide the exible
duct on the air take-off collar and secure it using the second gear clamp.
5. Installing the drain tube.
Select a convenient drain location for running the drain tube. Before you connect the tube to
the drain tting, slip the hose clamp over the tube. Push the drain tube (1/2” I.D.) over the drain
tting located at the bottom of the unit and secure it in place with the hose clamp. Make sure the
tube has no bends and the water can ow easily in a straight
manner to the drain without accumulating in the tube.
6. Installing the evaporator pad.
The pad is enclosed in a plastic frame having molded markings that clearly indicates
the bottom. Slide the pad into the bottom part of the humidier, the little bump at the
top facing to you, then push the pad against the back opening of the humidier. Lock
the pad in place with the pad retainer.
Installation, Operation, & Maintenance Manual
Water diffuser
Pad retainer
Solenoid Valve
4''+
This line
must be level
•
Installation

Model CM200
Installation, Operation, & Maintenance Manual
3
www.trioniaq.com
7. Connecting the water supply tubing to the selenoid valve.
- Remove the plastic cap from the solenoid
valve inlet port.
- Install the water supply tubing on the inlet
which has a compression tting to receive
the supply tubing. Slip the brass compres-
sion nut onto the plastic supply tube, then
the nylon sleeve with its most tapered end
towards the end of the tube.Finally, install a
brass insert into the end of the plastic tubing.
- Push the supply tube fully into the brass compression tting. Tighten the
brass compression nut with small wrenches, without stripping, using the double wrench method in order to apply the
torque on the tting only.
8. Installing the water supply valve.
The water supply is taken from the nearest suitable cold, hot, softened or
unsoftened water line. The use of service hot water (140°F / 60ºC Max) improves
the evaporative capacity.
- Install the other end of the supply tube and make the connection to the saddle
valve installed on the copper supply pipe.
- Turn the valve handle completely clockwise until it stops. This will pierce the
copper pipe and close the valve.
- This saddle valve is designed to be fully open or closed. Do not use it to adjust the water ow.
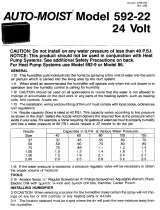
9. Installing the transformer.
The transformer supplied will support 120VAC maximum on the primary and supplies 24VAC output on the secondary.
Do not connect the primary of the transformer on a furance supplied with a different voltage.
Connect the transformer primary (white and black wires) to the relay activated when the furnace is in a heating cycle.
Some furnaces have power terminals that can be used for accessories. Please refer to the furnace installation manual
accordingly. Warning: Connecting the transformer in backwards or connecting the solenoid to the wrong side of the
transformer will damage the solenoid. For safety, verify the
transformer voltages are correct before connecting to the
water solenoid and humidistat.
The secondary of the transformer provides 24VAC output
and is connected with the two terminal screws. Please
reference the connection diagram to the right. Per the
diagram, connect one of the terminal screws to the
secondary of the transformer to the supplied humidistat.
Then, wire the other humidistat connection to the water solenoid. Then, the nal connection is connecting the second
water solenoid wire back to the second terminal screw on the transformer secondary.
10. Installing the humidistat and nal wiring.
The humidistat should be installed on a at and vertical surface of the RETURN duct. Attach the humidistat template
on the return duct at 6 inches minimum from the humidier top. Mark and drill the mounting holes and cut an opening
for the humidistat. Push the two quick connectors on the humidistat terminals. Run the two humidistat wires through
a little opening located at the bottom of the front panel. Install the humidistat in the opening and fasten it to the duct.
The mechanism is exposed in the duct. Check that the metal of the duct neither touches the connections nor cuts the
wire insulation. Complete the wiring of the humidistat according to the above diagram.
Note for the contractor:
Please ensure that customer receives the owner’s manual.
brass insert nut
nylon sleeve
Water valve
White wires
Black wires
Humidistat
Screw terminals
24VAC
120VAC

Model CM200
Installation, Operation, & Maintenance Manual
4 www.trioniaq.com
Operation
11. Humidier Start-Up.
Open the saddle valve, put the furnace power back on and start the furnace in a
heating cycle. Set the humidistat at the maximum setting. After a few ON/OFF cycles
of the electric valve, you should see water owing through the drain tube. Check that
the water is evenly distributed by the water diffuser across the pad. Carefully check
that both ends of the water supply tube are rmly held in place by their respective
compression tting. After peeling off the backing, afx the faceplate to the cover of
the humidistat and re-install the control knob. Set the humidistat according to the
recommended setting on the label. Check the system several times to make sure
there is a free ow in the drain tube and there is no leak before leaving the installation unattended. When everything is
working ne, afx the adhesive nameplate on the humidier cover.
1. Principal of Operation.
- This humidier uses a vertical evaporator pad, wetted by a water ow. Warm air is by-passed from the warm air
plenum and forced through the evaporator pad. Humid air is drawn back into the return duct.
- The pad is enclosed in a plastic frame with a marking that clearly indicates the bottom. It is designed to retain water
before it is evaporated. The excess of water is sent to the drain.
- All ow-through humidiers improve performance and evaporative capacities if they are used with constant blower
operation and are connected to the service hot water (max 140°F).
- When the furnace is producing heat and the humidistat is calling for humidity, the solenoid valve opens allowing water
to ow through the pad which is then evaporated in the system.
2. Adjusting the humidity level in your home.
- A relative humidity environment of 50% is recommended. Please refer to the table on the humidistat front plate to
help determine the proper level.
- At the beginning of the heating season it might take some time (a few days) to build up the humidity to the comfortable
level you want. Depending on the original dryness of the house, carpets, furniture and wood will absorb moisture before
you could really feel a difference.
- If your house remains unoccupied during the winter season, adjust the humidistat to a lower setpoint in order to
prevent condensation.
Outside Temperature Recommended Setting
-22
o
F (-30
o
C) 15%
-13
o
F (-25
o
C) 20%
-4
o
F (-20
o
C) 25%
+5
o
F (-15
o
C) 30%
+14
o
F (-10
o
C) 35%
above 23
o
F (-5
o
C) 40%

Model CM200
Installation, Operation, & Maintenance Manual
5
www.trioniaq.com
3. A few tips.
- Do not use the supply valve (saddle valve installed on the supply line) to regulate the water ow. This type of valve
is designed to be completely opened or closed.
- Do not allow the drain tube to ll with water in bends, elbows or kinks. Water could accumulate in them and that
could become a place for deposit build-up.
4. Annual Maintenance.
To replace the evaporator pad:
1. Shut off the furnace power.
2. Open the humidier by removing the plastic screw on the side of the cover.
3. Unlock the evaporator pad by turning the plastic retainer at the top of the pad.
4. Remove the old pad and replace it by a new one while checking the printed marking that clearly indicates the
bottom of the pad.
5. Lock the new pad in place.
6. Put the cover back and secure it with the plastic screw.
Note: Depending on the quality of water, it is recommended to replace the evaporator pad once per heating
season. Evaporator pad replacement part #: 266816-101.
5. Summer Season.
- If the system is used with air conditioning during the summer, reduce the air volume going through the humidier by
closing the air damper located on the side of the humidier. The control button shows the actual position of the damper.
- It is recommended to simply shut off the humidier system:
1. Close the water supply valve.
2. Turn the humidistat knob to the “OFF” position.
6. Warranty.
This humidier is guaranteed against any defects in material and workmanship, under normal use, for ve (5) years
from the date of purchase. The frame and door are guaranteed for life against defects in material and workmanship,
under normal use. This warranty applies only if the unit is properly installed and operated according to the instructions
provided with this product. This warranty will not cover defects due to misuse or faulty installation. The manufacturer will
not be held responsible for any bodily injuries or damages to personal property or real estate, whether caused directly
or indirectly by the humidier. If warranty service is required during the warranty period, the manufacturer will, at its
sole discretion, repair or replace the product, without charge, upon delivery of the product where it was purchased, with
proof of purchase.
7. Parts Guide.
CM200, P/N 266816-001
DESCRIPTION PART NO.
Replacement lter (qty 1) 266816-101
Replacement lter (box of 14) 266816-102
AC Solenoid Valve 266816-103
Water Diffuser 266816-104
Hardwire Transformer 115/24VAC 266816-105
Saddle Valve 266816-106
Replacement Door 266816-107
Replacement Body 266816-108
Humidistat 266816-109
Inlet Collar c/w damper 266816-110
Duct Collar 266816-111

Part No. 266816-500 Rev. 03/17
© TRION 2017. All Rights Reserved.
TRION
®
101 McNeill Rd. | Sanford, NC 27330
P: 800.884.0002 | F: 800.458.2379 | www.trioniaq.com | [email protected]
/