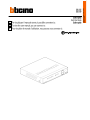
Bticino 391117 is a powerful and versatile 16-channel digital video recorder that offers a wide range of features for professional surveillance systems. With its ability to support up to 16 cameras, this recorder provides comprehensive coverage for large properties or businesses. The 391117 also features advanced motion detection and recording capabilities, allowing users to easily monitor and store important events. Additionally, this recorder supports remote access via the internet, enabling users to view live footage and manage recordings from anywhere in the world.
Bticino 391117 is a powerful and versatile 16-channel digital video recorder that offers a wide range of features for professional surveillance systems. With its ability to support up to 16 cameras, this recorder provides comprehensive coverage for large properties or businesses. The 391117 also features advanced motion detection and recording capabilities, allowing users to easily monitor and store important events. Additionally, this recorder supports remote access via the internet, enabling users to view live footage and manage recordings from anywhere in the world.


-
 1
1
-
 2
2
-
 3
3
-
 4
4
-
 5
5
-
 6
6
-
 7
7
-
 8
8
-
 9
9
-
 10
10
-
 11
11
-
 12
12
-
 13
13
-
 14
14
-
 15
15
-
 16
16
-
 17
17
-
 18
18
-
 19
19
-
 20
20
-
 21
21
-
 22
22
-
 23
23
-
 24
24
-
 25
25
-
 26
26
-
 27
27
-
 28
28
-
 29
29
-
 30
30
-
 31
31
-
 32
32
-
 33
33
-
 34
34
-
 35
35
-
 36
36
-
 37
37
-
 38
38
-
 39
39
-
 40
40
-
 41
41
-
 42
42


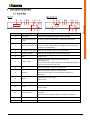
Bticino 391117 Quick start guide
- Type
- Quick start guide
Bticino 391117 is a powerful and versatile 16-channel digital video recorder that offers a wide range of features for professional surveillance systems. With its ability to support up to 16 cameras, this recorder provides comprehensive coverage for large properties or businesses. The 391117 also features advanced motion detection and recording capabilities, allowing users to easily monitor and store important events. Additionally, this recorder supports remote access via the internet, enabling users to view live footage and manage recordings from anywhere in the world.
Ask a question and I''ll find the answer in the document
Finding information in a document is now easier with AI
in other languages
- italiano: Bticino 391117 Guida Rapida
- français: Bticino 391117 Guide de démarrage rapide
Other documents
-
Elvox 46241.F04 Operating instructions
-
Elvox 46540.F08 Operating instructions
-
-
-
-
Elvox 46340.F08 User manual
-
Samsung SHR-9716 User manual
-
Atlantis NetDVR V400 User manual
-
Monacor HDVR-184 Owner's manual
-