Page is loading ...
Page is loading ...
Page is loading ...
Page is loading ...
Page is loading ...
Page is loading ...
Page is loading ...
Page is loading ...
Page is loading ...
Page is loading ...
Page is loading ...
Page is loading ...
Page is loading ...
Page is loading ...
Page is loading ...
Page is loading ...
Page is loading ...
Page is loading ...
Page is loading ...
Page is loading ...
Page is loading ...
Page is loading ...
Page is loading ...
Page is loading ...
Page is loading ...
Page is loading ...

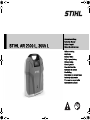
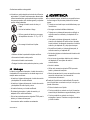
Translation of Original Instruction
Manual
Printed on chlorine-free paper
Printing inks contain vegetable oils, paper can be recycled.
© ANDREAS STIHL AG & Co. KG 2019
0458-820-9921-A. VA5.L19.
0000008638_004_GB
0458-820-9921-A
English
25
This instruction manual is protected by copyright. All rights reserved, especially the rights to reproduce, translate and process
with electronic systems.
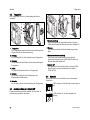
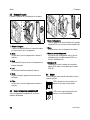
Contents
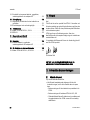
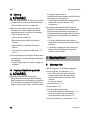
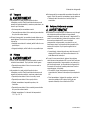
1 Introduction
. . . . . . . . . . . . . . . . . . . . . . . . . . . . . . . . . . . . . . . .
26
2 Guide to Using this Manual
. . . . . . . . . . . . . . . . . . . . . . . . .
26
2.1 Applicable Documentation
. . . . . . . . . . . . . . . . . . . . . . . . . .
26
2.2 Symbols used with warnings in the text
. . . . . . . . . . . . .
27
2.3 Symbols in Text
. . . . . . . . . . . . . . . . . . . . . . . . . . . . . . . . . . . .
27
3 Overview
. . . . . . . . . . . . . . . . . . . . . . . . . . . . . . . . . . . . . . . . . . .
27
3.1 Battery
. . . . . . . . . . . . . . . . . . . . . . . . . . . . . . . . . . . . . . . . . . . . .
27
3.2 Carrying System
. . . . . . . . . . . . . . . . . . . . . . . . . . . . . . . . . . .
28
3.3 Connecting Cable and AP Adapter
. . . . . . . . . . . . . . . . .
28
3.4 Symbols
. . . . . . . . . . . . . . . . . . . . . . . . . . . . . . . . . . . . . . . . . . .
28
4 Safety Precautions
. . . . . . . . . . . . . . . . . . . . . . . . . . . . . . . . .
29
4.1 Warning Signs
. . . . . . . . . . . . . . . . . . . . . . . . . . . . . . . . . . . . .
29
4.2 Intended Use
. . . . . . . . . . . . . . . . . . . . . . . . . . . . . . . . . . . . . . .
29
4.3 The Operator
. . . . . . . . . . . . . . . . . . . . . . . . . . . . . . . . . . . . . . .
30
4.4 Work Area and Surroundings
. . . . . . . . . . . . . . . . . . . . . . .
30
4.5 Safe Condition
. . . . . . . . . . . . . . . . . . . . . . . . . . . . . . . . . . . . .
31
4.6 Operation
. . . . . . . . . . . . . . . . . . . . . . . . . . . . . . . . . . . . . . . . . .
32
4.7 Transporting
. . . . . . . . . . . . . . . . . . . . . . . . . . . . . . . . . . . . . . .
32
4.8 Storing
. . . . . . . . . . . . . . . . . . . . . . . . . . . . . . . . . . . . . . . . . . . . .
33
4.9 Cleaning, Maintenance and Repairs
. . . . . . . . . . . . . . . .
33
5 Preparing Battery for Operation
. . . . . . . . . . . . . . . . . . . .
33
5.1 Preparing Battery for Operation
. . . . . . . . . . . . . . . . . . . .
33
5.2 Connecting Battery to STIHL App
. . . . . . . . . . . . . . . . . .
34
6 Charging the Battery, LEDS and Signals
. . . . . . . . . . .
34
6.1 Charging the Battery
. . . . . . . . . . . . . . . . . . . . . . . . . . . . . . .
34
6.2 Displaying State of Charge
. . . . . . . . . . . . . . . . . . . . . . . . .
34
6.3 LEDs and Beeps
. . . . . . . . . . . . . . . . . . . . . . . . . . . . . . . . . . .
35
7 Activating and Deactivating Bluetooth® Radio
Interface
. . . . . . . . . . . . . . . . . . . . . . . . . . . . . . . . . . . . . . . . . . .
35
7.1 Activating the Bluetooth
®
Radio Interface
. . . . . . . . . . .
35
7.2 Deactivating the Bluetooth
®
Radio Interface
. . . . . . . .
35
8 Assembling the Battery
. . . . . . . . . . . . . . . . . . . . . . . . . . . . .
35
8.1 Fitting the Connecting Cable
. . . . . . . . . . . . . . . . . . . . . . .
35
8.2 Fitting and Removing Battery and Cable on
Carrying System
. . . . . . . . . . . . . . . . . . . . . . . . . . . . . . . . . . .
36
9 Adjusting Battery for User
. . . . . . . . . . . . . . . . . . . . . . . . . .
36
9.1 Adjusting Carrying System to Suit User’s Height
. . . .
36
9.2 Fitting and Adjusting the Connecting Cable
. . . . . . . . .
37
9.3 Fitting and Removing Harness
. . . . . . . . . . . . . . . . . . . . .
37
10 Testing the Battery
. . . . . . . . . . . . . . . . . . . . . . . . . . . . . . . . .
38
10.1 Checking LEDs and Beeps
. . . . . . . . . . . . . . . . . . . . . . . . .
38
11 Working with the Battery
. . . . . . . . . . . . . . . . . . . . . . . . . . .
39
11.1 Working with the Battery
. . . . . . . . . . . . . . . . . . . . . . . . . . .
39
12 Connecting and Disconnecting Battery
. . . . . . . . . . . . .
40
12.1 Connecting battery to a STIHL cordless product
with a socket
. . . . . . . . . . . . . . . . . . . . . . . . . . . . . . . . . . . . . . .
40
12.2 Connecting battery to a STIHL cordless product
with a battery compartment for STIHL AP
batteries
. . . . . . . . . . . . . . . . . . . . . . . . . . . . . . . . . . . . . . . . . . .
40
12.3 Connecting battery to a STIHL cordless product
for STIHL AR L batteries
. . . . . . . . . . . . . . . . . . . . . . . . . . .
40
12.4 Disconnecting the battery
. . . . . . . . . . . . . . . . . . . . . . . . . .
40
13 After Finishing Work
. . . . . . . . . . . . . . . . . . . . . . . . . . . . . . .
40
13.1 After Finishing Work
. . . . . . . . . . . . . . . . . . . . . . . . . . . . . . .
40
14 Connecting and Charging USB Device
. . . . . . . . . . . . .
40
14.1 Connecting and Charging USB Device
. . . . . . . . . . . . .
40
15 Transporting
. . . . . . . . . . . . . . . . . . . . . . . . . . . . . . . . . . . . . . .
41
15.1 Transporting the Battery
. . . . . . . . . . . . . . . . . . . . . . . . . . .
41
16 Storing
. . . . . . . . . . . . . . . . . . . . . . . . . . . . . . . . . . . . . . . . . . . . .
41
16.1 Storing the Battery
. . . . . . . . . . . . . . . . . . . . . . . . . . . . . . . . .
41
16.2 Storing the Carrying System, Connecting Cable
and AP Adapter
. . . . . . . . . . . . . . . . . . . . . . . . . . . . . . . . . . . .
41
17 Cleaning
. . . . . . . . . . . . . . . . . . . . . . . . . . . . . . . . . . . . . . . . . . .
42
17.1 Cleaning the Battery, Carrying System,
Connecting Cable and AP Adapter
. . . . . . . . . . . . . . . . .
42
17.2 Cleaning Contacts of the Connecting Cable
. . . . . . . .
42
18 Maintenance and Repairs
. . . . . . . . . . . . . . . . . . . . . . . . . .
42

0458-820-9921-A
26
English
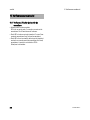
1 Introduction
Dear Customer,
Thank you for choosing STIHL. We develop and
manufacture our quality products to meet our customers’
requirements. The products are designed for reliability even
under extreme conditions.
STIHL also stands for premium service quality. Our
specialist dealers guarantee competent advice and
instruction as well as comprehensive service support.
We thank you for your confidence in us and hope you will
enjoy working with your STIHL product.
Dr. Nikolas Stihl
IMPORTANT: READ BEFORE USE AND KEEP IN A SAFE
PLACE.
2.1 Applicable Documentation
Local safety regulations apply.
► Read, understand and save the following documents in
addition to this instruction manual:
– Instruction manual of STIHL cordless product being
used.
– Instruction manual for STIHL AL 300, 500 chargers
– Safety information for STIHL batteries and products
with built-in batteries: www.stihl.com/safety-data-
sheets
18.1 Servicing and Repairing Battery, Carrying
System, Connecting Cable and AP Adapter
. . . . . . . . .
42
19 Troubleshooting
. . . . . . . . . . . . . . . . . . . . . . . . . . . . . . . . . . . .
43
19.1 Troubleshooting Battery or Cordless Product
. . . . . . .
43
19.2 Product Support and Assistance on Use
. . . . . . . . . . .
44
20 Specifications
. . . . . . . . . . . . . . . . . . . . . . . . . . . . . . . . . . . . . .
45
20.1 STIHL AR 2000 L, 3000 L
. . . . . . . . . . . . . . . . . . . . . . . . . .
45
20.2 REACH
. . . . . . . . . . . . . . . . . . . . . . . . . . . . . . . . . . . . . . . . . . . .
45
21 Spare Parts and Accessories
. . . . . . . . . . . . . . . . . . . . . . .
45
21.1 Spare Parts and Accessories
. . . . . . . . . . . . . . . . . . . . . . .
45
22 Disposal
. . . . . . . . . . . . . . . . . . . . . . . . . . . . . . . . . . . . . . . . . . .
45
22.1 Disposing of Battery, Carrying System,
Connecting Cable and AP Adapter
. . . . . . . . . . . . . . . . .
45
23 EC Declaration of Conformity
. . . . . . . . . . . . . . . . . . . . . . .
45
23.1 STIHL AR 2000 L, 3000 L Battery
. . . . . . . . . . . . . . . . . .
45
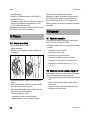
1 Introduction
2 Guide to Using this Manual

0458-820-9921-A
27
English
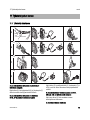
3 Overview
For further information on STIHL connected, compatible
products and FAQs visit https://connect.stihl.com/ or contact
a STIHL servicing dealer.
The Bluetooth
®
word mark and logos are registered
trademarks owned by Bluetooth SIG, Inc. These word
mark/logos are used by STIHL under license.
The battery is equipped with a Bluetooth
®
radio interface.
Local operating restrictions (in aircraft or hospitals, for
example) must be observed.
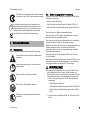
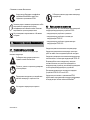
2.2 Symbols used with warnings in the text
WARNING
This symbol indicates dangers that can cause serious
injuries or death.
► The measures indicated can avoid serious injuries or
death.
NOTICE
This symbol indicates dangers that can cause damage to
property.
► The measures indicated can avoid damage to property.
2.3 Symbols in Text
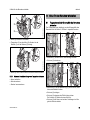
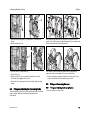
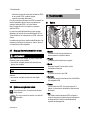
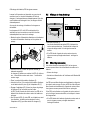
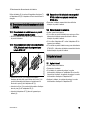
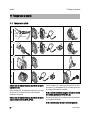
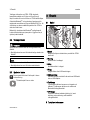
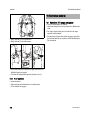
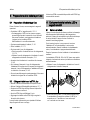
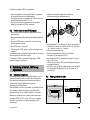
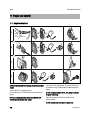
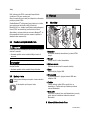
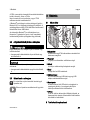
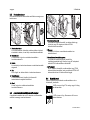
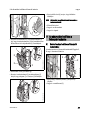
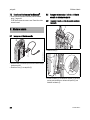
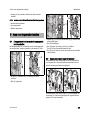
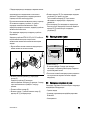
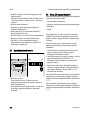
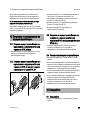
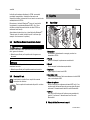
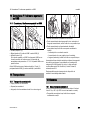
3.1 Battery
1 Battery
Supplies power to the STIHL cordless product.
2 Handle
Serves to carry the battery.
3 Socket
Receptacle for cable’s plug.
4 Dust Cap
Closes the USB port.
5 USB Port
For connecting a USB cable or USB adapter.
6 Button
Activates the LEDs and signal on battery. Activates and
deactivates Bluetooth® radio interface.
7LEDs
Indicate battery charge status, malfunctions, activation
and deactivation of Bluetooth® radio interface.
# Rating Label with Serial Number
This symbol refers to a chapter in this instruction
manual.
A video is available for this chapter
3Overview
#
1
7
6
5
4
2
3
0000-GXX-8331-A0

0458-820-9921-A
28
English
3 Overview
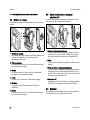
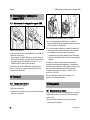
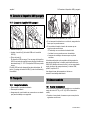
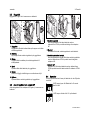
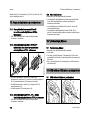
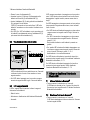
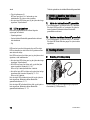
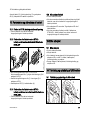
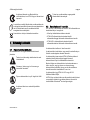
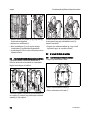
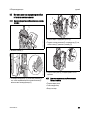
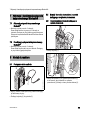
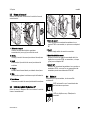
3.2 Carrying System
The battery’s scope of supply does not include the carrying
system.
1 Carrying System
Distributes weight of battery over shoulders and holds
the connecting cable.
2 Guide
Keeps the connecting cable in position on carrying
system.
3Loop
Keeps cable plug in position on carrying system.
4Lever
Secures battery to carrying system.
5Slide
Enables backpack to be adjusted to suit user’s height.
6 Fastener
Keeps the connecting cable in position on carrying
system.
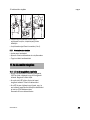
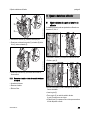
3.3 Connecting Cable and AP Adapter
The battery’s scope of supply does not include the
connecting cable or the AP adapter.
1 Connecting Cable
Connects battery to a STIHL cordless product with
socket or AP adapter.
2 Connector
Connects cable to battery.
3 Connecting Cable Plug
Connects the connecting cable to a STIHL cordless
product with socket or the AP adapter.
4 AP Adapter
Connects battery to a STIHL cordless product with a
battery compartment for STIHL AP batteries.
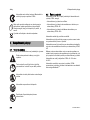
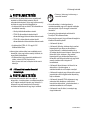
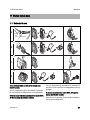
3.4 Symbols
Meanings of symbols that may be on the battery:
1
2 3
6
4
5
0000-GXX-9336-A0
1 LED glows red. Battery too hot or too cold.
4 LEDs flash red. There is a malfunction in the
battery.
The battery has a Bluetooth® radio interface and
can be connected with the STIHL app.
1
3
4
2
0000-GXX-9337-A0

0458-820-9921-A
29
English
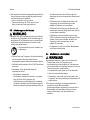
4 Safety Precautions
4.1 Warning Signs
Meanings of warning signs on the battery:
4.2 Intended Use
A STIHL AR L battery supplies the following STIHL cordless
products with energy:
– Cordless product with socket.
– Cordless product with battery compartment for STIHL AP
batteries.
– Cordless product with battery holder for STIHL AR L
batteries.
The battery may be used in the rain.
The battery may be used only for work performed while
standing on the ground or in a lift bucket.
The battery must not be used for cordless lawnmowers with
a battery compartment for STIHL AP batteries.
During operation the battery on the carrying system is
carried on the user’s back or connected to a cordless
product as described in that product’s instruction manual.
The battery is recharged with a STIHL AL 300 or AL 500
charger.
Combined with the STIHL app, the battery allows the
personalization and transmission of information to the
battery using Bluetooth
®
technology.
WARNING
■ Products and chargers not explicitly approved for the
battery by STIHL may cause accidents, a fire or explosion.
This can result in serious or fatal injuries and damage to
property.
► Use the battery only with the following STIHL cordless
products:
– Cordless product with socket.
– Cordless product with battery compartment for STIHL
AP batteries.
– Cordless product with battery holder for STIHL AR L
batteries.
► Recharge the battery with a STIHL AL 300 or AL 500
charger.
The data next to this symbol indicates the energy
content of the battery according to the cell
manufacturer’s specification. The energy content
available during operation is lower.
Do not dispose of the product with your household
waste.
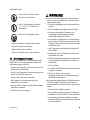
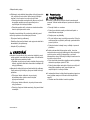
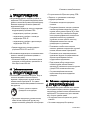
4 Safety Precautions
Observe safety notices and take the necessary
precautions.
Read, understand and save the instruction
manual.
Protect battery from heat and fire.
Do not immerse battery in fluids.
Observe battery’s permissible temperature
range.

0458-820-9921-A
30
English
4 Safety Precautions
■ Using the battery for purposes for which it is not designed
may result in serious or fatal injuries and damage to
property.
► Use the battery as described in this instruction manual,
the STIHL app and https://connect.stihl.com/.
4.3 The Operator
WARNING
■ Users without adequate instruction cannot recognize or
assess the risks involved in using the battery, carrying
system, connecting cable and AP adapter. The user or
other persons may sustain serious or fatal injuries.
► If you lend the battery, carrying system, connecting
cable or AP adapter to another person: Always give
them the instruction manual.
► If you have any queries: Contact a STIHL servicing
dealer for assistance.
► Make sure the user meets the following requirements:
– The user must be rested.
– The user must be in good physical condition and
mental health to operate and work with the battery,
carrying system, connecting cable and AP adapter. If
the user’s physical, sensory or mental ability is
restricted, he or she may work only under the
supervision of or as instructed by a responsible
person.
– The user is able to recognize and assess the risks
involved in using the battery, carrying system,
connecting cable and AP adapter.
– The user must be of legal age or is being trained in a
trade under supervision in accordance with national
rules and regulations.
– The user has received instruction from a STIHL
servicing dealer or other experienced user before
using the battery, carrying system, connecting cable
or AP adapter the first time.
– The user must not be under the influence of alcohol,
medication or drugs.
4.4 Work Area and Surroundings
WARNING
■ Bystanders, children and animals cannot recognize or
assess the dangers of the battery, carrying system,
connecting cable and AP adapter. Bystanders, children
and animals may be seriously injured.
► Keep bystanders, children and animals away from the
work area.
► Do not leave the battery unattended.
► Make sure that children cannot play with the battery,
carrying system, connecting cable or AP adapter.
■ The battery is not protected against all ambient
conditions. If the battery is exposed to certain ambient
conditions, it may catch fire or explode. This can result in
serious injuries and damage to property.
► Read, understand and save the instruction
manual.
► Protect battery from heat and fire.
► Do not throw the battery into a fire.

0458-820-9921-A
31
English
4 Safety Precautions
► Keep battery away from metallic objects.
► Do not expose battery to high pressure.
► Do not expose battery to microwaves.
► Protect battery from chemicals and salts.
4.5 Safe Condition
The battery, carrying system, connecting cable and AP
adapter are in a safe condition if the following points apply:
– The battery, carrying system, connecting cable and AP
adapter are not damaged.
– The battery, carrying system, connecting cable and AP
adapter are clean and dry.
– Battery functions properly and has not been modified.
– The battery, carrying system, connecting cable and AP
adapter have not been modified.
– Only original STIHL accessories designed for this battery
and carrying system are fitted.
– Accessories are properly mounted.
WARNING
■ A battery that is not in a safe condition cannot operate
safely. This can result in serious injuries.
► Never work with a damaged battery.
► Never attempt to charge a damaged or defective
battery.
► Work only with an undamaged carrying system, an
undamaged connecting cable and an undamaged AP
adapter.
► If the battery, carrying system, connecting cable or AP
adapter is dirty or wet: Clean the battery, carrying
system, connecting cable or AP adapter and allow to
dry.
► Never modify the battery, carrying system, connecting
cable or AP adapter.
► Never insert objects in any openings in the battery or AP
adapter.
► Never bridge a battery's or AP adapter’s contacts with
metallic objects (short circuit).
► Do not open the battery.
► Only use original STIHL accessories designed for this
battery and carrying system.
► Mount accessories as described in this instruction
manual or the instructions supplied with the accessory.
■ Fluid may escape from a damaged battery. The fluid can
cause irritation if it contacts the skin or eyes.
► Avoid contact with the fluid.
► In case of contact with the skin: Wash affected areas
with plenty of water and soap.
► In case of contact with the eyes: Rinse eyes with plenty
of water for at least 15 minutes and seek medical
advice.
■ A damaged or defective battery may smell unusual, emit
smoke or burn. This can result in serious or fatal injuries
and damage to property.
► If the battery smells unusual or emits smoke: Take the
battery off your back. Do not use the battery and keep it
away from combustible substances.
► If the battery catches fire: Attempt to extinguish the
battery with a fire extinguisher or water.
Contact with live components may occur for the following
reasons:
– Connecting cable is damaged.
► Use and store the battery at temperatures
between - 10°C and +50°C.
► Do not immerse battery in fluids.

0458-820-9921-A
32
English
4 Safety Precautions
– Connecting cable plug or plug on battery damaged.
– The AP adapter is damaged.
WARNING
■ Contact with live components can result in an electric
shock. This can result in serious or fatal injuries.
► Make sure the connecting cable, its plug, the plug on the
battery and the AP adapter are not damaged.
■ Connecting cable can be damaged if it is not fitted
properly. This can result in injuries and may damage the
connecting cable.
► Position the connecting cable so that it cannot be
touched by the tool of the cordless product being used.
► Position the connecting cable so that it cannot be kinked
or damaged.
► If the connecting cable is twisted: Straighten it out.
4.6 Operation
WARNING
■ The user cannot concentrate on the work in certain
situations. The user may stumble, fall and be seriously
injured.
► Work calmly and carefully.
► If light and visibility are poor: Do not work with the
battery.
► Watch out for obstacles.
► Stand on the ground while working and keep a good
balance. If it is necessary to work at heights: Use a lift
bucket.
► If you begin to feel tired: Take a break.
■ If you notice any change in the battery during operation, if
it behaves unusually or there is a quick succession of
short beeps, the battery may be in an unsafe condition.
This can result in serious injuries and damage to property.
► Stop work, take the battery off your back and contact
your STIHL servicing dealer.
► If the battery smells unusual or emits smoke: Take the
battery off your back. Do not use the battery and keep it
away from combustible substances.
■ In an emergency, the user may panic and not put the
carrying system down. This can result in serious injuries.
► Practice removing and putting down the carrying
system.
4.7 Transporting
WARNING
■ The battery is not protected against all ambient
conditions. The battery may be damaged if it is exposed to
certain ambient conditions and damage to property may
occur.
► Never transport a damaged battery.
► Transport the battery in non-conductive packaging.
■ The battery may turn over or shift during transport. This
may result in personal injuries and damage to property.
► Pack the battery in packaging in such a way that it
cannot move.
► Secure the packaging so that it cannot move.

0458-820-9921-A
33
English
5 Preparing Battery for Operation
4.8 Storing
WARNING
■ Children are not aware of and cannot assess the dangers
of the battery and can be seriously injured.
► Store the battery out of the reach of children.
■ The battery is not protected against all ambient
conditions. The battery may be damaged if it is exposed to
certain ambient conditions.
► Store the battery in a clean and dry condition.
► Store the battery in an enclosed location.
► Store the battery separately from the battery product
and charger.
► Store the battery in non-conductive packaging.
► Store the battery at temperatures between -10°C and
+50°C.
■ The connecting cable must not be used for carrying or
hanging up the battery. The connecting cable and the
battery may be damaged.
► Wind up the connecting cable and secure it to the
battery.
4.9 Cleaning, Maintenance and Repairs
WARNING
■ Aggressive cleaning agents, cleaning with a jet of water or
pointed objects can damage the battery, carrying system,
connecting cable and AP adapter. If the battery, carrying
system, connecting cable and AP adapter are not cleaned
correctly, components may no longer function properly or
safety devices may be rendered inoperative. This can
result in serious injuries.
► Clean the battery, carrying system, connecting cable
and AP adapter as described in this instruction manual.
■ If the battery, carrying system, connecting cable and AP
adapter are not serviced or repaired correctly,
components may no longer function properly or safety
devices may be rendered inoperative. This can result in
serious or fatal injuries.
► Never attempt to service or repair the battery, carrying
system, connecting cable or AP adapter.
► If the battery, carrying system, connecting cable or AP
adapter need to be serviced or repaired: Contact a
STIHL servicing dealer for assistance.
5.1 Preparing Battery for Operation
Perform the following steps before starting work:
► Check the LEDs and beeps, @ 6.3
► If 4 LEDs flash red and short beeps sound in quick
succession: Do not use or transport the battery, contact
your STIHL servicing dealer.
There is a malfunction in the battery.
► Fully charge the battery, @ 6.1
► Clean the battery, @ 17.1
► If you use the connecting cable:
► Clean contacts on the connecting cable, @ 17.2
► Fit the connecting cable or battery and connecting cable
on the carrying system. @ 8
► Make sure the battery is in a safe condition, @ 4.5.
.
► The battery, carrying system, connecting cable and AP
adapter are used: Check that the carrying system,
connecting cable and AP adapter are in a safe condition,
@ 4.5.
5 Preparing Battery for Operation

0458-820-9921-A
34
English
6 Charging the Battery, LEDS and Signals
► If you cannot carry out these steps: Do not use the battery
and contact your STIHL dealer for assistance.
5.2 Connecting Battery to STIHL App
► Activate Bluetooth® radio interface on mobile device.
► Activate Bluetooth® radio interface on battery, @ 7.1.
► Download STIHL App from app store of your mobile
device and create an account.
► Open and register STIHL App.
► Add the battery in the STIHL App and follow the
instructions on the screen.
For contacts and other information visit
https://support.stihl.com/ or see information in the App.
The STIHL connected feature is available in the STIHL App
in certain markets.
6.1 Charging the Battery
The charging time depends on several factors, e.g.
temperature of the battery or the ambient temperature. The
actual charging time may differ from the specified charging
time. For specified charging times see
www.stihl.com/charging-times.
The charging process starts automatically when the plug is
inserted in a wall outlet and the AP adapter is fitted in the
charger. The charger switches itself off automatically when
the battery is fully charged.
The battery and charger become hot during the charging
process.
The STIHL AL 300 and AL 500 chargers have a built-in fan
which may cut in and out during the charging process.
► Fit the connecting cable, or battery and connecting cable,
on the carrying system.
► Insert the plug (7) in a convenient wall outlet (8).
The charger (5) runs a self test. The LED (4) glows green
for about 1 second and then red for about 1 second.
► Fit the connecting cable (6).
► Insert the battery cable plug (1) in the socket (2) on the AP
adapter (3).
► Insert the AP adapter (3) in the guides in the charger (5)
and press it home as far as stop.
The LED (4) glows green. The LEDs on the battery glow
green and the battery is charged.
► When the LED (4) and the LEDs on the battery stop
glowing: The battery is fully charged. The AP adapter (3)
can be taken out of the charger (5).
6.2 Displaying State of Charge
6 Charging the Battery, LEDS and
Signals
3
4
3
7
2
1
8
6
5
0000-GXX-2742-A0
0000-GXX-2673-A0
100 % 0 %

0458-820-9921-A
35
English
7 Activating and Deactivating Bluetooth® Radio Interface
► Press the button (1).
The LEDs (5) glow green for about 5 seconds and indicate
the state of charge. There is a short beep.
► If the right-hand LED flashes green and there are six long
beeps: Charge the battery.
6.3 LEDs and Beeps
The LEDs and beeps can indicate the following information
about the battery:
– State of charge
– Activation and deactivation of Bluetooth® interface.
– Malfunctions
The LEDs can glow or flash green or red. The right-hand
LED can also glow or flash blue. Beeps may be short or long.
The state charge is indicated when the LEDs glow or flash
green and there is a short beep.
► If the right-hand LED flashes green and there are four long
beeps: Charge the battery.
► If the LEDs glow or flash red or there are no beeps: Rectify
the malfunction.@ 19.1
There is a malfunction in the cordless product or battery.
► If the four right-hand LEDs on the battery flash red and
short beeps sound in quick succession: Troubleshooting,
@ 19.1.
There is a malfunction in the battery.
If the right-hand LED on the battery glows blue and there are
three short beeps: The Bluetooth® radio interface on the
battery is activated, @ 7.1.
If the right-hand LED on the battery flashes blue and there
are three short beeps: The Bluetooth® radio interface on the
battery is deactivated, @ 7.2.
7.1 Activating the Bluetooth
®
Radio Interface
► Press the button and hold it depressed for about 3
seconds.
The right-hand LED glows blue for about 3 seconds. You
will hear 3 short beeps. The Bluetooth® radio interface on
the battery is activated.
7.2 Deactivating the Bluetooth
®
Radio Interface
► Press the button and hold it depressed for about 3
seconds.
The right-hand LED flashes blue six times. You will hear 3
short beeps.
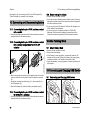
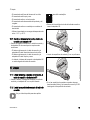
8.1 Fitting the Connecting Cable
► Position the connector (1) with the connecting cable facing
up.
► Insert the connector (1) in the socket (2).
7 Activating and Deactivating
Bluetooth® Radio Interface
8 Assembling the Battery
1
2
0000-GXX-9359-A0

0458-820-9921-A
36
English
9 Adjusting Battery for User
8.2 Fitting and Removing Battery and Cable on
Carrying System
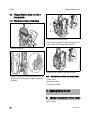
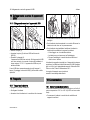
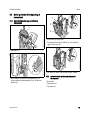
8.2.1 Fitting Battery and Cable on Carrying System
► Insert the connector (1).
► Position the battery (2) on the carrying system (3) so that
the guides on the carrying system engage the recesses in
the battery.
► Open the lever (4) and hold it there.
► Press the carrying system (3) against the battery (2) until
the connector (1) locates against the socket (5).
► Swing the lever (4) down. It must snap into place.
8.2.2 Removing Battery and Cable from Carrying System
► Open the lever.
► Remove the battery.
► Remove the connector.
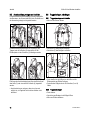
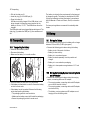
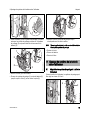
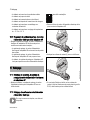
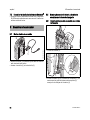
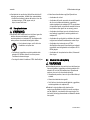
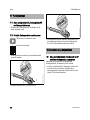
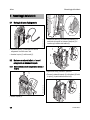
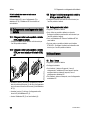
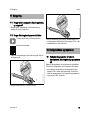
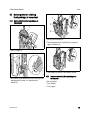
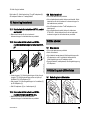
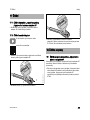
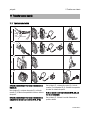
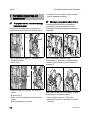
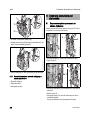
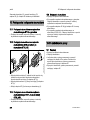
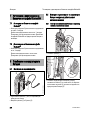
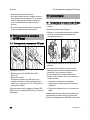
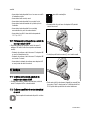
9.1 Adjusting Carrying System to Suit User’s Height
The carrying system can be set to positions S, M or L to suit
the user’s height.
1
0000-GXX-9361-A0
32
0000-GXX-9360-A0
9 Adjusting Battery for User
3
4
5
2
1
0000-GXX-9362-A0
4
0000-GXX-9357-A0

0458-820-9921-A
37
English
9 Adjusting Battery for User
► Depress the locking tab (1) and push it in direction of
arrow.
► Remove the slide (2).
► Line up mark (3) with mark (4).
► Fit the slide (2).
► Pull the slide (2) up (in opposite direction to arrow).
The slide (2) engages with a click.
► Set slide (2) to same position on left and right shoulder
straps.
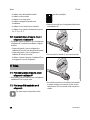
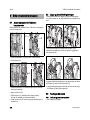
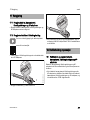
9.2 Fitting and Adjusting the Connecting Cable
The connecting cable can be fitted and adjusted to suit the
user’s height, different cordless products and the
application.
The connecting cable can be secured in position by the
guide (1) on the harness and the fasteners (2), or on the side
of the backplate with the fasteners (2).
The length of the connecting cable can be adjusted by
making a loop on the battery (3) or at one side (4).
► Fit the connecting cable so that has no kinks and is as
short as possible without hindering your work.
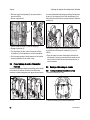
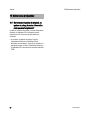
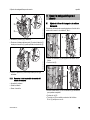
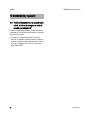
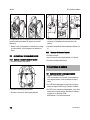
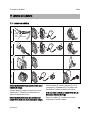
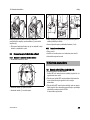
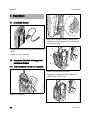
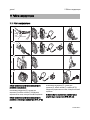
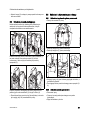
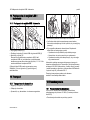
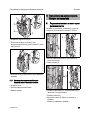
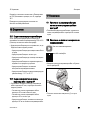
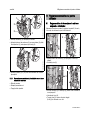
9.3 Fitting and Removing Harness
9.3.1 Fitting and Adjusting the Carrying System
► Put the battery on your back.
1
2
2
0000-GXX-A271-A0
S
M
L
4
3
2
2
2
0000-GXX-A272-A1
1
2
2
2
2
0000-GXX-A273-A0
3
4
0000-GXX-A274-A0

0458-820-9921-A
38
English
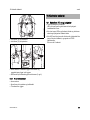
10 Testing the Battery
► Close buckle (2) on the waist belt.
► Close buckle (1) on the chest strap.
► Tighten the straps until the waist belt fits snugly on your
hips and the back padding is against your back.
► Thread the end of the waist belt through the loops (3 and
4).
9.3.2 Removing the Carrying System
► Loosen the straps.
► Open the buckles on the chest strap and waist belt.
► Take the battery off your back.
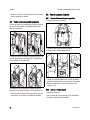
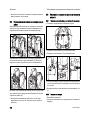
10.1 Checking LEDs and Beeps
► Press button on battery.
The LEDs glow green and a short beep sounds. The state
of charge is indicated.
► If the right-hand LED flashes green and there are six long
beeps: Charge the battery.
► If the LEDs do not glow or flash or there are no beeps: Do
not use the battery and contact your STIHL dealer for
assistance.
There is a malfunction in the battery.
1
2
0000-GXX-A275-A0
3
4
0000-GXX-A276-A0
10 Testing the Battery

0458-820-9921-A
39
English
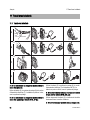
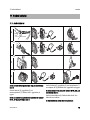
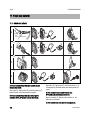
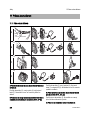
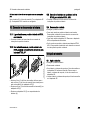
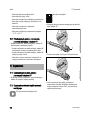
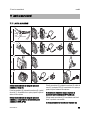
11 Working with the Battery
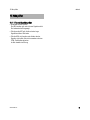
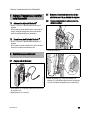
11.1 Working with the Battery
A: If a cordless product with socket (1) is to be supplied with
energy:
Use battery (5), carrying system (6) and connecting cable
(7). The battery is carried on the carrying system as a
backpack.
B: If a cordless product with battery compartment for STIHL
AP batteries (2) is to be supplied with energy:
Use battery (5), carrying system (6), connecting cable (7)
and AP adapter (8). The battery is carried on the carrying
system as a backpack.
C: If a cordless product for STIHL AR L batteries (3) is to be
supplied with energy:
Use the battery (5) alone. The battery is connected directly
to the cordless product.
D: If the battery is to be recharged with a charger (4):
11 Working with the Battery
A
B
C
D
1
2
3
4
5
5
5
5
6
6
7
7
7
8
8
0000-GXX-A270-A1

0458-820-9921-A
40
English
12 Connecting and Disconnecting Battery
Use battery (5), connecting cable (7) and AP adapter (8).
The AP adapter is inserted in the charger.
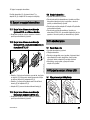
12.1 Connecting battery to a STIHL cordless product
with a socket
► Connect the battery as described in the instruction manual
supplied with the cordless product.
12.2 Connecting battery to a STIHL cordless product
with a battery compartment for STIHL AP
batteries
► Hold connecting cable plug (1) so that the arrow on its side
lines up with the arrow point on the AP adapter’s socket
(2).
► Insert the connecting cable plug (1) in the socket (2) on
the AP adapter (3).
► Push AP adapter (3) into the battery compartment (4).
12.3 Connecting battery to a STIHL cordless product
for STIHL AR L batteries
► Connect the battery as described in the instruction manual
supplied with the cordless product.
12.4 Disconnecting the battery
► Switch off the cordless product.
► If you are using a cordless product with a socket: Connect
the battery as described in the instruction manual supplied
with the cordless product.
► If you are using an AP adapter: Take the AP adapter out
of the battery compartment.
► If you are using a cordless product for STIHL AR L
batteries: Disconnect the battery as described in the
instruction manual supplied with the cordless product.
13.1 After Finishing Work
► Switch off the cordless product.
► Disconnect the battery.
► If the battery, carrying system, connecting cable or AP
adapter is dirty or wet: Clean the battery, carrying system,
connecting cable or AP adapter and allow to dry.
► Clean the battery, carrying system, connecting cable and
AP adapter.
14.1 Connecting and Charging USB Device
12 Connecting and Disconnecting Battery
3
0000-GXX-2830-A0
3
1
2
13 After Finishing Work
14 Connecting and Charging USB Device
4
3
1
2
0000-GXX-A277-A0

0458-820-9921-A
41
English
15 Transporting
► Pull out the dust cap (1).
► Insert the plug (2) in the USB port (3).
► Press the button (4).
USB device is being charged. If the USB device is not
being charged, the charging current supplied by the
battery is too low, @ 20.1. The USB device cannot be
charged.
The USB cable must be unplugged before starting work. The
dust plug (1) protects the USB port (3) from moisture and
dirt.
15.1 Transporting the Battery
► Switch off the cordless product.
► Disconnect the battery.
► Make sure the battery is in a safe condition.
► Carry the battery on your back or by the handle.
► If the battery is transported in a vehicle: Secure the battery
so that it cannot move.
► If the battery has to be packed: Observe the following
points when packing the battery:
– The packaging must be non-conductive.
– Make sure the battery cannot shift inside the packaging.
► Secure the packaging so that it cannot move.
The battery is subject to the requirements for the transport
of dangerous goods. The battery is classified as UN 3480
(lithium-ion batteries) and has been tested in accordance
with UN Manual of Tests and Criteria, Part III, sub-section
38.3.
For transport regulations see www.stihl.com/safety-data-
sheets
16.1 Storing the Battery
STIHL recommends that you store the battery with a charge
between 30% and 45% (2 LEDs glow green).
► Observe the following points when storing the battery:
– Battery is out of the reach of children.
– Battery is clean and dry.
– Battery is in an enclosed space.
– Battery is stored separately from the product and
charger.
– Battery is in non-conductive packaging.
– Battery is in a temperature range between -10°C and
+50°C.
16.2 Storing the Carrying System, Connecting Cable
and AP Adapter
► Observe the following points when storing the carrying
system, connecting cable and AP adapter:
– The carrying system, connecting cable and AP adapter
are out of the reach of children.
– The carrying system, connecting cable and AP adapter
are clean and dry.
– The battery, carrying system and AP adapter are not
hanging on the connecting cable.
15 Transporting
0000-GXX-A278-A0
16 Storing

0458-820-9921-A
42
English
17 Cleaning
17.1 Cleaning the Battery, Carrying System,
Connecting Cable and AP Adapter
► Clean the battery, carrying system, connecting cable and
AP adapter with a damp cloth.
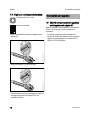
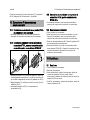
17.2 Cleaning Contacts of the Connecting Cable
► Pull connecting cable plug out of the socket or the AP
adapter.
► Clean the contacts (1) with a dry cloth.
► If the contacts are discolored (arrow):. Use a fine
sandpaper (grade P600) to remove the discoloration and
clean the contacts until they are bright.
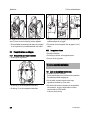
18.1 Servicing and Repairing Battery, Carrying
System, Connecting Cable and AP Adapter
The battery, carrying system, connecting cable and AP
adapter require no servicing and cannot be repaired by the
user.
► If the battery, carrying system, connecting cable or AP
adapter is defective or damaged: Do not use the battery,
carrying system, connecting cable or AP adapter and
contact a STIHL servicing dealer for assistance.
17 Cleaning
A video is available for this chapter
www.stihl.com/sxwjNw
1
1
1
0000-GXX-6041-A0
18 Maintenance and Repairs
0000-GXX-6245-A0

0458-820-9921-A
43
English
19 Troubleshooting
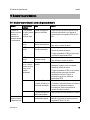
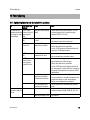
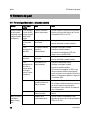
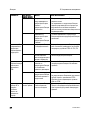
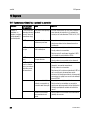
19.1 Troubleshooting Battery or Cordless Product
19 Troubleshooting
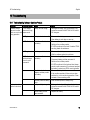
Condition LEDs and Beeps Cause Remedy
Cordless product
does not run after
switch-on or cuts out
during operation.
1 LED flashes
green and 6 long
beeps sound.
Battery has low charge. ► Recharge the battery fully as described in the
instruction manual for the STIHL AL 300 and AL
500 chargers.
1 LED glows red. Battery too hot or too cold. ► Disconnect the battery.
► Allow battery to cool down or warm up.
3 LEDs flash red. There is a malfunction in
the battery.
► Disconnect battery and then reconnect it.
► Switch on the cordless product.
► If 3 LEDs continue to flash red: Contact a STIHL
servicing dealer for assistance.
3 LEDs glow red. Cordless product too hot. ► Disconnect the battery.
► Wait for cordless product to cool down.
4 LEDs flash red
and short beeps
sound in quick
succession.
There is a malfunction in
the battery.
► Take the battery off your back.
► Disconnect battery and then reconnect it.
► Switch on the cordless product.
► If 4 LEDs continue to flash red and short beeps
sound in quick succession: Do not use or transport
the battery, contact your STIHL servicing dealer.
No electrical contact
between cordless product
and battery.
► Disconnect battery and then reconnect it.
► If the cordless product still does not run when
switched on or cuts out during operation: Clean
contacts of the connecting cable.
Cordless product or battery
damp.
► Allow cordless product / battery to dry.
Runtime of cordless
product is too short.
Battery not fully charged. ► Recharge the battery fully as described in the
instruction manual for the STIHL AL 300 and AL
500 chargers.
Normal battery life has
been exceeded.
► Replace the battery.

0458-820-9921-A
44
English
19 Troubleshooting
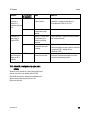
19.2 Product Support and Assistance on Use
Product support and assistance on use are available from
STIHL servicing dealers.
For contacts and other information visit
https://support.stihl.com/ or https://www.stihl.com/.
Battery cannot be
found with STIHL
App.
Bluetooth
®
radio interface
on battery or mobile device
is deactivated.
► Activate Bluetooth
®
radio interface on battery or
mobile device.
Distance between battery
and mobile device is too
long.
► Reduce distance, @ 20.1.
► If battery still cannot be found with STIHL App:
Contact a STIHL servicing dealer for assistance.
Charge process does
not start when AP
adapter is inserted in
the charger.
1 LED glows red. Battery too hot or too cold. ► Leave AP adapter in the charger.
Charge process starts automatically as soon as
permissible temperature range is reached.
Condition LEDs and Beeps Cause Remedy
Page is loading ...
Page is loading ...
Page is loading ...
Page is loading ...
Page is loading ...
Page is loading ...
Page is loading ...
Page is loading ...
Page is loading ...
Page is loading ...
Page is loading ...
Page is loading ...
Page is loading ...
Page is loading ...
Page is loading ...
Page is loading ...
Page is loading ...
Page is loading ...
Page is loading ...
Page is loading ...
Page is loading ...
Page is loading ...
Page is loading ...
Page is loading ...
Page is loading ...
Page is loading ...
Page is loading ...
Page is loading ...
Page is loading ...
Page is loading ...
Page is loading ...
Page is loading ...
Page is loading ...
Page is loading ...
Page is loading ...
Page is loading ...
Page is loading ...
Page is loading ...
Page is loading ...
Page is loading ...
Page is loading ...
Page is loading ...
Page is loading ...
Page is loading ...
Page is loading ...
Page is loading ...
Page is loading ...
Page is loading ...
Page is loading ...
Page is loading ...
Page is loading ...
Page is loading ...
Page is loading ...
Page is loading ...
Page is loading ...
Page is loading ...
Page is loading ...
Page is loading ...
Page is loading ...
Page is loading ...
Page is loading ...
Page is loading ...
Page is loading ...
Page is loading ...
Page is loading ...
Page is loading ...
Page is loading ...
Page is loading ...
Page is loading ...
Page is loading ...
Page is loading ...
Page is loading ...
Page is loading ...
Page is loading ...
Page is loading ...
Page is loading ...
Page is loading ...
Page is loading ...
Page is loading ...
Page is loading ...
Page is loading ...
Page is loading ...
Page is loading ...
Page is loading ...
Page is loading ...
Page is loading ...
Page is loading ...
Page is loading ...
Page is loading ...
Page is loading ...
Page is loading ...
Page is loading ...
Page is loading ...
Page is loading ...
Page is loading ...
Page is loading ...
Page is loading ...
Page is loading ...
Page is loading ...
Page is loading ...
Page is loading ...
Page is loading ...
Page is loading ...
Page is loading ...
Page is loading ...
Page is loading ...
Page is loading ...
Page is loading ...
Page is loading ...
Page is loading ...
Page is loading ...
Page is loading ...
Page is loading ...
Page is loading ...
Page is loading ...
Page is loading ...
Page is loading ...
Page is loading ...
Page is loading ...
Page is loading ...
Page is loading ...
Page is loading ...
Page is loading ...
Page is loading ...
Page is loading ...
Page is loading ...
Page is loading ...
Page is loading ...
Page is loading ...
Page is loading ...
Page is loading ...
Page is loading ...
Page is loading ...
Page is loading ...
Page is loading ...
Page is loading ...
Page is loading ...
Page is loading ...
Page is loading ...
Page is loading ...
Page is loading ...
Page is loading ...
Page is loading ...
Page is loading ...
Page is loading ...
Page is loading ...
Page is loading ...
Page is loading ...
Page is loading ...
Page is loading ...
Page is loading ...
Page is loading ...
Page is loading ...
Page is loading ...
Page is loading ...
Page is loading ...
Page is loading ...
Page is loading ...
Page is loading ...
Page is loading ...
Page is loading ...
Page is loading ...
Page is loading ...
Page is loading ...
Page is loading ...
Page is loading ...
Page is loading ...
Page is loading ...
Page is loading ...
Page is loading ...
Page is loading ...
Page is loading ...
Page is loading ...
Page is loading ...
Page is loading ...
Page is loading ...
Page is loading ...
Page is loading ...
Page is loading ...
Page is loading ...
Page is loading ...
Page is loading ...
Page is loading ...
Page is loading ...
Page is loading ...
Page is loading ...
Page is loading ...
Page is loading ...
Page is loading ...
Page is loading ...
Page is loading ...
Page is loading ...
Page is loading ...
Page is loading ...
Page is loading ...
Page is loading ...
Page is loading ...
Page is loading ...
Page is loading ...
Page is loading ...
Page is loading ...
Page is loading ...
Page is loading ...
Page is loading ...
Page is loading ...
Page is loading ...
Page is loading ...
Page is loading ...
Page is loading ...
Page is loading ...
Page is loading ...
Page is loading ...
Page is loading ...
Page is loading ...
Page is loading ...
Page is loading ...
Page is loading ...
Page is loading ...
Page is loading ...
Page is loading ...
Page is loading ...
Page is loading ...
Page is loading ...
Page is loading ...
Page is loading ...
Page is loading ...
Page is loading ...
Page is loading ...
Page is loading ...
Page is loading ...
Page is loading ...
Page is loading ...
Page is loading ...
Page is loading ...
Page is loading ...
Page is loading ...
Page is loading ...
Page is loading ...
Page is loading ...
Page is loading ...
Page is loading ...
Page is loading ...
Page is loading ...
Page is loading ...
Page is loading ...
Page is loading ...
Page is loading ...
Page is loading ...
Page is loading ...
Page is loading ...
Page is loading ...
Page is loading ...
Page is loading ...
Page is loading ...
Page is loading ...
Page is loading ...
Page is loading ...
Page is loading ...
Page is loading ...
Page is loading ...
Page is loading ...
Page is loading ...
Page is loading ...
Page is loading ...
Page is loading ...
Page is loading ...
Page is loading ...
Page is loading ...
Page is loading ...
Page is loading ...
Page is loading ...
Page is loading ...
Page is loading ...
Page is loading ...
Page is loading ...
Page is loading ...
Page is loading ...
Page is loading ...
Page is loading ...
Page is loading ...
Page is loading ...
Page is loading ...
Page is loading ...
Page is loading ...
Page is loading ...
Page is loading ...
Page is loading ...
Page is loading ...
Page is loading ...
Page is loading ...
Page is loading ...
Page is loading ...
Page is loading ...
Page is loading ...
Page is loading ...
Page is loading ...
Page is loading ...
Page is loading ...
Page is loading ...
Page is loading ...
Page is loading ...
Page is loading ...
Page is loading ...
Page is loading ...
Page is loading ...
Page is loading ...
Page is loading ...
Page is loading ...
Page is loading ...
Page is loading ...
Page is loading ...
Page is loading ...
Page is loading ...
Page is loading ...
Page is loading ...
Page is loading ...
Page is loading ...
Page is loading ...
Page is loading ...
Page is loading ...
Page is loading ...
Page is loading ...
Page is loading ...
Page is loading ...
Page is loading ...
Page is loading ...
Page is loading ...
Page is loading ...
Page is loading ...
Page is loading ...
Page is loading ...
Page is loading ...
Page is loading ...
Page is loading ...
Page is loading ...
Page is loading ...
Page is loading ...
Page is loading ...
Page is loading ...
Page is loading ...
Page is loading ...
Page is loading ...
Page is loading ...
Page is loading ...
Page is loading ...
Page is loading ...
Page is loading ...
Page is loading ...
Page is loading ...
Page is loading ...
Page is loading ...
Page is loading ...
Page is loading ...
Page is loading ...
-
 1
1
-
 2
2
-
 3
3
-
 4
4
-
 5
5
-
 6
6
-
 7
7
-
 8
8
-
 9
9
-
 10
10
-
 11
11
-
 12
12
-
 13
13
-
 14
14
-
 15
15
-
 16
16
-
 17
17
-
 18
18
-
 19
19
-
 20
20
-
 21
21
-
 22
22
-
 23
23
-
 24
24
-
 25
25
-
 26
26
-
 27
27
-
 28
28
-
 29
29
-
 30
30
-
 31
31
-
 32
32
-
 33
33
-
 34
34
-
 35
35
-
 36
36
-
 37
37
-
 38
38
-
 39
39
-
 40
40
-
 41
41
-
 42
42
-
 43
43
-
 44
44
-
 45
45
-
 46
46
-
 47
47
-
 48
48
-
 49
49
-
 50
50
-
 51
51
-
 52
52
-
 53
53
-
 54
54
-
 55
55
-
 56
56
-
 57
57
-
 58
58
-
 59
59
-
 60
60
-
 61
61
-
 62
62
-
 63
63
-
 64
64
-
 65
65
-
 66
66
-
 67
67
-
 68
68
-
 69
69
-
 70
70
-
 71
71
-
 72
72
-
 73
73
-
 74
74
-
 75
75
-
 76
76
-
 77
77
-
 78
78
-
 79
79
-
 80
80
-
 81
81
-
 82
82
-
 83
83
-
 84
84
-
 85
85
-
 86
86
-
 87
87
-
 88
88
-
 89
89
-
 90
90
-
 91
91
-
 92
92
-
 93
93
-
 94
94
-
 95
95
-
 96
96
-
 97
97
-
 98
98
-
 99
99
-
 100
100
-
 101
101
-
 102
102
-
 103
103
-
 104
104
-
 105
105
-
 106
106
-
 107
107
-
 108
108
-
 109
109
-
 110
110
-
 111
111
-
 112
112
-
 113
113
-
 114
114
-
 115
115
-
 116
116
-
 117
117
-
 118
118
-
 119
119
-
 120
120
-
 121
121
-
 122
122
-
 123
123
-
 124
124
-
 125
125
-
 126
126
-
 127
127
-
 128
128
-
 129
129
-
 130
130
-
 131
131
-
 132
132
-
 133
133
-
 134
134
-
 135
135
-
 136
136
-
 137
137
-
 138
138
-
 139
139
-
 140
140
-
 141
141
-
 142
142
-
 143
143
-
 144
144
-
 145
145
-
 146
146
-
 147
147
-
 148
148
-
 149
149
-
 150
150
-
 151
151
-
 152
152
-
 153
153
-
 154
154
-
 155
155
-
 156
156
-
 157
157
-
 158
158
-
 159
159
-
 160
160
-
 161
161
-
 162
162
-
 163
163
-
 164
164
-
 165
165
-
 166
166
-
 167
167
-
 168
168
-
 169
169
-
 170
170
-
 171
171
-
 172
172
-
 173
173
-
 174
174
-
 175
175
-
 176
176
-
 177
177
-
 178
178
-
 179
179
-
 180
180
-
 181
181
-
 182
182
-
 183
183
-
 184
184
-
 185
185
-
 186
186
-
 187
187
-
 188
188
-
 189
189
-
 190
190
-
 191
191
-
 192
192
-
 193
193
-
 194
194
-
 195
195
-
 196
196
-
 197
197
-
 198
198
-
 199
199
-
 200
200
-
 201
201
-
 202
202
-
 203
203
-
 204
204
-
 205
205
-
 206
206
-
 207
207
-
 208
208
-
 209
209
-
 210
210
-
 211
211
-
 212
212
-
 213
213
-
 214
214
-
 215
215
-
 216
216
-
 217
217
-
 218
218
-
 219
219
-
 220
220
-
 221
221
-
 222
222
-
 223
223
-
 224
224
-
 225
225
-
 226
226
-
 227
227
-
 228
228
-
 229
229
-
 230
230
-
 231
231
-
 232
232
-
 233
233
-
 234
234
-
 235
235
-
 236
236
-
 237
237
-
 238
238
-
 239
239
-
 240
240
-
 241
241
-
 242
242
-
 243
243
-
 244
244
-
 245
245
-
 246
246
-
 247
247
-
 248
248
-
 249
249
-
 250
250
-
 251
251
-
 252
252
-
 253
253
-
 254
254
-
 255
255
-
 256
256
-
 257
257
-
 258
258
-
 259
259
-
 260
260
-
 261
261
-
 262
262
-
 263
263
-
 264
264
-
 265
265
-
 266
266
-
 267
267
-
 268
268
-
 269
269
-
 270
270
-
 271
271
-
 272
272
-
 273
273
-
 274
274
-
 275
275
-
 276
276
-
 277
277
-
 278
278
-
 279
279
-
 280
280
-
 281
281
-
 282
282
-
 283
283
-
 284
284
-
 285
285
-
 286
286
-
 287
287
-
 288
288
-
 289
289
-
 290
290
-
 291
291
-
 292
292
-
 293
293
-
 294
294
-
 295
295
-
 296
296
-
 297
297
-
 298
298
-
 299
299
-
 300
300
-
 301
301
-
 302
302
-
 303
303
-
 304
304
-
 305
305
-
 306
306
-
 307
307
-
 308
308
-
 309
309
-
 310
310
-
 311
311
-
 312
312
-
 313
313
-
 314
314
-
 315
315
-
 316
316
-
 317
317
-
 318
318
-
 319
319
-
 320
320
-
 321
321
-
 322
322
-
 323
323
-
 324
324
-
 325
325
-
 326
326
-
 327
327
-
 328
328
-
 329
329
-
 330
330
-
 331
331
-
 332
332
-
 333
333
-
 334
334
-
 335
335
-
 336
336
-
 337
337
-
 338
338
-
 339
339
-
 340
340
-
 341
341
-
 342
342
-
 343
343
-
 344
344
-
 345
345
-
 346
346
-
 347
347
-
 348
348
-
 349
349
-
 350
350
-
 351
351
-
 352
352
-
 353
353
-
 354
354
-
 355
355
-
 356
356
-
 357
357
-
 358
358
-
 359
359
-
 360
360
-
 361
361
-
 362
362
-
 363
363
-
 364
364
-
 365
365
-
 366
366
-
 367
367
-
 368
368
-
 369
369
-
 370
370
-
 371
371
-
 372
372
-
 373
373
-
 374
374
-
 375
375
-
 376
376
-
 377
377
-
 378
378
-
 379
379
-
 380
380
-
 381
381
-
 382
382
-
 383
383
-
 384
384
-
 385
385
-
 386
386
-
 387
387
-
 388
388
-
 389
389
-
 390
390
-
 391
391
-
 392
392
-
 393
393
-
 394
394
-
 395
395
-
 396
396
-
 397
397
-
 398
398
-
 399
399
-
 400
400


Ask a question and I''ll find the answer in the document
Finding information in a document is now easier with AI
in other languages
- italiano: STIHL AR 2000 L, 3000 L Manuale del proprietario
- français: STIHL AR 2000 L, 3000 L Le manuel du propriétaire
- español: STIHL AR 2000 L, 3000 L El manual del propietario
- Deutsch: STIHL AR 2000 L, 3000 L Bedienungsanleitung
- русский: STIHL AR 2000 L, 3000 L Инструкция по применению
- Nederlands: STIHL AR 2000 L, 3000 L de handleiding
- português: STIHL AR 2000 L, 3000 L Manual do proprietário
- dansk: STIHL AR 2000 L, 3000 L Brugervejledning
- polski: STIHL AR 2000 L, 3000 L Instrukcja obsługi
- čeština: STIHL AR 2000 L, 3000 L Návod k obsluze
- svenska: STIHL AR 2000 L, 3000 L Bruksanvisning
- suomi: STIHL AR 2000 L, 3000 L Omistajan opas
- română: STIHL AR 2000 L, 3000 L Manualul proprietarului
Related papers
Other documents
-
Sony SRS-BTX300 Operating instructions
-
ATON A275 User manual
-
Boost Auto Parts 2014-2019 GM Wireless Phone Charger User manual
-
 One For All SV-9365 User manual
-
FIXED Multi Ports Wall Travel Adapter User manual
-
 Boost Auto Parts 2014-2019 GM All Lights Mod (6 High Mod) Installation guide
-
Tesy CN 052 200 EI CLOUD W F User guide

